Decadent Brownie Cheesecake Layer Cake Recipe

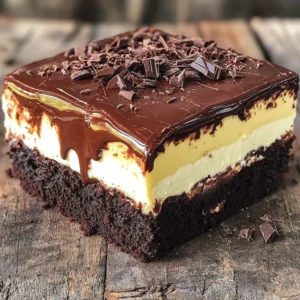
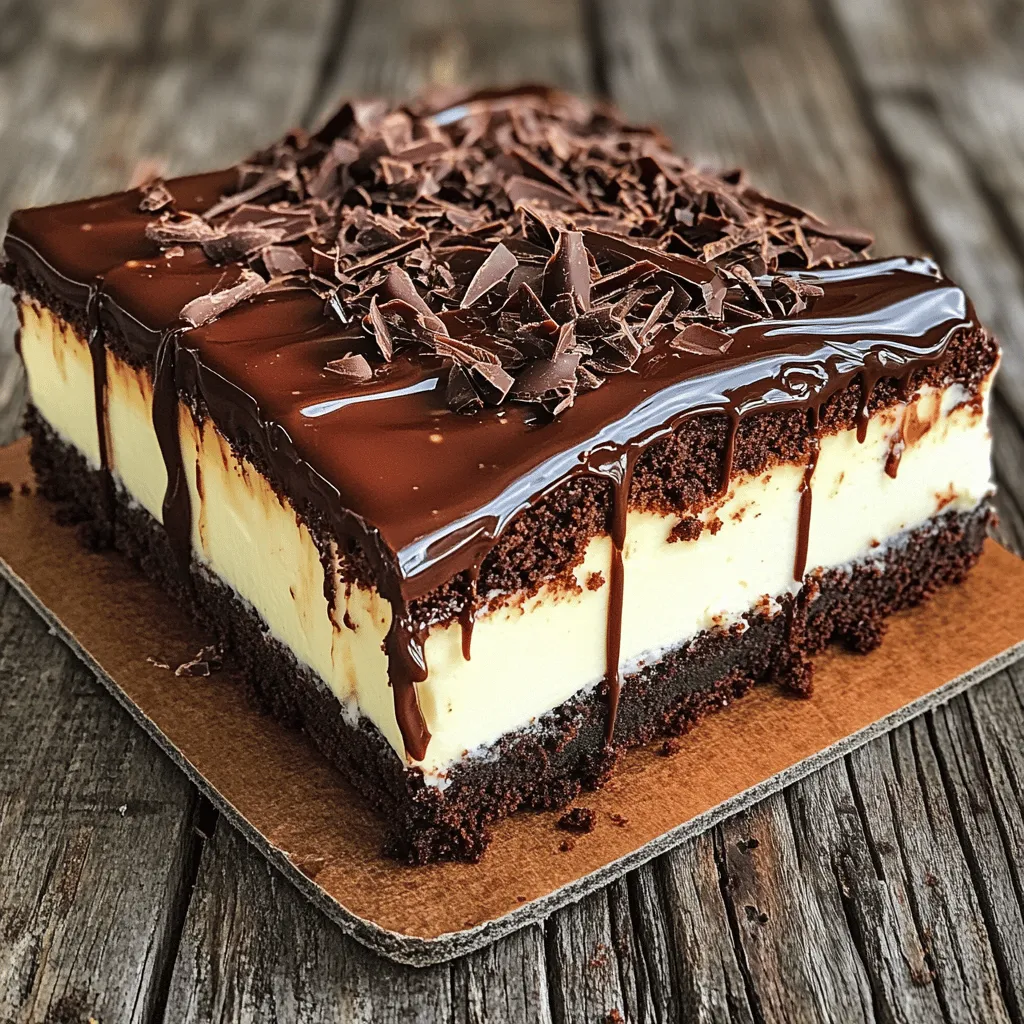
If you love rich flavors and creamy textures, you’re in for a treat! This Decadent Brownie Cheesecake Layer Cake combines gooey brownies and creamy cheesecake into one stunning dessert. With easy ingredients and simple steps, you’ll impress friends and family with your baking skills. Follow along as I guide you through each layer, ensuring this cake becomes your new favorite. Let’s dive into this sweet adventure!

- 1 cup unsalted butter - 2 cups granulated sugar - 4 large eggs - 1 teaspoon vanilla extract - 1 cup all-purpose flour - 1/2 cup unsweetened cocoa powder - 1/2 teaspoon salt - 1 cup semi-sweet chocolate chips - 16 oz cream cheese - 1 cup granulated sugar - 3 large eggs - 1 teaspoon vanilla extract - 1/4 cup sour cream - 1/2 cup chocolate ganache - Chocolate shavings or berries for garnish To start, we need to gather all our ingredients. This makes cooking smooth and fun. For the brownie layer, use good quality unsalted butter. It adds a rich flavor. You will also need granulated sugar, eggs, and vanilla extract for sweetness and moisture. Next, we add flour, cocoa powder, and salt. This gives the brownie a deep chocolate taste. Don't forget the semi-sweet chocolate chips! They melt and add gooey goodness. For the cheesecake layer, grab 16 ounces of cream cheese. It must be soft for easy mixing. Sugar, eggs, vanilla, and sour cream will make it creamy and rich. Finally, for the topping, you can use ready-made chocolate ganache or make your own. Use chocolate shavings or fresh berries to make the cake look pretty. Gathering all these ingredients makes the baking process easier. Enjoy the mix of flavors and textures in this decadent brownie cheesecake layer cake! - Preheat oven to 350°F (175°C). - Grease and line two 9-inch round cake pans with parchment paper. - Melt 1 cup of unsalted butter in a saucepan. - Mix melted butter with 2 cups of granulated sugar. - Add 4 large eggs, one at a time, mixing well after each. - Stir in 1 teaspoon of vanilla extract. - In a separate bowl, combine 1 cup of all-purpose flour, 1/2 cup of unsweetened cocoa powder, and 1/2 teaspoon of salt. - Gradually add the dry mix to the wet mixture until just combined. - Fold in 1 cup of semi-sweet chocolate chips. - Divide the brownie batter between the two prepared pans. - Bake brownies for 20-25 minutes. - Check with a toothpick; it should come out with a few moist crumbs. - Allow brownies to cool in the pans. - In a large bowl, beat 16 oz of softened cream cheese and 1 cup of granulated sugar until smooth. - Add 3 large eggs, one at a time, mixing well after each. - Stir in 1 teaspoon of vanilla extract and 1/4 cup of sour cream until fully combined. - Pour cheesecake batter over the cooled brownie layers. - Bake cheesecake layer at 325°F (160°C) for 30-35 minutes. - The edges should be set, but the center can still jiggle. - Let both layers cool completely. - Stack the brownie-cheesecake layers with a layer of ganache between them. - Chill the cake in the refrigerator for at least 2 hours before serving. - Use quality chocolate. Good chocolate gives your brownies a rich taste. - Avoid overbaking for fudginess. Bake just until a toothpick shows some moist crumbs. This keeps them soft and gooey. - Ensure cream cheese is at room temperature. Soft cream cheese blends well and creates a smooth batter. - Do not overmix to prevent cracking. Mix just until combined. Overmixing adds air, which can cause cracks. - Use ganache elegantly. Pour it over the top for a smooth, shiny finish. - Add garnishes for visual appeal. Use chocolate shavings or fresh berries for color and texture. These little details make a big difference in presentation. {{image_2}} You can change the flavor of this cake easily. Adding different extracts makes a big difference. For example, try using almond extract instead of vanilla. This will give your cake a nutty twist. You could also swap chocolate ganache for a fruit topping. Fresh berries or a berry sauce can add a bright flavor. This makes the cake more refreshing and fun to eat. If you are gluten-free, you can still enjoy this cake. Use almond flour instead of all-purpose flour for the brownie base. This change keeps the brownies rich and fudgy. For those who follow a vegan diet, both layers can be made vegan. Use plant-based cream cheese and a flax egg instead of regular eggs. This way, everyone can enjoy a slice of this delicious cake. How you present this cake can change the whole experience. You could layer the brownies and cheesecake in different colors or flavors. This makes each slice a surprise! Another fun idea is to serve individual cheesecakes in jars. This makes for a cute and easy dessert for parties. Plus, it’s a great way to let everyone enjoy their own serving. You can refrigerate leftovers for up to 4 days. Store the cake in airtight containers. This keeps it fresh and tasty. Make sure to cover it well to avoid drying out. To freeze individual slices, wrap them tightly in plastic wrap. Place them in a freezer-safe bag or container. This helps prevent freezer burn. When you want to enjoy a slice, thaw it in the fridge overnight. For quicker thawing, leave it at room temperature for about 30 minutes. To serve after storage, warm the cake slightly in the microwave. Heat it for about 10-15 seconds. This brings back its gooey texture. Pair your slice with a glass of milk or a scoop of vanilla ice cream. The creaminess complements the rich flavors well. Enjoying your cake this way makes it even better! To check if the cheesecake layer is done, look for a few signs. The edges should be set, while the center remains slightly jiggly. This means it will firm up as it cools. A toothpick inserted in the center should come out clean or with a few moist crumbs. Avoid overbaking, as this can lead to cracks. Yes, you can make this cake ahead of time. After baking, let it cool completely. Wrap the cake well in plastic wrap. Store it in the fridge for up to three days. You can also freeze it for up to a month. Just remember to thaw it in the fridge overnight before serving. If you need a substitute for cream cheese, try using Greek yogurt or silken tofu. Both options provide a creamy texture. You can also use dairy-free cream cheese for a vegan choice. Just ensure all ingredients blend well for the right consistency. To avoid cracks in your cheesecake, follow these tips. Use room temperature cream cheese to mix smoothly. Do not overmix the batter, as excess air can cause cracking. Bake the cheesecake in a water bath to keep it moist. Finally, let the cheesecake cool slowly in the oven with the door ajar. Yes, you can make a nut-free version of this recipe. Use semi-sweet chocolate chips that are labeled nut-free. Check for any potential cross-contamination. For the brownie layer, substitute any nut flour with all-purpose flour. This keeps the texture and taste just right. This blog detailed how to create a delicious brownie cheesecake layer cake. You learned about the key ingredients, step-by-step instructions, and essential tips for perfect baking. Remember, quality matters for both the brownies and cheesecake. Explore variations and presentation styles to make it your own. Lastly, follow the storage tips to keep your cake fresh and tasty. Enjoy the sweet rewards of your baking effort!

Ingredients

Brownie Layer Ingredients

– 1 cup unsalted butter

– 2 cups granulated sugar

– 4 large eggs

– 1 teaspoon vanilla extract

– 1 cup all-purpose flour

– 1/2 cup unsweetened cocoa powder

– 1/2 teaspoon salt

– 1 cup semi-sweet chocolate chips

Cheesecake Layer Ingredients

– 16 oz cream cheese

– 1 cup granulated sugar

– 3 large eggs

– 1 teaspoon vanilla extract

– 1/4 cup sour cream

Topping Ingredients

– 1/2 cup chocolate ganache

– Chocolate shavings or berries for garnish

To start, we need to gather all our ingredients. This makes cooking smooth and fun. For the brownie layer, use good quality unsalted butter. It adds a rich flavor. You will also need granulated sugar, eggs, and vanilla extract for sweetness and moisture.

Next, we add flour, cocoa powder, and salt. This gives the brownie a deep chocolate taste. Don’t forget the semi-sweet chocolate chips! They melt and add gooey goodness.

For the cheesecake layer, grab 16 ounces of cream cheese. It must be soft for easy mixing. Sugar, eggs, vanilla, and sour cream will make it creamy and rich.

Finally, for the topping, you can use ready-made chocolate ganache or make your own. Use chocolate shavings or fresh berries to make the cake look pretty.

Gathering all these ingredients makes the baking process easier. Enjoy the mix of flavors and textures in this decadent brownie cheesecake layer cake!

Step-by-Step Instructions

Preheating and Preparing Pans

– Preheat oven to 350°F (175°C).

– Grease and line two 9-inch round cake pans with parchment paper.

Making the Brownie Layer

– Melt 1 cup of unsalted butter in a saucepan.

– Mix melted butter with 2 cups of granulated sugar.

– Add 4 large eggs, one at a time, mixing well after each.

– Stir in 1 teaspoon of vanilla extract.

– In a separate bowl, combine 1 cup of all-purpose flour, 1/2 cup of unsweetened cocoa powder, and 1/2 teaspoon of salt.

– Gradually add the dry mix to the wet mixture until just combined.

– Fold in 1 cup of semi-sweet chocolate chips.

– Divide the brownie batter between the two prepared pans.

Baking and Cooling

– Bake brownies for 20-25 minutes.

– Check with a toothpick; it should come out with a few moist crumbs.

– Allow brownies to cool in the pans.

Preparing the Cheesecake Layer

– In a large bowl, beat 16 oz of softened cream cheese and 1 cup of granulated sugar until smooth.

– Add 3 large eggs, one at a time, mixing well after each.

– Stir in 1 teaspoon of vanilla extract and 1/4 cup of sour cream until fully combined.

Assembling and Baking Cheesecake Layer

– Pour cheesecake batter over the cooled brownie layers.

– Bake cheesecake layer at 325°F (160°C) for 30-35 minutes.

– The edges should be set, but the center can still jiggle.

Cooling and Final Assembly

– Let both layers cool completely.

– Stack the brownie-cheesecake layers with a layer of ganache between them.

– Chill the cake in the refrigerator for at least 2 hours before serving.

Tips & Tricks

Achieving Perfect Brownies

– Use quality chocolate. Good chocolate gives your brownies a rich taste.

– Avoid overbaking for fudginess. Bake just until a toothpick shows some moist crumbs. This keeps them soft and gooey.

Cheesecake Tips

– Ensure cream cheese is at room temperature. Soft cream cheese blends well and creates a smooth batter.

– Do not overmix to prevent cracking. Mix just until combined. Overmixing adds air, which can cause cracks.

Decorating the Layer Cake

– Use ganache elegantly. Pour it over the top for a smooth, shiny finish.

– Add garnishes for visual appeal. Use chocolate shavings or fresh berries for color and texture. These little details make a big difference in presentation.

Variations

Flavor Variations

You can change the flavor of this cake easily. Adding different extracts makes a big difference. For example, try using almond extract instead of vanilla. This will give your cake a nutty twist. You could also swap chocolate ganache for a fruit topping. Fresh berries or a berry sauce can add a bright flavor. This makes the cake more refreshing and fun to eat.

Dietary Alternatives

If you are gluten-free, you can still enjoy this cake. Use almond flour instead of all-purpose flour for the brownie base. This change keeps the brownies rich and fudgy. For those who follow a vegan diet, both layers can be made vegan. Use plant-based cream cheese and a flax egg instead of regular eggs. This way, everyone can enjoy a slice of this delicious cake.

Presentation Styles

How you present this cake can change the whole experience. You could layer the brownies and cheesecake in different colors or flavors. This makes each slice a surprise! Another fun idea is to serve individual cheesecakes in jars. This makes for a cute and easy dessert for parties. Plus, it’s a great way to let everyone enjoy their own serving.

Storage Info

Storing Leftovers

You can refrigerate leftovers for up to 4 days. Store the cake in airtight containers. This keeps it fresh and tasty. Make sure to cover it well to avoid drying out.

Freezing Instructions

To freeze individual slices, wrap them tightly in plastic wrap. Place them in a freezer-safe bag or container. This helps prevent freezer burn. When you want to enjoy a slice, thaw it in the fridge overnight. For quicker thawing, leave it at room temperature for about 30 minutes.

Serving Suggestions After Storage

To serve after storage, warm the cake slightly in the microwave. Heat it for about 10-15 seconds. This brings back its gooey texture. Pair your slice with a glass of milk or a scoop of vanilla ice cream. The creaminess complements the rich flavors well. Enjoying your cake this way makes it even better!

FAQs

How do I know when the cheesecake layer is done?

To check if the cheesecake layer is done, look for a few signs. The edges should be set, while the center remains slightly jiggly. This means it will firm up as it cools. A toothpick inserted in the center should come out clean or with a few moist crumbs. Avoid overbaking, as this can lead to cracks.

Can I make this cake ahead of time?

Yes, you can make this cake ahead of time. After baking, let it cool completely. Wrap the cake well in plastic wrap. Store it in the fridge for up to three days. You can also freeze it for up to a month. Just remember to thaw it in the fridge overnight before serving.

What can I substitute for cream cheese?

If you need a substitute for cream cheese, try using Greek yogurt or silken tofu. Both options provide a creamy texture. You can also use dairy-free cream cheese for a vegan choice. Just ensure all ingredients blend well for the right consistency.

How to prevent the cheesecake from cracking?

To avoid cracks in your cheesecake, follow these tips. Use room temperature cream cheese to mix smoothly. Do not overmix the batter, as excess air can cause cracking. Bake the cheesecake in a water bath to keep it moist. Finally, let the cheesecake cool slowly in the oven with the door ajar.

Is there a nut-free version of the recipe?

Yes, you can make a nut-free version of this recipe. Use semi-sweet chocolate chips that are labeled nut-free. Check for any potential cross-contamination. For the brownie layer, substitute any nut flour with all-purpose flour. This keeps the texture and taste just right.

This blog detailed how to create a delicious brownie cheesecake layer cake. You learned about the key ingredients, step-by-step instructions, and essential tips for perfect baking. Remember, quality matters for both the brownies and cheesecake. Explore variations and presentation styles to make it your own. Lastly, follow the storage tips to keep your cake fresh and tasty. Enjoy the sweet rewards of your baking effort!

- 1 cup unsalted butter - 2 cups granulated sugar - 4 large eggs - 1 teaspoon vanilla extract - 1 cup all-purpose flour - 1/2 cup unsweetened cocoa powder - 1/2 teaspoon salt - 1 cup semi-sweet chocolate chips - 16 oz cream cheese - 1 cup granulated sugar - 3 large eggs - 1 teaspoon vanilla extract - 1/4 cup sour cream - 1/2 cup chocolate ganache - Chocolate shavings or berries for garnish To start, we need to gather all our ingredients. This makes cooking smooth and fun. For the brownie layer, use good quality unsalted butter. It adds a rich flavor. You will also need granulated sugar, eggs, and vanilla extract for sweetness and moisture. Next, we add flour, cocoa powder, and salt. This gives the brownie a deep chocolate taste. Don't forget the semi-sweet chocolate chips! They melt and add gooey goodness. For the cheesecake layer, grab 16 ounces of cream cheese. It must be soft for easy mixing. Sugar, eggs, vanilla, and sour cream will make it creamy and rich. Finally, for the topping, you can use ready-made chocolate ganache or make your own. Use chocolate shavings or fresh berries to make the cake look pretty. Gathering all these ingredients makes the baking process easier. Enjoy the mix of flavors and textures in this decadent brownie cheesecake layer cake! - Preheat oven to 350°F (175°C). - Grease and line two 9-inch round cake pans with parchment paper. - Melt 1 cup of unsalted butter in a saucepan. - Mix melted butter with 2 cups of granulated sugar. - Add 4 large eggs, one at a time, mixing well after each. - Stir in 1 teaspoon of vanilla extract. - In a separate bowl, combine 1 cup of all-purpose flour, 1/2 cup of unsweetened cocoa powder, and 1/2 teaspoon of salt. - Gradually add the dry mix to the wet mixture until just combined. - Fold in 1 cup of semi-sweet chocolate chips. - Divide the brownie batter between the two prepared pans. - Bake brownies for 20-25 minutes. - Check with a toothpick; it should come out with a few moist crumbs. - Allow brownies to cool in the pans. - In a large bowl, beat 16 oz of softened cream cheese and 1 cup of granulated sugar until smooth. - Add 3 large eggs, one at a time, mixing well after each. - Stir in 1 teaspoon of vanilla extract and 1/4 cup of sour cream until fully combined. - Pour cheesecake batter over the cooled brownie layers. - Bake cheesecake layer at 325°F (160°C) for 30-35 minutes. - The edges should be set, but the center can still jiggle. - Let both layers cool completely. - Stack the brownie-cheesecake layers with a layer of ganache between them. - Chill the cake in the refrigerator for at least 2 hours before serving. - Use quality chocolate. Good chocolate gives your brownies a rich taste. - Avoid overbaking for fudginess. Bake just until a toothpick shows some moist crumbs. This keeps them soft and gooey. - Ensure cream cheese is at room temperature. Soft cream cheese blends well and creates a smooth batter. - Do not overmix to prevent cracking. Mix just until combined. Overmixing adds air, which can cause cracks. - Use ganache elegantly. Pour it over the top for a smooth, shiny finish. - Add garnishes for visual appeal. Use chocolate shavings or fresh berries for color and texture. These little details make a big difference in presentation. {{image_2}} You can change the flavor of this cake easily. Adding different extracts makes a big difference. For example, try using almond extract instead of vanilla. This will give your cake a nutty twist. You could also swap chocolate ganache for a fruit topping. Fresh berries or a berry sauce can add a bright flavor. This makes the cake more refreshing and fun to eat. If you are gluten-free, you can still enjoy this cake. Use almond flour instead of all-purpose flour for the brownie base. This change keeps the brownies rich and fudgy. For those who follow a vegan diet, both layers can be made vegan. Use plant-based cream cheese and a flax egg instead of regular eggs. This way, everyone can enjoy a slice of this delicious cake. How you present this cake can change the whole experience. You could layer the brownies and cheesecake in different colors or flavors. This makes each slice a surprise! Another fun idea is to serve individual cheesecakes in jars. This makes for a cute and easy dessert for parties. Plus, it’s a great way to let everyone enjoy their own serving. You can refrigerate leftovers for up to 4 days. Store the cake in airtight containers. This keeps it fresh and tasty. Make sure to cover it well to avoid drying out. To freeze individual slices, wrap them tightly in plastic wrap. Place them in a freezer-safe bag or container. This helps prevent freezer burn. When you want to enjoy a slice, thaw it in the fridge overnight. For quicker thawing, leave it at room temperature for about 30 minutes. To serve after storage, warm the cake slightly in the microwave. Heat it for about 10-15 seconds. This brings back its gooey texture. Pair your slice with a glass of milk or a scoop of vanilla ice cream. The creaminess complements the rich flavors well. Enjoying your cake this way makes it even better! To check if the cheesecake layer is done, look for a few signs. The edges should be set, while the center remains slightly jiggly. This means it will firm up as it cools. A toothpick inserted in the center should come out clean or with a few moist crumbs. Avoid overbaking, as this can lead to cracks. Yes, you can make this cake ahead of time. After baking, let it cool completely. Wrap the cake well in plastic wrap. Store it in the fridge for up to three days. You can also freeze it for up to a month. Just remember to thaw it in the fridge overnight before serving. If you need a substitute for cream cheese, try using Greek yogurt or silken tofu. Both options provide a creamy texture. You can also use dairy-free cream cheese for a vegan choice. Just ensure all ingredients blend well for the right consistency. To avoid cracks in your cheesecake, follow these tips. Use room temperature cream cheese to mix smoothly. Do not overmix the batter, as excess air can cause cracking. Bake the cheesecake in a water bath to keep it moist. Finally, let the cheesecake cool slowly in the oven with the door ajar. Yes, you can make a nut-free version of this recipe. Use semi-sweet chocolate chips that are labeled nut-free. Check for any potential cross-contamination. For the brownie layer, substitute any nut flour with all-purpose flour. This keeps the texture and taste just right. This blog detailed how to create a delicious brownie cheesecake layer cake. You learned about the key ingredients, step-by-step instructions, and essential tips for perfect baking. Remember, quality matters for both the brownies and cheesecake. Explore variations and presentation styles to make it your own. Lastly, follow the storage tips to keep your cake fresh and tasty. Enjoy the sweet rewards of your baking effort!

Brownie Cheesecake Layer Cake

Indulge in the ultimate dessert experience with this Brownie Cheesecake Layer Cake! This decadent recipe combines rich brownie layers with a creamy cheesecake filling, all topped with luscious chocolate ganache. Perfect for celebrations or a sweet treat at home, this cake is sure to impress. Ready to take your dessert game to the next level? Click through for the full recipe and detailed instructions to create this mouthwatering masterpiece!

Ingredients
  

For the Brownie Layer:

1 cup unsalted butter (2 sticks)

2 cups granulated sugar

4 large eggs

1 teaspoon vanilla extract

1 cup all-purpose flour

1/2 cup unsweetened cocoa powder

1/2 teaspoon salt

1 cup semi-sweet chocolate chips

For the Cheesecake Layer:

16 oz cream cheese, softened

1 cup granulated sugar

3 large eggs

1 teaspoon vanilla extract

1/4 cup sour cream

For the Topping:

1/2 cup chocolate ganache (store-bought or homemade)

Chocolate shavings or berries for garnish

Instructions
 

Preheat Oven: Preheat your oven to 350°F (175°C). Grease and line two 9-inch round cake pans with parchment paper.

    Make the Brownie Layer:

      a. In a medium saucepan, melt the butter over low heat.

        b. Once melted, remove from heat and stir in the sugar, mixing until combined.

          c. Add the eggs one at a time, mixing well after each addition, then stir in the vanilla.

            d. In a separate bowl, whisk together the flour, cocoa powder, and salt. Gradually add this mixture to the wet ingredients until just combined.

              e. Fold in the chocolate chips. Divide the brownie batter between the two prepared pans.

                Bake Brownies: Bake in the preheated oven for 20-25 minutes or until a toothpick inserted comes out with a few moist crumbs. Remove from the oven and allow to cool in the pans.

                  Prepare the Cheesecake Layer:

                    a. While the brownies cool, in a large bowl, beat the softened cream cheese and sugar until smooth.

                      b. Add the eggs, one at a time, mixing well after each addition.

                        c. Stir in the vanilla and sour cream until fully combined.

                          Assemble the Cheesecake Layer:

                            a. Once the brownie layers are completely cool, pour the cheesecake batter evenly on top of each brownie layer.

                              b. Bake in the oven at 325°F (160°C) for about 30-35 minutes, or until the cheesecake is set around the edges but still slightly jiggly in the center.

                                Cool and Assemble Cake: After removing from the oven, let both layers cool completely. Once cooled, stack the brownie-cheesecake layers with a layer of ganache between them.

                                  Chill & Decorate: Chill the cake in the refrigerator for at least 2 hours. Before serving, drizzle the chocolate ganache on top and garnish with chocolate shavings or berries as desired.

                                    Prep Time: 30 mins | Total Time: 3 hrs | Servings: 12

                                      - Presentation Tips: Serve slices on dessert plates; for an extra touch, dust with powdered sugar and add a sprig of mint for color.