FREE DINNER EBOOK! Get your copy!
  • Cookie Policy
  • GDPR Policy
  • Disclaimer
  • Terms Of Use
  • Visit my other site: Fun Cookie Recipes
go kitchen now
  • Home
  • Dinner
  • Desserts
  • Drinks
  • Appetizers
  • Contact
  • About
  • Privacy Policy
  • Home
  • Dinner
  • Desserts
  • Drinks
  • Appetizers
  • Contact
  • About
  • Privacy Policy
  • Cookie Policy
  • GDPR Policy
  • Disclaimer
  • Terms Of Use
Visit my other site: Fun Cookie Recipes

HOME / CATEGORIES /

Latest

- Chicken - 1.5 lbs chicken thighs, boneless and skinless, cut into chunks - Vegetables and Aromatics - 1 large onion, finely chopped - 4 cloves garlic, minced - 1-inch piece ginger, grated - 2 tomatoes, pureed - Spices - 2 teaspoons ground cumin - 2 teaspoons ground coriander - 1 teaspoon turmeric powder - 1 teaspoon garam masala - 1 teaspoon red chili powder (adjust to taste) - Salt to taste - Coconut Milk and Garnish - 1 cup coconut milk - Fresh cilantro, chopped (for garnish) When I make this chicken curry, I focus on fresh ingredients. The chicken thighs are juicy and tender. They soak up all the rich flavors. I love using onions, garlic, and ginger for a strong base. Each adds depth to the dish. Spices bring life to this recipe. Ground cumin and coriander give warmth and earthiness. Turmeric adds a bright color and a slight bitterness. Garam masala is the star with its sweet spice notes. The red chili powder can kick the heat up a notch or two, depending on your taste. Coconut milk ties everything together. It adds creaminess and balances the spices. Fresh cilantro on top makes the dish pop. It adds a fresh taste and a nice color contrast. With these ingredients, you're ready to create a flavorful meal. {{ingredient_image_1}} Start by heating the vegetable oil in a large pot over medium heat. Add the finely chopped onion. Cook it until it turns golden brown, which takes about 7 to 8 minutes. This step builds a sweet base for your curry and adds depth to the flavor. Next, stir in the minced garlic and grated ginger. Let them cook for another 2 minutes. You will smell a wonderful aroma as they cook. This mix of onion, garlic, and ginger adds great flavor to our curry. Now, mix in the pureed tomatoes. Cook this mixture for about 5 minutes until it thickens. After that, add the ground cumin, coriander, turmeric, garam masala, red chili powder, and salt. Sauté this spice mix for 2 to 3 minutes. Toasting the spices helps release their flavors. Increase the heat to medium-high. Add the chicken pieces to the pot. Cook for 5 to 7 minutes. Stir occasionally until the chicken is browned on all sides. This step locks in the juices and creates a nice crust on the chicken. Now, pour in the coconut milk and stir well. Bring the mixture to a simmer. After that, reduce the heat to low and cover the pot. Let it cook for 25 to 30 minutes, stirring occasionally. The chicken will become tender and soak up all the rich flavors from the sauce. Once the chicken curry is ready, taste it and adjust the seasoning if needed. Garnish with fresh cilantro before serving. For a beautiful presentation, serve the curry in a deep bowl. Pair it with fluffy basmati rice or warm naan bread. Add a slice of lime on the side for color and a zesty kick. Enjoy your flavorful meal! Spice Toasting Techniques To get the best flavor from your spices, toast them. Heat your pan first. Add the dry spices like cumin and coriander. Stir them for 2-3 minutes until they smell strong. This step wakes up the spices. It brings out their natural oils and flavors. You will notice a big taste difference in your chicken curry. Importance of Fresh Ingredients Always use fresh ingredients when you cook. Fresh onions, garlic, and spices make your dish shine. They add depth to your curry. A good tip is to buy whole spices and grind them yourself. This keeps their flavor strong and bold. Fresh coconut milk also enhances the dish. It brings creaminess and richness that canned versions can't match. Using Heavy-Bottomed Pots Choose a heavy-bottomed pot for this recipe. It spreads heat evenly. This helps avoid burning your curry. A sturdy pot keeps everything simmering well. When you use the right pot, your chicken cooks evenly. It also keeps the sauce rich and thick. Alternative Cooking Appliances If you don’t have a heavy pot, you can use other appliances. A slow cooker or Instant Pot works well. They keep the flavors locked in and let the chicken cook slowly. This can make your chicken extra tender. Just adjust the cooking time for these devices. They can help you create delicious meals with less effort. Best Sides to Accompany Chicken Curry Pair your chicken curry with the right sides. Basmati rice is a classic choice. Its fluffy texture balances the rich curry. You can also serve naan bread. It’s perfect for scooping up the sauce. If you want something lighter, try a simple salad. Fresh cucumber and tomato can brighten your meal. Presentation Ideas Make your chicken curry look appealing. Use a deep bowl to serve. Garnish with chopped cilantro for a fresh look. A slice of lime adds color and flavor. This makes your dish pop on the table. When you present well, it makes meals more special and inviting. Pro Tips Adjust the Spice Level: Feel free to modify the amount of red chili powder based on your heat preference. Start with less and add more if you like it spicier. Marinate the Chicken: For deeper flavor, marinate the chicken in yogurt and spices for a few hours before cooking. This will also tenderize the meat. Use Fresh Ingredients: Fresh garlic, ginger, and herbs will elevate the flavor of your curry. Whenever possible, opt for fresh over dried ingredients. Rest Before Serving: Allow the curry to sit for a few minutes after cooking. This resting time lets the flavors meld together beautifully. {{image_2}} Indian chicken curry varies greatly by region. In South India, the curry often has coconut milk. This gives it a creamy texture. You might find curry leaves and mustard seeds in the mix. These add a unique flavor that warms the heart. In North India, you'll see a richer sauce. This style uses yogurt for creaminess. Spices like cardamom and cloves give depth. You may also find it paired with naan instead of rice. If you want a vegetarian version, you can swap chicken for paneer or chickpeas. These options still give you protein and flavor. Use the same spices and cooking method. It will taste just as good! For gluten-free needs, skip any bread and serve with rice. Most spices are naturally gluten-free. Always check labels for safety. Your meal can still be delicious and safe. Like spice? You can make it spicy by adding more chili powder. Start with one teaspoon and adjust to taste. For milder flavors, reduce the chili powder or use sweet paprika. Different chili types add varied heat. For a smoky flavor, try smoked paprika. If you like sweetness, use bell peppers. Adjusting the heat makes the dish your own. Enjoying your meal is the goal! How to Store Leftovers After you enjoy your chicken curry, let it cool down. Use a clean, airtight container to store it. This keeps the flavors fresh and safe. You can also place it in smaller containers for easy meals later. Shelf Life in the Fridge Your leftover chicken curry stays good in the fridge for about 3 to 4 days. Make sure to check for any strange smells or changes in color before eating. Tips for Freezing Chicken Curry If you want to keep your chicken curry longer, freezing is a great option. Allow the curry to cool completely. Then, pour it into freezer-safe bags or containers. Leave some space at the top for expanding. Defrosting and Reheating Best Practices To defrost, move the curry to the fridge overnight. You can also use the microwave for quick thawing. When reheating, warm it on the stove over low heat. Stir it well to make sure it heats evenly. Batch Cooking for Quick Meals Cooking a big batch of chicken curry saves time. You can enjoy it on busy nights or when you need quick meals. Just store it in portions, and you’re set for the week. Portion Control Tips Use smaller containers for your meals. This helps you manage your portions and reduces food waste. You can grab a container and enjoy a tasty meal anytime. Indian curry stands out for its rich spices and bold flavors. Other curries may use different spices or sauces. Indian curries often have a creamy base, like coconut milk or yogurt. They also feature a mix of spices, such as cumin and coriander. Each region in India has its unique style. For example, South Indian curry uses coconut and tamarind. North Indian curry tends to be richer and creamier. All these differences make Indian curries unique and exciting. Yes, you can use other meats in this recipe. Lamb, beef, and shrimp can work well. Just adjust the cooking time based on the meat's type. Fish cooks faster, so add it later in the process. You can also use tofu for a vegetarian option. Just remember to keep the spices the same for flavor. Each meat will add its own taste to the dish, making it versatile and fun. Many side dishes pair well with chicken curry. Basmati rice is a classic choice. Its fluffy texture balances the rich curry. Naan bread is another favorite. It’s great for scooping up curry. You can also serve it with raita, a yogurt dip that cools the spice. A simple salad with cucumber and tomatoes adds freshness. These sides enhance the meal and provide a variety of flavors and textures. This article explored the essential ingredients and steps for making a delicious chicken curry. You learned about key components, like fresh veggies, spices, and coconut milk, that create rich flavors. We discussed cooking tips to achieve authentic tastes, along with fun variations and serving ideas. Remember, cooking is a journey, and the right techniques make all the difference. With these tips, your chicken curry will shine at every meal. Enjoy experimenting and sharing the joy of food with others. Happy cooking!

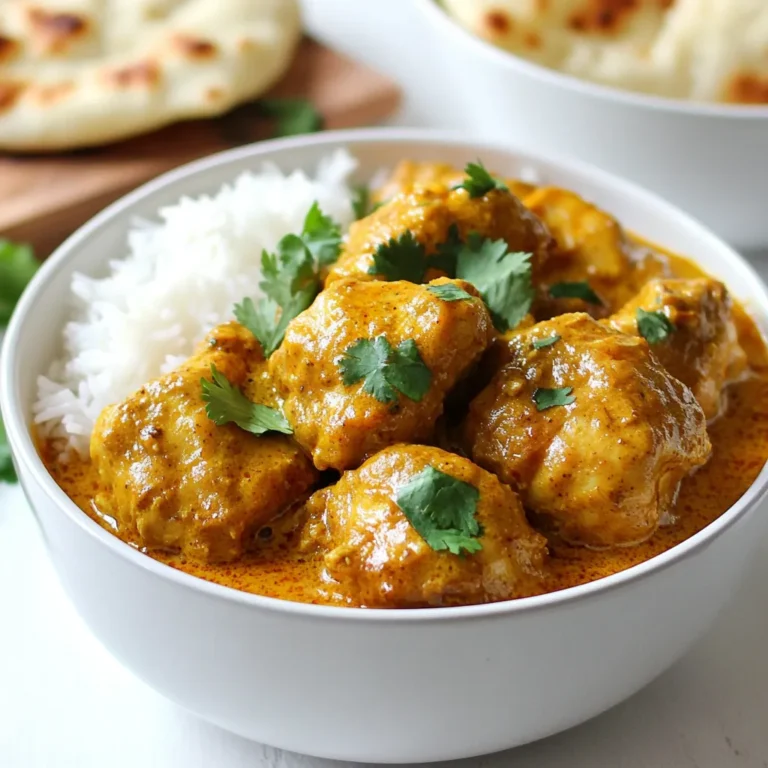
Authentic Indian Chicken Curry Flavorful and Easy Meal

- 2 cups fresh or frozen cranberries - 1 cup granulated sugar - 1 cup water These are the heart of your sauce. Fresh cranberries give a bright, tart taste. Frozen cranberries work well too if fresh ones are not available. The sugar adds sweetness and balances the tartness of cranberries. Water helps to cook the cranberries and create a sauce. - 1 teaspoon vanilla extract - 1 teaspoon orange zest - 1/2 teaspoon cinnamon - 1 tablespoon lemon juice These extra ingredients take your sauce to the next level. Vanilla extract adds warmth. Orange zest gives a fresh, citrusy note. A hint of cinnamon adds spice, while lemon juice brightens the overall flavor. - 1 tablespoon cornstarch - 2 tablespoons cold water Cornstarch can help thicken your sauce. If you want a thicker texture, mix cornstarch with cold water before adding it to the sauce. This mix binds the liquid and creates a rich, smooth finish. {{ingredient_image_1}} - In a medium saucepan, combine 2 cups of cranberries, 1 cup of sugar, and 1 cup of water. - Bring this mix to a gentle boil over medium heat. - Once it boils, reduce the heat. Let it simmer for about 10 minutes. You will see the cranberries burst open, and the sauce will thicken slightly. - Now, stir in 1 teaspoon of vanilla extract, 1 teaspoon of orange zest, 1/2 teaspoon of cinnamon, and 1 tablespoon of lemon juice. - Mix well to blend all the flavors. This step brings a bright taste to the sauce. - If you want a thicker sauce, take 1 tablespoon of cornstarch and mix it with 2 tablespoons of cold water. - Slowly add this mixture to the saucepan while stirring constantly. - Allow it to simmer for an additional 2-3 minutes until it thickens. - After that, remove the sauce from heat. Let it cool for 10 to 15 minutes before using it on your cheesecake. To make the best cranberry sauce, always use fresh cranberries. They have a bright, bold taste that makes your sauce pop. If you want to get creative, try adding spices. A pinch of nutmeg or a dash of ginger can add a fun twist to your sauce. When serving your cheesecake, drizzle the cranberry sauce over the top. This adds color and flavor to each slice. For a fun garnish, use a twist of orange peel. It adds a nice touch and enhances the citrus notes in the sauce. Cranberry sauce tastes best when served fresh. Make it right before you serve the cheesecake for the best flavor. It pairs perfectly with the rich and creamy texture of cheesecake. This combo makes for a delightful dessert experience. Pro Tips Perfectly Sweetened: Adjust the sugar to your taste; if you prefer a tangier sauce, reduce the sugar by a quarter cup. Fresh vs. Frozen: Both fresh and frozen cranberries work well, but fresh cranberries provide a brighter flavor. Flavor Additions: Experiment with additional spices like nutmeg or ginger for a unique twist to your sauce. Storage Tips: Store any leftover sauce in an airtight container in the refrigerator for up to a week. {{image_2}} You can add other fruits to your cranberry sauce. Raspberries or strawberries work great. Their sweet and tart flavors mix well with cranberries. You can also mix in some apple for a fall twist. This adds a nice crunch and extra sweetness. Spices can elevate your sauce. Try adding nutmeg or ginger for a warm flavor. These spices bring a cozy feel to the dish. You can even consider using flavored extracts, like almond or maple. Just a few drops can create a new taste. If you want to change the sweetness, explore other sweeteners. Honey or maple syrup can be great substitutes for sugar. They add a unique flavor and are often healthier. You can also adjust sugar levels based on your diet. This way, everyone can enjoy the sauce without worry. To keep your cranberry sauce fresh, store it in a clean jar. Glass jars work best, as they seal well. Make sure the jar is airtight to prevent any odors from other foods. Place the jar in the fridge after it cools. It can last up to one week this way. If you want to keep it longer, freezing is a great choice. Pour the cooled sauce into a freezer-safe container. Leave some space at the top, as the sauce will expand. It can stay fresh for up to three months. Label the container with the date, so you'll know when to use it. When you’re ready to enjoy your sauce, reheating is simple. You can use a small pot on the stove. Heat it over low heat, stirring often. This helps maintain the texture. If you see it’s too thick, add a splash of water. You can also use a microwave. Just heat it in short bursts, stirring in between. Yes, you can use frozen cranberries. They work well in this recipe. Pros of using frozen cranberries: - They are often cheaper and available year-round. - They save time because you don't need to wash them. Cons of using frozen cranberries: - They may not burst as easily as fresh ones. - The texture might be slightly softer after cooking. To thicken your cranberry sauce without cornstarch, try these tips: - Simmer longer: Let the sauce cook for a bit more time to reduce liquid. - Add more cranberries: Use extra berries to naturally thicken the sauce. - Mash some berries: As the sauce cooks, mash a few cranberries with a fork. This adds body to the sauce. Cranberry sauce goes great with many desserts. Here are some ideas: - Cheesecake: The tartness balances the creaminess. - Pound cake: It adds a nice pop of flavor. - Ice cream: A scoop of vanilla ice cream with cranberry sauce is delicious. - Pancakes or waffles: Use it as a topping for a fun brunch treat. You now have all the steps to make a tasty cranberry sauce. You learned about main ingredients like cranberries and sugar, plus flavor boosters like vanilla and cinnamon. I shared tips to enhance flavor and ideas for storage. You can even try variations with other fruits or sweeteners. Remember, fresh is best, but frozen works too. With these tips, you can whip up the perfect sauce to impress anyone. Enjoy your cooking adventure with cranberry sauce!

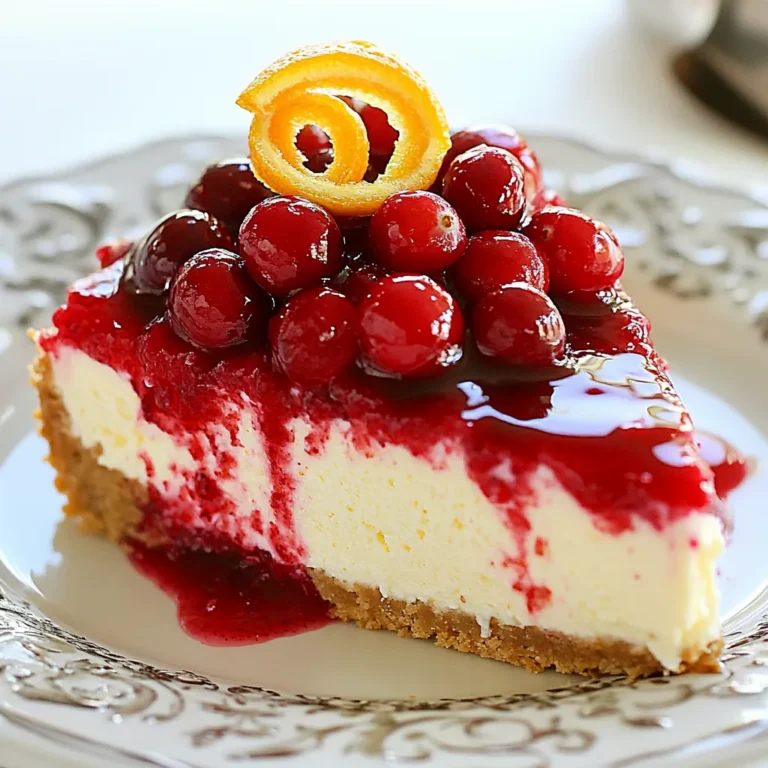
Cranberry Sauce for Cheesecake Swirl Delightful Recipe

To make this One-Pot Creamy Cajun Sausage Pasta, you need a few key items: - 12 ounces penne pasta - 1 pound smoked sausage, sliced - 1 tablespoon Cajun seasoning - 1 medium onion, diced - 1 bell pepper, diced (red or green) - 2 cloves garlic, minced These ingredients bring rich flavors and textures to the dish. The penne pasta holds the creamy sauce well. The smoked sausage adds a savory depth. Cajun seasoning gives it a nice kick. The onion, bell pepper, and garlic provide sweetness and aroma. Next, gather these ingredients to enhance the dish: - 1 can (14.5 ounces) diced tomatoes, drained - 3 cups chicken broth - 1 cup heavy cream - 1 cup shredded cheddar cheese The diced tomatoes add acidity, balancing the creaminess. Chicken broth adds flavor and moisture. Heavy cream creates a silky texture, while cheddar cheese brings richness and depth. Finally, add these finishing touches: - 2 tablespoons olive oil - Salt and pepper to taste - Fresh parsley, chopped (for garnish) Olive oil helps cook the sausage and vegetables. Salt and pepper enhance all the flavors. Fresh parsley adds a pop of color and freshness to the dish. This blend of ingredients makes a delightful meal that you can enjoy any night of the week. 1. First, heat 2 tablespoons of olive oil in a large pot over medium heat. 2. Next, add 1 pound of sliced smoked sausage. Cook until it is brown, which takes about 5 to 7 minutes. This step gives the sausage a nice flavor and texture. 1. Once the sausage is cooked, add 1 medium diced onion, 1 diced bell pepper (red or green), and 2 cloves of minced garlic to the pot. 2. Sauté these together until they soften, which should take about 3 to 4 minutes. The smell will be amazing! 1. Stir in 1 tablespoon of Cajun seasoning and cook for another minute. This helps to release all the great aromas. 2. Now, add 1 can of drained diced tomatoes and 3 cups of chicken broth. Bring this mixture to a simmer. 3. Next, stir in 12 ounces of penne pasta and season with a little salt and pepper. Cover the pot and let it cook for about 10 to 12 minutes. Stir halfway through to prevent sticking. 4. After the pasta is al dente, reduce the heat to low. Pour in 1 cup of heavy cream and stir until well mixed. 5. Finally, add 1 cup of shredded cheddar cheese. Stir until it melts and makes the dish creamy. Adjust the seasoning if needed. Serve hot with fresh parsley on top for a burst of color and flavor. To get that perfect al dente pasta, follow these steps: - Cook the penne pasta just until it is firm to the bite. This usually takes around 10-12 minutes. Stir halfway through to keep it from sticking together. - After cooking, drain the pasta but keep some of the cooking water. This starchy water can help adjust the sauce's thickness later. Balancing creaminess is key for a rich sauce. Adding heavy cream at the right time makes a big difference. Stir it in slowly after the pasta cooks. This helps the cream blend evenly. You can customize Cajun seasoning to suit your taste. If you like it spicy, add a pinch of cayenne pepper or more paprika. You can also mix in some dried oregano or thyme for a fresh twist. Consider adding other spices too. A touch of garlic powder or onion powder can deepen the flavor. A bit of smoked paprika adds a nice depth and warmth. Pair this dish with a fresh green salad or garlic bread for a complete meal. A side of roasted vegetables also works well. For garnishes, sprinkle fresh parsley on top for color and taste. A squeeze of lemon juice can brighten the dish and enhance the flavors. You could also add crushed red pepper for some extra heat. {{image_2}} You can change the protein in this dish easily. - Using chicken or shrimp: If you prefer chicken, use sliced grilled chicken breast. For shrimp, add peeled shrimp during the last few minutes of cooking. They cook fast and add a nice flavor. - Vegetarian options: For a meatless meal, swap the sausage for chickpeas or lentils. These add protein and texture. You can also use plant-based sausage for a similar taste. You have options for the creamy sauce too. - Using alternative dairy options: If you want a lighter sauce, try low-fat milk or half-and-half instead of heavy cream. This will still give you creaminess. - Vegan cream substitutes: For vegan needs, use coconut milk or cashew cream. Both options add a rich flavor without dairy. Don't feel stuck with just penne pasta. - Switching to other pasta shapes: You can try rotini, farfalle, or fusilli. These shapes hold the sauce well and make for a fun dish. - Gluten-free options: If you need gluten-free pasta, look for rice or quinoa pasta. They cook a bit differently, so check the package for cooking times. To keep your One-Pot Creamy Cajun Sausage Pasta fresh, follow these tips: - Let the pasta cool to room temperature before storing. - Use airtight containers to prevent moisture loss. - Refrigerate the pasta within two hours of cooking. - Store leftovers for up to three days. When it’s time to enjoy your leftovers, follow these methods: - Use a microwave-safe dish for quick reheating. - Heat in short intervals, stirring often to avoid hot spots. - For stovetop reheating, add a splash of chicken broth to keep it creamy. - Cover the pot to trap moisture and prevent drying out. If you want to freeze your pasta, here’s how: - Cool the pasta completely before freezing. - Portion it into individual servings for easy defrosting. - Use freezer-safe bags or containers to save space. - Label with the date to keep track of freshness. - To defrost, place in the fridge overnight or use the microwave on low. Yes, you can make this dish ahead of time. To prep, cook the sausage, veggies, and pasta as directed. Let it cool and then store it in an airtight container. You can keep it in the fridge for up to 3 days. When ready to serve, reheat it on the stove. Add a splash of chicken broth or cream to keep it creamy. This method saves time on busy days. To add heat, you can use extra Cajun seasoning. A dash of hot sauce works too. Try adding sliced jalapeños or crushed red pepper flakes for more spice. Mix these spicy elements in with the sausage or veggies during cooking. Start with a little and taste as you go. You can always add more heat! This pasta pairs great with a simple green salad. A fresh garden salad adds a nice crunch. Garlic bread is another tasty option. If you want something lighter, try steamed broccoli or green beans. These sides balance the creamy pasta well. They also make your meal more colorful and healthy! In this post, we explored a flavorful dish: One-Pot Creamy Cajun Sausage Pasta. We covered the main and additional ingredients, cooking steps, and tips for perfect texture. I shared ways to customize flavors and suggested possible variations for proteins and sauces. Proper storage and reheating were also highlighted. This dish is easy to adapt and fun to make. Enjoy experimenting with flavors and ingredients. Remember, cooking should be simple and enjoyable!

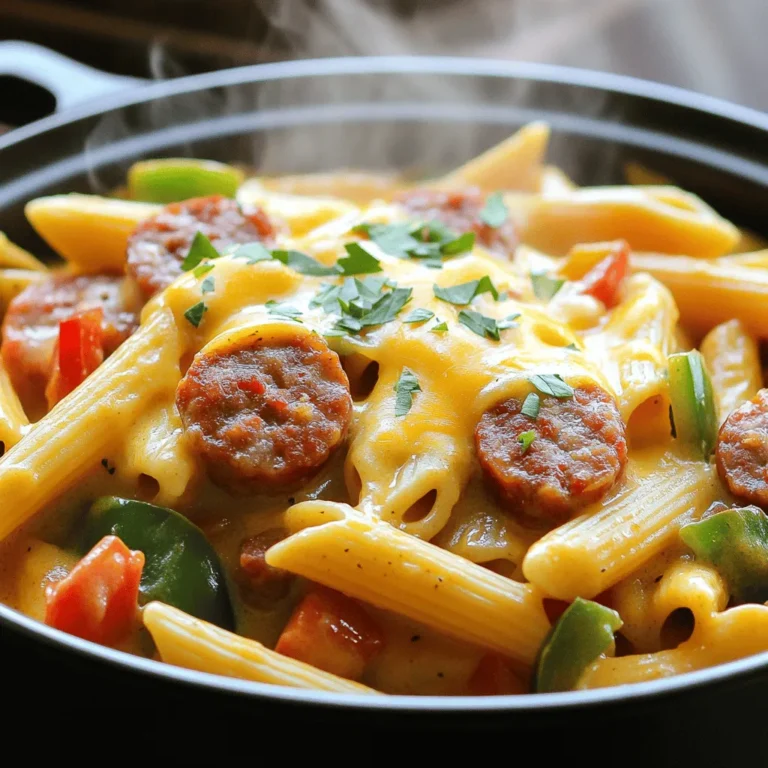
One-Pot Creamy Cajun Sausage Pasta Easy and Quick Meal

- 1 sheet of puff pastry (thawed) - 1 cup fresh raspberries (or frozen, thawed) - 1/2 cup almond paste - 1/4 cup powdered sugar - 1 tablespoon milk - 1 egg (for egg wash) - 1 teaspoon vanilla extract - 1 tablespoon lemon juice - Sliced almonds (for garnish) - Optional: powdered sugar for dusting To make these lovely raspberry almond Danish braids, gather your ingredients first. Start with puff pastry, which gives the dish its flaky texture. You can find it in most grocery stores. If using frozen raspberries, make sure they are thawed before you begin. Next, almond paste adds a rich flavor. You can buy it pre-made or make your own if you want. Then, get powdered sugar for sweetness in the filling and for dusting later. Milk is key for mixing your filling. Don't forget the egg, which makes a shiny, golden crust when brushed on top. Vanilla extract and lemon juice add nice flavor notes. Finally, sliced almonds give a crunchy topping. You can dust with powdered sugar if you want extra sweetness. Having all these ingredients ready makes the process smooth. Enjoy the fun of baking! - Preheat your oven to 400°F (200°C). Line a baking sheet with parchment paper. - Thaw one sheet of puff pastry. Roll it out on a floured surface to a rectangle, about 12x16 inches. - Use a sharp knife to cut slits along the long sides of the pastry. Make cuts about 1.5 inches apart and 4 inches deep. This creates a lovely braid effect. - In a bowl, mix together the almond paste, powdered sugar, milk, vanilla extract, and lemon juice. Stir until smooth. - Spread the almond paste mixture down the center of the puff pastry rectangle. Make a line about 4 inches wide. - Evenly place the fresh raspberries over the almond paste. Keep them within the center line for best results. - Start folding the pastry strips alternately across the filling. Begin from the top and crisscross the strips. This makes your braid look beautiful. - Beat an egg in a small bowl. Brush the egg wash over the entire Danish braid. This gives it a golden color when baked. - Sprinkle sliced almonds on top for added crunch. - Bake in your preheated oven for 20-25 minutes. Watch for puffing and golden brown color. - Once baked, let it cool slightly. If you want, dust with powdered sugar for a sweet finish and great look. To make perfect puff pastry, roll it out evenly. Use a lightly floured surface to prevent sticking. Aim for a rectangle about 12x16 inches. Keep the edges straight for a neat look. For even baking, place your Danish on a lined baking sheet. This ensures hot air circulates. Bake at 400°F (200°C) for a golden, flaky finish. Watch closely in the last minutes; you want it puffed and brown. Don’t feel stuck with raspberries. You can swap them for blueberries or strawberries. These fruits add a different twist. Also, try apricot or cherry preserves for a fun change! For toppings, consider a drizzle of glaze. You can mix powdered sugar with milk for a sweet finish. Or, add fresh mint leaves for a pop of color and flavor. Pair your Danish with coffee or tea. The flavors blend nicely, making each bite special. Serve it warm for the best taste. For presentation, cut the Danish into neat slices. Arrange them on a pretty platter. Dust with powdered sugar for a lovely touch. You can also add a few whole berries around for color. {{image_2}} You can switch up the fruit in your Danish braid. Blueberries or strawberries work great. Blueberries add a burst of sweetness. Strawberries bring a fresh, tangy flavor. You can also use seasonal fruits like peaches in summer or apples in fall. These fruits add unique tastes and colors. For a gluten-free Danish, use a gluten-free puff pastry. Look for brands that provide good texture. You can make your own using gluten-free flour blends. Adjust your almond paste with gluten-free ingredients. This way, you keep the rich almond flavor without gluten. To make a vegan Danish, swap dairy and eggs for plant-based options. Use almond milk in the filling instead of regular milk. Replace the egg wash with a mixture of plant-based milk and a little syrup. You can find vegan almond paste at stores or make your own. These changes keep the taste delicious and friendly for everyone. To keep your Danish fresh, wrap it tightly. Use plastic wrap or aluminum foil. Store in the fridge. It stays good for 2 to 3 days. For longer storage, freeze the Danish. Place it in an airtight bag or container. It can last up to 3 months in the freezer. When ready, thaw it overnight in the fridge. To reheat your Danish, use the oven. Preheat it to 350°F (175°C). Place the Danish on a baking sheet. Heat for about 10 minutes. This keeps the pastry flaky. You can also use an air fryer. Set it to 300°F (150°C) for 5 minutes. This method works well too! Avoid the microwave. It makes the pastry soggy. The best way to thaw puff pastry is in the fridge overnight. If you need it faster, leave it at room temperature for 30-40 minutes. This keeps the pastry cold and easy to work with. Avoid using a microwave, as it can make the dough sticky. Yes, you can use store-bought almond paste. It saves time and works well in this recipe. Just ensure it is smooth and easy to spread. If it feels dry, you can add a little milk to soften it. The Danish braid stays fresh for about two days at room temperature. Store it in an airtight container to keep it soft. After that, you can refrigerate it for up to five days. The taste remains good, but the texture may change a bit. Absolutely! You can make the filling a day ahead. Just store it in the fridge in a sealed container. When you are ready to use it, mix it well before spreading it on the pastry. If you don’t have almond paste, you can use marzipan as a substitute. It has a similar texture and flavor. Another option is to blend ground almonds with sugar and a little water to form a paste. Adjust the sweetness to your taste. This blog post covered how to make a delicious raspberry almond Danish. You learned about the key ingredients, preparation, filling, and baking steps. I shared tips to perfect puff pastry and offered different variations, including gluten-free and vegan options. Remember, cooking is fun and you can adjust recipes to fit your taste. Enjoy your baking and impress friends with your tasty treats!

Bakery-Style Raspberry Almond Danish Braids Delight

To make fluffy pumpkin spice pancakes, you need these items: - 1 cup all-purpose flour - 1 tablespoon baking powder - 1/2 teaspoon baking soda - 1/2 teaspoon salt - 1 teaspoon ground cinnamon - 1/2 teaspoon ground nutmeg - 1/4 teaspoon ground ginger - 1 cup pumpkin puree (not pumpkin pie filling) - 1/4 cup brown sugar - 1 large egg - 1 cup milk (or almond milk for a dairy-free option) - 2 tablespoons melted butter (or coconut oil for a dairy-free option) Each ingredient plays a role in creating soft, fluffy pancakes. The flour gives structure, while baking powder and baking soda help them rise. Pumpkin puree adds moisture and flavor, making them delightfully rich. When serving your pancakes, consider these tasty toppings: - Maple syrup - Whipped cream - Chopped nuts - Chocolate chips These toppings can enhance the flavor and texture of your pancakes. A drizzle of maple syrup adds sweetness, while whipped cream makes it feel special. Nuts or chocolate chips provide a fun crunch. You can easily adjust this recipe for different diets: - Use almond milk or oat milk for a dairy-free option. - Swap butter for coconut oil if you prefer a dairy-free fat. - For a gluten-free option, use a gluten-free flour blend. These substitutions allow everyone to enjoy fluffy pumpkin spice pancakes. Just keep in mind that texture may change slightly with different ingredients. Start with a large mixing bowl. Add 1 cup of all-purpose flour. Next, put in 1 tablespoon of baking powder. Then, add 1/2 teaspoon of baking soda and 1/2 teaspoon of salt. Now sprinkle in 1 teaspoon of ground cinnamon, 1/2 teaspoon of ground nutmeg, and 1/4 teaspoon of ground ginger. Use a whisk to mix everything well. This step is key for a fluffy texture. In another bowl, combine 1 cup of pumpkin puree with 1/4 cup of brown sugar. Crack in 1 large egg and pour in 1 cup of milk. You can use almond milk if you prefer. Finally, add 2 tablespoons of melted butter. Mix until smooth and creamy. This mixture brings in the pumpkin flavor and moisture. Now it’s time to cook! Preheat a non-stick skillet over medium heat. If needed, lightly grease it with butter or oil. Pour 1/4 cup of pancake batter onto the skillet for each pancake. Watch closely as bubbles form on the surface. This takes about 2-3 minutes. Flip the pancake and cook for another 2-3 minutes until golden brown. Keep the pancakes warm in a low oven while you finish the rest. Enjoy your fluffy pumpkin spice pancakes! To get the best texture, start with the right mix. Use all-purpose flour for fluffiness. When mixing, stir gently. Overmixing makes the pancakes tough. You want small lumps in the batter. This keeps them light and airy. Let the batter sit for a few minutes. This helps the baking powder work better. One big mistake is using pumpkin pie filling. Always use pure pumpkin puree. Another error is cooking on heat that's too high. This can burn the outside while leaving the inside raw. Flip the pancakes once bubbles form on the surface. If you wait too long, they might dry out. To keep pancakes warm, place them in a low oven. Set it to about 200°F (93°C). Stack the pancakes on a plate. Cover them with foil to keep in heat. This way, they stay warm and soft until you serve them. You can also warm them in the microwave. Just heat for a few seconds on low power. {{image_2}} Want to make your pancakes even sweeter? Add chocolate chips! Just sprinkle about half a cup of chocolate chips into the batter. This will give your pancakes a rich, sweet flavor. The chocolate melts as the pancakes cook. You get a yummy surprise with each bite. Serve these with maple syrup for a delightful treat. You can easily make these pancakes vegan. Replace the egg with one tablespoon of ground flaxseed mixed with three tablespoons of water. Let it sit for a few minutes to thicken. Use almond milk instead of regular milk. Swap out the butter for coconut oil or a plant-based blend. These changes keep the flavor while making it plant-based. If you need gluten-free pancakes, use a gluten-free flour blend. This works well in place of all-purpose flour. Make sure your baking powder is also gluten-free. The rest of the recipe stays the same. These pancakes still taste fluffy and delicious. Enjoy them without worry about gluten! To store leftover pancakes, let them cool first. Place them in a single layer on a plate. Cover the plate with plastic wrap or foil. You can also stack pancakes with parchment paper between them. This keeps them from sticking together. Store the plate in the fridge if you plan to eat them soon. They should last for about 2-3 days in the fridge. When you want to reheat pancakes, use a microwave or skillet. For the microwave, place a pancake on a plate. Heat it for about 20-30 seconds. Check it to see if it’s warm enough. If not, heat it a bit more. For the skillet, warm it over low heat. Place the pancake in the skillet for a minute on each side. This keeps the pancake fluffy and tasty. Freezing pancakes is a great way to save them. First, cool the pancakes completely. Then, layer them with parchment paper in a freezer-safe bag. Remove as much air as possible before sealing the bag. You can freeze them for up to 2 months. When you want to eat them, thaw them in the fridge overnight. Reheat them using the tips mentioned above. Enjoy your delicious pancakes any day! To make pancakes fluffier, use fresh baking powder. Make sure your batter is not too smooth. Stir gently until just combined. This keeps air pockets in the batter. Also, let the batter rest for a few minutes. This helps the baking powder work better. No, do not use pumpkin pie filling. It has added sugar and spices that change the taste. Stick to pure pumpkin puree for the best flavor. This keeps your pancakes true to the recipe. You can use almond milk, oat milk, or coconut milk. These options work well in this recipe. They give the pancakes a nice texture. Just replace regular milk with your choice. In this post, we explored how to make delicious fluffy pumpkin spice pancakes. We discussed essential ingredients, optional toppings, and substitutions for diet needs. You learned step-by-step instructions, tips for perfect texture, and common mistakes to avoid. We also shared fun variations and storage tips. These pancakes bring warmth and joy to any breakfast. Experiment and enjoy this seasonal treat!

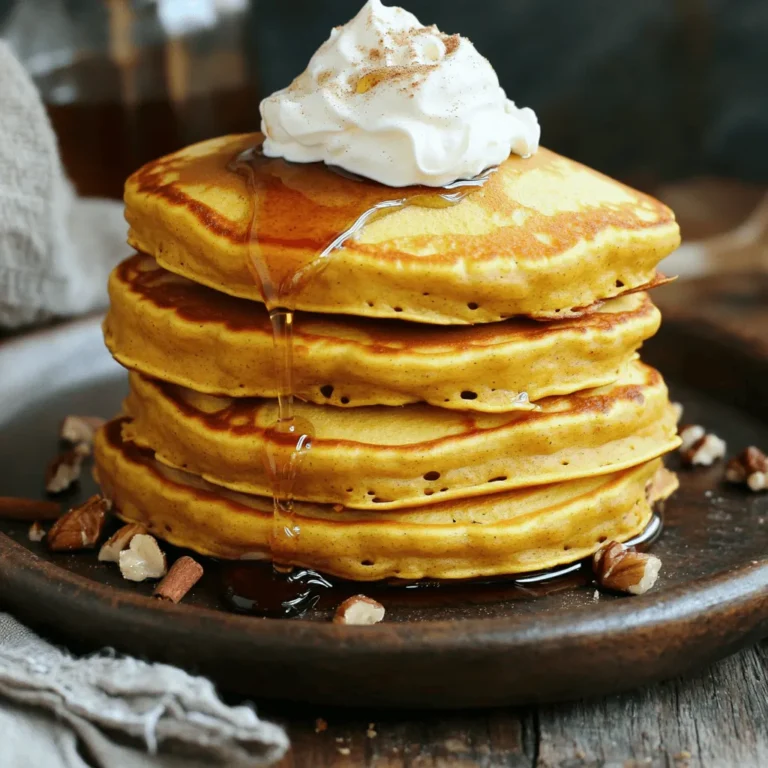
Fluffy Pumpkin Spice Pancakes Simple and Delicious Recipe

- 2 cups rolled oats - 1 cup creamy peanut butter - 1/2 cup honey or maple syrup - 1/2 cup dark chocolate chips - 1/4 cup chia seeds - 1/4 cup coconut flakes (unsweetened) - 1/2 teaspoon vanilla extract - A pinch of salt I love how simple these ingredients are. Each one plays a role in making these bars taste great. The rolled oats give a nice chewy base. Peanut butter adds creaminess and protein. Honey or maple syrup adds sweetness and binds everything together. Chia seeds bring fiber and healthy fats. Coconut flakes add a touch of tropical flavor. Dark chocolate chips make everything better. Vanilla extract gives a warm hint. The salt brings out all the flavors. You can swap out the peanut butter for almond or sunflower seed butter. If you want a different sweetener, use agave syrup instead of honey. For a nut-free option, try tahini. You can leave out the coconut flakes if you don’t like them. If you prefer milk chocolate, use that instead of dark chocolate. You can also add nuts or dried fruit for extra texture. Each bar has about: - 150 calories - 5 grams protein - 10 grams fat - 15 grams carbs - 2 grams fiber These bars are a good snack choice. They provide energy and help keep you full. They are also rich in protein and healthy fats, which are great for your body. Enjoying these bars means you're treating yourself well! To start, gather all your ingredients. You will need rolled oats, creamy peanut butter, honey or maple syrup, dark chocolate chips, chia seeds, coconut flakes, vanilla extract, and a pinch of salt. This recipe is quick and fun! 1. In a large bowl, add 2 cups of rolled oats, 1/4 cup of chia seeds, and 1/4 cup of coconut flakes. Mix well until everything is combined. 2. Next, take a microwave-safe bowl. Heat 1 cup of peanut butter and 1/2 cup of honey (or maple syrup) in the microwave for about 30 seconds. Mix until it's smooth and warm. 3. Pour the warm peanut butter blend over the dry mixture. Add in 1/2 teaspoon of vanilla extract and a pinch of salt. 4. Now, use a spatula or your hands to mix everything. Make sure the dry ingredients are well coated with the peanut butter mixture. 5. Gently fold in 1/2 cup of dark chocolate chips, but save a few for topping later. 1. Line an 8x8-inch baking dish with parchment paper. Leave some overhang for easy removal. 2. Firmly press the mixture into the dish using your hands or a spatula. 3. Sprinkle the reserved chocolate chips on top and press them down slightly to stick. 4. Place the baking dish in the fridge. Let the bars set for at least 1 hour. 5. Once set, lift the bars out using the parchment paper. Cut them into squares or rectangles. 6. Store any leftovers in an airtight container in the fridge for up to one week. One big mistake is not mixing the dry ingredients well. You need to stir the oats, chia seeds, and coconut flakes until they are even. If they are not mixed, some bites will be dry. Another mistake is not pressing the mixture firmly into the dish. If you don’t press hard enough, the bars will crumble. Lastly, don’t skip the fridge time. Chilling helps the bars hold together. To boost the flavor, try adding a pinch of cinnamon or nutmeg. These spices give a warm taste that mixes well with peanut butter. You can also swap in different nut butters. Almond or cashew butter adds a unique twist. For texture, consider adding more coconut flakes or nuts. These give a nice crunch and flavor. Use a large mixing bowl for easy stirring. A microwave-safe bowl helps melt the peanut butter and honey smoothly. A spatula works best to mix the ingredients. You will need an 8x8-inch baking dish lined with parchment paper. This helps you lift the bars out easily. Lastly, a sharp knife is key to cutting the bars into perfect squares. {{image_2}} You can change up the bars to fit your taste. Try adding nuts for crunch. Walnuts or almonds work well. Dried fruit like raisins or cranberries adds sweetness. You can even add seeds like sunflower or pumpkin for more nutrition. Just keep the total amount similar, so the bars stay firm. If you want to switch the sweetener, use agave syrup instead of honey. Maple syrup gives a nice flavor too. You can even try brown rice syrup. Each sweetener changes the taste a bit, so pick what you like best. Just remember, keep the amount the same for the best texture. You can swap peanut butter for other nut butters. Almond butter gives a milder taste. Cashew butter is creamy and rich. Sunflower seed butter is great for nut-free options. Each choice brings a new flavor. Just make sure the texture stays similar for easy mixing. To keep your no-bake peanut butter chocolate oat bars fresh, use an airtight container. This helps lock in moisture and flavor. Place the bars in the fridge after they set. Make sure to separate layers with parchment paper, so they don’t stick together. This small step keeps each bar intact and ready to enjoy. If you want to save some bars for later, freezing is a great option. Wrap each bar in plastic wrap first, then place them in a freezer-safe bag. This keeps them fresh and prevents freezer burn. To enjoy, take them out and let them thaw in the fridge. They taste just as good after freezing. These tasty bars last about one week in the fridge. After that, they may lose their yummy flavor and texture. If you freeze them, they can last up to three months. Just remember to check for any changes in color or smell before eating. Keeping an eye on freshness ensures you always enjoy the best snacks. Yes, you can make these bars vegan. Just use maple syrup instead of honey. Maple syrup is a great plant-based sweetener. Also, choose vegan dark chocolate chips. This way, you keep the bars delicious and vegan-friendly. If you need a swap for peanut butter, try almond butter or sunflower seed butter. Both options add creaminess and flavor. Almond butter has a nice nutty taste. Sunflower seed butter is a great choice for nut-free diets. Just make sure to pick a creamy version for the best texture. To make these bars gluten-free, use certified gluten-free rolled oats. Regular oats may have gluten from cross-contamination. Most brands offer gluten-free oats, so check the label. This simple swap ensures everyone can enjoy these tasty bars without worry. This blog post covered key points to make tasty bars. We discussed ingredients, substitutions, and nutrition. You learned step-by-step mixing and cutting methods. Tips helped you avoid mistakes and improve flavor. Variations gave you ideas for custom treats. Lastly, we shared smart storage methods and answers to common questions. Whether you're a novice or a pro, these bars can suit any taste. Keep experimenting and enjoy your snack!

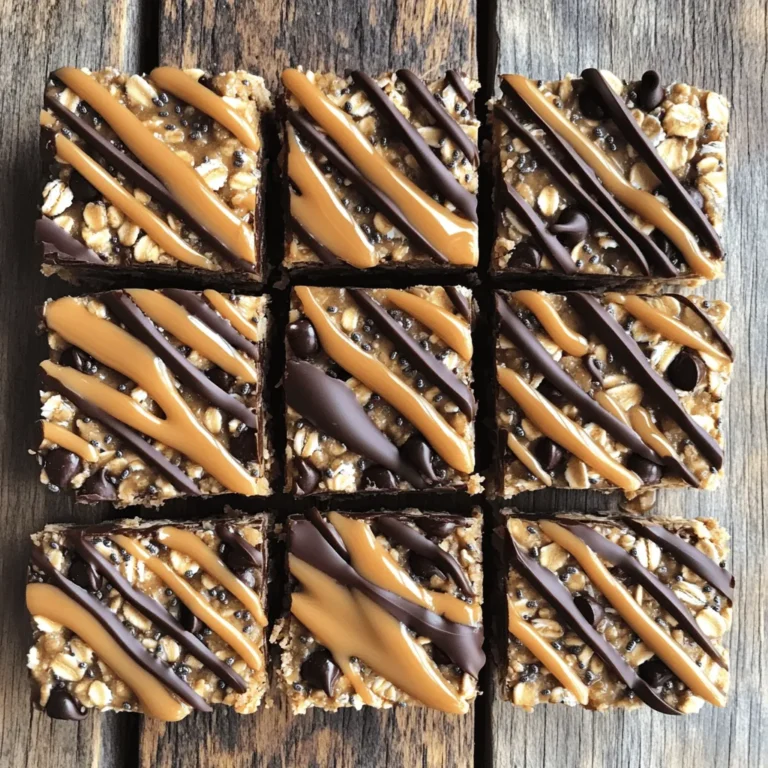
No-Bake Peanut Butter Chocolate Oat Bars Delight

- 1 lb boneless, skinless chicken breasts - 1 can black beans, rinsed and drained - 1 can diced tomatoes with green chilies - 1 yellow onion, chopped - 2 cloves garlic, minced - 1 red bell pepper, diced - 1 cup corn kernels (fresh or frozen) - 4 cups low-sodium chicken broth - 2 tsp ground cumin - 1 tsp chili powder - 1 tsp smoked paprika - Salt and pepper to taste - Juice of 1 lime - Tortilla strips - Fresh cilantro, chopped - Avocado, diced Gathering these ingredients is the first step to making a great soup. The chicken adds protein and texture. The black beans bring fiber, while the tomatoes add a tasty kick. Next, the vegetables and aromatics are key. The onion and garlic give the soup a strong base. The bell pepper adds a sweet crunch. Corn can be fresh or frozen, making it easy to find. The spices and seasonings elevate the dish. Ground cumin and chili powder add warmth. Smoked paprika gives a nice depth. A splash of lime juice at the end brightens the whole soup. Finally, garnishes make a big difference. Tortilla strips add crunch. Avocado gives a creamy touch. Fresh cilantro adds a pop of color and flavor. These simple touches make your soup look and taste amazing! Start by adding the chicken. Place the boneless, skinless chicken breasts at the bottom of your slow cooker. Next, layer in the ingredients. Pour in the black beans, then the diced tomatoes with their liquid. Add the chopped onion, minced garlic, diced red bell pepper, and corn kernels on top. Each layer adds flavor and texture. Cover your slow cooker with its lid. Set it to cook on low for 6 to 8 hours or on high for 3 to 4 hours. If you're short on time, the high setting works well. Make sure the chicken is cooked through and tender before you move on. This slow cooking lets all the flavors mix together beautifully. When cooking time is up, take out the chicken. Use two forks to shred it into bite-sized pieces. Return the shredded chicken to the pot. Now, add the fresh lime juice. This adds a bright flavor that wakes up the soup. Taste it, and adjust the seasoning if needed. Your soup is now ready to serve and enjoy! To make your soup even more tasty, try adding extra spices. A pinch of cayenne pepper can bring heat. You can also add fresh herbs like oregano or thyme for depth. Want a smoky touch? Try adding chipotle peppers in adobo sauce. They pack flavor and spice, perfect for your soup. For the best texture, aim for balance. If your soup is too thick, add more chicken broth until it reaches your desired consistency. If it’s too thin, you can thicken it by mashing some black beans with a fork. This will keep the soup hearty and rich without losing any flavor. Serve your soup with flair! Ladle it into bowls and top with crispy tortilla strips. Add diced avocado and chopped cilantro for color and freshness. A squeeze of lime juice right before serving boosts the flavor. This simple touch makes your dish pop and adds brightness. {{image_2}} You can easily make this soup gluten-free. Just check the labels on the broth and tortilla strips. For a dairy-free option, skip cheese and use dairy-free cream if you like. This soup tastes great even without dairy. Want to change up the protein? Use turkey or even tofu instead of chicken. If you don’t have black beans, any type of beans works well. Great alternatives are pinto beans or kidney beans. They all add good flavor. To change the taste, add different herbs and spices. Try fresh cilantro or parsley for a fresh kick. A pinch of oregano or thyme can also add depth. For heat, add jalapeños or hot sauce. Each choice makes the soup uniquely yours. To store leftovers, let the soup cool down first. Place it in an airtight container. You can keep it in the fridge for up to three days. Make sure the lid is on tight to prevent spills and keep it fresh. If you want to freeze the soup, use a freezer-safe container. Leave some space at the top, as the soup will expand when frozen. It stays good in the freezer for about three months. When you are ready to eat, thaw it in the fridge overnight. Reheat it on the stove or in the microwave until hot. In the fridge, your Chicken Tortilla Soup lasts about three days. In the freezer, it can last for three months. After that, the taste may fade. Always check for any off smells or signs of spoilage before eating. To make your soup spicier, add more chili powder or diced jalapeños. You can also include hot sauce. Start with small amounts and taste as you go. This way, you can find the right heat for your taste. Yes, you can use frozen chicken. Just make sure it is in a single layer in the slow cooker. Cooking time may increase. Check that the chicken reaches 165°F before serving. This ensures it is safe to eat. Some great side dishes include: - Cornbread - Mexican rice - Fresh salad with lime dressing - Chips and guacamole These pairings add more flavor and make your meal complete. Enjoy! To make delicious Slow Cooker Chicken Tortilla Soup, start with simple ingredients. Use chicken, beans, and spices for great flavor. Focus on layering for easy cooking. Remember to shred the chicken and add lime juice for the final touch. As you enjoy this soup, think about the variations and how to personalize it. Don’t forget to add garnishes for extra texture and taste. This recipe is a crowd-pleaser that will warm your heart and satisfy your hunger. Enjoy making it your own!

Slow Cooker Chicken Tortilla Soup Simple and Tasty

To make Air Fryer Buffalo Cauliflower Bites, you need the right ingredients. Here’s what you will need: - 1 medium head of cauliflower, cut into bite-sized florets - 1 cup all-purpose flour - 1 cup plant-based milk (or regular milk) - 1 teaspoon garlic powder - 1 teaspoon onion powder - 1 teaspoon smoked paprika - 1/2 teaspoon cayenne pepper (adjust for spice level) - Salt and pepper to taste - 1 cup buffalo sauce (store-bought or homemade) - 2 tablespoons olive oil - Chopped green onions for garnish - Blue cheese or ranch dressing for dipping (optional) Start with fresh cauliflower. It should be firm and bright. The flour and milk create a smooth batter that coats the cauliflower. You can use plant-based milk or regular milk, whichever you prefer. The seasonings add flavor. Garlic powder and onion powder provide a savory base. Smoked paprika gives a nice depth, while cayenne pepper adds heat. You can adjust the cayenne for more or less spice. Buffalo sauce is key for that classic flavor. You can buy it ready-made, or make your own if you like. Olive oil helps the sauce stick and adds richness. This list gives you all you need to create a crispy, spicy treat that everyone will love. - Preheat Air Fryer Set your air fryer to 400°F (200°C). This step warms the air fryer and helps the bites cook evenly. - Make the Batter In a bowl, mix 1 cup of all-purpose flour, 1 teaspoon of garlic powder, 1 teaspoon of onion powder, 1 teaspoon of smoked paprika, 1/2 teaspoon of cayenne pepper, and salt and pepper. Slowly add 1 cup of plant-based milk or regular milk. Stir until smooth. - Coat Cauliflower Florets Take each cauliflower floret and dip it into the batter. Make sure each piece is well-covered. Shake off any extra batter before placing them in the air fryer. - Air Frying Process Place the coated cauliflower bites in the air fryer basket. Ensure they are in a single layer. Do not overcrowd them. Air fry for 12-15 minutes. Shake the basket halfway through for even cooking. - Tossing in Buffalo Sauce In a bowl, mix 1 cup of buffalo sauce with 2 tablespoons of olive oil. Once the cauliflower bites are done, transfer them into the bowl and toss them in the sauce until fully coated. - Final Crisping in Air Fryer Return the coated bites back to the air fryer. Cook them for another 3-5 minutes. This step helps the sauce stick and gives them a nice crispiness. Once done, take them out and let them cool a bit before serving. Avoiding Overcrowding When you fill the air fryer, keep space between each piece. If they touch, they will steam instead of crisp. A single layer allows hot air to flow and makes each bite crunchy. Importance of Shaking Basket Shaking the basket during cooking is key. It helps the heat reach all sides of the cauliflower. I recommend shaking it halfway through to keep things even. This simple step gives you that perfect crunch. Modifying Cayenne Pepper Cayenne pepper adds heat, but you can adjust how much you use. If you like milder bites, cut the cayenne to 1/4 teaspoon. For more heat, add a little more. Taste as you go to find your perfect level. Alternative Hot Sauces You can switch out buffalo sauce for other hot sauces. Try a garlic hot sauce for a different flavor. Experiment with your favorites to make these bites your own. {{image_2}} You can change the flavor of your buffalo cauliflower bites with some fun dips. Try ranch dressing or blue cheese on the side. These creamy dips add a cool touch to the spicy bites. You can also mix things up with a honey mustard or barbecue sauce for a sweet twist. If you want to kick it up a notch, add cheese or herbs. Shredded cheese can melt over the hot bites, giving them a rich flavor. You can use cheddar, mozzarella, or even a spicy pepper jack for zing. Fresh herbs like parsley or chives can brighten the dish. Just sprinkle them on top before serving. If you don’t have an air fryer, there are other ways to make these bites. Baking in the oven works great, too. Preheat your oven to 425°F (220°C). Place the coated florets on a baking sheet lined with parchment paper. Bake for about 25-30 minutes. Flip them halfway for even crispiness. Cooking in a deep fryer is another option. Heat oil in a deep pot to 350°F (175°C). Fry the coated cauliflower in small batches until golden brown. This method gives you a crunchy exterior but can add extra calories. Whichever method you choose, you’ll enjoy these tasty bites! To keep your buffalo cauliflower bites fresh, use a proper container. I recommend an airtight container. This helps keep the bites crispy and tasty. Place them in the fridge right after they cool down. They will stay good for about three days. If you want to store them longer, consider freezing. Just place the bites in a freezer-safe bag and remove as much air as you can. To enjoy your leftovers, reheating is key. The best method is to use the air fryer again. Set it to 350°F (175°C) and heat for about 5-7 minutes. This helps to regain that crispy texture. Avoid using a microwave if you can. Microwaving can make them soggy. Always check to ensure they are heated through before serving again. Yes, you can use frozen cauliflower. Just thaw it first. Pat it dry to remove excess moisture. This helps the batter stick better and ensures crispiness. To make these bites gluten-free, swap all-purpose flour with a gluten-free flour blend. Many options work well, like almond flour or chickpea flour. Check the label to ensure it’s certified gluten-free. Buffalo cauliflower bites pair well with many sauces. Try blue cheese dressing for a classic taste. Ranch dressing is another popular option. For a kick, serve with a spicy yogurt sauce. Enjoy experimenting with your favorites! In this blog post, I shared a simple guide for making buffalo cauliflower bites. We covered key ingredients like cauliflower, flour, and buffalo sauce. I explained the easy steps to prepare and cook them. Keeping crispiness and adjusting spice levels were also discussed. Remember, you can change the flavors and switch cooking methods too. Enjoy trying this healthy twist on classic buffalo wings. Make these bites your own by adding dips or new spices. Happy cooking!

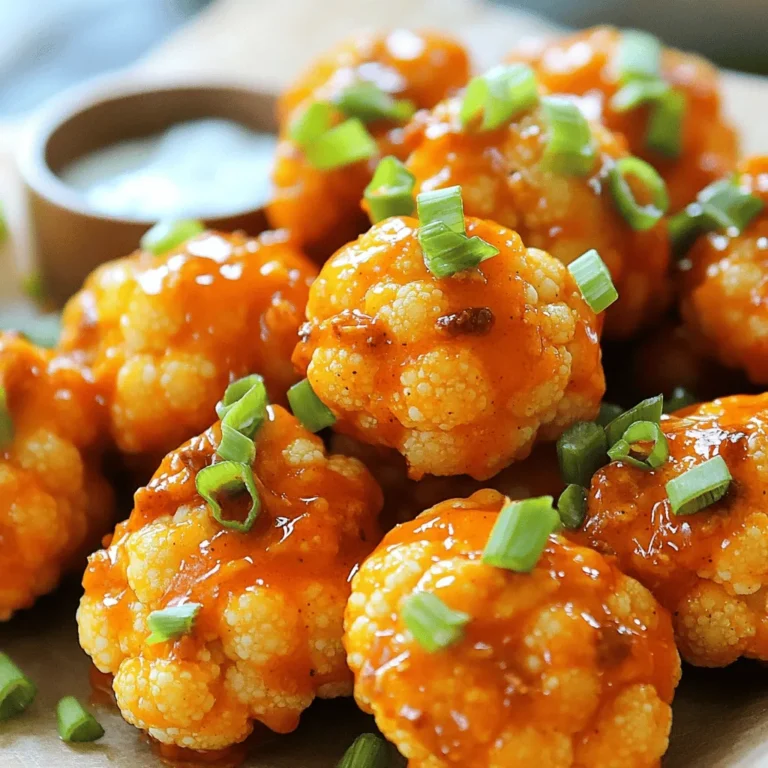
Air Fryer Buffalo Cauliflower Bites Crispy Delight

- 8 oz (225g) fresh noodles or your choice of pasta - 4 tablespoons olive oil - 6 cloves garlic, thinly sliced - 1-2 red chili peppers, sliced (adjust for desired heat) - 1 teaspoon red pepper flakes - 2 tablespoons soy sauce - 1 tablespoon sesame oil - 2 green onions, finely chopped - 1 tablespoon toasted sesame seeds - Salt, to taste For this dish, fresh noodles work best, but any pasta will do. I love using fresh noodles because they soak up flavor better. Olive oil is key for the chili oil base. Choose a good quality olive oil for the best taste. Garlic adds a rich flavor, and six cloves give it a nice punch. Chili peppers bring heat, and you can adjust the number based on how spicy you want it. I recommend starting with one pepper if you prefer mild. Red pepper flakes add an extra kick, so use them wisely! Next, soy sauce and sesame oil deepen the flavors. Green onions and sesame seeds offer a fresh crunch and a hint of nuttiness. Finally, salt is your friend in balancing the flavors. Use it to taste for the perfect balance. To start, bring a pot of water to a boil. Add a good pinch of salt. This step helps season the noodles as they cook. If you are using fresh noodles, cook them for about 2-3 minutes. If you use dried noodles, check the package for cooking times. Once cooked, drain the noodles and set them aside. Next, grab a large skillet and heat the olive oil over medium heat. Once the oil is hot, add the sliced garlic and chili peppers. Sauté these for 2-3 minutes. You want the garlic to turn golden but not burnt. The smell will be amazing! Now, it’s time to add more flavor. Sprinkle in the red pepper flakes, soy sauce, and sesame oil. Stir everything well and let it simmer for about one minute. This helps the flavors mix. Then, add the cooked noodles to the skillet. Toss them in the skillet until they are fully coated with the chili oil and spices. Adjust the salt to taste. Finally, it’s time to make your dish look great. Serve the noodles in a large shallow bowl. Drizzle some extra chili oil on top. Then, sprinkle with chopped green onions and toasted sesame seeds. This adds color and crunch. You can pair these noodles with some grilled chicken or sautéed veggies for a full meal. To get the best garlic taste, slice the garlic thinly. This helps it cook evenly. I like to use a sharp knife for this. Thin slices turn golden quickly. If you chop it too thick, it might burn and taste bitter. Timing is key to avoid burnt garlic. Cook the garlic in olive oil over medium heat. When it turns golden, it’s ready. This usually takes about 2-3 minutes. Watch it closely, so it doesn’t burn. For a good kick, use fresh red chili peppers. I like Thai or Fresno chilies for this dish. They add a nice heat that’s not too overwhelming. Slice them thin and add to the oil when cooking. If you prefer less heat, reduce the number of chili peppers. You can also remove the seeds. For a milder flavor, use more red pepper flakes or skip them. Adjusting these ingredients lets you control the spice. These noodles pair well with proteins like chicken, shrimp, or tofu. You can add cooked veggies like bell peppers or snap peas for more color and crunch. To make it a complete meal, serve it with a side salad or steamed rice. You can also top the noodles with a fried egg for extra protein. This adds richness and makes the dish even more satisfying. {{image_2}} For a vegetarian dish, you can swap out meat or seafood. Try adding mushrooms, tofu, or tempeh. These ingredients bring great taste and texture. You can sauté them with garlic and chili oil for extra flavor. If you want to boost the plant-based aspect, add vegetables like bell peppers, carrots, or snap peas. They add crunch and color. You can also use edamame for protein. If you need a gluten-free meal, choose gluten-free noodles or pasta. Rice noodles or quinoa pasta work well. Cook them just like regular noodles. For sauces, check your soy sauce. Many brands offer gluten-free options. You can also use tamari as a great alternative. It has a similar flavor without gluten. To change the flavor, add different herbs or spices. Fresh basil or cilantro can give it a nice twist. You can sprinkle some lime juice for a bright finish. Explore using alternative oils too. Peanut oil or avocado oil can give unique tastes. You can even try infused oils for more layers of flavor. After you finish your meal, let the noodles cool down. Place them in an airtight container. This keeps them fresh in the fridge. Store them in the refrigerator for up to three days. You can reheat the noodles in two ways: the microwave or a skillet. For the microwave, put the noodles in a bowl and cover them loosely. Heat for about one minute. Stir and check if they are warm enough. For a skillet, add a splash of water and heat over medium heat. Stir often to avoid overcooking the noodles. You want them hot, not mushy. You can freeze the noodles too! Make sure they are completely cool. Place them in a freezer-safe container or bag. Remove as much air as you can. This helps prevent freezer burn. You can freeze them for up to three months. When you are ready to eat, thaw them in the fridge overnight. Reheat using the skillet method for the best taste. To make garlic chili oil, you need just a few ingredients. Start with ½ cup of olive oil. Heat it in a pan over medium heat. Add 4-6 cloves of sliced garlic. Cook until golden, about 2 minutes. Then, add 1-2 sliced red chili peppers and 1 teaspoon of red pepper flakes. Stir it well and let it simmer for 1-2 minutes. Your garlic chili oil is ready! Yes, you can use dried noodles. Just follow these steps: Boil a pot of salted water. Add your dried noodles and cook them according to the package. This usually takes about 6-8 minutes. Drain the noodles and add them to the chili oil mix. They will soak up the flavors nicely. These noodles pair well with many sides. Try serving them with: - Grilled chicken or shrimp - Steamed broccoli or bok choy - A fresh salad with cucumber and sesame dressing - Soft-boiled eggs for extra protein These options add balance to your meal. To lower the heat, try these tips: - Use fewer chili peppers or red pepper flakes. - Add more soy sauce or sesame oil to balance the spice. - Mix in some cooked vegetables like carrots or bell peppers. These changes will help make the dish milder while keeping it tasty. This blog post covered how to make garlic chili oil noodles. You learned about key ingredients like fresh noodles, garlic, and chili peppers. I shared tips for cooking and garnishing your dish to elevate its flavor. You can adapt the recipe for dietary needs and learn to store your leftovers properly. Enjoy experimenting with different ingredients and flavors. Cooking should be fun, so don’t be afraid to make it your own!

Minute Garlic Chili Oil Noodles Flavorful and Quick Meal

To make crispy chickpea Caesar salad wraps, you need a few simple ingredients. Here’s what you’ll need: - 1 can (15 oz) chickpeas, drained and rinsed - 2 tablespoons olive oil - 1 teaspoon garlic powder - 1 teaspoon smoked paprika - Salt and pepper, to taste - 1 cup romaine lettuce, chopped - 1/2 cup cherry tomatoes, halved - 1/4 cup Parmesan cheese, grated (or nutritional yeast for a vegan option) - 1/4 cup Caesar dressing (store-bought or homemade) - 4 large whole wheat wraps or tortillas You can switch up the cheese if you want it to be vegan. Use nutritional yeast instead of Parmesan cheese. For the wraps, you can choose whole wheat or opt for gluten-free tortillas. This way, you can cater to different diets and preferences. The chickpeas provide protein, while the fresh veggies add crunch and flavor. Enjoy customizing your wraps to fit your taste! Start by preheating your oven to 400°F (200°C). This temperature is key for roasting. It helps the chickpeas get crispy. A hot oven ensures even cooking and a golden finish. Next, drain and rinse the chickpeas from the can. Spread them on a baking sheet lined with parchment paper. Drizzle 2 tablespoons of olive oil over them. Then, add 1 teaspoon of garlic powder, 1 teaspoon of smoked paprika, and salt and pepper to taste. Toss the chickpeas well to coat them evenly. Roast for 20 to 25 minutes. Shake the pan halfway through to ensure they cook evenly. Look for a crispy texture and a nice golden color. While the chickpeas roast, grab a large bowl. Add 1 cup of chopped romaine lettuce and 1/2 cup of halved cherry tomatoes. If you like, sprinkle in 1/4 cup of grated Parmesan cheese or nutritional yeast for a vegan option. Pour in 1/4 cup of Caesar dressing. Toss everything gently to coat the salad well. Once the chickpeas are crispy, take them out and let them cool for a few minutes. Take a large whole wheat wrap and lay it flat. Place a generous portion of the Caesar salad mixture in the center. Top it with a handful of crispy chickpeas. To wrap it up, fold in the sides and roll tightly from the bottom. Cut the wraps in half and place them on a plate. For a nice touch, serve with extra Caesar dressing on the side. You can also add lemon wedges for extra flavor and a pretty look. To get crispy chickpeas, avoid using wet chickpeas. Always drain and rinse them well. Pat them dry with a towel before cooking. This helps them crisp up. Use enough oil but not too much; two tablespoons is great. If they do not crisp, try roasting them longer or at a higher heat. Remember to shake the pan halfway through. This helps them cook evenly. If you want to make your own Caesar dressing, it’s easy! Mix together these simple ingredients: - 1/4 cup mayonnaise - 2 tablespoons lemon juice - 1 teaspoon Dijon mustard - 1 clove garlic, minced - Salt and pepper to taste This mix gives you a fresh, creamy dressing. You can adjust the flavors to fit your taste. For a vegan option, use silken tofu instead of mayo. Blend it with lemon juice, garlic, and a pinch of salt for a smooth texture. Make your wrap unique by adding more ingredients. Try adding sliced avocado for creaminess. You can also throw in some diced cucumbers for crunch. Want more protein? Add grilled chicken or tofu. For spice, sprinkle in some crushed red pepper flakes. Fresh herbs like basil or cilantro can boost flavor too. Mix and match to create your perfect wrap! {{image_2}} You can switch up the chickpeas for other proteins. If you want a meaty wrap, try grilled chicken or turkey. For a plant-based option, use tofu or tempeh. These proteins can add flavor and texture. You can marinate them before cooking for extra taste. Change the salad based on the season. In spring, add fresh peas or asparagus. For summer, use cucumbers or bell peppers for crunch. In fall, try roasted squash or apples for sweetness. In winter, add kale or shredded carrots for a hearty bite. Tailoring your wrap keeps it fresh and exciting. If you need gluten-free wraps, look for corn tortillas or lettuce leaves. You can also find gluten-free whole wheat wraps at stores. For the Caesar dressing, choose a gluten-free brand or make your own. Mixing Greek yogurt with lemon juice and garlic makes a tasty dressing. These swaps let everyone enjoy the wraps without worry. To store leftover wraps, place them in an airtight container. This keeps them fresh in the fridge for up to three days. If you need to store them longer, freeze the wraps. Wrap each one in plastic wrap, then place them in a freezer bag. They can last for up to three months in the freezer. Just remember, the longer you store them, the softer they may get. When you want to reheat your wraps, do it in an oven or a toaster oven. Set it to 350°F (175°C). This helps keep the wraps crispy. Heat them for about 10 minutes or until warm. Avoid using a microwave, as it can make the wraps chewy. Store any leftover chickpeas in a sealed container in the fridge. They stay fresh for about three to four days. If you have extra Caesar dressing, keep it in the fridge too. It can last for up to a week. For the lettuce, wrap it in a damp paper towel and place it in a plastic bag. This keeps it crisp for several days. If you have grated cheese, store it in an airtight container in the fridge for up to a week. Yes, you can. To prep ahead, roast the chickpeas and store them in an airtight container. Chop the lettuce and tomatoes and keep them in the fridge. Wrap everything in a tortilla when you are ready to eat. This way, your meal stays fresh and quick. If you want a different protein, try black beans or lentils. These choices mix well with the Caesar flavors. You can also use shredded chicken or tofu for a heartier wrap. To make it gluten-free, use gluten-free wraps or tortillas. Check the dressing to ensure it’s gluten-free too. You can make your own dressing using gluten-free ingredients. Absolutely! You can use spinach or kale for a twist. Butter lettuce adds a nice crunch. Each type gives a unique flavor and texture to your wrap. This blog post covered how to make tasty wraps with roasted chickpeas. We explored the right ingredients, from salad mix to wraps. You learned how to roast chickpeas for extra crispiness and assemble your wraps. Tips helped you customize the recipe to your taste, ensuring great meals every time. Remember, you can adapt this recipe with seasonal flavors or different proteins. Enjoy your cooking adventure and create wraps that suit your style!

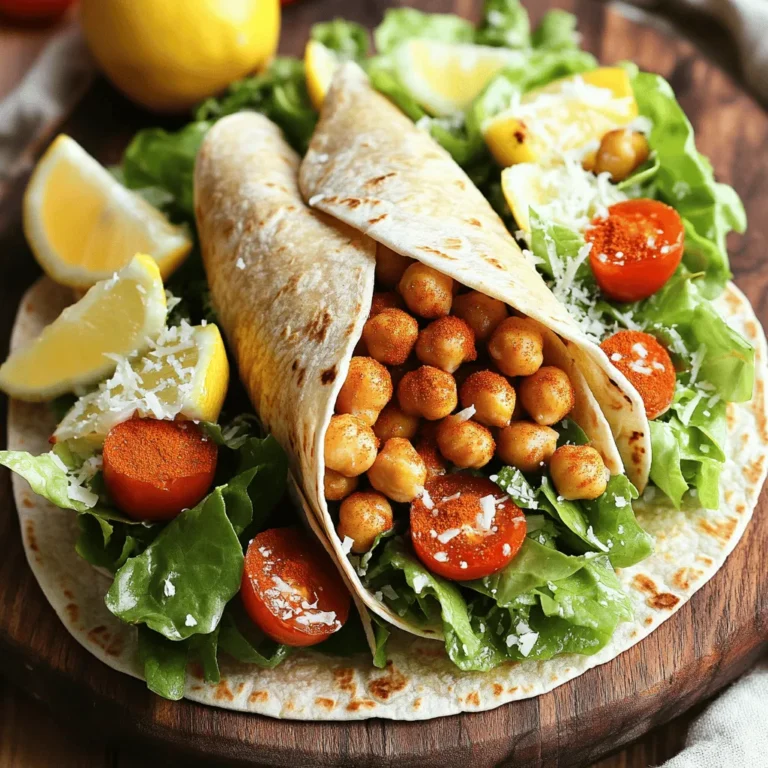
Crispy Chickpea Caesar Salad Wraps Fresh and Tasty Meal

PREV 1 … 28 29 30 … 56 NEXT
go kitchen now

explore

DessertsDinnerAppetizersDrinks

Our Policies

  • Cookie Policy
  • Copyright Policy
  • Disclaimer
  • GDPR Policy
  • Terms Of Use
Back to Top
  • About
  • Contact Us
  • Privacy Policy
© 2025 go kitchen now