FREE DINNER EBOOK! Get your copy!
  • Cookie Policy
  • GDPR Policy
  • Disclaimer
  • Terms Of Use
  • Visit my other site: Fun Cookie Recipes
go kitchen now
  • Home
  • Dinner
  • Desserts
  • Drinks
  • Appetizers
  • Contact
  • About
  • Privacy Policy
  • Home
  • Dinner
  • Desserts
  • Drinks
  • Appetizers
  • Contact
  • About
  • Privacy Policy
  • Cookie Policy
  • GDPR Policy
  • Disclaimer
  • Terms Of Use
Visit my other site: Fun Cookie Recipes

HOME / CATEGORIES /

Latest

- 4 chicken thighs, skin-on and bone-in - 1/4 cup soy sauce - 2 tablespoons honey - 4 cloves garlic, minced - 1 tablespoon grated fresh ginger - 1 tablespoon sesame oil - 1 teaspoon black pepper - 1 teaspoon red pepper flakes (optional for heat) - 2 green onions, sliced for garnish - Sesame seeds for garnish For this recipe, it's important to use the right amounts. The chicken thighs provide a hearty base. The soy sauce adds saltiness and umami. Honey gives a sweet touch that balances the salt. Garlic and ginger offer bold flavors. Using sesame oil adds a nutty taste, which is key to this dish. Black pepper gives warmth, and red pepper flakes can spice it up if you like heat. - Chicken Thighs: I prefer bone-in thighs for juiciness. The skin helps keep moisture in. - Soy Sauce: Choose a good quality soy sauce. It enhances the overall taste. - Honey: Use pure honey for the best flavor. It helps caramelize the chicken. - Garlic and Ginger: Fresh garlic and ginger add depth. They make the dish aromatic and vibrant. - Sesame Oil: This adds a rich, nutty flavor. A little goes a long way. - Red Pepper Flakes: Optional but fun! They bring a kick if you enjoy spice. These ingredients work together to create a dish that is both savory and sweet, making each bite a flavorful delight. To start, grab a large mixing bowl. Add 1/4 cup of soy sauce, 2 tablespoons of honey, and 4 cloves of minced garlic. Next, add 1 tablespoon of grated fresh ginger and 1 tablespoon of sesame oil. Sprinkle in 1 teaspoon of black pepper and, if you like heat, add 1 teaspoon of red pepper flakes. Whisk everything together until it blends well. The mix should smell amazing! Now, take 4 chicken thighs and place them in the marinade. Use your hands or a spoon to coat each piece well. Cover the bowl with plastic wrap or a lid. Let the chicken sit in the fridge for at least 30 minutes. If you have time, marinate for up to 2 hours. This step helps the flavors soak in deep. Preheat your air fryer to 380°F (193°C) for about 5 minutes. Once ready, take the chicken thighs out of the marinade. Let the excess marinade drip off. Place the thighs in the air fryer basket, skin-side up. Cook them for 20 to 25 minutes. Flip them halfway through for even cooking. Check that they reach an internal temperature of 165°F (74°C). When done, let the chicken rest for a few minutes. Garnish with sliced green onions and sesame seeds before serving. Enjoy your flavorful delight! To get crispy skin, start with dry chicken thighs. Pat them with paper towels before marinating. The marinade adds flavor but can make the skin wet. After marinating, let excess marinade drip off. This way, the air fryer can do its magic. Cook them skin-side up in the air fryer. This helps render the fat and crisp up the skin nicely. Marinate your chicken thighs for at least 30 minutes. This gives the flavors time to sink in. If you have more time, aim for 2 hours. Longer marinating makes the chicken even more tasty. Just don’t go over 2 hours, or the soy sauce can make the meat too salty. To check if your chicken is done, use a meat thermometer. You want the internal temp to reach 165°F (74°C). This means it’s safe to eat. If you don’t have a thermometer, cut into the chicken. The juices should run clear, not pink. Always let the chicken rest for a few minutes after cooking. This helps keep it juicy and tender. {{image_2}} You can change the taste of soy garlic chicken thighs by adding new flavors. Try using orange juice instead of honey for a citrus twist. You can also add a splash of rice vinegar for some tang. If you like heat, mix in more red pepper flakes or add some sriracha. For a sweeter touch, try maple syrup instead of honey. Each change gives a new taste while keeping the base recipe. While chicken thighs are great, other cuts can work too. You can use chicken breasts for a leaner option. Just remember, breasts may cook faster. Adjust the cooking time down to about 15-20 minutes. Drumsticks are another fun choice. They stay juicy and have a nice skin when air-fried. Just keep an eye on the internal temperature to ensure they are safe to eat. Air frying gives a crispy outside, but you can cook these thighs in other ways too. Baking in the oven works well if you don’t have an air fryer. Set your oven to 400°F (204°C) and bake for about 30-35 minutes. You can also grill the chicken for a smoky flavor. Just marinate as usual and cook on medium heat for about 6-8 minutes per side. Each method brings its own unique flair to this tasty dish. After cooking, let the chicken cool. Place it in an airtight container. Store in the fridge for up to 4 days. Make sure it is sealed well to keep the flavors fresh. You can freeze leftovers for later use. Wrap each chicken thigh in plastic wrap. Then, put them in a freezer-safe bag. They will keep well for up to 3 months. When ready to eat, thaw them in the fridge overnight. To reheat, use your air fryer for the best results. Preheat it to 375°F (190°C). Heat the chicken for about 5 to 10 minutes. This helps keep the skin crispy. You can also use a microwave, but it may not be as crispy. I recommend air frying chicken thighs for 20 to 25 minutes. You should set the air fryer to 380°F (193°C). Flip the thighs halfway through cooking for even crispiness. Always check the internal temperature. It should reach 165°F (74°C) for safe eating. Yes, you can use boneless chicken thighs. They will cook faster than bone-in thighs. Adjust the cooking time to about 15 to 20 minutes. Keep an eye on them to avoid overcooking. The tender meat will soak up the soy garlic flavors well. Many sides go well with soy garlic chicken. Here are some great options: - Steamed rice - Fried rice - Roasted vegetables - Asian slaw - Garlic mashed potatoes These sides will complement the rich flavors of the chicken and make your meal more filling. This article covered how to make tasty soy garlic chicken in an air fryer. We reviewed key ingredients, the best way to marinate chicken, and cooking steps. I offered tips on achieving crispy skin and ensuring perfect doneness. You can explore different flavors and cooking methods, plus storage tips. Now you have a simple guide to make delicious chicken meals. Enjoy your cooking adventure and share your results!

Air Fryer Soy Garlic Chicken Thighs Flavorful Delight

To make this tasty soup, gather these ingredients: - 1 tablespoon coconut oil - 1 pound chicken breast, thinly sliced - 1 teaspoon ginger, minced - 2 cloves garlic, minced - 2 tablespoons red curry paste - 4 cups chicken broth - 1 can (14 oz) coconut milk - 1 red bell pepper, sliced - 1 cup snap peas - 2 green onions, sliced - 1 tablespoon fish sauce - 1 tablespoon lime juice - Fresh cilantro, for garnish - Salt and pepper to taste If you need to swap some items, here are good options: - Use olive oil if you don’t have coconut oil. - Chicken thighs work well instead of chicken breast. - For a vegan option, use tofu or tempeh. - You can use vegetable broth instead of chicken broth. - For fish sauce, try soy sauce or tamari for a similar taste. Each serving of this soup is both tasty and healthy: - Calories: 380 - Protein: 27g - Carbohydrates: 15g - Fat: 25g - Fiber: 3g This soup is rich in flavor and nutrients. It’s a great meal for busy nights! To make this soup, first gather all your ingredients. You will need coconut oil, chicken, ginger, garlic, red curry paste, chicken broth, coconut milk, a red bell pepper, snap peas, green onions, fish sauce, lime juice, and cilantro. Start by slicing the chicken thinly. Mince the ginger and garlic. Slice the bell pepper and green onions. This makes cooking easier and faster. Heat your pot on medium heat and add coconut oil. Once the oil is hot, add the chicken. Sauté until the chicken turns brown, about 5 to 7 minutes. This step locks in flavor. Next, add ginger and garlic. Cook for one more minute. This will fill your kitchen with a lovely smell. Stir in the red curry paste, coating the chicken. Pour in chicken broth and coconut milk. Bring this mixture to a gentle simmer. This is where the magic happens! Add the bell pepper and snap peas. Cook for about 5 minutes until they are tender but still crisp. Finally, mix in fish sauce and lime juice. Taste and adjust seasoning with salt and pepper. To save time, you can prep your ingredients ahead of time. Store them in the fridge until you are ready to cook. You can also use rotisserie chicken to cut down on cooking time. This way, you only need to heat the broth and add your veggies. Another tip is to chop vegetables while the chicken is cooking. This will help speed up the process. To make your Weeknight Thai Chicken Soup truly pop, try these tips: - Fresh Herbs: Add fresh cilantro for a bright taste. It complements the coconut milk well. - Lime Zest: Use lime zest along with lime juice. This adds a zesty kick. - Chili Flakes: If you like heat, sprinkle in some chili flakes. It gives a nice spice. - Broth Quality: Use high-quality chicken broth. This makes a big difference in taste. Here are some common slip-ups to watch for: - Overcooking Chicken: Don’t let the chicken cook too long. It can become dry and tough. - Too Much Curry Paste: Start with less curry paste. You can always add more if needed. - Skipping Fresh Ingredients: Avoid using dried herbs instead of fresh ones. Fresh herbs bring out the best flavors. - Ignoring Seasoning: Taste before serving. Sometimes, a little salt or pepper can elevate the dish. To serve your soup just right, consider these ideas: - Serve Hot: Enjoy the soup hot. This brings out the rich flavors. - Accompany with Rice: Serve the soup with jasmine rice. It makes for a filling meal. - Garnish Generously: Don’t skimp on the green onions and cilantro. They add color and flavor. - Pair with Lime Wedges: Offer lime wedges on the side. A squeeze of lime enhances the soup's freshness. {{image_2}} You can make this soup vegetarian or vegan easily. Swap the chicken for tofu or tempeh. Use vegetable broth instead of chicken broth. The coconut milk adds a creamy touch. You can also add more veggies like mushrooms or carrots. They boost flavor and nutrition. If you love spice, add more red curry paste. You can also toss in sliced jalapeños or Thai bird chilies. These will give your soup a nice kick. For a smoky flavor, add a dash of sriracha or chili oil. Adjust the spice to your taste! Use seasonal veggies to keep things fresh. For spring, add asparagus or peas. In summer, try zucchini or corn. In fall, consider adding butternut squash or kale. Winter calls for hearty vegetables like carrots or parsnips. These swaps add variety and keep your soup exciting! After you enjoy your soup, store any leftovers in an airtight container. Let the soup cool first. This keeps it fresh and tasty. You can keep it in the fridge for up to three days. If you want to keep it longer, consider freezing it. When you are ready to eat your leftovers, reheat them on the stove. Pour the soup into a pot over low heat. Stir it often to warm it evenly. You can also use a microwave. Just heat it in short bursts, stirring in between. Make sure it is hot all the way through. If you want to freeze the soup, do it before adding the fresh vegetables. Store it in a freezer-safe container. Leave some space at the top for expansion. The soup can last for up to three months in the freezer. When you are ready to eat it, thaw it in the fridge overnight. Then reheat it and add fresh veggies for a tasty meal. Yes, you can! This soup is very flexible. You can use shrimp, tofu, or beef. Just make sure to adjust cooking times. For shrimp, cook them until they turn pink. Tofu should be firm and cubed. If you use beef, slice it thinly for quick cooking. If you need a fish sauce swap, use soy sauce. It adds saltiness and flavor. Another option is tamari for a gluten-free choice. You can also mix soy sauce with a bit of lime juice. This gives a nice tang to the soup. To keep the soup gluten-free, use tamari instead of soy sauce. Check your chicken broth too. Some brands add gluten. Use broth labeled gluten-free to be safe. All other ingredients in this soup are naturally gluten-free. Enjoy your meal without worry! In this article, we covered key aspects of cooking delicious meals. We explored ingredients, including substitutions and nutritional info. You learned step-by-step instructions for prep and cooking. We shared tips to enhance flavors and avoid mistakes. Variations catered to different diets and preferences. Lastly, we discussed how to store and reheat leftovers effectively. Remember, cooking is fun and rewarding. Use these ideas to create tasty and memorable dishes!

Weeknight Thai Chicken Soup Easy and Flavorful Meal

To make these tasty overnight oats, you will need: - 1 cup rolled oats - 1 cup almond milk (or any milk of your choice) - 1 tablespoon chia seeds - 1 tablespoon almond butter - 1 tablespoon maple syrup (optional for sweetness) - 1/2 teaspoon vanilla extract - 1/2 cup mixed berries (blueberries, strawberries, raspberries) - 1 tablespoon sliced almonds (for topping) - A pinch of salt These ingredients come together to create a creamy and satisfying breakfast. The oats provide fiber, while the chia seeds add omega-3s. Almond butter gives it a nutty flavor and protein boost. You can change this recipe to fit your taste. Here are some fun ideas: - Swap almond milk for coconut or soy milk. - Use honey or agave syrup instead of maple syrup. - Add a scoop of protein powder for extra nutrition. - Mix in spices like cinnamon or nutmeg for warmth. - Try different nuts or seeds, like walnuts or pumpkin seeds. Feel free to experiment and find your favorite mix! Each serving offers a healthy balance of nutrients. Here’s what you get: - Calories: Around 300 - Protein: 8 grams - Carbohydrates: 45 grams - Fiber: 10 grams - Sugars: 8 grams (with maple syrup) - Fats: 10 grams These oats not only taste great but also fuel your body. They keep you full and ready for the day ahead. Enjoy your morning with this simple and healthy treat! To make your Dreamy Berry Almond Overnight Oats, start with a medium mixing bowl. Add 1 cup of rolled oats, 1 tablespoon of chia seeds, and a pinch of salt to the bowl. Stir these dry ingredients together. Make sure they mix well. This blend gives your oats texture and nutrition. In another bowl, whisk together 1 cup of almond milk, 1 tablespoon of almond butter, 1 tablespoon of maple syrup, and 1/2 teaspoon of vanilla extract. Mix until smooth. Pour this wet mixture over the dry ingredients. Stir it all together until everything is well combined. Be gentle when you fold in 1/2 cup of mixed berries. Set aside a few berries for later. This adds a pop of color and flavor. Now, divide the mixture into two airtight containers or jars. Seal them tightly and place them in the fridge. Let them chill overnight or for at least 4 hours. This step is key! It allows the oats to soak up the liquid. In the morning, stir the oats well. If they are too thick, add a splash more almond milk. This will help you reach your desired consistency. Top each serving with the reserved berries and sliced almonds. Enjoy your healthy breakfast! To make the best overnight oats, measure your oats and liquid correctly. Use one cup of rolled oats with one cup of almond milk. This ratio gives you a creamy texture. Mix your dry and wet ingredients well. This helps all flavors blend. Adding a pinch of salt enhances sweetness. Let the mixture sit overnight so it absorbs all the liquid. You can use many types of milk for your oats. Almond milk is great, but try oat milk, coconut milk, or soy milk. Each milk adds its own flavor. For a richer taste, use full-fat coconut milk. For a nut-free option, stick with oat or soy milk. This way, you can find your perfect match. Consistency is key for delicious overnight oats. If your oats are too thick, add a splash more milk. Stir well to mix. If they are too runny, add more oats or chia seeds. Chia seeds help thicken the oats as they soak. Aim for a creamy, smooth texture that is easy to eat. You want a satisfying bite without any dryness. {{image_2}} You can switch up your fruit for fun flavors. Here are some great ideas: - Bananas: Mash ripe bananas for a creamy texture. - Peaches: Use fresh or canned peaches for a sweet bite. - Apples: Chop apples and add cinnamon for a fall feel. - Pineapple: Add crushed pineapple for a tropical twist. Mixing different fruits keeps your breakfast exciting. Try them all to find your favorite! Nuts and seeds can change your oat game. Here are some easy swaps: - Peanut Butter: Swap almond butter for peanut butter for a rich taste. - Walnuts: Use chopped walnuts for a nice crunch. - Pumpkin Seeds: Replace chia seeds with pumpkin seeds for a nutty flavor. - Sunflower Seeds: Add sunflower seeds for a crunchy touch and extra nutrients. These swaps can add protein and healthy fats to your meal. You can infuse your oats with fun flavors. Here are some simple ideas: - Cocoa Powder: Add a tablespoon for a chocolatey treat. - Coconut Flakes: Stir in shredded coconut for a tropical vibe. - Matcha Powder: Use matcha for a green boost; it’s full of antioxidants. - Spices: Add cinnamon or nutmeg for warmth and depth. These flavored oats will keep you excited for breakfast each day! To keep your overnight oats fresh, use airtight containers or jars. This helps prevent spills and keeps them from drying out. Always seal the containers tightly after filling them. If you have leftovers, refrigerate them right away. Overnight oats can last in the fridge for up to five days. The oats absorb liquid and soften over time. For the best taste, enjoy them within three days. Check for any off smells or changes in texture before eating. If they look dry, add a splash of almond milk to revive them. If you prefer warm oats, you can reheat them. Pour the oats into a microwave-safe bowl. Heat them for about 30 seconds. Stir and check the temperature. If they need more warmth, heat in 10-second bursts until hot. You can also add a little almond milk while reheating for a creamy finish. Yes, you can use quick oats. They absorb liquid faster than rolled oats. This means your oats may be softer. I prefer rolled oats for their chewy texture. But if you like quick oats, go ahead! To make your oats tastier, try adding different fruits or spices. Cinnamon adds warmth. Nutmeg gives a nice flavor too. You can mix in yogurt for creaminess. A splash of juice can also boost flavor. Experiment with toppings like nuts or seeds for crunch! No, it is not necessary to add sweetener. The berries provide natural sweetness. However, if you like sweeter oats, add a bit of maple syrup or honey. Start with a small amount and taste as you go. Adjust to your liking! Dreamy berry almond overnight oats are easy to make and full of flavor. We covered the key ingredients, preparation steps, and helpful tips to create the perfect dish. Remember, you can customize them with your favorite fruits and nuts. Store your oats properly to keep them fresh. With these insights, you can enjoy a tasty and nutritious breakfast each day. I hope you feel inspired to try this simple recipe and make it your own!

Best Overnight Oats Simple and Healthy Recipe

- 2 medium zucchini, diced - 1 large sweet potato, peeled and cubed - 1 red bell pepper, chopped - 1 small onion, diced - 2 cloves garlic, minced - 1 teaspoon cumin - 1 teaspoon smoked paprika - 1 tablespoon olive oil - Salt and pepper to taste - Fresh parsley for garnish These ingredients form the base of your Zucchini Sweet Potato Skillet. Each item plays a key role in creating a tasty and colorful dish. Zucchini adds a light crunch, while sweet potatoes provide sweetness and heartiness. The red bell pepper brings a pop of color and flavor, and onion and garlic add depth. - Other veggies to include: carrots, spinach, or broccoli - Protein additions: beans, chicken, or tofu - Spices and seasonings for extra flavor: chili powder, oregano, or thyme Feel free to mix in other veggies or proteins to suit your taste. Each choice can change the dish's flavor and texture. Adding spices can turn this skillet into a flavor explosion. It’s all about what you like! {{ingredient_image_1}} - Preheat your skillet over medium heat. - Gather and chop your ingredients: dice the zucchini, cube the sweet potato, chop the bell pepper, and dice the onion. - Mince the garlic cloves, so they're ready to go. - Add olive oil to the hot skillet. - Sauté the diced onion for about 3 to 4 minutes until it turns translucent. - Stir in the minced garlic and let it cook for 1 minute. You want it fragrant! - Next, add the cubed sweet potato. Sprinkle in cumin, smoked paprika, salt, and pepper. - Stir often for about 10 minutes, until the sweet potato starts to soften. - Once it’s partly cooked, toss in the diced zucchini and chopped red bell pepper. - Continue cooking everything for 6 to 8 minutes. You want the veggies tender and slightly caramelized. - Check the tenderness of your vegetables. They should be just right! - Adjust the seasoning if needed. Taste it to be sure! - Remove the skillet from heat and garnish with fresh parsley before serving. To cook sweet potatoes evenly, start by cutting them into small, uniform cubes. This helps them cook at the same rate. You can also boil them for a few minutes before adding them to the skillet. This method speeds up cooking time. When sautéing vegetables, always heat your oil first. This ensures a good sear and prevents sticking. Use a large skillet for more surface area. Stir the veggies often but not too much. Let them sit for a minute to develop color. To boost flavors, add fresh herbs like basil or thyme. You can also use dried herbs if fresh ones are not available. A splash of lemon juice brightens the dish. Don't shy away from spices! Try adding chili flakes for some heat. For sauces, consider a drizzle of balsamic glaze or a dollop of yogurt. These additions can elevate your dish and make it even tastier. Experiment with different condiments to find what you like best. For an attractive serving, use a colorful dish. White plates make the colors pop. Layer the veggies in a way that shows off their shapes. Garnish with freshly chopped parsley for a fresh look. You can also add some crumbled feta or avocado slices for extra flair. A sprinkle of toasted seeds can add a nice crunch, too. Pro Tips Choose Fresh Vegetables: Opt for firm, vibrant zucchini and sweet potatoes for the best flavor and texture. Customize Your Spices: Feel free to add your favorite spices or herbs to enhance the flavor profile further. Use a Lid: Covering the skillet while cooking can help speed up the cooking time of the sweet potatoes. Make It a Meal: Add some protein like cooked chickpeas or grilled chicken for a heartier dish. {{image_2}} You can easily adapt this dish for different diets. For vegan and vegetarian options, simply keep all the ingredients plant-based. All the veggies and spices are already vegan-friendly. If you want it gluten-free, this dish is perfect! Every ingredient is naturally gluten-free, so you can enjoy it without worry. If you can't find sweet potatoes, try using butternut squash. It has a similar texture and sweet flavor. You can also mix in other vegetables like carrots, broccoli, or bell peppers. This adds even more color and nutrition. Don't be afraid to get creative with what you have! The spices in this dish bring it to life. Cumin and smoked paprika add warmth and depth. You can experiment with other spices too. Try adding chili powder for heat, or oregano for a fresh taste. For an international twist, make it Mediterranean! Add olives, feta cheese, and fresh herbs like basil or thyme for a whole new flavor experience. To store leftovers, let the dish cool first. Then, transfer it to an airtight container. This keeps the flavors fresh and prevents spills. The recommended shelf life is about 3 to 4 days in the fridge. Make sure to check for any signs of spoilage before eating. Freezing is a great option if you want to save some for later. First, let the dish cool down completely. Then, pack it into freezer-safe containers or bags. Remove as much air as possible to avoid freezer burn. When you're ready to eat, thaw it overnight in the fridge. Reheat in a skillet over medium heat until hot, stirring occasionally. Preparing this dish in advance saves time during the week. You can chop the veggies and store them in separate containers. This way, when it's time to cook, everything is ready to go. Use glass or BPA-free plastic containers for storage. They keep the food fresh and make reheating easy. How long does it take to make a Zucchini Sweet Potato Skillet? It takes about 25 minutes to make this dish. You will spend 10 minutes prepping and 15 minutes cooking. Can I use frozen vegetables instead of fresh? Yes, you can use frozen veggies. They will cook faster, so keep an eye on them. What goes well with Zucchini Sweet Potato Skillet as a side dish? This dish pairs well with grilled chicken or a fresh salad. You can also serve it with quinoa or rice. What if my sweet potatoes are not softening? If your sweet potatoes are tough, try cutting them into smaller cubes. You may need to cook them longer, about 5 more minutes. How to prevent zucchini from becoming mushy? To keep zucchini firm, add it later in the cooking process. Cook it just until tender. What are the calorie counts? Each serving has about 150 calories. This can vary based on added ingredients. Are there any significant health benefits? Yes, this skillet is rich in vitamins A and C. Both sweet potatoes and zucchini offer fiber, which is great for digestion. This blog post gave you a clear guide to making a delicious Zucchini Sweet Potato Skillet. You learned about the key ingredients, easy steps, and helpful tips for cooking. Don't forget the optional ingredients that can add flavor and protein. You can also explore variations and storage methods to optimize your meals. Cooking doesn't have to be hard. With practice, you can create tasty dishes that fit your needs. Enjoy experimenting and making this dish your own!

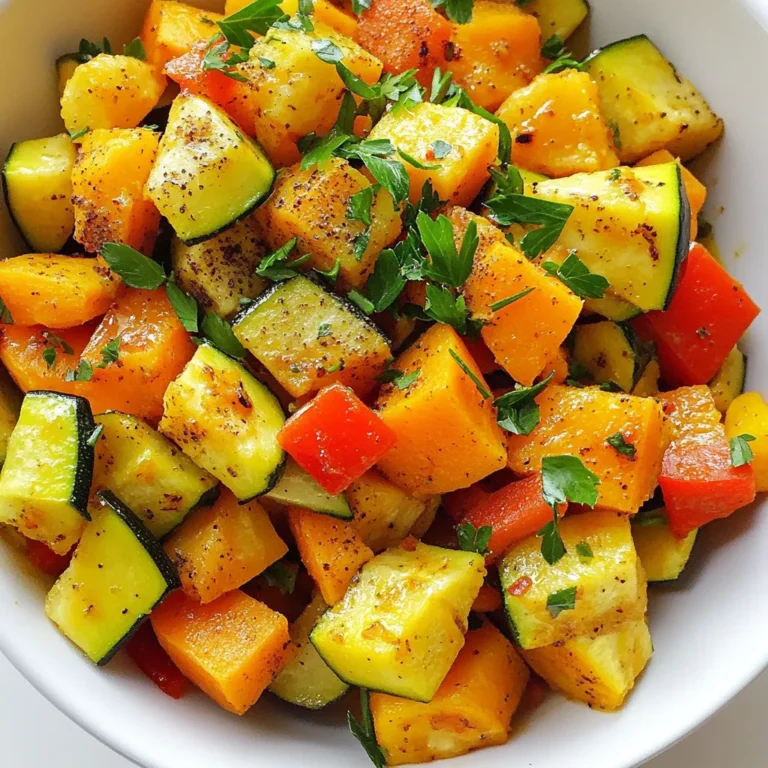
Zucchini Sweet Potato Skillet Flavorful and Healthy Dish

- 4 boneless, skinless chicken breasts - 1 cup fresh spinach, chopped - 1 cup canned artichoke hearts, drained and chopped - 1 cup cream cheese, softened - 1/2 cup grated Parmesan cheese - 1/2 cup shredded mozzarella cheese The main ingredients hold the key to this dish's tasty goodness. The chicken breasts serve as a hearty base. Spinach and artichokes add color and a zing to every bite. Cream cheese lends a rich, creamy texture, while Parmesan and mozzarella provide that melt-in-your-mouth experience. - 1 teaspoon garlic powder - 1 teaspoon onion powder - Salt and pepper to taste - 2 tablespoons olive oil Seasoning is vital for flavor. Garlic and onion powder bring warmth and depth. Salt and pepper enhance all the tastes. Olive oil not only adds flavor but also helps sear the chicken. - Fresh parsley Garnish is a fun touch. Fresh parsley adds a pop of color and a hint of freshness. It makes your dish look beautiful and inviting. {{ingredient_image_1}} First, preheat your oven to 375°F (190°C). This step gets everything ready for baking. Next, let's prepare our chicken and spinach-artichoke mix. In a bowl, combine 1 cup of softened cream cheese, 1 cup of chopped fresh spinach, and 1 cup of drained, chopped artichoke hearts. Add 1 teaspoon of garlic powder, 1 teaspoon of onion powder, and 1/2 cup of grated Parmesan cheese. Mix until smooth and creamy. Don't forget to season with salt and pepper to your taste. Now it's time to cook the chicken. Heat 2 tablespoons of olive oil in a large oven-safe skillet over medium heat. While the oil heats, season 4 boneless, skinless chicken breasts with salt and pepper. Once the oil is hot, carefully place the chicken in the skillet. Sear each side for 3-4 minutes, until they turn golden brown. When done, remove the chicken from the skillet and set it aside on a plate. Now comes the fun part! Spread the spinach-artichoke mixture evenly over the seared chicken. Make sure each piece is well covered. Sprinkle the remaining 1/2 cup of shredded mozzarella cheese on top. Place the skillet in your preheated oven. Bake for 20-25 minutes, or until the chicken reaches an internal temperature of 165°F (74°C). You want the cheese to be bubbly and slightly golden. Once baked, let the dish cool for a few minutes before serving. Enjoy your delicious meal! To ensure your chicken is cooked through, use a meat thermometer. The chicken should reach 165°F (74°C). This keeps it safe to eat and moist. For a juicy texture, you can brine the chicken before cooking. Just soak it in saltwater for a few hours. This adds flavor and keeps it tender during cooking. For a creamy consistency, mix cream cheese with the other cheeses well. If it seems too thick, add a splash of milk or cream. This helps it spread easily over the chicken. To balance flavors, use salt and pepper wisely. Garlic and onion powder add depth to the dish. Taste as you go to find the perfect blend. To save time on busy weeknights, prep ahead. Chop your spinach and artichokes in advance. You can also mix the cheese blend before cooking. Store it in the fridge for quick use later. If you have leftover cooked chicken, it works well in this recipe. Just adjust your cooking time to heat it through. Pro Tips Use Fresh Ingredients: Fresh spinach and artichokes will enhance the flavor of the dish significantly compared to canned options. Don't Overcook the Chicken: Ensure the chicken is cooked to an internal temperature of 165°F (74°C) to keep it juicy and tender. Customize Your Cheeses: Feel free to mix in different cheeses like feta or gouda for a unique flavor twist. Let it Rest: Allow the dish to cool for a few minutes after baking to let the flavors meld and make serving easier. {{image_2}} You can change up the protein in this dish. Try using turkey instead of chicken. You can also use tofu for a vegetarian option. Each choice adds a different taste. For vegetables, you can swap spinach for kale or add bell peppers for a sweeter flavor. These swaps keep the dish exciting and fresh. If you like slow cooking, you can adapt this recipe. Place the seared chicken and spinach-artichoke mix in a slow cooker. Cook on low for 4-6 hours. This method makes the chicken super tender. If you prefer a quick option, you can use a skillet-only method. Cook the chicken fully in the skillet, then add the mixture on top. Finish cooking on the stovetop. This method saves time and energy. To make this dish even tastier, add spices or herbs. Try a pinch of red pepper flakes for heat or fresh basil for a herbal twist. You can also mix in a splash of lemon juice to brighten the flavors. For a richer taste, drizzle a sauce like balsamic glaze over the top. These enhancements make the dish more complex and enjoyable. To keep your leftovers fresh, let the chicken cool first. Then, place it in an airtight container. Store it in the fridge for up to three days. If you want to save it longer, freeze it. Wrap each piece in plastic wrap, then put it in a freezer bag. This keeps the chicken safe for up to three months. When you reheat the chicken, avoid drying it out. The best method is to use the oven. Preheat it to 350°F (175°C). Place the chicken on a baking sheet and cover it with foil. Heat for about 15 minutes or until it warms through. You can also use the microwave, but check every 30 seconds. Ensure it reaches an internal temperature of 165°F (74°C). In the fridge, your Weeknight Spinach Artichoke Chicken stays fresh for about three days. Look for any signs of spoilage. These signs include a bad smell or a change in color. If you notice these, it’s best to throw it away. Always trust your senses for food safety! Yes, you can use frozen chicken breasts. Just be sure to thaw them first. Thawing helps them cook evenly. You can leave them in the fridge overnight or use the microwave. After thawing, follow the same steps in the recipe. The safest way to check chicken doneness is by using a meat thermometer. Insert it into the thickest part of the chicken. It should read 165°F (74°C). If you don't have one, cut into the chicken. The meat should be white, and the juices should run clear. Yes, you can make this dish dairy-free. Use dairy-free cream cheese and vegan cheese instead. Check labels to ensure they meet your needs. The spinach and artichokes will still give it great flavor. To add some heat, sprinkle in red pepper flakes or cayenne pepper. You can also add diced jalapeños to the spinach-artichoke mix. For a different flavor, try adding hot sauce to the cream cheese blend. Pair this dish with simple sides. Here are some ideas: - Steamed broccoli - Quinoa or rice - Garlic bread - A fresh green salad These sides balance the rich flavors of the chicken and add freshness to the meal. This blog post shared how to make a delicious spinach artichoke chicken dish. I covered key ingredients, cooking steps, and tips to make it perfect. You can customize it with different ingredients and cooking methods. Proper storage keeps your leftovers fresh for longer. Remember to check the chicken for doneness and adjust flavors to your taste. Enjoy exploring this meal that’s easy to make and great for busy nights!

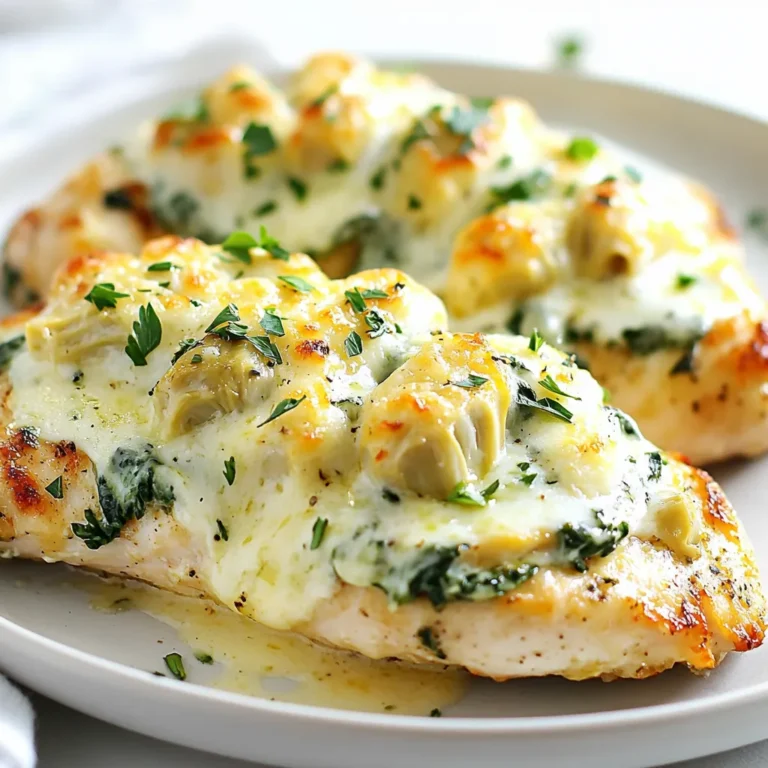
Weeknight Spinach Artichoke Chicken Quick and Easy Meal

To make Minute Creamy Broccoli Pasta, gather these ingredients: - 8 oz pasta (your choice, like rotini or penne) - 2 cups broccoli florets - 1 cup heavy cream - 1/2 cup grated Parmesan cheese - 2 cloves garlic, minced - 1 tablespoon olive oil - 1 teaspoon lemon juice - Salt and pepper to taste - Optional: Red pepper flakes for heat These simple ingredients come together to create a rich and creamy dish. You can use any pasta you like. Rotini and penne work very well. They hold the sauce nicely. Other great options include fusilli or farfalle. Each shape gives a unique texture. Choose what you love! Want to make this dish your own? Try these fun add-ins: - Grilled chicken or shrimp for protein - Spinach or peas for extra veggies - Sun-dried tomatoes for a burst of flavor - Nuts like pine nuts for crunch Feel free to mix and match as you please. This flexibility makes it easy to create a dish that fits your taste. First, grab a large pot and fill it with water. Add a good amount of salt, then bring it to a boil. Once the water is bubbling, add 8 oz of your favorite pasta, like rotini or penne. Cook the pasta according to the package instructions until it is al dente. This usually takes about 8-10 minutes. Now, here comes the fun part! During the last 3 minutes of cooking, toss in 2 cups of fresh broccoli florets. This will blanch the broccoli quickly and keep it bright green. After the time is up, drain both the pasta and broccoli together. This helps save time and keeps things simple. In the same pot, add 1 tablespoon of olive oil. Heat it over medium heat until it's warm. Then, add 2 cloves of minced garlic. Sauté the garlic for 1-2 minutes until it smells good. Be careful not to let it brown, as that can change the flavor. Next, pour in 1 cup of heavy cream. Stir it well to mix with the garlic. Let this simmer for about 2-3 minutes. You want it to thicken slightly but not too much. Then, stir in 1/2 cup of grated Parmesan cheese. Mix until the cheese melts and the sauce becomes smooth. Add 1 teaspoon of lemon juice, and season with salt and pepper. If you like heat, sprinkle in some red pepper flakes. Now, it’s time to bring everything together! Add the drained pasta and broccoli back into the pot with the creamy sauce. Toss gently to coat every piece. Cook for another 1-2 minutes to heat everything through. If your sauce is too thick, just add a splash of reserved pasta water to reach the right consistency. Your Minute Creamy Broccoli Pasta is almost ready to enjoy! Serve it in shallow bowls, topped with extra Parmesan and a sprinkle of black pepper for a lovely finish. To get that perfect creamy texture, use heavy cream. Heavy cream gives the sauce a rich and smooth feel. Stir the cream well with garlic before it simmers. If your sauce seems too thick, add a splash of pasta water. This will help loosen it up and coat the pasta nicely. Timing is key in this dish. Start cooking the pasta first. When there are three minutes left, add the broccoli florets. This blanching step keeps the broccoli bright and crisp. Drain the pasta and broccoli together to save time. Then, heat the olive oil and garlic right after. Flavor is what makes this dish special. Use fresh minced garlic for the best taste. Add salt and pepper to balance the creaminess. A splash of lemon juice brightens the sauce. If you like heat, sprinkle in some red pepper flakes. This adds a nice kick to each bite. {{image_2}} You can easily add protein to your Minute Creamy Broccoli Pasta. This makes it more filling and tasty. Here are some great options: - Grilled Chicken: Cooked and diced chicken is a classic choice. It pairs well with the creamy sauce. - Shrimp: Sauté shrimp in olive oil until pink, then toss them in with the pasta. - Tofu: For a plant-based option, use firm tofu. Cube and sauté it for a protein boost. - Bacon: Crispy bacon bits add a nice crunch and flavor. Cook and crumble them before mixing in. Feel free to switch up the veggies in your pasta. This keeps things fresh and fun. Here are some tasty ideas: - Spinach: Add fresh spinach during the last minute of cooking. It wilts nicely and adds color. - Peas: Sweet peas bring a pop of sweetness. Toss them in during the last few minutes with the broccoli. - Bell Peppers: Sauté sliced bell peppers for a crunchy texture and vibrant color. - Zucchini: Spiralized or diced zucchini can give a great twist. Cook it quickly with the garlic for the best flavor. Cheese is key for creaminess in this dish. If you want to change it up, try these substitutes: - Mozzarella: For a milder taste, use shredded mozzarella. It melts beautifully and adds stretch. - Feta: Crumbled feta gives a nice tang. Add it just before serving for a burst of flavor. - Cheddar: Sharp cheddar adds a deeper taste. Use it in place of Parmesan for a different vibe. - Nutritional Yeast: If you want a dairy-free option, sprinkle nutritional yeast for a cheesy flavor without the dairy. To keep Minute Creamy Broccoli Pasta fresh, store it in an airtight container. Let the dish cool down before placing it in the fridge. This helps avoid extra moisture. Leftovers can stay good for up to three days. If you plan to eat it later, keep the sauce separate from the pasta and broccoli. This keeps everything nice and creamy. When you want to enjoy your leftovers, reheat them gently. Use a pan over low heat for best results. Add a splash of water or cream to help the sauce return to its creamy state. Stir often to avoid burning. You can also use the microwave. Heat it in short bursts, stirring in between. This way, you keep the dish warm without cooking it further. If you want to freeze this dish, it’s best to freeze the pasta and sauce separately. Cool everything first, then place them in freezer-safe containers. You can freeze the pasta for up to two months and the sauce for about a month. When ready to eat, thaw them in the fridge overnight. Reheat as mentioned above to restore that creamy goodness. You can make Minute Creamy Broccoli Pasta healthier by using less cream. Try substituting half of the heavy cream with low-fat milk or unsweetened almond milk. You can also add more vegetables like spinach or peas. This adds fiber and nutrients without much extra calories. For a protein boost, consider adding grilled chicken or chickpeas. They make the dish more filling and nutritious. Yes, you can use gluten-free pasta. There are many types available, like brown rice or quinoa pasta. Just cook them according to the package instructions. Keep in mind that gluten-free pasta can cook faster, so watch it closely. The taste might differ a bit, but the creamy sauce will still make it delicious! If you want to avoid heavy cream, use Greek yogurt or sour cream. Both options add creaminess without the extra fat. You can also use silken tofu blended until smooth. For a vegan choice, try coconut cream or cashew cream. Each alternative will give a unique flavor, so pick what you like best! We explored key ingredients and steps to create a delicious pasta dish. You learned about preferred pasta types, optional add-ins, and how to prepare pasta and sauce. Tips on achieving a creamy texture and cooking timing will improve your dish. Remember, you can customize it with proteins and different veggies. Store leftovers wisely and reheat them easily. With these insights, you’ll enjoy this dish every time you make it!

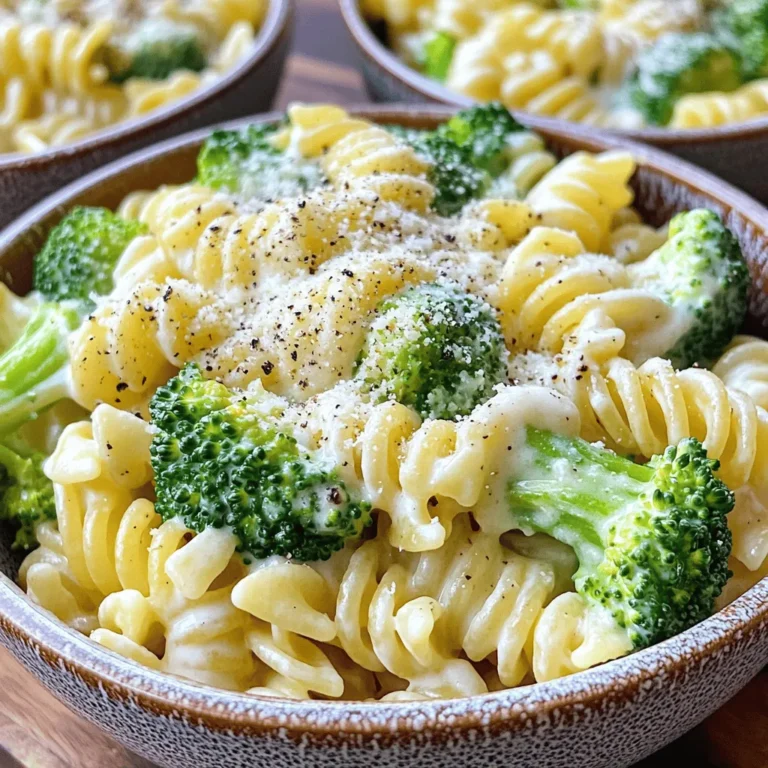
Minute Creamy Broccoli Pasta Quick and Easy Dish

- 2 ripe bananas - 1 cup rolled oats - 1/4 cup almond butter (or nut butter of choice) - Chopped nuts - Dried fruit - Chocolate chips First, preheat your oven to 350°F (175°C). This helps the bars bake evenly. Next, take your two ripe bananas and mash them in a mixing bowl. Use a fork to get them smooth and creamy. This is your base. Now, add the rolled oats and almond butter to the mashed bananas. Mix everything well. You want it to be thick and combined. This mixture is what makes the bars tasty and healthy. Pour the mixture into a prepared baking pan. Spread it evenly with a spatula. Bake for 20-25 minutes until the edges turn golden brown. This gives them a nice texture and flavor. When they are done, let them cool before cutting. How to choose ripe bananas: Select bananas that are yellow with a few brown spots. These spots show they are sweet and ready. Avoid green ones, as they are not sweet yet. The right ripeness makes your bars taste great. Ensuring the right consistency: When you mash the bananas, make sure they are smooth. No lumps should remain. This helps mix well with oats and nut butter. The mixture should be thick, not runny. If it feels too dry, add a splash of water or milk. Best served warm or chilled: You can enjoy these bars warm, straight from the oven. They also taste nice when cooled. Either way, they make a great snack or breakfast. Toppings or spreads to pair with: Top the bars with yogurt or fresh fruit for added flavor. You can also spread more nut butter on top. Honey or maple syrup adds a sweet touch, too. To keep your banana oat bars fresh, store them in an airtight container. This helps keep moisture out and preserves flavor. If you want to store them longer, the freezer is your best friend. Just wrap them tightly in plastic wrap and place them in a freezer bag. This way, they last much longer without losing taste. These banana oat bars typically last about five days in the fridge. If they are frozen, they can last up to three months. You can tell they are spoiled if you see mold or notice an off smell. Always check before you enjoy your snack! Each bar has around 100 calories. They are rich in fiber, which helps digestion, and protein, good for muscle health. The almond butter adds healthy fats that keep you full longer. Oats and bananas are both great for your health. Oats help lower cholesterol and improve heart health. Bananas provide potassium, which is good for your muscles and heart. These bars make a smart snack choice, offering energy without added sugar. {{image_2}} Can I substitute ingredients? Yes, you can substitute ingredients in many ways. You can switch almond butter for peanut butter or sunbutter. You can also replace rolled oats with quick oats. These swaps still keep the bars tasty and healthy! How to make these bars gluten-free? To make these bars gluten-free, use certified gluten-free rolled oats. Most oats are safe, but some may have gluten. Always check labels to be sure. Recommended portion sizes for snacks I recommend cutting the bars into 12 squares. Each square makes a perfect snack. You can also cut them smaller for bite-sized treats. Can I double the recipe? Yes, you can easily double the recipe. Just use a larger baking pan. A 9x13-inch pan works well for double batches. Keep the baking time similar, but check for doneness. What to do if the bars don't hold together? If your bars fall apart, try adding more nut butter. You can also mash the bananas more. This helps create a stickier mixture that holds better. Adjustments for high-altitude baking At high altitudes, you may need to add a little more liquid. Try adding an extra tablespoon of almond butter. You might also bake for a bit longer if needed. In this blog post, I shared how to make tasty banana oat bars. You need just three main ingredients: ripe bananas, rolled oats, and almond butter. Optional add-ins can make your bars even better. Remember to preheat your oven and mix ingredients well for the best results. These bars are easy to store and are a healthy snack choice. With simple variations, you can customize them to suit your taste. Enjoy making and eating your banana oat bars!

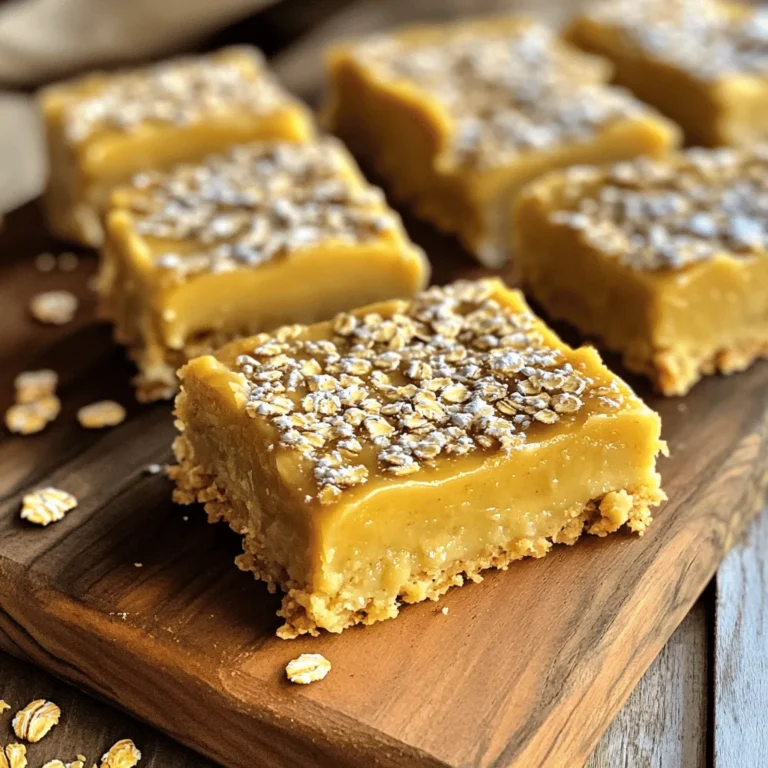
Three-Ingredient Banana Oat Bars Simple and Delicious

- 1 lb boneless chicken thighs - 1 cup cornstarch - 1/2 cup all-purpose flour - 2 eggs - 1/4 cup vegetable oil - 1 teaspoon garlic powder - 1 tablespoon grated ginger - 1/2 cup orange juice - 1/4 cup honey - 2 tablespoons soy sauce - 1 tablespoon rice vinegar - 1/2 teaspoon crushed red pepper flakes - 1 tablespoon sesame oil - 2 tablespoons sesame seeds - 2 green onions The main ingredients for this dish focus on chicken thighs, which are juicy and perfect for frying. Cornstarch and flour create a crispy coating. You will also need eggs to bind everything together. For flavor, garlic powder and ginger bring warmth and aroma. The sauce gets its sweetness from honey and a bright taste from orange juice. Soy sauce adds depth, while rice vinegar balances the flavors. Crushed red pepper adds a kick, and sesame oil gives a nutty finish. To garnish, you will need sesame seeds and green onions. They not only look nice but also add texture and flavor. This mix of ingredients makes a delicious orange chicken that tastes just like the restaurant version. First, you need to season the chicken. In a bowl, mix the chicken pieces with garlic powder and ginger. This adds great flavor. Let this sit for 15 minutes to marinate. This step is key for tasty chicken. Next, set up your breading stations. Use three bowls: one for cornstarch, one for beaten eggs, and one for flour. Start with the chicken pieces. Dredge each piece in flour, then dip it in the egg, and finally coat it with cornstarch. This technique helps make the chicken crispy. Now it's time to cook the chicken. Heat vegetable oil in a large skillet over medium-high heat. Once hot, add the breaded chicken in batches. Fry each piece for about 3-4 minutes on each side. You want them golden brown and crispy. After frying, place the chicken on a plate lined with paper towels. This drains excess oil. For the sauce, combine orange juice, honey, soy sauce, rice vinegar, crushed red pepper flakes, and sesame oil in a saucepan. Heat this mixture over medium heat. Stir occasionally and cook for about 5 minutes. You want it to thicken slightly. Once the sauce is ready, add the crispy chicken into the pan. Toss the chicken with the sauce to coat it evenly. Cook for an extra 2 minutes. This allows the flavors to mix well. To finish, sprinkle sesame seeds over the chicken. Also, garnish with chopped green onions. This adds a nice touch and extra flavor. Enjoy your dish! To get that perfect crunch, marinate the chicken first. I like to use garlic powder and fresh ginger for flavor. Let the chicken sit for 15 minutes. This step makes a big difference. When breading, use a three-bowl setup. Use cornstarch, beaten eggs, and flour. Dredge each piece in flour first, then egg, and finally coat with cornstarch. This method ensures a crispy crust. For frying, heat vegetable oil to medium-high. The right temperature is key. If it’s too cool, the chicken will turn soggy. Fry the chicken for about 3-4 minutes on each side until golden brown. If you love heat, add red pepper flakes to the sauce. Start with half a teaspoon. You can add more if you want it spicier. Adjust to your taste. Always use fresh ingredients when you can. Fresh ginger and orange juice will give the best flavor. If you must, you can use substitutes like dried ginger or bottled juice, but fresh is better. Serving style matters! I love to serve this chicken over white rice or with steamed veggies. It looks great and tastes even better. For a pop of color, garnish with chopped green onions and sesame seeds. This small touch adds visual appeal. A beautiful dish makes the meal more special. {{image_2}} You can switch up the protein in this recipe. Chicken thighs work well, but chicken breasts are a leaner choice. If you prefer seafood, shrimp adds a nice touch. For a plant-based option, tofu is a great substitute. Just press the tofu to remove extra water before cooking. Each protein brings its own flavor and texture, making the dish unique. Want to change the sauce? You can add more citrus flavors. Try adding lemon or lime juice for a fresh zing. If you like it sweeter, add more honey. To lower the sodium, use low-sodium soy sauce. This way, you can enjoy the taste without the extra salt. If you are gluten-free, use alternative flours like rice flour or almond flour for breading. This keeps the crunch while being safe for your diet. For a vegan version, replace the chicken with tofu and use maple syrup instead of honey. This keeps all the flavors while fitting different diets perfectly. To keep your orange chicken fresh, place it in the fridge. Use an airtight container for storage. This will help prevent moisture loss and keep flavors intact. When you store it, let it cool down to room temperature first. This prevents steam, which can make the chicken soggy. If you want to save your orange chicken for later, freezing is a great option. To freeze, place the cooled chicken in a freezer-safe bag. Remove as much air as you can. This helps avoid freezer burn. When you’re ready to eat it, thaw it overnight in the fridge. For reheating, bake it in the oven at 350°F for about 15-20 minutes. This keeps it crispy and tasty. In the fridge, your orange chicken lasts about 3 to 4 days. If you freeze it, it can stay good for up to 3 months. Always check for any bad smells or changes in texture before eating. You can adjust the honey levels in the sauce. Start by using less honey. Try using 2 tablespoons instead of 1/4 cup. You can also add more soy sauce or vinegar. These will balance the sweetness and add flavor. Yes, you can use different oils for frying. Good options include canola oil, peanut oil, or sunflower oil. These oils have high smoke points and work well for frying. They also have a neutral taste that won't overpower your dish. Absolutely! You can add more crushed red pepper flakes to the sauce. Start with an extra 1/4 teaspoon and taste as you go. You can also add sriracha or chili paste for more heat. Mix these in with the sauce while it simmers. I recommend serving this dish with steamed rice or fried rice. Broccoli or snap peas make great sides, too. You can also try it with a simple salad. These sides complement the sweet and tangy flavors of the chicken. Yes, you can bake or air-fry the chicken instead of frying. For baking, preheat the oven to 400°F (200°C). Place the breaded chicken on a lined baking sheet. Bake for about 20-25 minutes until golden and crispy. For air-frying, cook at 375°F (190°C) for 10-15 minutes. You can find the full recipe with detailed instructions in the recipe section above. It includes all the steps you need to make this delicious dish. This blog post covered the key steps to make delicious orange chicken at home. You learned about the main ingredients, how to prepare and cook the chicken, and the best way to make a tasty sauce. We also discussed tips for crispiness and various recipe variations. Cooking this dish brings joy and flavor to your table. With simple steps, you can impress family and friends. Enjoy your tasty creation!

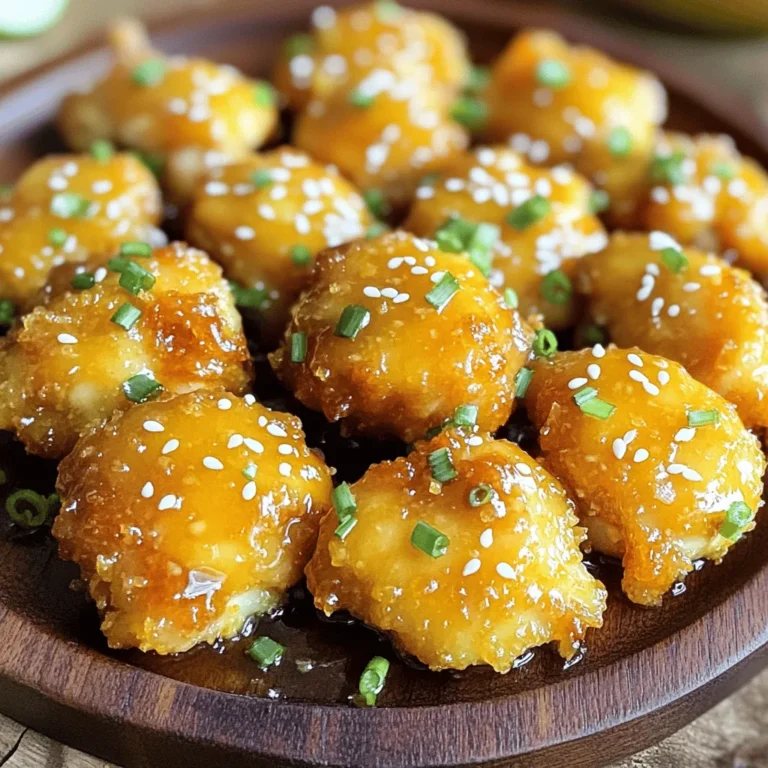
Copycat Panda Express Orange Chicken Simple Recipe

To make Jamaican shrimp pasta, you need a few simple ingredients. Here’s what you will need: - 8 oz fettuccine pasta - 1 lb shrimp, peeled and deveined - 2 tablespoons coconut oil - 1 bell pepper (red or yellow), sliced - 1 small red onion, thinly sliced - 2 cloves garlic, minced - 1 teaspoon fresh ginger, grated - 1 teaspoon allspice - 1 teaspoon thyme (fresh or dried) - 1/2 teaspoon cayenne pepper (adjust to taste) - 1 cup coconut milk - 2 tablespoons lime juice - Salt and pepper to taste - Fresh cilantro, chopped (for garnish) Each ingredient plays a big role in this dish. The shrimp gives the meal its main protein. You can use fresh or frozen shrimp. Just ensure they are peeled and deveined. The bell pepper and red onion add color and crunch. They give a nice sweet flavor, too. Garlic and ginger bring a warm aroma to the dish. They make everything taste better! The spices reflect Jamaican flavors. Allspice and thyme give it depth, while cayenne adds heat. You can adjust the cayenne to match your taste. Coconut milk is the star of the sauce. It makes it creamy and rich. This ingredient captures the essence of Jamaica. The lime juice adds a bright touch that balances the richness. Using fresh produce and spices is key to success. They bring out the best flavor. A simple garnish of cilantro on top completes the dish. Enjoy the vibrant colors and flavors of this delightful Jamaican shrimp pasta! Start by boiling a large pot of salted water. Add the fettuccine and cook it until it’s al dente, about 8-10 minutes. You can check if the pasta is done by tasting a piece. It should be firm but cooked through. Once done, drain the pasta, but save about half a cup of the pasta water. This water helps adjust the sauce later. In a large skillet, heat two tablespoons of coconut oil over medium heat. This oil gives a nice flavor to the veggies. Add the sliced bell pepper and red onion. Sauté them for about 3-4 minutes until they soften. For the bell pepper, cut off the top, remove the seeds, and slice it thin. For the onion, just slice it thinly as well. This prep work helps the veggies cook evenly. Next, add the shrimp to the skillet. Cook them for about 3-4 minutes. You know they are ready when they turn pink and opaque. Season them with allspice, thyme, cayenne pepper, salt, and pepper. If you like more heat, add more cayenne. After the shrimp is cooked, lower the heat and pour in the coconut milk. Stir in the lime juice and let it simmer for about 5 minutes. If the sauce seems too thick, add a splash of that reserved pasta water. This will help you get the right sauce consistency. When cooking shrimp, avoid common mistakes. Overcooking shrimp makes them rubbery. Cook them just until they turn pink and opaque, which takes about 3-4 minutes. To select the freshest shrimp, look for shrimp that smell mild and sweet. The shells should be shiny and firm. If possible, buy shrimp that has been frozen right after being caught. This keeps it fresh. To boost the flavor of your Jamaican shrimp pasta, consider adding spices like paprika or fresh basil. A touch of lime zest brightens the dish. Pair your pasta with a side salad or garlic bread. A fresh, crisp salad balances the rich coconut sauce. For attractive plating, twirl the pasta into a nest shape in the bowl. This way, the shrimp and sauce sit nicely on top. Garnish your dish with fresh cilantro and a lime wedge. This adds color and a fresh aroma. You can also sprinkle some extra cayenne for a pop of color and heat. {{image_2}} If you want to switch things up, try using chicken instead of shrimp. Simply cut the chicken into bite-sized pieces and cook them until golden. Tofu is a great choice for a vegetarian twist. Use firm tofu, press it to remove water, and cut it into cubes. Sauté it until crispy for added texture. You can also mix in veggies like zucchini, broccoli, or spinach for extra flavor and nutrition. Fettuccine is a classic choice, but you can use other pasta shapes too. Penne, linguine, or even spaghetti work well. If you need gluten-free options, look for brown rice or chickpea pasta. These alternatives taste great and hold the sauce nicely. Just be mindful of the cooking times, as they may differ from traditional pasta. To change the flavor, add different spices. Consider jerk seasoning for a spicier kick. You can also try adding fresh herbs like basil or parsley. If you prefer a creamier sauce, increase the coconut milk. For a tangy twist, add more lime juice or even a splash of pineapple juice. Adjust these flavors based on your taste and dietary needs. To keep your Jamaican shrimp pasta fresh, follow these steps: - Cool it First: Let the dish cool down to room temp before storing. - Airtight Containers: Use airtight containers for best results. They keep the pasta fresh and tasty. - Separate Shrimp and Pasta: If possible, store shrimp and pasta separately. This helps maintain the texture. When it’s time to enjoy leftovers, here’s how to do it right: - Stovetop Method: Heat a pan on low. Add the pasta and shrimp. Stir gently to avoid sticking. - Add Liquid: If the pasta seems dry, splash in some water or coconut milk. This keeps it creamy. - Avoid Overcooking: Heat until just warm. This prevents the pasta from getting mushy. By following these tips, you can enjoy your Jamaican shrimp pasta days after making it! You can tell shrimp is done when it turns pink and opaque. Cook it for about 3-4 minutes. Look for a firm texture and a curled shape. If it's rubbery, you may have overcooked it. Perfectly cooked shrimp should be tender and juicy. Yes, you can use frozen shrimp. First, thaw them in the fridge overnight. For quicker thawing, place them in a sealed bag and run cold water over it. Pat dry before cooking. This step ensures even cooking and helps the shrimp absorb flavors. Serve this dish with a fresh green salad or garlic bread. For drinks, try a fruity mocktail or a light beer. These pairings enhance the meal and add to the tropical vibe. You could also serve it with coconut rice for an extra flavor boost. Jamaican Shrimp Pasta blends flavors from Caribbean cooking. It highlights the island's love for seafood and spices. The dish reflects the culture's vibrant food scene, mixing fresh ingredients with bold flavors. Many Jamaican dishes focus on using local produce and spices, making them unique. Yes, you can make this dish in advance. Cook the shrimp and sauce, then store them separately from the pasta. This helps maintain the pasta's texture. When ready to eat, reheat the shrimp and sauce together. Toss them with the pasta just before serving. In this blog post, we explored the key ingredients for Jamaican Shrimp Pasta, including fresh shrimp, vibrant vegetables, and rich coconut milk. We covered step-by-step instructions to cook the pasta and sauté the vegetables. I shared tips for perfect shrimp, enhancing flavor, and creative variations. Lastly, we discussed proper storage and reheating methods. Overall, Jamaican Shrimp Pasta is a simple and delicious dish. With the right techniques, you can enjoy it any time!

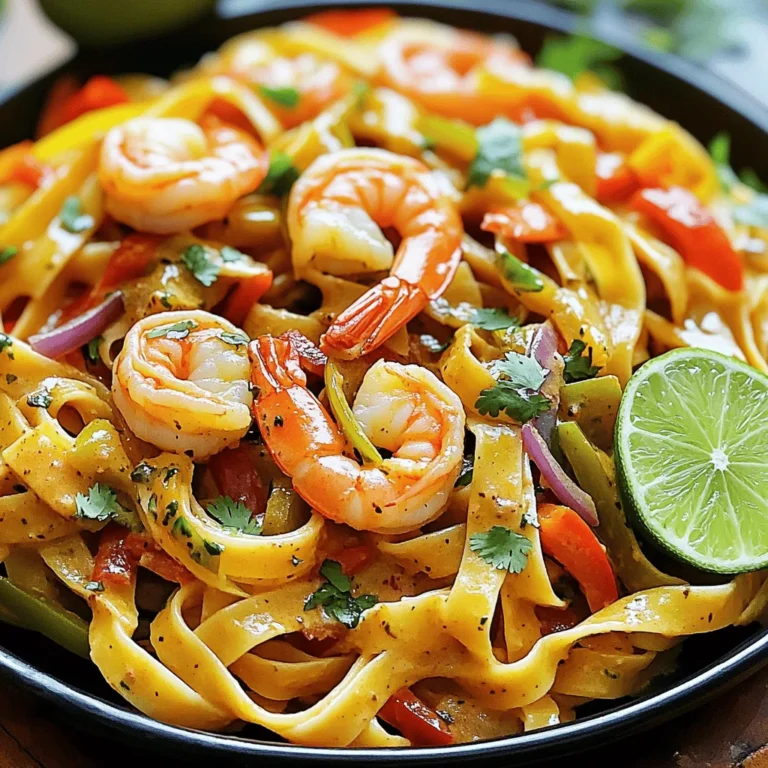
Jamaican Shrimp Pasta Flavorful and Simple Recipe

To make this tasty dish, gather these key ingredients: - 1 lb ground beef - 1 small onion, diced - 2 cloves garlic, minced - 1 cup frozen mixed vegetables (peas, carrots, corn) - 1 can (10.5 oz) cream of mushroom soup - 1/2 cup milk - 2 teaspoons Worcestershire sauce - 1 teaspoon onion powder - 1 teaspoon garlic powder - Salt and pepper to taste - 1 bag (32 oz) frozen tater tots - 1 cup shredded cheddar cheese These ingredients come together to create a flavorful and filling meal. The ground beef gives it a hearty base, while the mixed vegetables add color and nutrition. You might already have some of these items in your kitchen: - Worcestershire sauce - Onion powder - Garlic powder - Salt - Pepper Having these staples on hand makes it easy to whip up the casserole with little prep time. To make your casserole even better, consider these fun toppings: - Fresh parsley, chopped - Chives, chopped - Additional cheese varieties, like mozzarella or pepper jack These garnishes not only enhance the look but also add fresh flavors. You can serve the casserole hot, with a side salad for a complete meal. {{ingredient_image_1}} Start by preheating your oven to 425°F (220°C). This heat will make your tater tots crispy. While the oven heats, gather your ingredients. You will need ground beef, onion, garlic, mixed vegetables, cream of mushroom soup, milk, Worcestershire sauce, and seasonings. In a large skillet, heat over medium. Add the ground beef, diced onion, and minced garlic. Cook until the beef turns brown and the onion goes clear. This step takes about 5 to 7 minutes. Drain any fat. Next, stir in your frozen mixed vegetables. Then add the cream of mushroom soup and milk. Mix in Worcestershire sauce, onion powder, garlic powder, salt, and pepper. Let this simmer for about 5 minutes. This helps the flavors blend well. Now, transfer your beef mixture into a greased 9x13 inch baking dish. Spread it evenly on the bottom. Next, layer the frozen tater tots over the beef mixture. Make sure to cover it all. Bake in your preheated oven for 25 to 30 minutes. You want the tater tots to turn golden brown and get crispy. After that, take the dish out of the oven. Sprinkle shredded cheddar cheese on top. Return it to the oven for about 5 more minutes. This melts the cheese and makes it bubbly. Let the dish cool for a few minutes before serving. To get crispy tater tots, follow these steps. First, don't thaw the tots. Use them straight from the freezer. This keeps them firm during baking. Spread them evenly on top of your beef mix. Avoid overlapping, as this can lead to sogginess. Bake at 425°F for 25-30 minutes. Check for a golden brown color before serving. If you want extra crispiness, broil them for a few minutes at the end. Enhance the flavor of your beef mix with simple tips. Start with good quality ground beef. I like to use 80/20 for the right balance of fat. This keeps the meat juicy. Don't skip the onion and garlic; they add a lot of flavor. Add Worcestershire sauce for a deeper taste. You can also mix in spices like paprika or cumin for a twist. If you like a kick, add a pinch of cayenne pepper. Serving Tater Tot Beef Casserole is easy and fun. I love to garnish it with fresh parsley or chives. This adds color and a fresh taste. Pair it with a crisp salad to balance the rich flavors. You can also serve it with some crusty bread to soak up the sauce. If you want, offer a side of steamed veggies for extra nutrition. This way, you get a hearty meal that's not just filling but also colorful! Pro Tips Use Lean Ground Beef: Opt for lean ground beef to reduce excess grease while still enjoying a hearty flavor. Add Your Favorite Vegetables: Feel free to customize the vegetable mix according to your family's preferences—broccoli or bell peppers work great, too! Make It Ahead: This casserole can be assembled a day in advance. Just cover it with foil and refrigerate until you’re ready to bake. Experiment with Cheese: Try using different cheeses like Monterey Jack or pepper jack for a unique twist on flavor. {{image_2}} You can easily make this dish meat-free. Swap the ground beef for a mix of beans, lentils, or mushrooms. They add great texture and flavor. Use the same onions and garlic for a solid base. Add your favorite frozen veggies, like broccoli or bell peppers. This gives you a colorful and tasty casserole. You can also use a creamy sauce made from cashews or coconut milk for richness. If you want a lighter option, try turkey or chicken. Ground turkey works well and keeps the dish lean. For chicken, shredded rotisserie chicken saves time. Just add it to the mix with the veggies and soup. Both meats blend well with the flavors of onion, garlic, and Worcestershire sauce. You can also season them to taste with spices like paprika or cayenne for an extra kick. Cheese makes this dish even better! While cheddar is classic, try mozzarella for a stretchy, gooey layer. Pepper jack brings spice and a creamy texture. For a sharper taste, use gouda or swiss cheese. Mix different cheeses for a layered flavor. Top with fresh herbs like chives, cilantro, or parsley right before serving. This adds freshness and brightens your casserole. To store leftovers, let the casserole cool first. Then, cover it tightly with plastic wrap or foil. You can also use an airtight container. Store it in the fridge for up to three days. Keeping it covered helps prevent drying out and keeps the flavors fresh. When you’re ready to eat the leftovers, preheat your oven to 350°F (175°C). Place the casserole in an oven-safe dish. Cover it with foil to keep it moist. Heat for about 20-25 minutes or until it’s hot all the way through. You can also reheat in the microwave. Heat in short bursts, stirring in between, until warm. If you want to freeze the casserole, let it cool completely first. Then, cut it into smaller portions for easy thawing. Wrap each piece in plastic wrap and then aluminum foil. You can also place portions in freezer-safe bags. Store in the freezer for up to three months. To thaw, place it in the fridge overnight before reheating. Yes, you can prepare this dish ahead of time. Cook the beef mixture and layer it in the baking dish. Cover it well and keep it in the fridge. You can bake it the next day. Just add a few extra minutes to the cooking time. This way, you save time when you are busy. If you don’t have cream of mushroom soup, try using cream of chicken soup. You can also mix sour cream with a bit of broth. Another option is to use a homemade white sauce. Just melt butter, mix in flour, then add milk. Stir until thick, and you have a great base. To add some heat, mix in diced jalapeños with the beef. You can also add hot sauce to the beef mixture. For a kick, try using pepper jack cheese instead of cheddar. Another idea is to sprinkle red pepper flakes on top before baking. Adjust the spice to your taste! This blog post covered how to make a tasty Tater Tot Beef Casserole. We explored key ingredients, cooking steps, and some handy tips. You learned about fun variations, like using turkey or adding cheese. I also shared how to store leftovers and some common questions. Remember, this dish is versatile and easy. Feel free to make it your own. Enjoy cooking and sharing this meal with your loved ones!

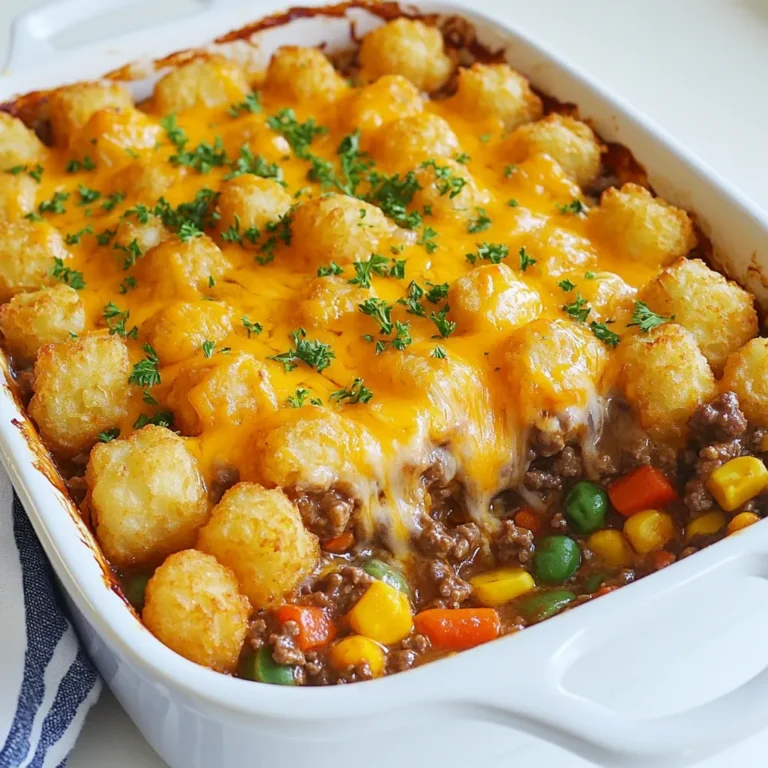
Tater Tot Beef Casserole Hearty and Simple Dish

PREV 1 … 35 36 37 … 57 NEXT
go kitchen now

explore

DessertsDinnerAppetizersDrinks

Our Policies

  • Cookie Policy
  • Copyright Policy
  • Disclaimer
  • GDPR Policy
  • Terms Of Use
Back to Top
  • About
  • Contact Us
  • Privacy Policy
© 2025 go kitchen now