FREE DINNER EBOOK! Get your copy!
  • Cookie Policy
  • GDPR Policy
  • Disclaimer
  • Terms Of Use
  • Visit my other site: Fun Cookie Recipes
go kitchen now
  • Home
  • Dinner
  • Desserts
  • Drinks
  • Appetizers
  • Contact
  • About
  • Privacy Policy
  • Home
  • Dinner
  • Desserts
  • Drinks
  • Appetizers
  • Contact
  • About
  • Privacy Policy
  • Cookie Policy
  • GDPR Policy
  • Disclaimer
  • Terms Of Use
Visit my other site: Fun Cookie Recipes

HOME / CATEGORIES /

Latest

- 2 large sweet potatoes - 2 tablespoons olive oil - 1 teaspoon garlic powder - 1 teaspoon paprika - ½ teaspoon cumin - ½ teaspoon sea salt - ¼ teaspoon black pepper - ½ teaspoon cornstarch - Fresh parsley for garnish To make crispy oven sweet potato fries, you need just a few simple ingredients. Start with two large sweet potatoes. They will be the star of your dish. Next, gather olive oil and a few spices: garlic powder, paprika, cumin, sea salt, and black pepper. These add great flavor to your fries. Cornstarch is also key. It helps the fries get that perfect crispiness. Finally, fresh parsley adds a pop of color and freshness when you serve the fries. Once you gather these ingredients, you can dive into the fun of cooking. Each ingredient plays a role in creating a tasty and healthy snack. Enjoy the process of making these fries as much as you enjoy eating them! 1. Preheating the oven: Start by preheating your oven to 425°F (220°C). This hot temperature helps the fries get crispy. While the oven heats, you can prep your sweet potatoes. 2. Peeling and cutting the sweet potatoes: Take two large sweet potatoes and peel them. Use a sharp knife to cut them into fry shapes. Aim for uniform size for even cooking. 1. Tossing with oil and spices: In a large bowl, add the cut sweet potatoes. Pour in 2 tablespoons of olive oil. Then, add 1 teaspoon of garlic powder, 1 teaspoon of paprika, ½ teaspoon of cumin, ½ teaspoon of sea salt, ¼ teaspoon of black pepper, and ½ teaspoon of cornstarch. Toss everything together until each fry is well-coated with the oil and spices. 2. Ensuring even coating: Make sure every fry gets a good mix. This step is key for flavor and crispiness. Take your time to ensure even coverage. 1. Spreading fries on a baking sheet: Line a baking sheet with parchment paper. Spread the seasoned fries in a single layer on the sheet. Avoid overlapping them; this helps them cook evenly. 2. Initial baking time and flipping: Place the baking sheet in the oven for 20 minutes. After 20 minutes, take a spatula and flip the fries. This ensures they brown on all sides. 3. Final bake for crispiness: Return the fries to the oven for another 15 to 20 minutes. Keep an eye on them to prevent burning. They should come out crispy and golden brown. To get the best crispiness, cornstarch is key. It helps absorb moisture and creates a crunchy outer layer. Just use half a teaspoon in your mix. This small amount makes a big difference. Next, use a single layer baking technique. Spread the fries out on the baking sheet without overlapping. This allows hot air to reach every fry. You want each fry to cook evenly and get golden brown. Spice up your fries with different seasonings. Try adding cayenne for heat or cinnamon for sweetness. You can mix and match based on what you like. When it comes to dips, there are many choices! A creamy ranch or tangy aioli pairs well. You can also serve them with ketchup or a spicy sriracha sauce. Each dip adds its own fun twist to your fries. {{image_2}} You can switch things up with sweet potato fries. Try making sweet potato wedges. Just cut the sweet potatoes into thicker pieces. They will take a bit longer to cook, so check for doneness. Another fun option is sweet potato chips. Use a mandoline to slice them very thin. This method creates crispy chips that are great for snacking. Bake them at a higher temperature for a shorter time. Adding heat can make your fries exciting. Use cayenne or chili powder to give them a kick. Start with a small amount and adjust to your taste. If you prefer sweet flavors, try adding cinnamon or brown sugar. This mix pairs well with the natural sweetness of the potatoes. It's a delightful twist that kids love. Experiment with these variations to find your favorite taste! To keep your leftover fries crispy, follow these simple tips: - Cool Down: Let the fries cool completely before storing. This helps reduce moisture. - Use an Airtight Container: Place the fries in a container with a tight lid. This keeps them fresh longer. - Avoid Stacking: If you have many fries, avoid stacking them. This prevents sogginess. Store the fries in the fridge. They will stay good for up to three days. Remember, the quicker you eat them, the better! When it's time to enjoy your leftover fries, you can reheat them in two ways: - Oven Reheating: Preheat your oven to 400°F (200°C). Spread the fries in a single layer on a baking sheet. Bake for about 10-15 minutes. This method keeps them crispy. - Microwave: If you’re in a hurry, you can use the microwave. Place fries on a plate and cover them with a paper towel. Heat for about 30 seconds, but this may make them soft. To restore crispiness in the microwave, try finishing in the oven. This gives you the best of both worlds! To make sweet potato fries crispy, use a few key techniques. First, cut your fries evenly. This helps them cook at the same rate. Next, toss them with cornstarch. Cornstarch absorbs moisture and adds crunch. Use olive oil to coat the fries, but don’t overdo it. Too much oil can make them soggy. Spread the fries in a single layer on your baking sheet. Make sure they are not touching. This allows hot air to circulate around each fry. Bake at 425°F (220°C) for the best results. Flip them halfway through cooking for even browning. Yes, you can freeze sweet potato fries. To freeze them, first, bake them until they are slightly undercooked. Let them cool completely. Then, spread the fries on a baking sheet in a single layer and freeze for about an hour. Once frozen, transfer them to a freezer-safe bag. They will stay good for up to three months. When ready to eat, bake them straight from the freezer. No need to thaw! Sweet potato fries are great with many seasonings. Some popular combinations include: - Garlic powder and paprika for a savory kick - Cumin and sea salt for a warm flavor - Chili powder and lime juice for a zesty twist You can also try custom flavors. Mix in cinnamon and brown sugar for a sweet option. Or add cayenne pepper for heat. The options are endless! In this article, I shared how to make delicious sweet potato fries. We covered ingredients, preparation steps, and tips for achieving a perfect crisp. Remember to use cornstarch and bake in a single layer for best results. You can also explore various flavors and storage methods. Enjoy your tasty fries with your favorite dips and impress your friends! Cooking can be fun, and sweet potato fries are a great way to start.

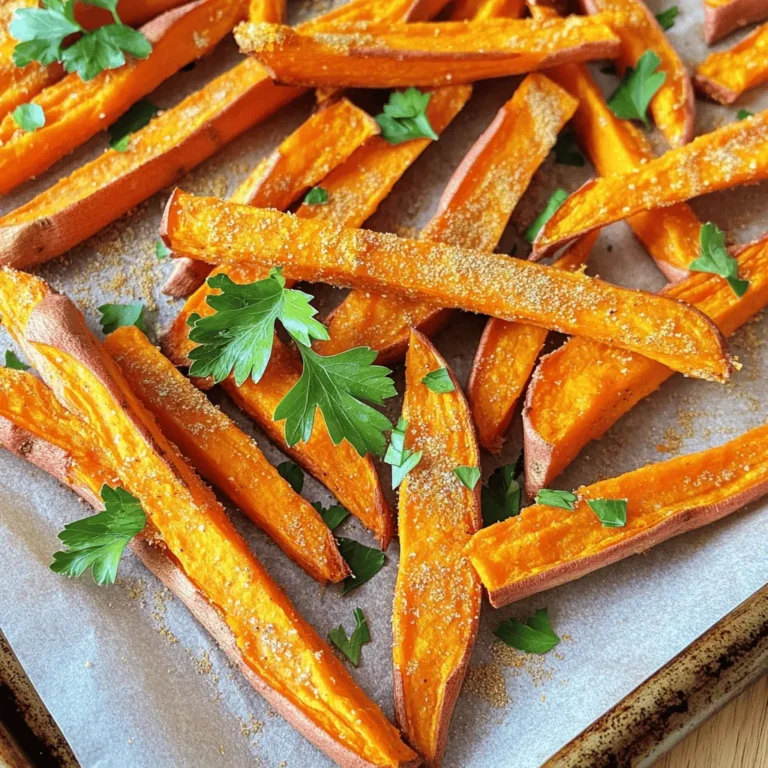
Crispy Oven Sweet Potato Fries Healthy and Easy Recipe

- 1 lb ground chicken - 1/2 cup breadcrumbs - 1/4 cup green onions, finely chopped - 1/2 cup mayonnaise - 2 tbsp sweet chili sauce - 1 tbsp Sriracha (or to taste) The main ingredients for these Bang Bang Chicken Sliders create a juicy, flavorful bite. Ground chicken serves as the base. It provides the perfect texture. Breadcrumbs help bind everything together. They also add a nice crunch. Green onions give a fresh taste. The mayonnaise keeps the patties moist. Sweet chili sauce adds sweetness. Sriracha brings heat. Adjust the Sriracha to match your taste. - 1 tsp garlic powder - 1 tsp onion powder - 1 tsp paprika - Salt and pepper to taste Spices are key to great flavor. Garlic powder adds depth. Onion powder enhances the savory taste. Paprika brings warmth and color. Salt and pepper balance the flavors. Use them to taste. - Slider buns (mini brioche or whole wheat) - Lettuce leaves (for garnish) - Sliced cucumbers The right buns make all the difference. Mini brioche or whole wheat buns are great choices. They are soft and easy to handle. Lettuce adds crunch and freshness. Sliced cucumbers bring a cool touch. Together, they elevate your sliders. First, I grab a large mixing bowl. I combine 1 pound of ground chicken with 1/2 cup of breadcrumbs. Next, I add 1/4 cup of finely chopped green onions. Then, I sprinkle in 1 teaspoon each of garlic powder, onion powder, and paprika. I also add salt and pepper to taste. I mix everything until it is well blended. This mixture should feel sticky but firm. Now, I form the mixture into small patties. Each patty should match the size of the slider buns. I usually get about 8 to 10 patties, depending on how big I make them. Next, I heat a skillet over medium heat. I add a little oil to the pan. When the oil is hot, I place the patties in the skillet. I cook them for about 5 to 6 minutes on each side. I wait until they are golden brown and cooked through. This will give the sliders a nice texture. While the patties are cooking, I prepare the Bang Bang sauce. I take a small bowl and whisk together 1/2 cup of mayonnaise, 2 tablespoons of sweet chili sauce, and 1 tablespoon of Sriracha. I mix it until it is smooth. Here, I can adjust the Sriracha to my spice level. If I want more heat, I add extra Sriracha. This sauce is what makes the sliders pop! To ensure perfect patty texture, always mix the ground chicken with care. Do not overmix, as this can make the patties tough. Use your hands to combine the ingredients until just mixed. The breadcrumbs help hold everything together, so don’t skip them. For golden-brown patties, heat your skillet over medium heat. Add a little oil to the pan, then place the patties in. Cook for 5-6 minutes on each side. Look for a nice golden color to know they are ready. Presentation matters. Arrange the sliders on a platter. Drizzle extra Bang Bang sauce on top for a colorful look. You can also garnish with fresh cilantro or lime slices for added freshness. This gives a nice pop and makes your sliders look even more inviting. For garnishing, add lettuce leaves and sliced cucumbers on top of the patties. This not only adds crunch but also balances the rich sauce. You can also serve them with toothpicks for easy handling. Pair your sliders with side dishes like sweet potato fries or a bright salad. These sides add balance to the meal and keep it light. A cold drink, like iced tea or lemonade, complements the sliders well. If you want to make sliders ahead of time, prepare the chicken patties and sauce in advance. Store them separately in the fridge. When ready to serve, simply cook the patties and assemble with the sauce and toppings. This makes hosting easy and fun! {{image_2}} You can swap ground chicken for ground turkey. Turkey has less fat, but still tastes great. You can also try plant-based ground meat. These options keep your sliders tasty and healthy. For breadcrumbs, use gluten-free ones. They work just as well to bind your patties. Change up the sauce for different tastes. You can use less sweet chili sauce and more Sriracha for a spicier kick. You can also mix in garlic or lime juice for extra zing. For toppings, try sliced jalapeños or avocado. These add fresh flavors and textures to your sliders. You can make mini sliders for fun bites or regular-sized ones for hearty meals. Mini sliders are perfect for parties. They let guests try more flavors without filling up. You can set up a slider bar with various sauces and toppings for a unique twist. To keep your Bang Bang Chicken Sliders fresh, place leftovers in an airtight container. Store them in the fridge. They will last about 3 to 4 days. Make sure they cool down before sealing. This helps keep the moisture in. If you notice any weird smells, toss them out. You can freeze cooked or uncooked patties. For cooked patties, let them cool completely. Then, wrap each patty in plastic wrap. Place them in a freezer bag. They will last up to 3 months. For uncooked patties, you can freeze them after shaping. Just make sure to separate layers with parchment paper. To thaw, place them in the fridge overnight. You can also use the microwave on low. For best taste, avoid letting them sit out too long. To keep that juicy texture, reheat patties in a skillet. Heat them on low to medium heat. Cook for about 5 minutes on each side. You can also use an oven at 350°F for about 10 minutes. For the Bang Bang sauce, warm it gently in a small pot. Stir often so it doesn't burn. You can also microwave it for a few seconds, but watch it closely. Enjoy your sliders warm and tasty! I prefer using ground chicken for these sliders. It stays juicy and tender. You can also use ground turkey if you want a lighter option. Both meats blend well with the spices and sauce. Yes, you can prepare the chicken mixture a day ahead. Store it in the fridge until you are ready to cook. You can also cook the patties and keep them warm in the oven. Reheat them in the oven or on a skillet. This keeps them crispy. These sliders pair well with many sides. Try crispy sweet potato fries or a fresh salad. For drinks, a light beer or iced tea works great. You can also serve a fruity mocktail to balance the heat. This blog post covered everything you need to make delicious Bang Bang Chicken Sliders. You learned about the key ingredients, how to prepare the chicken mixture, and cook the patties. I shared tips for serving and enhancing your sliders. You even discovered ways to store leftovers and variations to try. Get creative with flavors and enjoy sliders any time. They are easy to make and share with friends. Have fun cooking!

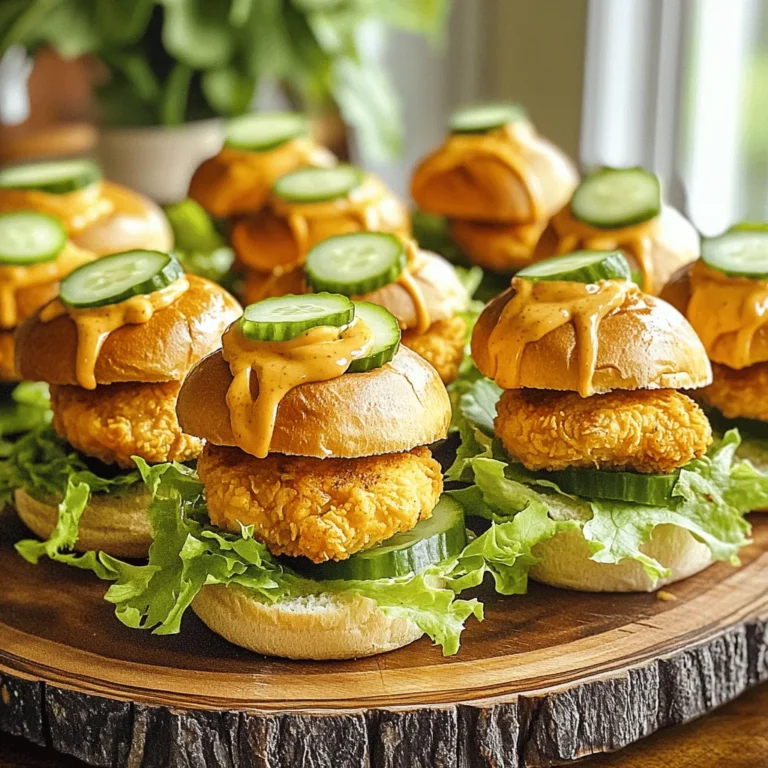
Bang Bang Chicken Sliders Savory and Juicy Treat

To make Hot Honey Crispy Baked Chicken, you need a few simple ingredients. Each one plays an important role in flavor and texture. Here’s what you will need: - 4 chicken thighs, skin-on and bone-in - 1 cup buttermilk - 1 cup all-purpose flour - 1 teaspoon paprika - 1 teaspoon garlic powder - 1 teaspoon onion powder - 1 teaspoon cayenne pepper (adjust to taste) - Salt and pepper, to taste - 1/2 cup hot honey (store-bought or homemade) - 2 tablespoons olive oil - Fresh herbs (parsley or thyme) for garnish Let’s dive deeper into why each ingredient matters: 1. Chicken thighs: They are juicy and flavorful. The skin helps keep the meat moist during cooking. 2. Buttermilk: This ingredient adds tenderness to the chicken. It also helps the coating stick well. 3. All-purpose flour: Flour creates a crispy outer layer. It absorbs the spices that you mix in. 4. Seasoning spices: Paprika, garlic powder, onion powder, and cayenne pepper add depth and warmth. You can adjust the heat by changing the cayenne amount. 5. Salt and pepper: These enhance all the flavors. They are essential in any savory dish. 6. Hot honey: This is the star of the dish. It adds a sweet and spicy kick that contrasts with the crispy chicken. 7. Olive oil: This helps the chicken become golden and crispy. It also adds flavor. 8. Fresh herbs: Parsley or thyme garnishes the dish beautifully. They add a fresh finish. These ingredients come together to create a dish that is full of flavor and easy to make. Enjoy the process of cooking and the delicious results! Marinating chicken in buttermilk is key. It makes the meat tender and juicy. The buttermilk adds flavor and helps the coating stick. I suggest marinating for at least 1 hour, or overnight if you can. This gives you the best texture and taste. To coat the chicken, simply take the thighs out of the buttermilk. Let the excess drip off. Make sure they are well covered. Set your oven to 425°F (220°C). This high heat helps create a crispy skin. For the baking sheet, I recommend lining it with parchment paper. This makes cleanup easy and keeps the chicken from sticking. A wire rack can also help with crispiness as it allows air to circulate. In a bowl, mix 1 cup of flour with spices. Use paprika, garlic powder, onion powder, cayenne pepper, salt, and pepper. Mix well so every bite is flavorful. For dredging, take each chicken thigh. Coat it in the flour mix, pressing down gently. This helps the coating stick. Shake off any extra flour before placing it on the baking sheet. Bake the chicken for about 35-40 minutes. You want the skin to turn golden brown and crispy. It’s important to check that the internal temperature reaches 165°F (74°C). This ensures the chicken is fully cooked and safe to eat. Once the chicken is done, take it out of the oven. Drizzle hot honey over each thigh while it’s still hot. This adds a sweet and spicy finish. For serving, I recommend garnishing with fresh herbs like parsley or thyme. They add a nice touch and enhance the look of the dish. To get that perfect crispy skin, use hot air circulation in your oven. Position the chicken thighs so air flows freely around them. This helps them cook evenly and become golden. Oil is key to a crispy coating. Drizzling olive oil over the chicken before baking adds flavor and crunch. Don’t skip this step. If you want the crispiest chicken, consider using a wire rack. This allows grease to drip away, keeping the chicken dry. If you don’t have one, a baking sheet will still work. Just line it with parchment paper. Adjust the spice levels to fit your taste. If you like it spicy, add more cayenne pepper. For a milder bite, cut back on it. You can make your own hot honey too. Just mix honey with a pinch of cayenne or chili flakes. This adds a personal touch to your dish. Marinating overnight gives the chicken great flavor and tenderness. If you are short on time, even an hour in buttermilk works well. Keep the chicken cold while marinating. A cool temperature helps the meat absorb the flavors better. Always cover it and place it in the fridge. {{image_2}} You can change up the chicken you use. Try chicken breasts for a leaner option. If you want a different texture, use chicken wings. For those with gluten issues, swap all-purpose flour with almond flour or a gluten-free blend. It still gives a nice crunch. Spice mixes can also change the taste. Use Cajun seasoning for a kick, or Italian herbs for a different flavor. Adding citrus can brighten the dish. A bit of lemon or lime zest in the coating adds freshness. You can also make a simple citrus glaze. Just mix hot honey with a splash of orange juice. For herbs, try mixing fresh parsley, thyme, or rosemary into your flour. This gives a nice herbal note to each bite. Hot honey crispy baked chicken pairs well with many sides. Coleslaw adds a crunchy, creamy contrast. Cornbread brings a sweet, soft touch. If you want more flavor, serve it with different sauces. A tangy ranch or a spicy aioli works great. You can even create a dipping station with various sauces. This makes the meal fun and interactive! To keep your hot honey crispy baked chicken fresh, store it right. First, let the chicken cool down to room temperature. This helps avoid moisture build-up. Then, place the chicken in an airtight container. This keeps it from drying out. Make sure to eat it within three days for the best taste. When reheating, you want to keep that crispy texture. The best method is to use an oven. Preheat your oven to 375°F (190°C). Place the chicken on a baking sheet. Bake for about 10 to 15 minutes. This helps the skin stay crispy. If you need a quicker method, use a skillet. Heat it on medium heat for about 5 minutes per side. If you want to save some for later, you can freeze the cooked chicken. First, let it cool completely. Wrap each piece in plastic wrap, then place them in a freezer bag. Make sure to remove as much air as possible. For the best results, eat the frozen chicken within three months. When you’re ready to eat it, thaw it overnight in the fridge. This keeps the chicken juicy and tasty. Hot honey is a blend of honey and spicy peppers. It adds a sweet and spicy kick to dishes. You can find hot honey at most grocery stores or online. Look for brands with natural ingredients. You can also make your own by mixing honey with chili flakes or hot sauce. Yes, you can use boneless chicken if you prefer. Boneless chicken cooks faster. Just adjust the cooking time to avoid overcooking. Aim for about 25-30 minutes in the oven. Check for a golden color on the outside. To check if the chicken is done, use a meat thermometer. The internal temperature should reach 165°F (74°C). Look for clear juices when you cut into the chicken. If the juices run red, cook it a bit longer. Yes, you can prepare the chicken ahead of time. Marinate it the night before for the best flavor. After cooking, let it cool completely, then store it in the fridge. Reheat before serving for a fresh taste. Hot honey crispy baked chicken pairs well with many sides. Consider serving it with coleslaw or cornbread. Both add great texture and flavor. You can also try roasted veggies or a simple salad to balance the meal. This recipe for hot honey crispy baked chicken makes a tasty meal. You learned about key ingredients and proper marination techniques. I shared tips for achieving crispiness and balancing flavors. Variations allow you to customize the dish to your taste. You can store leftovers easily and even freeze them. Enjoy your cooking and serving this dish with friends and family. It's fun to create and share delicious meals!

Hot Honey Crispy Baked Chicken Flavorful and Easy Dish

- 4 boneless, skinless chicken thighs - 1 can (8 oz) pineapple chunks in juice, drained (reserve juice) - 1 red bell pepper, sliced - 1 yellow bell pepper, sliced - 1 red onion, cut into wedges - 2 tablespoons soy sauce - 2 tablespoons honey - 1 tablespoon olive oil - 1 teaspoon minced garlic - 1 teaspoon grated ginger - Salt and pepper to taste - Green onions, chopped (for garnish) - Sesame seeds (for garnish) For this dish, I love using chicken thighs. They stay juicy and tender. You also need a mix of colorful veggies. Red and yellow bell peppers add sweetness and crunch. The red onion gives a nice sharpness. Don't forget the pineapple. It adds a sweet and tangy flavor that pairs well with the chicken. The marinade is key. It brings everything together. You will mix soy sauce, honey, garlic, and ginger for a tasty blend. With these simple ingredients, you create a dish that shines. Plus, it is easy to prepare and cook. The bright colors make it fun to eat. You can serve this dish to family or friends with pride. To start, mix the marinade ingredients in a small bowl. Combine the reserved pineapple juice, soy sauce, honey, minced garlic, and grated ginger. Stir until it blends well. This mix brings a sweet and savory taste to the chicken. Next, marinate the chicken and vegetables. In a larger bowl or plastic bag, add the chicken thighs, sliced bell peppers, red onion, and pineapple chunks. Pour the marinade over everything. Make sure all pieces are coated. Season with salt and pepper. Let it marinate for at least 15 minutes. For best results, refrigerate for up to 2 hours. Now, it’s time to bake. First, preheat your oven to 400°F (200°C). Line a large baking sheet with parchment paper. This makes cleanup easy. Arrange the marinated chicken, bell peppers, onion, and pineapple in a single layer on the sheet pan. Drizzle olive oil over the top. Place the pan in the preheated oven and bake for 25 to 30 minutes. The chicken should reach an internal temperature of 165°F (74°C) when done. For extra flavor, broil the dish for 2 to 3 minutes. This gives a nice char to the chicken and veggies. Watch closely to avoid burning. Once done, remove the pan from the oven and let it rest for a few minutes. Garnish with chopped green onions and sesame seeds. This adds a pop of color and flavor before serving. For the best flavor, marinate the chicken for at least 15 minutes. You can let it sit in the fridge for up to 2 hours for a deeper taste. If you like a sweeter bite, add a bit more honey. For a salty kick, increase the soy sauce. Always taste the marinade before using it. This way, you can adjust the flavors to your liking. Make sure the chicken is fully cooked by checking its internal temperature. It should reach 165°F (74°C). For even cooking, place the chicken and veggies in a single layer on the sheet pan. This helps everything cook evenly. Lining your pan with parchment paper makes for easy cleanup, too. Garnish your dish with chopped green onions and sesame seeds for a fresh look. When serving, consider adding a side of steamed rice or a green salad. This makes the meal feel complete and colorful. A bright, inviting plate will make everyone eager to dig in! {{image_2}} You can easily switch up the proteins in this dish. Try using chicken breasts or even shrimp for a new take. If you want a meatless option, tofu works great too. When it comes to veggies, feel free to mix it up. Zucchini, snap peas, or broccoli can replace the bell peppers. You can also add more veggies for extra color and nutrients. Adding spices or herbs can change the taste. Try a sprinkle of red pepper flakes for heat. Fresh cilantro or basil can also add a nice twist. If you want to switch up the marinade, use teriyaki sauce instead of soy sauce. You can also try a coconut milk base for a creamier feel. This gives a different flavor while still keeping it Hawaiian. Pair this dish with white rice or quinoa for a complete meal. You can also serve it with a fresh salad or steamed veggies for balance. This recipe is great for meal prep. You can cook it ahead of time and store portions in the fridge. Just reheat when you're ready to eat. To keep your Sheet Pan Hawaiian Chicken fresh, follow these tips: - Refrigeration: Place leftovers in an airtight container. Store them in the fridge for up to 3 days. This keeps the chicken and veggies safe to eat. - Freezing: If you want to keep it longer, freeze the cooked chicken. Place it in a freezer-safe bag and remove as much air as you can. It stays good for about 2-3 months. When you are ready to eat it, just thaw in the fridge overnight. Reheating your chicken right is key to keeping it tasty: - Methods for Reheating: - Oven: Preheat your oven to 350°F (175°C). Spread the chicken and veggies on a baking sheet. Heat for about 15-20 minutes until warm. - Microwave: Place the food in a microwave-safe dish. Cover it with a lid or microwave-safe wrap. Heat in 1-minute bursts until hot. - Tips for Retaining Flavor and Texture: - Add a splash of the reserved pineapple juice. This helps keep it moist and adds flavor. - Avoid overcooking. Check often to keep the chicken juicy and the veggies crisp. Yes, you can use bone-in chicken. This will change the cooking time. Bone-in chicken usually takes longer to cook. You should cook it for about 40-50 minutes. Make sure the internal temperature reaches 165°F (74°C) for safety. The bone adds extra flavor, making the dish even tastier. Just remember to adjust the cooking time based on the size of the chicken pieces. To make this dish gluten-free, swap the soy sauce for a gluten-free version. Many brands offer gluten-free soy sauce or tamari. Honey is gluten-free, so that’s perfect. Use fresh vegetables and pineapple as they are naturally gluten-free. Always check labels when buying pre-packaged items. This way, you can enjoy the same great taste without gluten. Yes, you can prepare this dish in advance. Marinate the chicken and veggies for at least 15 minutes. For more flavor, marinate them up to 2 hours in the fridge. You can even marinate overnight. This saves time on busy days. After marinating, you can bake it right away or store it in the fridge until ready to cook. Just be sure to let it sit at room temperature for 10-15 minutes before baking. This blog post covered a simple and tasty chicken dish. You learned the key ingredients, marinade steps, and baking methods. We explored tips for the best flavor and presentation ideas. I shared fun variations to keep the recipe fresh and exciting. Remember to store leftovers properly to enjoy them later. With these tips, you can make a meal that pleases everyone. Try this dish at your next gathering and enjoy the compliments!

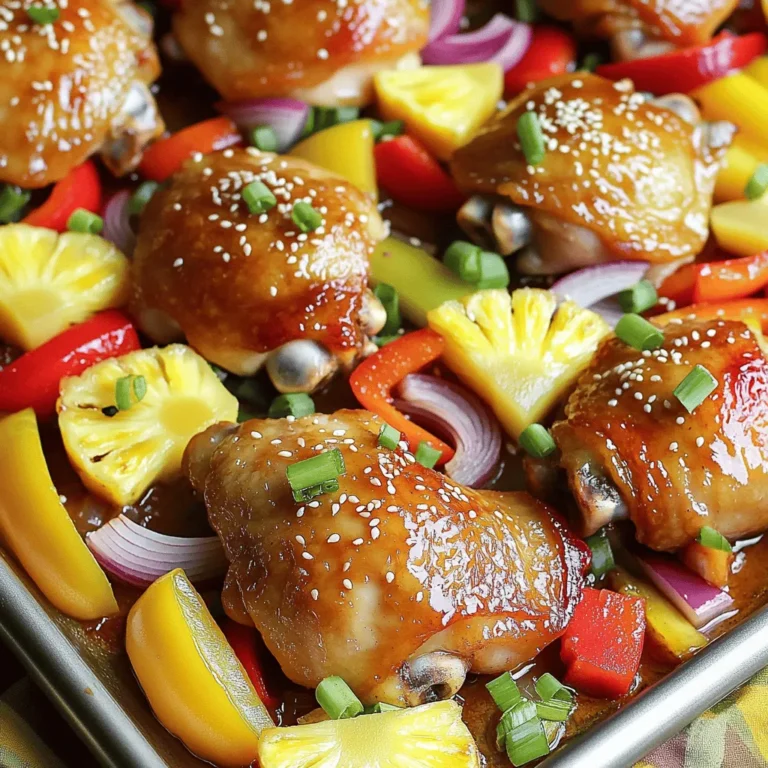
Sheet Pan Hawaiian Chicken Flavorful and Easy Meal

Here are the ingredients you need for One Pan Balsamic Chicken: - 4 boneless, skinless chicken breasts - 1/2 cup balsamic vinegar - 2 tablespoons honey - 2 tablespoons olive oil - 3 cloves garlic, minced - 1 teaspoon dried oregano - 1 teaspoon dried basil - Salt and pepper to taste - 2 cups cherry tomatoes, halved - 1 cup broccoli florets - 1 cup bell peppers, sliced (assorted colors) - Fresh basil for garnish This simple mix of ingredients brings great flavor. The balsamic vinegar adds tang, while honey adds a sweet touch. Garlic and herbs make everything taste fresh. You get a balanced meal with chicken and colorful veggies. This dish is not only tasty but also quick to prepare. Make sure to have everything ready before you start cooking. It helps to have fresh basil for a nice finish. First, mix the marinade. In a bowl, combine balsamic vinegar, honey, olive oil, minced garlic, oregano, basil, salt, and pepper. This blend gives the chicken its rich taste. Then, take your chicken breasts and coat them well in the marinade. Make sure each piece is covered. I suggest marinating for at least 30 minutes. If you have more time, let it sit for up to 2 hours in the fridge. This will deepen the flavors. Next, preheat your oven to 400°F (200°C). Preheating is key for even cooking. If your oven isn’t hot enough, the chicken may not cook through properly. You want that perfect, juicy chicken every time. Now, grab a large baking sheet or sauté pan. Place the marinated chicken breasts on it. Surround them with halved cherry tomatoes, broccoli florets, and sliced bell peppers. This mix of colors makes the dish not only tasty but also beautiful. Pour any leftover marinade over the chicken and veggies for extra flavor. It’s time to bake! Place the pan in your preheated oven. Bake for about 25-30 minutes. The chicken should reach an internal temperature of 165°F. You can check this with a meat thermometer. The vegetables should be tender but not mushy. For that extra touch, switch to broil for the last 3-5 minutes. This step gives the chicken and veggies a nice char. Keep a close eye on them to avoid burning. You want just a hint of crispiness. Once done, take the pan out and let the chicken rest for a couple of minutes. This helps keep it juicy. Before serving, sprinkle fresh basil over the top. It adds color and a fresh taste. Serve the chicken and veggies on a large platter, drizzling any juices from the pan over everything for more flavor. Enjoy your meal! To cook chicken just right, you must check the internal temperature. Aim for 165°F. Use a meat thermometer for accuracy. Cooking chicken too long can dry it out. To avoid this, marinate the chicken well. Marinating adds moisture and flavor. You can also cover the chicken while it bakes. This helps keep the juices in. The marinade is key for great taste. You can change it to suit your taste. Want it sweeter? Add more honey. Like it tangy? Use extra balsamic vinegar. For a spicy kick, add red pepper flakes. Mix and match spices to find what you love. Don't be afraid to experiment! Choosing the right veggies makes a big difference. Cherry tomatoes, broccoli, and bell peppers work well. But feel free to swap in your favorites. Zucchini, carrots, or asparagus can be great choices. You can also use frozen vegetables if fresh ones aren’t available. Just adjust cooking times as needed. This keeps your meals fun and varied! {{image_2}} You can easily change the protein in this dish. Try using turkey breasts for a leaner option. Tofu works well too if you want a plant-based meal. Just ensure the tofu is firm and pressed to absorb the flavors. For the veggies, feel free to mix and match. Zucchini, carrots, or green beans can add a nice twist. To boost the taste, add fresh herbs like thyme or rosemary. A pinch of red pepper flakes gives it a nice kick. You can also swap the honey for maple syrup for a different sweetness. If you like citrus, a squeeze of lemon juice brightens the dish. These simple changes can elevate the taste. If you need a quicker meal, use the stovetop. Sear the chicken in a hot pan, then add the veggies and sauce. Cover it and let it cook for about 15-20 minutes. For those who love slow cooking, place everything in a slow cooker. Cook on low for 6-8 hours for tender results. This method allows the flavors to deepen and meld beautifully. Store your leftovers in airtight containers. Glass or plastic containers work well. Make sure the chicken and veggies cool down first. This keeps them fresh longer. You can store them in the fridge for up to 3 days. Label your containers with the date to stay organized. To reheat your balsamic chicken, use an oven or a skillet. The oven helps keep the chicken juicy. Preheat the oven to 350°F (175°C) and place the chicken in a baking dish. Add a splash of chicken broth or water to keep it moist. Cover it with foil and heat for about 15-20 minutes. If using a skillet, add a little olive oil. Heat over medium-low, turning the chicken gently. You can freeze this dish for future meals. Cut the chicken into slices before freezing. Place it in a freezer-safe bag or container. Remove as much air as possible to prevent freezer burn. This dish can last up to 3 months in the freezer. To reheat from frozen, let it thaw in the fridge overnight before using the oven or skillet. I suggest marinating the chicken for at least 30 minutes. This allows the flavors to sink in well. For a deeper taste, you can marinate it for up to 2 hours. Just remember, longer marinating gives better flavor. Yes, you can make this dish ahead of time. You can marinate the chicken the night before. Store it in the fridge until you’re ready to cook. Just chop the veggies and keep them in a separate container. This saves time on busy days. The chicken should reach an internal temperature of 165°F. This ensures it is safe to eat. Use a meat thermometer to check the temperature. This step keeps your meal safe and tasty. Yes, balsamic vinegar is gluten-free. It is made from grapes and does not contain gluten. This makes it a great option for those with gluten sensitivities. Always check the label for added ingredients, just to be safe. This blog post guided you through a simple and tasty chicken recipe. We covered ingredients, marinating, baking, and serving tips. Remember, marinating adds flavor, and checking the chicken's temperature ensures it's safe to eat. You can swap ingredients for different tastes and store leftovers for later meals. Cooking can be fun and easy! With the tips and variations provided, you can make this dish your own. Enjoy your time in the kitchen, and happy cooking!

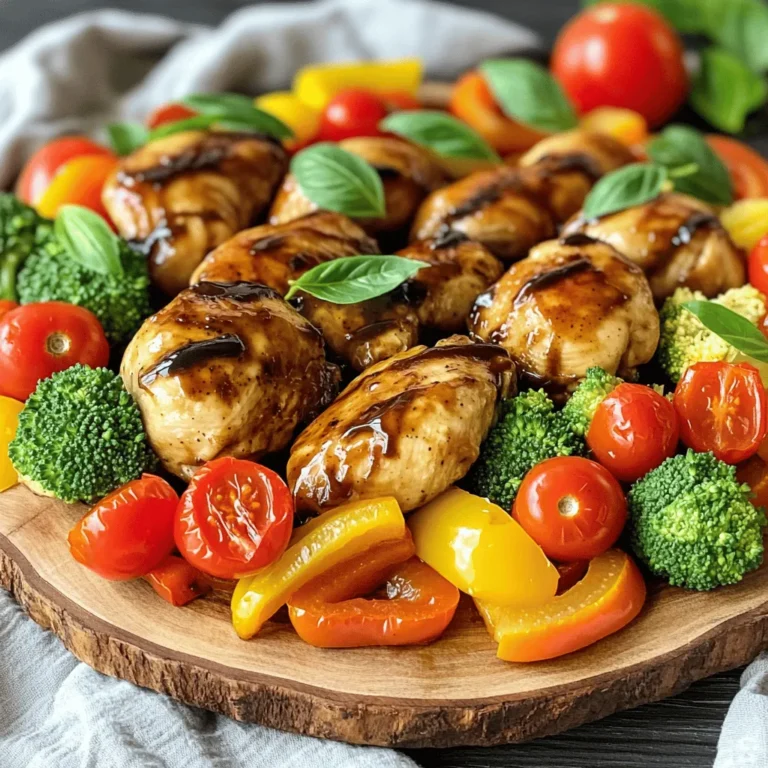
One Pan Balsamic Chicken Flavorful and Easy Meal

- 3-4 pounds beef chuck roast - 4 large carrots, peeled and chopped - 3 Yukon Gold potatoes, diced - 1 large onion, quartered - 4 cloves garlic, minced The beef chuck roast is the star of the dish. It becomes tender and flavorful when cooked slowly. Carrots, potatoes, and onion add sweetness and texture to the meal. Garlic gives it an extra punch of flavor. - 2 cups beef broth - 2 tablespoons olive oil - 1 tablespoon Worcestershire sauce Beef broth keeps the roast moist and full of flavor. Olive oil helps with searing and adds richness. Worcestershire sauce has a deep, umami taste that enhances the dish. - 2 teaspoons dried thyme - 2 teaspoons dried rosemary - 1 bay leaf - Salt and pepper to taste Dried thyme and rosemary bring a lovely herbal note. A bay leaf adds depth to the broth. Salt and pepper balance all the flavors. Together, these herbs and spices make each bite a delight. How do I season the beef chuck roast? Start by sprinkling salt and pepper on all sides of the beef chuck roast. This simple step adds great flavor. Use your hands to rub the seasoning in well. Why should I sear the meat? Searing the meat builds a rich taste. Heat olive oil in a large skillet over medium-high heat. When the oil is hot, add the roast. Sear it for 3-4 minutes on all sides until it becomes brown. This step makes the pot roast even more tasty. What goes in the slow cooker first? Begin by arranging chopped carrots, diced potatoes, quartered onion, and minced garlic at the bottom. This creates a tasty base for your roast. How do I add the roast and liquids? Next, place the seared beef roast on top of the vegetables. In a bowl, mix 2 cups of beef broth, Worcestershire sauce, dried thyme, rosemary, and a bay leaf. Pour this mix over the roast and veggies. What is the difference between cooking on low vs. high heat? You can slow cook on low heat for 8-10 hours or on high heat for 4-6 hours. Low heat makes the roast very tender. High heat cooks it faster, but may not be as tender. How do I check for doneness? After cooking, check if the meat is tender. You can use a fork to test it. Once done, let the roast rest for 10 minutes before slicing. This helps keep the juices in the meat. Serve the slices with the cooked vegetables and some cooking juices for extra flavor. - Enhancing flavor with searing: Searing the meat is key. It locks in juices and adds a rich, deep flavor. Heat the olive oil and brown the roast for 3-4 minutes on each side. This small step packs a big punch. - Importance of resting the meat: After cooking, let the roast rest for 10 minutes. This helps keep the juices inside, making each bite tender and juicy. Trust me, don’t skip this step! - Adjusting for different sizes of roasts: If your roast is larger or smaller than 3-4 pounds, adjust the cooking time. A bigger roast needs more time, while a smaller one cooks faster. A good rule is to add or reduce an hour for each pound. - Cooking times based on heat settings: Cooking on low heat takes 8-10 hours. If you’re in a rush, high heat works in 4-6 hours. Just make sure the meat is fork-tender before serving. - Serving suggestions with vegetables: Serve the pot roast on a large platter. Arrange the vibrant carrots and potatoes around the roast. This adds color and makes the dish look appealing. - Garnishing for an elegant presentation: Drizzle some of the cooking juices over the meat. Then, sprinkle fresh herbs on top. This simple touch elevates the dish and makes it look gourmet. {{image_2}} You can change the beef chuck roast if you want something different. Try using brisket or round roast. Both cuts cook well in a slow cooker. They give you great flavor, too. For vegetables, you have lots of options. If you don't like carrots, try parsnips or sweet potatoes. If you want greens, add green beans or peas. Mixing vegetables can change the taste. It keeps things fun and fresh. Changing up the herbs and spices can make your pot roast unique. Instead of thyme and rosemary, use oregano or basil for a new twist. You can also add smoked paprika for a rich flavor. Thinking of sauces? Try adding red wine or balsamic vinegar for extra depth. A splash of soy sauce can also do wonders. These small changes can really enhance your dish. If you're looking to make your pot roast gluten-free, it's easy! Just check that your Worcestershire sauce is gluten-free. Most brands offer a safe option. For a low-carb version, swap out the potatoes and carrots. Use cauliflower or zucchini instead. These veggies will soak up the flavors and keep the meal light. You can still enjoy a hearty dish without the carbs. To keep your pot roast fresh, follow these steps: - Cool the roast: Let it sit at room temperature for no more than two hours. - Use airtight containers: Store leftovers in glass or plastic containers with tight lids. - Label and date: Write the date on the container to track freshness. This method keeps your pot roast tasty for about three to four days in the fridge. When it’s time to enjoy your leftovers, here’s how to reheat: - Use the oven: Preheat to 300°F (150°C). Place the roast in a baking dish, cover with foil, and heat for 20-30 minutes. - Stovetop option: Slice the meat and warm it in a skillet over low heat. Add a splash of broth to keep it moist. To keep the flavor and tenderness, avoid high heat. Low and slow works best! If you want to save some for later, follow these tips: - Portion it out: Cut the roast into smaller pieces. This makes it easier to thaw. - Use freezer bags: Place portions in freezer-safe bags, removing excess air before sealing. For thawing, move the roast to the fridge overnight. Reheat as mentioned earlier for a delicious meal! Cooking a pot roast typically takes 8-10 hours on low heat. If you use high heat, it will take 4-6 hours. The meat should be very tender when done. Always check for doneness with a fork. It should shred easily. Cooking times can change based on the size of your roast. Using frozen meat is not advised. It can lead to uneven cooking. When meat stays in the danger zone too long, bacteria can grow. If you must use frozen meat, increase the cooking time. Always thaw the meat in the fridge first for safe cooking. The best cuts for pot roast are beef chuck roast or brisket. These cuts have more fat and connective tissue. This helps them become flavorful and tender during slow cooking. Always look for marbling, as it adds flavor. Avoid lean cuts, as they can dry out and become tough. We explored the key ingredients, step-by-step cooking, and useful tips for making a great pot roast. The right beef, veggies, and herbs create a dish bursting with flavor. You can easily adjust cooking times and ingredients to suit your taste and diet. Remember to rest your meat for the best texture. With proper storage and reheating, leftovers can stay delicious. Enjoy your cooking journey and have fun experimenting with variations!

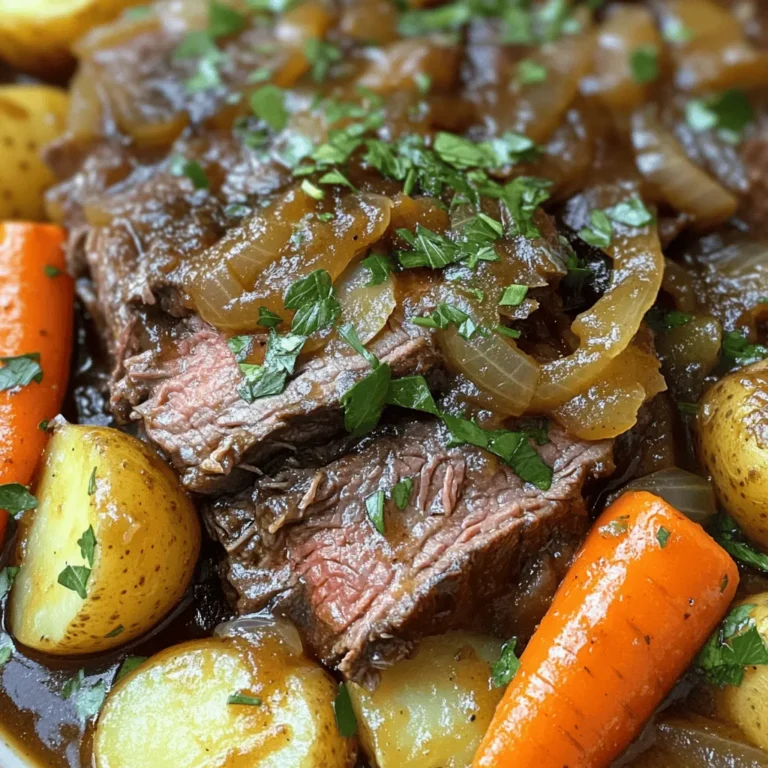
Slow Cooker Pot Roast Tasty and Simple Meal Guide

To make a delightful Italian Veggie Pasta Salad, gather the following ingredients: - Pasta Types: - 8 oz (about 2 cups) rotini or farfalle pasta - Fresh Vegetables: - 1 cup cherry tomatoes, halved - 1 medium cucumber, diced - 1 red bell pepper, diced - 1 cup black olives, sliced - 1/4 cup red onion, finely chopped - 1/4 cup fresh basil leaves, chopped - Dressing Components: - 1/4 cup olive oil - 2 tablespoons red wine vinegar (or apple cider vinegar) - 1 teaspoon dijon mustard - 1 teaspoon Italian seasoning - Salt and pepper to taste - Optional Add-Ins: - Additional veggies or proteins like mozzarella balls (bocconcini), chickpeas, or grilled chicken These ingredients create a bright, fresh dish. The pasta serves as a base, while the vegetables add crunch and color. The dressing ties everything together, providing a burst of flavor. You can also customize this salad. Add more veggies or proteins to suit your taste. Enjoy the process of mixing and matching! {{ingredient_image_1}} How to Cook Pasta Al Dente To cook pasta al dente, bring a large pot of salted water to a boil. Add 8 oz of rotini or farfalle pasta. Stir occasionally. Cook according to package directions, usually around 8-10 minutes. The pasta should be firm, not mushy. Rinsing Pasta to Stop Cooking Once the pasta is cooked, drain it in a colander. Rinse it under cold water. This stops the cooking process. It also helps cool the pasta quickly. Cool Down Techniques After rinsing, spread the pasta on a baking sheet. This allows it to cool evenly. You want to avoid clumping. Set it aside while you prep the veggies. Chopping Cherry Tomatoes and Cucumber Take 1 cup of cherry tomatoes and cut them in half. This gives a nice bite. Next, grab a medium cucumber and dice it into small pieces. This adds crunch. Dicing Red Bell Pepper and Red Onion Now, take 1 red bell pepper and remove the seeds. Dice it into small cubes. For the red onion, finely chop 1/4 cup. This adds a sweet bite to the salad. Slicing Olives and Mozzarella Balls Slice 1 cup of black olives. They bring salty flavor to the dish. For the mozzarella, cut 1 cup of mozzarella balls in half. They add creaminess to the salad. Whisking Ingredients Together In a small bowl, add 1/4 cup of olive oil, 2 tablespoons of red wine vinegar, and 1 teaspoon of dijon mustard. Whisk until combined. This forms a smooth dressing. Adjusting Flavor with Seasoning Add salt, pepper, and 1 teaspoon of Italian seasoning to the dressing. Taste and adjust as needed. You want a balanced flavor that enhances the salad. Best Practices for Homemade Dressings Always use fresh ingredients for the best taste. Make your dressing ahead of time to boost the flavor. Store it in the fridge until ready to use. Mixing Ingredients in a Large Bowl In a large bowl, combine the cooled pasta, cherry tomatoes, cucumber, red bell pepper, black olives, mozzarella, red onion, and chopped basil. Ensuring Even Distribution of Ingredients Gently toss the ingredients to mix well. You want every bite to have all the flavors. Importance of Chilling for Flavor Development Cover the salad and refrigerate for at least 30 minutes. This allows the flavors to meld. Serve chilled for the best taste. - How to Avoid Sticky Pasta To keep pasta from sticking, use plenty of water. Aim for 4-6 quarts for 8 oz of pasta. Stir the pasta often in the first few minutes. This helps separate the pieces. - Importance of Salting Pasta Water Always salt your water before adding pasta. Use about 1 tablespoon of salt for every 4 quarts of water. This adds flavor to the pasta. - Cooling Techniques for Pasta After draining, rinse the pasta under cold water. This stops the cooking and cools it down quickly. Spread it out on a baking sheet to cool even faster. - Best Practices for Chopping Efficiency Use a sharp knife for clean cuts. Chop all your veggies in one go. This saves time and keeps your kitchen tidy. - Choosing Fresh Vegetables Look for bright colors and firm textures. Fresh veggies taste better and add crunch. Check for any blemishes or soft spots before buying. - Storing Chopped Veggies Keep chopped veggies in airtight containers. Store them in the fridge for up to three days. This keeps them fresh and ready for your salad. - Ideas for Flavor Enhancements Add a squeeze of lemon juice for brightness. Try different herbs like parsley or oregano for extra flavor. - Seasonal Vegetable Suggestions In summer, add sweet corn or zucchini. In fall, consider roasted butternut squash or Brussels sprouts. This keeps your salad fresh and exciting. - Protein Options to Add for Heartiness For a filling meal, add grilled chicken or chickpeas. You can also use shrimp or diced tofu for a vegetarian twist. This makes the salad more satisfying. Pro Tips Tip for Perfect Pasta: Always cook pasta in a large pot of salted boiling water to enhance flavor and prevent sticking. Chill for Flavor: Allow the salad to chill for at least 30 minutes before serving to let the flavors meld together beautifully. Freshness Matters: Use fresh vegetables and herbs for the best taste; they will elevate the overall freshness of the salad. Customize Your Ingredients: Feel free to swap out veggies or add proteins like grilled chicken or chickpeas for a heartier salad. {{image_2}} To make a Mediterranean veggie pasta salad, add these ingredients: - 1 cup artichoke hearts, chopped - 1/2 cup feta cheese, crumbled - 1/2 cup sun-dried tomatoes, sliced - 1/4 cup fresh parsley, chopped For dressing, use lemon juice instead of vinegar. You can also add a splash of balsamic vinegar for a deeper flavor. This mix brings a bright and tangy taste. The feta cheese adds creaminess that complements the pasta. You can boost your pasta salad with protein. Try adding grilled chicken or shrimp. Cook the chicken until it's golden brown. For shrimp, cook until they turn pink and opaque. Both options add heartiness to the dish. For vegetarian options, chickpeas or tofu work great. If using chickpeas, drain and rinse them well. For tofu, press it to remove excess water and then cube it. Cook the tofu until it's golden for added flavor. If you need a gluten-free option, choose gluten-free pasta like brown rice or quinoa pasta. These options cook well and taste great in salads. Adjust your ingredients to avoid gluten. Look for gluten-free dressings and avoid any pre-made mixes that may contain gluten. To maintain flavor, add extra herbs like oregano or thyme. These adjustments keep your dish tasty while being gluten-free. - Best Containers for Storage: Use airtight containers to keep your pasta salad fresh. Glass or plastic containers work well. - Refrigeration Tips for Freshness: Always store your pasta salad in the fridge. It should stay cool. Make sure to cover it tightly to avoid odors. - Freezing Options for Long-Term Storage: You can freeze pasta salad, but it may change texture. Use freezer-safe containers and eat within three months. - How Long Does It Last in the Fridge?: Pasta salad lasts about three to five days in the fridge. Store it properly to keep it fresh. - Signs of Spoilage to Watch For: Check for bad smells, discoloration, or mold. If you see these, throw it away. - Best Practices for Reheating Pasta Salad: Reheat gently. Use low heat to avoid mushy pasta. Add a splash of olive oil if needed. - Microwave vs. Stovetop Methods: You can use the microwave for quick reheating. The stovetop is better for even heating. Just stir often. To boost nutrition, add more veggies like spinach or kale. These greens pack vitamins. You can also toss in some chickpeas for protein and fiber. They make the salad heartier without many calories. For a low-calorie dressing, try using Greek yogurt mixed with herbs. This option is creamy but light. You can also use lemon juice and herbs for a fresh taste without added fat. These changes keep the salad tasty and healthy. Yes, you can make this salad ahead of time. It tastes even better after chilling. Prepare it the night before. Just keep it in the fridge until serving. Store it in an airtight container to keep it fresh. You can also mix the dressing separately. Add it right before serving for the best flavor. This way, your pasta won’t get soggy. You can try many dressings for this salad. A balsamic vinaigrette adds a sweet tang. A lemon-based dressing gives a bright flavor. Homemade dressings are often healthier. They let you control the ingredients. Store-bought options can be easy, but check for added sugars. Making your own is simple and fun. To boost flavor, add more herbs like parsley or oregano. Fresh herbs make a big difference. You can also sprinkle some grated cheese on top for richness. Try adding some crushed red pepper for heat. If you like a smoky taste, mix in some smoked paprika. These little touches will make your pasta salad stand out! In this post, we explored how to make a tasty Italian Veggie Pasta Salad. We covered key ingredients like pasta, fresh veggies, and dressing components. You learned to cook pasta perfectly and prepare your vegetables with ease. Customizing your dish and storing leftovers were also discussed. With these tips, you can create a salad that’s fresh, fun, and healthy. Remember, your pasta salad should reflect your taste. Enjoy mixing it up with new flavors!

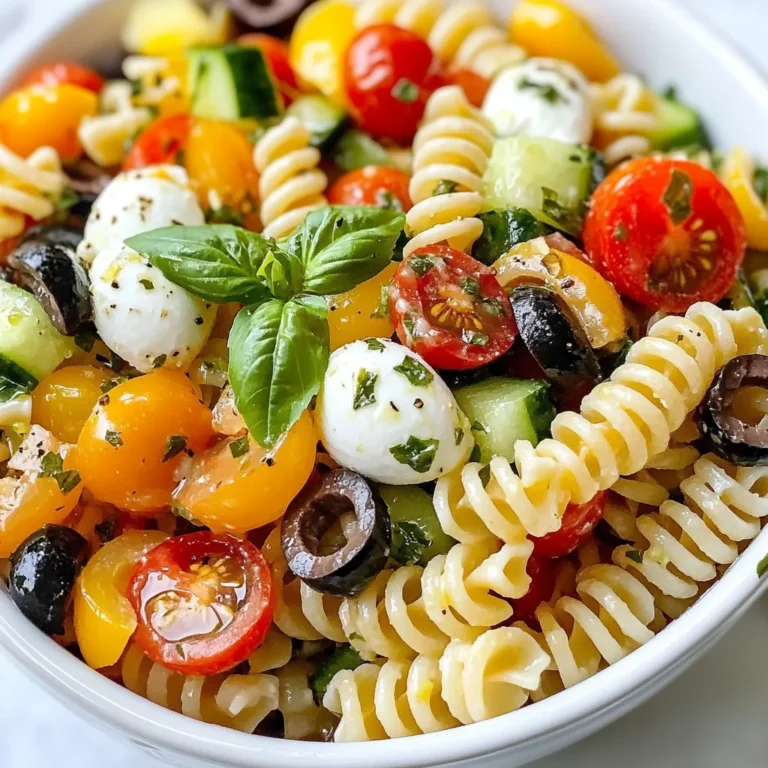
Italian Veggie Pasta Salad Fresh and Flavorful Dish

For the perfect fluffy breakfast rolls, gather these key ingredients: - 3 cups all-purpose flour - 1 packet (2 1/4 teaspoons) instant yeast - 1/4 cup granulated sugar - 1/2 teaspoon salt - 1/2 cup milk, warmed - 1/4 cup unsalted butter, melted - 2 large eggs, room temperature - 1 teaspoon vanilla extract - 1/2 cup cream cheese, softened (for filling) - 1/4 cup powdered sugar (for filling) These ingredients work together to create soft, fluffy rolls. The yeast helps the dough rise, while the cream cheese filling adds a delicious surprise. You can customize your rolls with these fun add-ins or toppings: - Cinnamon and sugar for a sweet sprinkle - Raisins or chocolate chips for extra flavor - A glaze made from milk and powdered sugar for sweetness Feel free to mix and match these options. They can add a personal touch to your rolls. If you need to swap out some ingredients, here are some ideas: - Use whole wheat flour instead of all-purpose flour for a healthier option. - Substitute almond milk or oat milk for regular milk if you want a dairy-free version. - Replace cream cheese with Greek yogurt for a lighter filling. These substitutions can help you cater to dietary needs while keeping your rolls tasty. Start with a large bowl. Add 3 cups of all-purpose flour, 2 1/4 teaspoons of instant yeast, 1/4 cup of granulated sugar, and 1/2 teaspoon of salt. Mix these dry ingredients well. In another bowl, whisk together 1/2 cup of warmed milk, 1/4 cup of melted unsalted butter, 2 large eggs, and 1 teaspoon of vanilla extract. Once mixed, pour this into the dry ingredients. Stir with a wooden spoon until you see a shaggy dough. Next, place the dough on a floured surface. Knead it for 5-7 minutes. You want it to be smooth and elastic. Then, put the dough in a greased bowl. Cover it with a kitchen towel. Let it rise in a warm spot for about 1 hour, or until it doubles in size. While your dough is rising, it’s time to make the filling. Take 1/2 cup of softened cream cheese and place it in a small bowl. Add 1/4 cup of powdered sugar. Mix until it is smooth and creamy. This will be the tasty surprise inside your rolls. Once the dough has risen, punch it down to remove air. Roll the dough out on a floured surface. Aim for a rectangle about 12 by 18 inches. Spread the cream cheese filling evenly over the dough. If you like, sprinkle a mix of cinnamon and sugar on top for extra flavor. Now, start from one long side and tightly roll the dough into a log. Pinch the seams to seal it well. Slice the log into 12 equal rolls. Place them in a greased 9x13 inch baking dish. Cover them with a towel and let them rise for another 30 minutes until puffy. Preheat your oven to 350°F (175°C). Bake the rolls for 20-25 minutes. They should look golden brown on top. Once out of the oven, let them cool slightly before serving. If you want, drizzle a mix of milk and powdered sugar over them for a sweet touch. To get fluffy breakfast rolls, use warm milk. It helps the yeast work better. Make sure your yeast is fresh. If it bubbles when mixed with warm milk, it is good to use. Knead the dough until it is smooth. This builds the gluten, which gives your rolls structure. Let the dough rise in a warm spot. This helps it to grow big and airy. One mistake I see often is not measuring flour correctly. Too much flour makes the rolls dense. Use a spoon to fill your measuring cup, then level it off with a knife. Another mistake is skipping the second rise. This step is key for fluffiness. Also, don't roll the dough too thin. A thicker dough helps keep air inside. Kneading should be done on a lightly floured surface. Knead for about 5 to 7 minutes. This time is enough to develop the dough. When rising, cover the bowl with a clean kitchen towel. This keeps the dough warm and moist. If your kitchen is cold, place the bowl near a warm oven. It can help the dough rise faster. Always check if the dough has doubled in size before you shape it. {{image_2}} You can change up the flavor of your breakfast rolls easily. Try adding chocolate chips or chunks for a sweet treat. You can also use fruit jams like raspberry or strawberry. Just spread a thin layer on the dough before rolling it up. This adds a fruity twist to every bite. If you want something different, use Nutella or peanut butter as a filling. Spread a layer of Nutella for a rich, chocolatey flavor. Peanut butter gives a nice, creamy texture and nutty taste. Both options are fun and tasty. Don’t forget to sprinkle a little sea salt on top to balance the sweetness. Making these rolls vegan or gluten-free is simple. For a vegan version, swap out the milk and butter for almond milk and coconut oil. Use a flax egg instead of regular eggs. For gluten-free rolls, you can use a gluten-free all-purpose flour blend. Just make sure it has xanthan gum for the best texture. These changes keep your rolls fluffy and delicious for everyone to enjoy. To keep your leftover rolls fresh, place them in an airtight container. You can also wrap them tightly in plastic wrap. Store them at room temperature for up to three days. If you want to keep them longer, consider freezing them. Freezing is a great option for these rolls. First, let the rolls cool completely. Then, wrap each roll in plastic wrap. Place the wrapped rolls in a freezer bag or container. They can last in the freezer for up to three months. Make sure to label your bags with the date for easy tracking. When you're ready to enjoy your rolls again, remove them from the freezer. Let them thaw overnight in the fridge. For quick reheating, place them in a warm oven at 350°F (175°C) for about 10 minutes. This warms them up and brings back their fluffiness. Enjoy them fresh and warm! To make your breakfast rolls fluffier, use fresh yeast. Instant yeast works well, but fresh yeast can add extra rise. Warm your milk to about 110°F before mixing it in. This helps activate the yeast properly. Additionally, knead the dough until it feels smooth and elastic. This builds gluten, which makes the rolls light and airy. Allow the dough to rise in a warm place. The longer the rise, the fluffier the rolls. Yes, you can prepare the dough in advance. After mixing and kneading, let it rise for one hour. Then, punch it down and cover it tightly. You can place it in the fridge overnight. The cold helps develop flavor. When you're ready, let the dough come to room temperature before shaping it into rolls. This way, you can enjoy fresh rolls in the morning with minimal effort. You can serve fluffy breakfast rolls with many things. Fresh fruit adds color and flavor. A drizzle of honey or maple syrup makes it sweet. You can also pair them with yogurt for creaminess. If you want something hearty, try scrambled eggs or bacon. These options will make your breakfast complete and satisfying. You now know how to make fluffy breakfast rolls with a tasty cream cheese filling. We covered essential ingredients, step-by-step instructions, and helpful tips to make them perfect. Don’t forget the fun variations and storage tips to enjoy them longer. With these insights, you can bake delicious rolls and impress anyone. Try these methods and make breakfast special! Enjoy your baking journey!

Fluffy Breakfast Rolls That Are Easy and Delicious

To make this tasty dish, you need some key items: - 1.5 lbs boneless, skinless chicken breasts - 4 cloves garlic, minced - 1 cup chicken broth - 1 cup heavy cream - 1 cup grated Parmesan cheese - 8 oz. uncooked pasta (penne or rotini works best) - 1 teaspoon Italian seasoning - Salt and pepper to taste - Fresh parsley, chopped (for garnish) Each ingredient plays a role in the flavor and texture of the dish. The chicken gives protein, while the garlic adds a rich taste. Heavy cream makes the sauce creamy and smooth. Parmesan adds a salty kick that ties it all together. You can elevate the dish with some extras: - Red pepper flakes for heat - Lemon zest for brightness - Extra herbs like basil or oregano These seasonings can add depth and personal flair. A sprinkle of red pepper flakes brings warmth. Lemon zest can brighten the flavors. You can easily swap items to fit your needs: - Use chicken thighs if you prefer darker meat. - Substitute coconut milk for heavy cream for a dairy-free option. - Choose gluten-free pasta if you need to avoid gluten. These substitutions help make the meal fit different diets. It allows everyone to enjoy this comforting dish without missing out! Start by placing the chicken breasts at the bottom of the crockpot. This will help them cook evenly. Next, chop the garlic and sprinkle it over the chicken. Garlic adds a rich flavor. Then, pour in the chicken broth and heavy cream. These liquids keep the chicken moist and create a creamy sauce. Make sure the chicken is fully submerged. After that, add the Italian seasoning, salt, and pepper. This will enhance the taste of the dish. Cover the crockpot and set it to low for 4 hours or high for 2 hours. The chicken should be fully cooked by then. Once the time is up, shred the chicken using two forks right in the crockpot. It will mix well with the sauce. Now, stir in the grated Parmesan cheese until it melts and blends perfectly. The cheese gives a nice, cheesy flavor to the dish. Add the uncooked pasta to the crockpot. Mix it well so the pasta gets coated with the sauce. Cover the crockpot again and cook on high for an additional 30 minutes. This will cook the pasta until it is al dente. Once it is done, give it another good stir. Check the seasoning and adjust if needed. For serving, use deep bowls and top with more Parmesan cheese and fresh parsley. This adds color and a fresh taste to each serving. Enjoy your delicious meal! To get the best flavor in your Crockpot Garlic Parmesan Chicken Pasta, focus on fresh ingredients. Use fresh garlic instead of jarred. Fresh garlic gives a strong taste that really shines in this dish. Also, choose a good quality Parmesan cheese. It melts better and adds depth. Don’t rush the cooking time. Low and slow cooking brings out all the flavors from the chicken and spices. One common mistake is adding too much liquid. The cream and broth should cover the chicken, but not drown it. Another mistake is not seasoning enough. Salt and pepper are key. Taste your dish before serving and adjust if needed. Lastly, avoid overcooking the pasta. It can turn mushy. Adding it later in the cooking process helps keep it firm. Timing is crucial for perfect pasta texture. Add the uncooked pasta 30 minutes before serving. This way, it cooks in the sauce but still stays al dente. If you cook it too long, it can become too soft. Keep an eye on it and check for doneness as you go. Stirring the pasta helps it cook evenly and soak up the sauce. {{image_2}} To make a vegetarian version, swap the chicken for hearty mushrooms or chickpeas. Use 1.5 lbs of mushrooms, like portobellos or button mushrooms, for a rich taste. If you want protein, chickpeas are great. Use 2 cans of drained chickpeas instead. Keep the garlic and cream for flavor. This will keep your dish creamy and tasty. For a low-carb meal, skip the pasta. Instead, use spiralized zucchini or cauliflower rice. These veggies soak up the sauce well. You can also add more chicken or cheese for protein. This change keeps the meal filling without the carbs. You can use different pasta shapes to change things up. Penne and rotini are great, but try fusilli or farfalle for fun. Each shape holds sauce differently, adding variety to your dish. You can even use whole wheat or gluten-free pasta for dietary needs. Just adjust cooking times based on the pasta you choose. After you enjoy your Crockpot Garlic Parmesan Chicken Pasta, let it cool. Place the pasta in an airtight container. This helps keep it fresh. Store it in the fridge for up to three days. Make sure to keep it covered to avoid drying out. If you have a large batch, consider dividing it into smaller portions. This makes it easy to reheat later. To freeze leftovers, let the dish cool completely. Transfer the pasta into freezer-safe bags or containers. Remove as much air as possible to prevent freezer burn. Label your containers with the date. You can freeze the pasta for up to three months. When you're ready to eat it, thaw it in the fridge overnight before reheating. When reheating, use low heat on the stove or microwave. Add a splash of chicken broth or cream to keep it moist. Stir gently to mix the flavors back together. If using the microwave, cover the container but leave a small gap for steam to escape. This helps avoid soggy pasta. Enjoy your tasty meal just like it was fresh! You should cook chicken in a crockpot for about 4 hours on low or 2 hours on high. This time ensures the chicken becomes tender and easily shreds. Cooking it too long may dry it out. Always check if the chicken reaches a safe internal temperature of 165°F. I find that using a meat thermometer helps a lot! Yes, you can use frozen chicken for this recipe. However, be aware that it may take longer to cook. If you choose this option, add an extra hour on high or two hours on low. Make sure the chicken cooks completely. I suggest checking the internal temperature to ensure safety. Cooking from frozen can also keep the chicken juicy. You can serve this dish with a variety of sides. Here are some tasty options: - Garlic bread: It pairs well and soaks up the rich sauce. - Side salad: A fresh green salad adds crunch and balance. - Steamed veggies: Broccoli or green beans work great for color and nutrients. - Roasted potatoes: They add a hearty touch to the meal. Feel free to mix and match these sides to create your perfect meal! You learned about the key ingredients and steps for making Crockpot Garlic Parmesan Chicken Pasta. We explored tips for great flavor and avoided common mistakes. You saw how to adapt the dish for different diets and filled it with options. In conclusion, this recipe is fun and easy for anyone. Enjoy your cooking and share your tasty results!

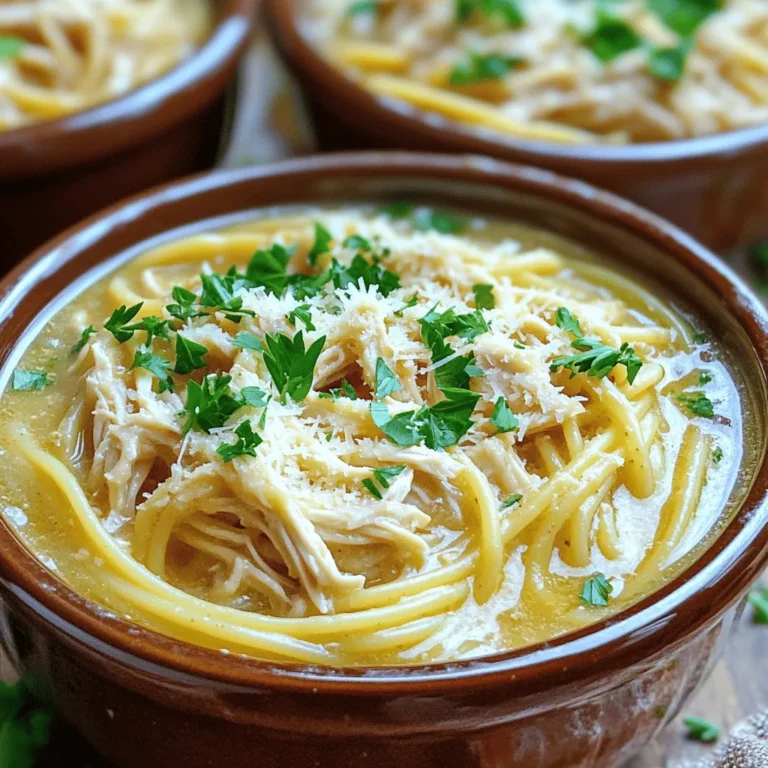
Crockpot Garlic Parmesan Chicken Pasta Simple Delight

To make these tasty skewers, you need: - 1.5 lbs chicken breast, cut into 1-inch cubes - 4 cloves garlic, minced - 1/2 cup grated Parmesan cheese - 1/4 cup olive oil - 2 tablespoons lemon juice - 1 teaspoon dried oregano - 1 teaspoon salt - 1/2 teaspoon black pepper These items form the base of your dish. The chicken provides protein. Garlic adds a strong flavor. Parmesan brings a rich, cheesy taste. Olive oil helps keep everything moist. Lemon juice brightens up the dish. Oregano gives it a nice herbal note. Salt and pepper season the chicken perfectly. You can add more flavor with: - 1/4 teaspoon crushed red pepper flakes (optional) - Fresh parsley, chopped (for garnish) If you like a little heat, the crushed red pepper flakes are great. They provide a nice kick. Chopping fresh parsley adds color and freshness to your dish when serving. You will need some basic tools to prepare this meal: - Large bowl for mixing - Whisk for the marinade - Wooden skewers (soaked in water) or metal skewers - Grill or grill pan - Tongs for flipping the skewers These tools make cooking easy. A large bowl lets you mix the marinade well. A whisk helps combine all the ingredients smoothly. If you use wooden skewers, soaking them prevents burning on the grill. Finally, tongs help you turn the skewers without losing any chicken. Start by gathering your ingredients. You will need olive oil, minced garlic, lemon juice, dried oregano, salt, black pepper, and optional crushed red pepper flakes. In a large bowl, mix these items together. Whisk them until they blend well. This mix will give the chicken its great flavor. The garlic and Parmesan add a rich taste that you will love. Next, take your chicken breast, cut into 1-inch cubes. Add the chicken to your marinade. Make sure every piece is well coated. This step is key for flavor. Cover the bowl and place it in your fridge. Let it marinate for at least 30 minutes. If you have time, an hour is even better. This allows the flavors to soak in. Now it’s time to grill your skewers. Preheat your grill or grill pan to medium-high heat. If you’re using wooden skewers, soak them in water first. This keeps them from burning. Thread the marinated chicken onto the skewers, leaving space between each piece. This helps them cook evenly. Grill the skewers for 10-12 minutes. Turn them occasionally for even cooking. Check the chicken’s internal temperature; it should reach 165°F (75°C). In the last few minutes, sprinkle grated Parmesan cheese on top. Let it melt slightly onto the chicken. Once done, remove the skewers and let them rest for a few minutes. Finally, garnish with fresh parsley before serving. Enjoy your meal! To get your chicken just right, start with even-sized cubes. This helps them cook evenly. Use medium-high heat when grilling. It gives a nice char without drying out the meat. Turn the skewers often for even cooking. Aim for an internal temperature of 165°F (75°C). This ensures your chicken is safe and juicy. Marinating is key for flavor. I suggest at least 30 minutes. However, if you have more time, let it rest for an hour. This allows the garlic, lemon juice, and spices to soak in. The longer you marinate, the more flavorful your chicken will be. These skewers are great on their own, but you can make them even better! Serve them with a fresh salad or grilled veggies. A drizzle of extra olive oil adds richness. You can also pair them with rice or quinoa for a complete meal. Don't forget to sprinkle more Parmesan cheese on top for a tasty finish! {{image_2}} You can add vegetables to your skewers for more flavor and color. Bell peppers, onions, and cherry tomatoes work well. Cut these veggies into bite-sized pieces. Alternate them with the chicken on the skewers. This mix will add taste and nutrients to your meal. If you want to change the taste, try other seasonings. A mix of smoked paprika and cumin gives a nice twist. You can also use fresh herbs like thyme or rosemary. Experiment with different spices to find what you like best. You can swap chicken for other proteins if you prefer. Shrimp is a great choice and cooks quickly. Firm tofu works well for a vegetarian option. Just adjust the cooking time for these proteins. Each option offers a different flavor, keeping your meal exciting. To store leftover skewers, let them cool first. Place them in an airtight container. You can keep them in the fridge for up to three days. Make sure the skewers are sealed well to keep them fresh. If you want to enjoy them later, consider freezing. When you're ready to eat the leftover skewers, reheat them for the best taste. Place them on a grill or in a skillet over medium heat. Heat them for about 5 to 7 minutes until hot. You can also use a microwave. If you do, cover them to keep them moist and heat for 1-2 minutes. You can freeze chicken skewers for later meals. Wrap each skewer in plastic wrap or aluminum foil. Then, place them in a freezer bag. They will stay fresh for about three months in the freezer. When you're ready to cook, thaw them in the fridge overnight before reheating. You grill chicken skewers for about 10 to 12 minutes. Turn them often for even cooking. The chicken should reach a safe internal temperature of 165°F (75°C). This ensures your skewers are juicy and safe to eat. Yes, you can use frozen chicken. Just make sure to thaw it first. This helps the marinade soak in well. If you skip thawing, the chicken may not cook evenly. You can serve these skewers with many sides. Some great options are: - Fresh salad - Rice or quinoa - Grilled veggies - Garlic bread - Pasta These sides will complement the flavors of the skewers. Yes, marinating the chicken overnight enhances the flavor. Just make sure to cover it well in the fridge. This extra time allows the garlic and spices to really seep in. If you want to change the cheese, try mozzarella or feta. Each will give a different taste. Always choose a cheese that melts well for the best results. To add heat, increase the crushed red pepper flakes. You can also add hot sauce to the marinade. Adjust the spice level to your liking for a delicious kick. This post covered how to make Garlic Parmesan Chicken Skewers. We talked about the main and optional ingredients you can use. The steps to prepare, marinate, and grill chicken were detailed. Helpful tips were shared to ensure perfect grilling. I included ideas for variations and how to store leftovers. Enjoy making these skewers at home. With simple steps and tasty flavors, you can impress anyone. Dive into cooking and have fun with your meals!

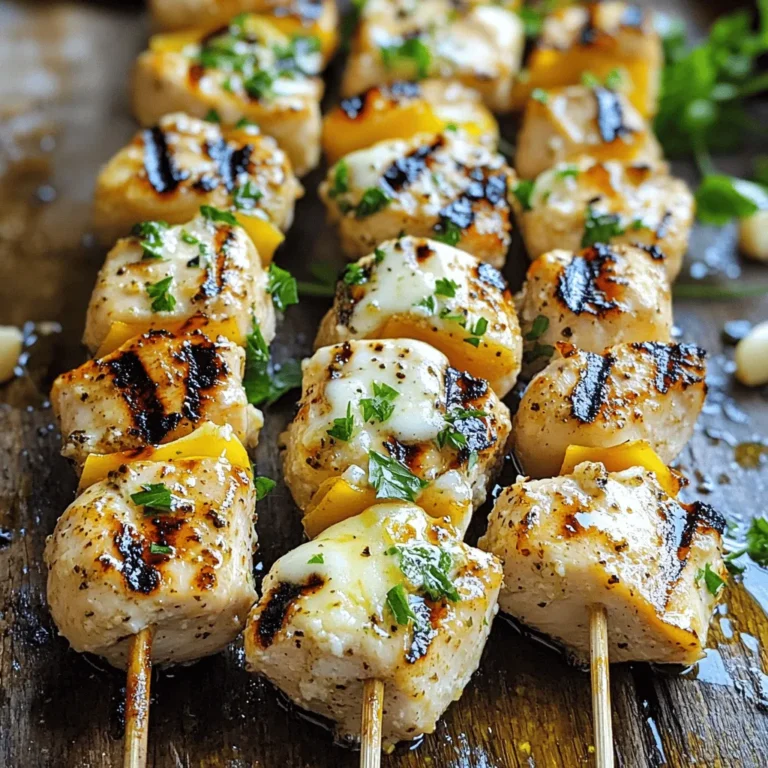
Garlic Parmesan Chicken Skewers Flavorful and Easy Meal

PREV 1 … 36 37 38 … 57 NEXT
go kitchen now

explore

DessertsDinnerAppetizersDrinks

Our Policies

  • Cookie Policy
  • Copyright Policy
  • Disclaimer
  • GDPR Policy
  • Terms Of Use
Back to Top
  • About
  • Contact Us
  • Privacy Policy
© 2025 go kitchen now