FREE DINNER EBOOK! Get your copy!
  • Cookie Policy
  • GDPR Policy
  • Disclaimer
  • Terms Of Use
  • Visit my other site: Fun Cookie Recipes
go kitchen now
  • Home
  • Dinner
  • Desserts
  • Drinks
  • Appetizers
  • Contact
  • About
  • Privacy Policy
  • Home
  • Dinner
  • Desserts
  • Drinks
  • Appetizers
  • Contact
  • About
  • Privacy Policy
  • Cookie Policy
  • GDPR Policy
  • Disclaimer
  • Terms Of Use
Visit my other site: Fun Cookie Recipes

HOME / CATEGORIES /

Latest

To make Minute Caprese Pesto Pasta, gather these key items: - 8 oz pasta (your choice: penne, spaghetti, or fusilli) - 1 cup cherry tomatoes, halved - 1 cup fresh mozzarella balls (bocconcini), halved - 1 cup fresh basil leaves - 1/4 cup pine nuts, toasted - 1/2 cup extra virgin olive oil - 2 cloves garlic, minced - Salt and pepper to taste - Balsamic glaze for drizzling These ingredients make the dish fresh and tasty. You can swap the pasta type based on what you have. Penne, spaghetti, and fusilli all work well. If you want a twist, try whole wheat or chickpea pasta. They add unique flavors and textures to your dish. Using fresh ingredients makes a big difference. Fresh basil gives the best flavor. Look for vibrant green leaves, as they have more taste. Cherry tomatoes should be ripe and firm. Fresh mozzarella is creamy and melts well. If you can, toast the pine nuts right before use. This adds a lovely nutty taste. Always check the dates on your ingredients to ensure they are fresh for the best results. To start, fill a large pot with water and add salt. Bring it to a boil. Add 8 ounces of your favorite pasta, like penne or spaghetti. Cook the pasta according to the package instructions. You want it to be al dente, which means it should still have a slight bite. This usually takes about 8 to 10 minutes. Once cooked, reserve half a cup of the pasta water. Then, drain the pasta and set it aside. Next, grab a food processor. Add 1 cup of fresh basil leaves, 1/4 cup of toasted pine nuts, and 2 cloves of minced garlic. Sprinkle in a pinch of salt. Pulse this mixture until it is well blended. Now, while the processor runs, slowly drizzle in 1/2 cup of extra virgin olive oil. This will make your pesto smooth and creamy. Taste it and adjust the salt if needed. In a large mixing bowl, combine the pasta with the pesto. Toss them together gently, making sure the pasta is well coated. If the pesto is too thick, add some of that reserved pasta water a little at a time. This helps to reach your desired creaminess. Now, fold in 1 cup of halved cherry tomatoes and 1 cup of halved mozzarella balls. Season with salt and pepper to taste. Your dish is now ready to serve! To make great pasta, start with plenty of water. Salt the water well before boiling. This adds flavor to the pasta. Cook the pasta just until it is al dente. This means it should be firm but not hard. Reserve some pasta water before draining. This water helps mix the pesto later. Add salt and pepper to taste after mixing the pasta and pesto. You can also use red pepper flakes for some heat. Fresh herbs like parsley or extra basil can boost flavor. Try adding a squeeze of lemon juice for brightness. A little balsamic glaze on top adds a sweet and tangy finish. For a smooth pesto, blend the basil, pine nuts, garlic, and oil well. If it’s too thick, add reserved pasta water little by little. This helps reach your desired creaminess. If you prefer a chunkier pesto, pulse less. Just remember to taste as you go to ensure the right balance. {{image_2}} You can make this dish vegan by swapping out the mozzarella. Use dairy-free cheese or skip it altogether. Instead, add more cherry tomatoes for that fresh taste. You can also add nutritional yeast for a cheesy flavor. This keeps the dish creamy and tasty while sticking to a plant-based diet. If you need gluten-free pasta, many options are available. Brown rice or quinoa pasta works well. You can also try chickpea or lentil pasta for a protein boost. Just cook them according to the package instructions. These options keep the dish light and delicious without the gluten. Want to make it heartier? Add cooked chicken or shrimp. Simply grill or sauté them before mixing with the pasta. Add diced chicken breast or shrimp right before you serve. This addition makes your meal more filling and adds a nice, savory touch. You can even season the protein with garlic and herbs for extra flavor. To store your Minute Caprese Pesto Pasta, let it cool first. Use an airtight container to keep it fresh. Place the pasta in the fridge. It will stay good for about three days. Make sure to cover it well to avoid drying out. When you're ready to eat leftovers, heat them gently. Use a pan on low heat. Add a splash of water or olive oil to keep it moist. Stir often to heat evenly. You can also use the microwave. Heat in short bursts, stirring in between. This keeps the pasta from getting too dry. If you want to freeze the pasta, do it before adding tomatoes and cheese. This helps maintain its taste and texture. Use a freezer-safe container or bag. Remove as much air as you can. It will last for up to three months in the freezer. When ready to eat, thaw it overnight in the fridge. Reheat as mentioned above. Caprese Pesto Pasta is a fresh and tasty dish. It combines pasta, pesto, and classic Caprese flavors. You get fresh tomatoes, mozzarella, and basil. This dish is light yet filling. It’s perfect for a quick meal. Yes, you can use store-bought pesto. It saves time and effort. Just mix it into your cooked pasta. Look for a brand that has fresh ingredients. This option is great for busy days or last-minute meals. Minute Caprese Pesto Pasta takes about 15 minutes to make. You’ll spend 5 minutes prepping and 10 minutes cooking. It’s a fast and simple recipe. You can enjoy a gourmet meal in no time. You can use walnuts or sunflower seeds instead of pine nuts. Both options add a nice crunch. Almonds can work too if you prefer. Just remember to toast them for extra flavor. In this post, we explored the key ingredients for Caprese Pesto Pasta and the freshness needed for the best taste. I shared step-by-step instructions to cook the pasta and make delicious pesto. We also discussed tips for perfect flavor and variations like vegan options. Remember, cooking is about fun and creativity. Use these insights to make your dish stand out. Enjoy every bite!

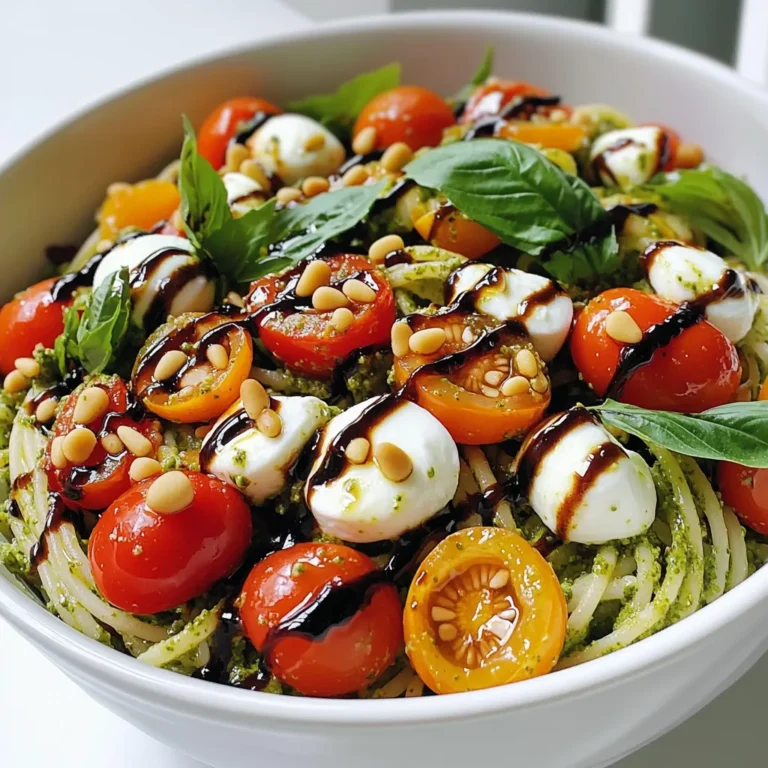
Minute Caprese Pesto Pasta Quick and Simple Dish

To make these tasty muffins, you need some key ingredients. Here’s the list: - 1 cup cornmeal - 1 cup all-purpose flour - 1 tablespoon baking powder - 1/2 teaspoon salt - 1/2 teaspoon baking soda - 1 cup buttermilk (or regular milk with 1 tablespoon vinegar) - 1/4 cup vegetable oil - 1 large egg - 1 cup shredded cheddar cheese - 1/2 cup pickled jalapeños, finely chopped These ingredients create a rich, cheesy taste. The cornmeal gives a nice texture. The jalapeños add a spicy kick. You can add extra flavors to your muffins. Here are some options: - 1 tablespoon honey (for a touch of sweetness) - 2 tablespoons chopped fresh cilantro (for garnish) Adding honey balances the spice of the jalapeños. Cilantro gives a fresh look and taste. You can make changes to suit your needs. Here are some ideas: - Use almond milk or oat milk instead of buttermilk for a dairy-free option. - Replace all-purpose flour with a gluten-free blend if needed. - Try pepper jack cheese instead of cheddar for a spicier flavor. These swaps keep the muffins tasty while meeting dietary needs. Don’t hesitate to experiment! Start by preheating your oven to 400°F (200°C). Line a muffin tin with paper liners or grease it. In a large bowl, mix the cornmeal, flour, baking powder, salt, and baking soda. Use a whisk to blend these dry ingredients well. This step helps ensure your muffins rise nicely. In a second bowl, combine the buttermilk, vegetable oil, and egg. If you want a touch of sweetness, add the honey here. Whisk these wet ingredients together until smooth. Mixing well ensures a creamy batter. Now, pour the wet mix into the dry mix. Stir gently until they just come together. Avoid overmixing; this keeps your muffins light. Next, fold in the shredded cheddar cheese and chopped jalapeños for that spicy kick. Spoon the batter into the muffin tin, filling each cup about two-thirds full. Bake them for 15-20 minutes. Check if they are done by inserting a toothpick in the center. If it comes out clean, your muffins are ready! Once baked, allow the muffins to cool for a few minutes in the tin. Then, transfer them to a wire rack. This helps them stay fluffy. If you like, sprinkle some chopped cilantro on top for a fresh look and flavor. Serve these warm with a pat of butter, or add a jalapeño slice for an extra touch! To get the best texture and flavor in your cheesy jalapeño cornbread muffins, follow these tips: - Use fresh cornmeal for a sweet taste. - Ensure your baking powder is fresh for good rise. - Mix the dry and wet ingredients just until combined to keep muffins light. - Fold in cheese and jalapeños gently to avoid tough muffins. - Consider adding a bit of honey for a nice sweet note. Avoid these common mistakes for perfect muffins: - Overmixing the batter makes muffins dense. - Not measuring ingredients correctly affects texture. - Skipping the cooling time can lead to soggy muffins. - Not adjusting jalapeño amounts can make muffins too spicy or bland. - Forgetting to preheat the oven can result in uneven baking. For the best bake time, follow these steps: - Preheat your oven to 400°F (200°C) well before baking. - Bake muffins for 15-20 minutes, checking for doneness. - Insert a toothpick into the center; it should come out clean. - If muffins are golden brown but not cooked, lower the heat slightly. - Let muffins cool in the tin for 5 minutes before moving them. {{image_2}} You can make these muffins even better by adding a few sweet and savory items. Try mixing in a tablespoon of honey for a hint of sweetness. If you like a touch of crunch, add some corn kernels. They give a nice texture. For a fresh taste, consider adding chopped green onions or bell peppers. If you need gluten-free muffins, swap all-purpose flour for a gluten-free blend. Look for one that works well in baking. Use a dairy-free milk, like almond or oat milk, in place of buttermilk. This keeps the muffins moist and tasty. You can also use dairy-free cheese for the classic cheesy flavor without the dairy. While cheddar is great, feel free to mix it up! Try pepper jack for a spicier kick. For a milder taste, use mozzarella. You can even blend different cheeses for a rich flavor. Experiment and find your favorite combination! To keep your Cheesy Jalapeño Cornbread Muffins fresh, let them cool completely. Place them in an airtight container. You can also wrap each muffin in plastic wrap. Store them at room temperature for up to three days. If you want to keep them longer, consider freezing. If you want to freeze your muffins, wrap each one tightly in plastic wrap. Then, place them in a freezer-safe bag or container. They can last for up to three months in the freezer. Remember to label your container with the date. This way, you know when to use them. To reheat your muffins, take them out of the fridge or freezer. If frozen, let them thaw in the fridge overnight. You can warm them in the oven or microwave. For the oven, preheat to 350°F (175°C) and bake for about 10 minutes. If using a microwave, heat for about 15 to 20 seconds. This keeps them moist and tasty. Enjoy your warm, cheesy muffins! You can use regular milk instead of buttermilk. Just add 1 tablespoon of vinegar to a cup of milk. This mix will create a similar tangy flavor. You can also use yogurt or sour cream. Just thin them out with a little water to get the right consistency. These muffins have a nice kick from the jalapeños. The heat can vary based on the brand and type of jalapeños used. If you want less heat, use fewer jalapeños. You can also remove the seeds to lower the spice. To amp up the heat, add more jalapeños or use fresh ones instead of pickled. Yes, you can make these muffins ahead of time! They taste great when fresh, but you can store them. Just keep them in an airtight container for up to three days. You can also freeze them for longer storage. Thaw them at room temperature when you’re ready to eat. Serve these muffins warm for the best taste. A pat of butter on top adds richness. You can also add a slice of fresh jalapeño or a sprinkle of cheese for a fun touch. They pair well with chili or soup, making them a perfect side dish. Now you know how to make delicious Cheesy Jalapeño Cornbread Muffins. You learned about the key ingredients, along with some tasty options and substitutions. I provided easy steps for mixing, baking, and serving these muffins. You also discovered tips for perfect texture and common mistakes to avoid. In the end, you hold the power to make these muffins your own, with sweet or savory twists. Enjoy sharing them with friends or family, or savor them all by yourself. Happy baking!

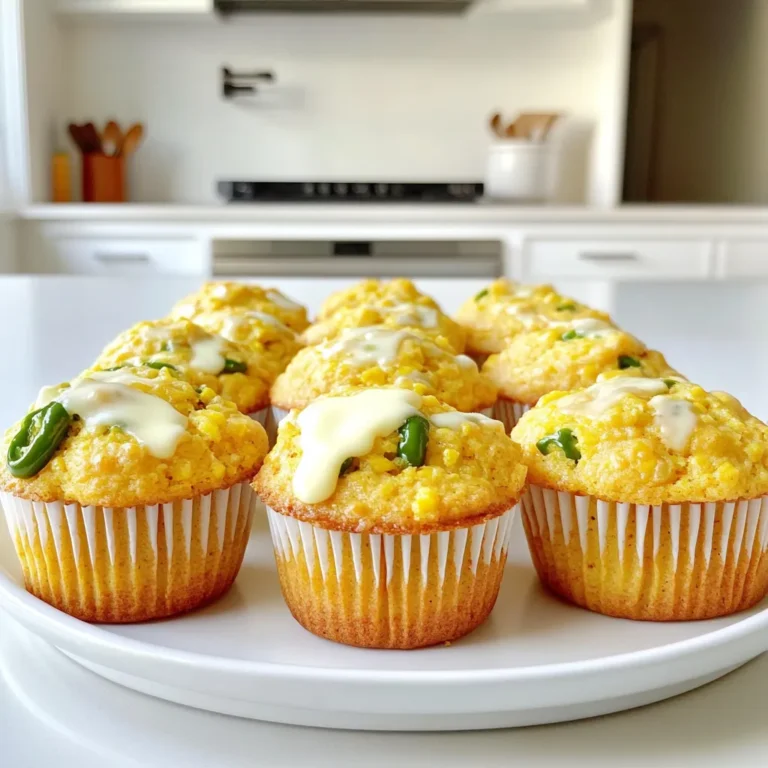
Cheesy Jalapeño Cornbread Muffins Flavorful and Easy

- 1 cup unsalted butter - 2 cups granulated sugar - 4 large eggs - 1 teaspoon vanilla extract - 1 cup all-purpose flour - 1 cup unsweetened cocoa powder - 1/2 teaspoon baking powder - 1/4 teaspoon salt - 1 cup canned pumpkin puree - 1 teaspoon pumpkin spice blend - 8 ounces cream cheese - 1/2 cup powdered sugar You can swap unsalted butter for coconut oil or margarine. If you want a lower-sugar option, try using a sugar substitute like Stevia or monk fruit. For the pumpkin puree, you can also use homemade puree made from roasted pumpkin. Just blend it until smooth. Use high-quality cocoa powder for the best flavor. Look for Dutch-processed cocoa for a richer taste. When choosing cream cheese, select a full-fat variety for a creamy texture. Avoid low-fat cream cheese, as it can make the cheesecake less rich and flavorful. - Preheat your oven to 350°F (175°C). - Grease a 9x13 inch baking pan. Line it with parchment paper. Leave some overhang to lift the brownies out later. - In a large bowl, whisk the melted butter and sugar until smooth. - Add the eggs, one by one. Mix well after each. Stir in the vanilla extract. - In a separate bowl, sift the flour, cocoa powder, baking powder, and salt. - Gradually add the dry mix to the wet mix. Stir until just combined. - In another bowl, mix the pumpkin puree and pumpkin spice. - Add the softened cream cheese and mix until smooth. - Gradually stir in the powdered sugar. The mix should be creamy and well combined. - Pour half of the brownie batter into the prepared pan. Spread it evenly. - Drop spoonfuls of the pumpkin cheesecake mix over the brownie base. - Add the remaining brownie batter on top. Use a knife to swirl the two mixes. Create a marble effect. - Bake for 30-35 minutes. - Use a toothpick to test doneness. It should come out with a few moist crumbs. - Remove from the oven and cool for about 10 minutes. - Lift the brownies out using the parchment paper. Cool completely on a wire rack before slicing. To get a great swirl in your brownies, use a knife or toothpick. Gently drag it through the brownie and pumpkin mixes. Do this in a figure-eight motion for the best results. This creates a lovely marbled look. Avoid overmixing, or you will lose that nice swirl. Just a few gentle strokes will do. You can take these brownies up a notch by adding nuts or chocolate chips. Chopped walnuts or pecans work well here. They add a nice crunch to each bite. You can also sprinkle chocolate chips on top before baking for extra sweetness. Serving these brownies with a dollop of whipped cream really elevates them. It adds a light, creamy touch that balances the rich flavor. One big mistake is overbaking the brownies. Keep an eye on them in the oven. They should be soft in the center when done. Use a toothpick to check. It should come out with a few moist crumbs but not wet batter. Another mistake is mismeasuring your ingredients. Always use the correct measuring cups for dry and wet ingredients. This step ensures your brownies turn out just right every time. {{image_2}} You can change the taste of these brownies by adding different spices. Try using nutmeg or ginger for a warm flavor. You can also swap in chocolate or white chocolate for a fun twist. Mix in chocolate chips for extra richness or use white chocolate to brighten the dessert. If you want gluten-free brownies, use almond flour instead of all-purpose flour. This will keep the texture rich and tasty. For a vegan option, replace the eggs with flaxseed meal mixed with water. Use a plant-based cream cheese to keep the cheesecake filling creamy and rich. These brownies taste great with a scoop of vanilla ice cream. The cold creaminess pairs well with the warm brownies. You can also garnish them with a sprinkle of cocoa powder or powdered sugar. Add a dollop of whipped cream for an extra treat. Enjoy these brownies on special occasions or just because! To keep your pumpkin cheesecake swirl brownies fresh, choose the right storage method. I recommend placing them in an airtight container. This method keeps them moist and delicious. If you store them at room temperature, they last about 3 to 4 days. If you want them to last longer, put them in the fridge. They can stay fresh for up to a week in the refrigerator. Just remember to let them come to room temperature before serving for the best taste. Freezing brownies is a great way to save some for later. To freeze them, first cool the brownies completely. Then, cut them into squares. Wrap each square tightly in plastic wrap. For extra protection, place the wrapped brownies in a freezer bag or container. This method prevents freezer burn. They can last for up to three months in the freezer. When you are ready to enjoy, remove them from the freezer. Let them thaw in the fridge overnight or at room temperature for a few hours. Enjoy your delicious treat any time! To cut brownies cleanly, follow these tips: - Use a sharp knife. - Heat the knife in hot water, then dry it. - Make one smooth cut for each piece. - Wipe the knife after each cut to keep it clean. This method helps avoid messy edges and makes your brownies look great. Yes, you can make these brownies ahead of time. Here are some best practices: - Bake the brownies and let them cool fully. - Store them in an airtight container at room temperature. - They will stay fresh for about 3 days. - You can also freeze them for longer storage. Just wrap each brownie in plastic wrap, then place in a freezer bag. To check if your brownies are done, look for these signs: - The edges will pull away from the pan slightly. - The top will look set and might have a shiny finish. - Insert a toothpick in the center; it should come out with a few moist crumbs. If it comes out clean, they may be overbaked. Yes, you can use fresh pumpkin! Here’s how to prepare it: - Cut a small pumpkin in half and scoop out the seeds. - Roast the halves cut-side down in the oven at 350°F for about 45 minutes. - Once soft, scoop out the flesh and blend it until smooth. Make sure to measure it out to match the canned amount. For toppings, consider these tasty options: - Whipped cream adds a light touch. - A sprinkle of cinnamon gives warmth. - Chopped nuts like walnuts or pecans add crunch. - Drizzle with caramel sauce for extra sweetness. These toppings enhance the flavors and make the treat even more special. In this article, we explored how to make pumpkin cheesecake swirl brownies. We discussed the ingredients needed, steps for preparation, and tips for success. I shared ways to swap ingredients, enhance flavors, and avoid common mistakes. Plus, we covered storage tips to keep your brownies fresh. These brownies make a delicious treat for any season. Enjoy baking and sharing these tasty desserts! Your friends and family will love them.

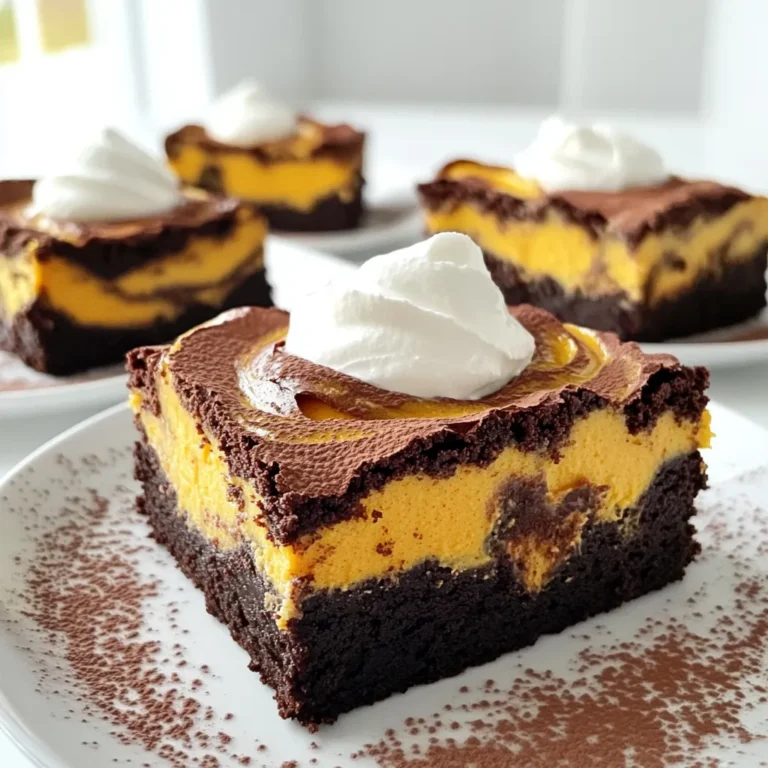
Pumpkin Cheesecake Swirl Brownies Irresistible Treat

- 2 ribeye steaks (about 1 inch thick) - 4 medium-sized baby potatoes, quartered - 4 tablespoons unsalted butter - 4 cloves garlic, minced - 1 teaspoon fresh rosemary, chopped - 1 teaspoon fresh thyme, chopped - Salt and pepper, to taste - 1 tablespoon olive oil - Fresh parsley, for garnish - You can swap ribeye for sirloin or filet mignon. - Add vegetables like bell peppers or green beans for more color. - Use garlic powder if you don’t have fresh garlic. - Try different herbs like oregano or basil for a twist. - A large skillet for cooking - A pot for boiling potatoes - A cutting board for prep - A sharp knife for chopping - Measuring spoons for accuracy - Tongs for flipping steaks - A paper towel for drying the steaks First, take your ribeye steaks out. Let them sit for about 30 minutes. This helps them cook better. Pat the steaks dry with a paper towel. Next, season both sides with salt and pepper. Use enough to cover well. This makes the steak tasty. While the steaks rest, take your baby potatoes. Cut them into quarters. Put them in a pot of salted water. Boil for 10 to 12 minutes. They should be fork-tender. After that, drain the potatoes and set them aside. They are ready to join the fun later! Grab a large skillet and heat olive oil over medium-high heat. When it's hot, add your seasoned steaks. Sear them for about 4 to 5 minutes on each side. This gives them a nice brown crust. Cook until they reach your favorite doneness. Once done, remove the steaks and let them rest on a plate. Cover them loosely with aluminum foil. Lower the heat to medium in the same skillet. Add 2 tablespoons of butter. Let it melt, then add minced garlic, chopped rosemary, and thyme. Sauté for about 1 minute until it smells amazing. Next, toss in the boiled baby potatoes. Stir them in the garlic herb butter. Sauté for another 3 to 4 minutes. You want them crispy and coated in flavor. Finally, return the rested steaks to the skillet. Spoon the garlic butter over them. Cook for 1 to 2 more minutes to warm them up. Now, you are ready to serve! To cook the steak just right, start with room-temperature meat. This helps the steak cook evenly. Use a paper towel to pat it dry. Season it well with salt and pepper. Heat your skillet until it's hot. Sear the steak for about 4-5 minutes on each side for medium-rare. Let it rest afterward, covered loosely. This keeps the juices in. For crispy potatoes, boil them first. This makes them soft inside. After boiling, drain them well. Toss the potatoes in the skillet with garlic butter. Cook them until golden brown, about 3-4 minutes. This creates a crispy outer layer. Make sure to stir them often for even cooking. Fresh herbs add amazing flavor to this dish. Use chopped rosemary and thyme in the garlic butter. These herbs bring a bright taste that pairs well with steak. You can also add parsley as a garnish. It adds color and freshness to your plate. Don't skip the herbs; they make it special! {{image_2}} You can change the steak for this dish. Ribeye is great, but other cuts work too. Try sirloin or flank steak for a leaner option. These cuts still give you a nice flavor. Just remember to adjust cooking time based on thickness. Always aim for a good sear to lock in those juices. If you want a vegetarian dish, skip the steak. Focus on the garlic butter potatoes instead. Boil the potatoes as before. Sauté them in garlic butter, rosemary, and thyme. Add some veggies like bell peppers or mushrooms for extra flavor. This dish keeps the taste but makes it meat-free. For a kick, try a spicy garlic butter version. Add red pepper flakes to the garlic butter. You can also toss in some diced jalapeños. This adds heat without losing the dish's essence. Adjust the spice level to your liking. Enjoy the flavor explosion that comes with each bite! To store your garlic butter steak and potatoes, let them cool first. Place the steak and potatoes in an airtight container. This keeps them fresh and tasty. You can store them in the fridge for up to three days. Make sure to separate them if possible. This helps them retain their texture. When you want to eat your leftovers, use the stove for best results. Heat a skillet over medium heat. Add a tiny bit of butter or oil to it. Once it’s hot, add the steak and potatoes. Cook them for about 5-7 minutes. Stir often so everything warms evenly. This method keeps them juicy and delicious. If you want to keep your meal longer, freezing is a great option. First, let the steak and potatoes cool completely. Wrap them tightly in plastic wrap or foil, then place them in a freezer bag. Remove as much air as you can. You can freeze them for up to three months. When ready to eat, thaw them in the fridge overnight before reheating. Yes, you can use other types of potatoes. Yukon Gold or red potatoes work well. They add creaminess and flavor. Just make sure to cut them into similar sizes for even cooking. Smaller potatoes, like fingerlings, can also be a fun choice. You can store leftovers in the fridge for 3 to 4 days. Keep them in an airtight container. If you want to keep them longer, freeze the steak and potatoes. They can last for about 2 to 3 months in the freezer. This dish pairs well with simple sides. Try a fresh green salad or steamed veggies. A light red wine can enhance the meal too. You might also enjoy some crusty bread to soak up the garlic butter goodness. This blog post covered essential ingredients, easy steps, and helpful tips for cooking. You learned how to prepare steaks and crispy roast potatoes. We discussed variations, storage methods, and answers to common questions. Cooking at home can be fun and rewarding. With practice, you’ll create tasty meals for yourself or others. Enjoy the process, savor each bite, and make it your own. Happy cooking!

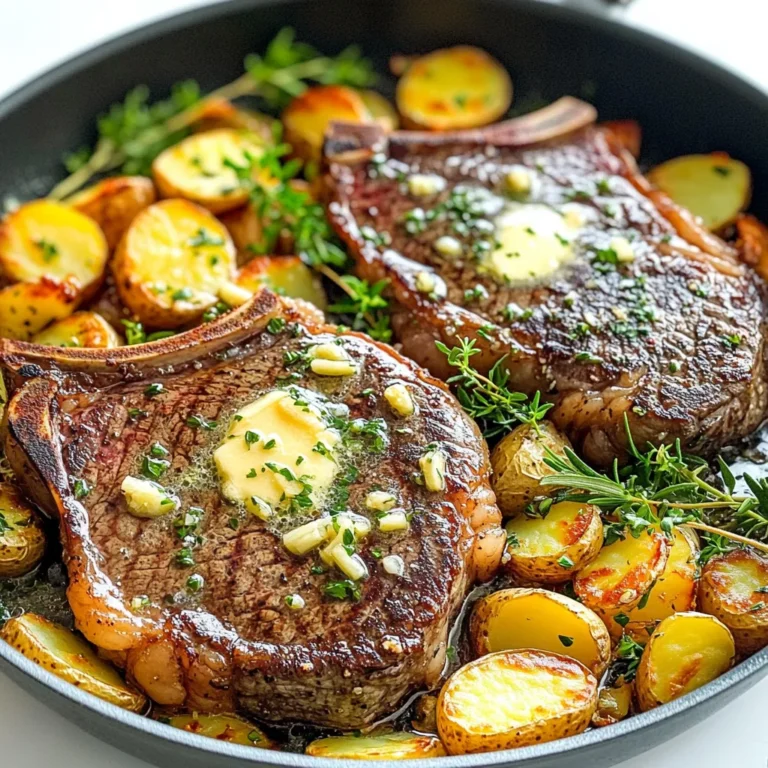
Garlic Butter Steak & Potatoes Skillet Flavor Explosion

- 2 cups milk (whole or your choice) - 1/2 cup heavy cream - 1/4 cup unsweetened cocoa powder - 1/2 cup semi-sweet chocolate chips - 1/4 cup caramel sauce (plus extra for drizzling) - 1 teaspoon vanilla extract - 1/4 teaspoon sea salt (plus more for garnish) - Whipped cream (for topping) I love using whole milk for my salted caramel hot chocolate. It gives a rich, creamy taste. Heavy cream adds smoothness and makes each sip feel special. Unsweetened cocoa powder gives that deep chocolate flavor, while semi-sweet chocolate chips melt in to add sweetness. Caramel sauce is the star, bringing the sweet and salty balance we crave. Don't forget the vanilla extract! It adds a lovely aroma and warmth. Sea salt is crucial. It enhances the sweetness and ties all the flavors together. Finally, whipped cream is a must for topping. It adds a fluffy texture that feels like a warm hug. - Additional caramel sauce - Extra sea salt for garnish If you want to elevate your drink, you can drizzle more caramel sauce on top. It not only looks great but adds extra sweetness. A sprinkle of sea salt on the whipped cream makes every sip even better. The salt contrasts the sweetness and makes every flavor pop. In a medium saucepan, combine 2 cups of milk and 1/2 cup of heavy cream. Place the pan over medium heat. Stir occasionally and watch closely. You want it to steam, not boil. This step creates a rich and creamy base. Once the milk and cream are hot, whisk in 1/4 cup of unsweetened cocoa powder. Keep whisking until it is smooth. Next, add 1/2 cup of semi-sweet chocolate chips and 1/4 cup of caramel sauce. Stir continuously until they melt and mix well. This is where the magic happens, and it smells amazing too! Remove the pot from heat. Stir in 1 teaspoon of vanilla extract and 1/4 teaspoon of sea salt. This adds depth to the flavor. Taste your hot chocolate. If you want it sweeter, add more caramel sauce. Pour the hot chocolate into mugs. Top it off with whipped cream. Drizzle extra caramel sauce over the whipped cream and sprinkle with more sea salt. Enjoy your warm and cozy drink! Choosing the right type of chocolate: For the best taste, I recommend using semi-sweet chocolate chips. They melt smoothly and add rich flavor. You can also try dark chocolate for a deeper taste. If you like sweet, milk chocolate works well too. Just remember, the chocolate you choose impacts the final drink. Adjusting sweetness levels: Sweetness is key in hot chocolate. I often taste my drink before serving. If it needs more sweetness, I add a bit more caramel sauce. You can also reduce sugar by using less caramel. Balance is important, so keep tasting until you find what you love. Best types of mugs or cups to use: I enjoy using thick ceramic mugs. They keep the drink warm longer. Plus, they feel cozy in your hands. Clear glass mugs are fun too. You can see the lovely layers of chocolate and cream. Pairing with snacks or desserts: This hot chocolate pairs well with light snacks. Try it with buttery popcorn for a sweet and salty combo. Cookies, like shortbread or chocolate chip, also make a great match. You can even serve it with a slice of cake for a special treat. Enjoy exploring different pairings! {{image_2}} You can make this drink dairy-free! Simply swap regular milk and cream for almond milk or coconut milk. Both options work well and add a unique flavor. Almond milk gives a nutty taste, while coconut milk adds creaminess. Choose whichever you like best! Want to change things up? Try adding spices like cinnamon or nutmeg. A pinch of cinnamon warms the drink. Nutmeg adds a nice twist. You can also use flavored whipped cream. Vanilla or caramel whipped cream can enhance the taste. Get creative and find your favorite blend! For iced salted caramel hot chocolate, start with the same base. After you prepare it, let it cool completely. Once cool, pour it over ice. You can also mix in milk and caramel sauce for a refreshing treat. Top it with whipped cream and drizzle with caramel sauce. Enjoy your cold treat on a hot day! After enjoying your salted caramel hot chocolate, you might have some left. Store it in the fridge in a sealed container. It will stay fresh for about 2 to 3 days. When you’re ready to enjoy it again, give it a good stir. This helps mix any settled ingredients. To reheat, pour the hot chocolate into a saucepan over low heat. Stir it gently to warm it evenly. Avoid boiling, as this can change the texture. You can also use a microwave. Heat it in short bursts, stirring in between. This keeps it smooth and tasty. Can you freeze salted caramel hot chocolate? Yes, but with some notes. Freeze it in an airtight container or ice cube trays. When you want to drink it, thaw it in the fridge overnight. Then, reheat as mentioned above. Keep in mind, freezing may slightly change the texture. Yes, you can use sugar-free caramel sauce. It can help cut down on sugar. Look for brands that taste good and have a creamy texture. Sugar-free options often use sweeteners like stevia or erythritol. Just be aware that the flavor might differ from regular caramel. If you love the taste, go ahead and swap it in your recipe. To make your hot chocolate thicker, try these tips: - Use less milk and more heavy cream. - Add a bit of cornstarch mixed with cold water. - Use more chocolate chips. This boosts the chocolate flavor and thickness. - Heat your hot chocolate longer to help it reduce and thicken. Experiment with these methods to find your perfect texture. If you need a substitute for heavy cream, consider these options: - Coconut cream adds a rich flavor. - Whole milk with a little butter can work too. - Use evaporated milk for a lighter choice. - Almond milk mixed with a bit of oil can help mimic the richness. Each option changes the taste, so choose what fits your needs best. This blog post covered the key ingredients for a delicious salted caramel hot chocolate. You learned about the main components and optional garnishes to elevate your drink. We explored step-by-step instructions for perfecting the recipe and shared helpful tips for enhancing flavor and presentation. Variations included dairy-free options, flavor additions, and making it iced. Remember, storing and reheating your drink properly will keep it tasty. Enjoy creating your personalized cup of comfort!

Salted Caramel Hot Chocolate Indulge in Warmth

- 1 block (14 oz) firm tofu - 1/4 cup soy sauce (low sodium) - 2 tablespoons maple syrup - 1 tablespoon rice vinegar - 1 tablespoon sesame oil - 2 teaspoons cornstarch - 2 cloves garlic, minced - 1 teaspoon ginger, grated - Green onions and sesame seeds for garnish Gather these ingredients before starting. The tofu is the star, so choose a firm block. Low sodium soy sauce keeps it balanced. Maple syrup adds a sweet touch. Rice vinegar gives a nice tang. Sesame oil brings rich flavor. Cornstarch helps make it crispy. Garlic and ginger add zest. Don't forget the green onions and sesame seeds for the finish. Each ingredient plays a role in making this dish a delight. Let's dive into the cooking now! To start, you need to press the tofu. This step helps remove moisture. Wrap the block of tofu in a clean kitchen towel. Place a heavy object on top. Let it sit for about 15 minutes. After pressing, cut the tofu into cubes. Aim for bite-sized pieces. This size helps with even cooking and crispiness. Next, we will make the marinade. In a small bowl, combine soy sauce, maple syrup, rice vinegar, and sesame oil. This mix gives great flavor. Then, add minced garlic and grated ginger. Whisk it all together until well blended. The garlic and ginger add a nice kick. Now, toss the tofu in the marinade. Make sure each piece is coated well. This will give the tofu its unique taste. After tossing, let it marinate for at least 20 minutes. This time allows the flavors to soak in. For extra crispiness, sprinkle cornstarch over the marinated tofu. Toss gently to coat each cube. Preheat your air fryer to 375°F (190°C) for about 5 minutes. This step is key for crispiness. Place the tofu cubes in a single layer in the basket. Avoid crowding them to ensure even cooking. If needed, cook in batches. Air fry at 375°F for 15-20 minutes. Shake the basket halfway through. This helps achieve that golden, crispy texture. Once done, remove the tofu and serve it with garnish, like green onions and sesame seeds. To get that perfect crunch, you need cornstarch. This fine powder coats the tofu, making it crisp. When you sprinkle cornstarch on the marinated tofu, it clings well. This helps the tofu crisp up nicely in the air fryer. Don't overcrowd the basket! Give the tofu space to breathe. If you stack it up, the air won't flow well. This can lead to soggy tofu instead of crispy bites. Cook in batches if needed, and you will see a big difference. Want to kick up the flavor? Consider adding some red pepper flakes for a spicy twist. You can also try garlic powder or onion powder. These add depth to the taste of your tofu. Homemade teriyaki sauce is another great option. It lets you control the sweetness. Store-bought sauces are quick and easy but may have preservatives. If you have time, try making your own for a fresh taste. Pair your crispy teriyaki tofu with rice or stir-fried veggies. The soft rice balances the crunchy tofu. It makes for a satisfying meal. When you serve it, think about presentation. Use a nice bowl and add a little extra teriyaki sauce on top. Sprinkle some sesame seeds and chopped green onions for color. A well-presented dish makes every bite more enjoyable! {{image_2}} You can change the flavor with different marinades. If you want a twist, try using a teriyaki sauce alternative. Here are some ideas: - Soy Sauce Mix: Blend soy sauce with honey or agave syrup for a sweet touch. - Miso Paste: Mix miso with water for a rich, savory base. If you like heat, a spicy version is great. You can add Sriracha to the marinade for a kick. Just mix in a tablespoon for a fun flavor. You can enjoy this dish with different types of tofu. Here are some suggestions: - Soft Tofu: Use soft tofu for a creamier texture. Just be gentle when cooking. - Extra Firm Tofu: Extra firm tofu gives more crunch. Press it well to remove moisture. Another option is tempeh. It has a nutty flavor and a unique texture. Cut it in cubes and marinate like tofu for a tasty twist. To keep your crispy air fryer teriyaki tofu fresh, store it in an airtight container. Place it in the refrigerator within two hours of cooking. This helps maintain its flavor and texture. Use the tofu within three to four days for the best taste. When you reheat the tofu, use the air fryer or a hot skillet. This helps to keep it crispy. Heat at 350°F (175°C) for about five to seven minutes. This method revives that golden crunch. If you have extra marinated tofu, you can freeze it. Place the marinated tofu in a freezer bag. Make sure to remove as much air as possible before sealing. Label the bag with the date. You can freeze it for up to three months. To thaw the tofu, move it to the fridge for a few hours or overnight. For quicker thawing, place the bag in a bowl of cold water. After thawing, use the tofu in your favorite dishes. It may be softer but still packed with flavor. To make crispy tofu, start with extra firm tofu. Press it to remove moisture. Wrap the block in a towel and place a heavy object on top for 15 minutes. Cut the pressed tofu into small cubes. In a bowl, mix soy sauce, maple syrup, rice vinegar, sesame oil, minced garlic, and grated ginger. Marinate the tofu cubes in this mixture for at least 20 minutes. After marinating, sprinkle cornstarch over the tofu and toss gently. Preheat your air fryer to 375°F (190°C). Cook the tofu for 15 to 20 minutes, shaking halfway through. The tofu should turn golden and crispy. Yes, you can use firm tofu. However, it may not be as crispy. Extra firm tofu holds its shape better and absorbs less moisture. This helps achieve a crunchier texture. If you use firm tofu, make sure to press it well to remove as much moisture as possible. The best way to press tofu is to wrap it in a clean towel or paper towels. Place a heavy object on top, like a cast iron skillet or canned goods. Let it sit for about 15 minutes. This method helps to squeeze out excess moisture, allowing the tofu to absorb more marinade. Pressing tofu is key for a great texture. You can store cooked teriyaki tofu in the refrigerator for about 3 to 5 days. Keep it in an airtight container to maintain freshness. If you want to enjoy it again, reheat it in the air fryer for a few minutes. This will help keep it crispy. Tofu is a versatile ingredient that can shine in your meals. This post showed you the steps to make crispy teriyaki tofu in an air fryer. You learned how to press, marinate, and cook tofu for great taste. I shared tips for perfect crispiness and flavor boosts. Plus, I covered storage and answered common questions. With a few tweaks, you can enjoy many delicious variations. Use these methods to make your dishes stand out and impress everyone at the table. Enjoy your cooking journey!

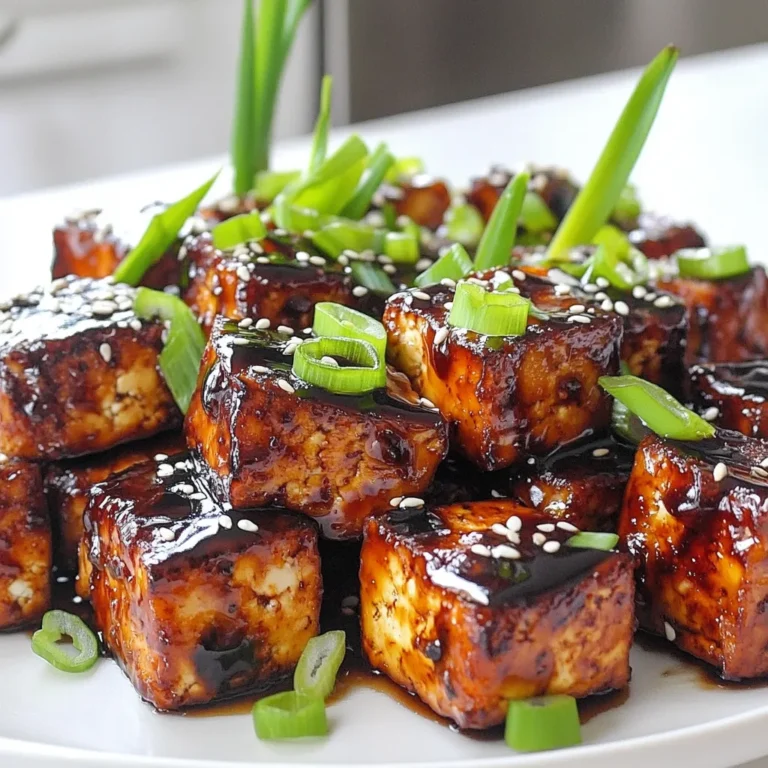
Crispy Air Fryer Teriyaki Tofu Flavorful Delight

Here are the ingredients you need for the Sun Dried Tomato Gnocchi Skillet. - 1 package (16 oz) potato gnocchi - 1 cup sun-dried tomatoes, chopped (in oil, drained) - 2 cups fresh spinach - 2 garlic cloves, minced - 1 small onion, finely chopped - 1 cup vegetable broth - 1 cup heavy cream (or coconut cream for a vegan option) - 1 teaspoon Italian seasoning - 1/2 cup grated Parmesan cheese - Salt and pepper to taste - 2 tablespoons olive oil - Fresh basil leaves for garnish This simple list makes a tasty meal. The potato gnocchi acts as a soft base, while the sun-dried tomatoes add a rich, tangy flavor. Fresh spinach brings a burst of color and nutrients. Garlic and onion give the dish a warm aroma that fills your kitchen. The vegetable broth adds depth, and the heavy cream makes it creamy and luxurious. Italian seasoning ties all the flavors together. Parmesan cheese adds saltiness and richness. Don’t forget the olive oil for cooking and fresh basil for a lovely finish. With these ingredients, you are ready to make a dish that feels fancy but is easy to prepare. It’s perfect for a weeknight dinner or impressing guests. Enjoy cooking! - Sautéing the onion and garlic Heat two tablespoons of olive oil in a large skillet over medium heat. Add one small, finely chopped onion. Cook until it turns soft and translucent, about three to four minutes. Next, add two minced garlic cloves. Sauté for two more minutes. This mix creates a great base for flavor. - Incorporating sun-dried tomatoes Now, add one cup of chopped sun-dried tomatoes to the skillet. Make sure they're drained and in oil. Cook this mix for another two minutes. The aroma will fill your kitchen, making your mouth water. - Adding broth and gnocchi Pour in one cup of vegetable broth and bring it to a simmer. This step adds depth to your dish. Once simmering, gently stir in one package (16 oz) of potato gnocchi. Cook according to the package. Usually, this takes about three to five minutes. You’ll know the gnocchi is done when it floats to the top. - Adding cream and seasoning Next, add one cup of heavy cream to the skillet. For a vegan option, use coconut cream instead. Stir in one teaspoon of Italian seasoning. Mix well and let it simmer for another two to three minutes. This helps the sauce thicken slightly and coat the gnocchi beautifully. - Adding spinach and cheese Toss in two cups of fresh spinach and stir until it wilts. This adds color and nutrients. If you like cheese, now is the time to add half a cup of grated Parmesan cheese. Stir until it melts and creates a creamy texture. - Garnishing with basil Finally, remove the skillet from heat. Garnish your dish with fresh basil leaves. This adds a pop of freshness and looks stunning. Your sun-dried tomato gnocchi skillet is now ready to serve! To make your Sun Dried Tomato Gnocchi Skillet even creamier, try using coconut cream. This is a great option for vegan diets. Coconut cream adds a rich texture without dairy. Just swap it in when a recipe calls for heavy cream. You can also adjust the cheese quantities. If you want a richer taste, add more grated Parmesan. Start with half a cup, then taste. Add more if you like. This simple tweak can change the whole dish! How do you know when gnocchi is done? Look for them to float in the skillet. This means they are cooked through. Typically, this takes about 3-5 minutes. Keep an eye on them, so they don’t overcook. For the best results, use a large skillet with enough space. This helps the gnocchi cook evenly. Stir gently, so they don’t break apart. And always follow the package instructions for timing. You can boost the flavor by adding spices or herbs. Italian seasoning works well, but feel free to experiment. Try adding a pinch of red pepper flakes for some heat. Fresh herbs, like basil or thyme, can also enhance the dish. For side dishes, consider pairing this gnocchi with a fresh salad. A mix of greens with a light vinaigrette goes perfectly. You can also serve it with garlic bread for a hearty meal. {{image_2}} You can easily make this dish vegan. Start by swapping the heavy cream with coconut cream. Coconut cream adds the same rich feel but is dairy-free. It will give your dish a hint of sweetness. For cheese, use nutritional yeast or a vegan cheese blend. These options melt well and add flavor. They can make your gnocchi creamy and satisfying without dairy. Want to add protein? Chicken and shrimp are great choices. Cook them before adding the other ingredients. They blend well with the gnocchi and add heartiness to your meal. For a vegetarian option, try chickpeas or lentils. These will boost protein and fiber. They also soak up the sauce well, making each bite tasty. You can mix in different greens and veggies. Kale or arugula can replace spinach. They add new flavors and textures. Add zucchini or bell peppers for extra crunch and color. Seasonal veggies make this dish even better. Use asparagus in spring or butternut squash in fall. This keeps your meal fresh and fun, no matter the season! To keep your sun-dried tomato gnocchi fresh, follow these easy steps: - Refrigerate: Place the leftovers in an airtight container. Store them in the fridge. They will last for up to three days. - Freezing: If you want to save some for later, freeze the gnocchi. Use a freezer-safe container or bag. Make sure to remove excess air. The gnocchi can stay fresh for up to three months. Reheating your gnocchi can be simple. Here are some methods: - Stovetop: Heat a skillet over medium heat. Add a splash of vegetable broth or cream. Stir in the gnocchi until heated through. This helps keep the texture nice. - Microwave: Place the gnocchi in a microwave-safe dish. Add a little broth or cream. Cover it with a lid or a damp paper towel. Heat it in short bursts, stirring in between. This keeps the flavor strong and the dish creamy. Gnocchi is made from potatoes, flour, and sometimes eggs. The potatoes give it a soft, fluffy texture. You can find pre-made gnocchi at most stores. Some brands use sweet potatoes or gluten-free flour. Yes, you can use fresh tomatoes. However, sun-dried tomatoes add a rich flavor that fresh ones do not. If you choose fresh, use about two cups, diced. Cook them longer to help them break down and release their juices. To prevent sticking, use a large pot of boiling water. Make sure to stir gently as you add gnocchi. Once they float, they are ready. You can also toss them with a bit of olive oil after cooking to keep them separate. Absolutely! This gnocchi dish is great for meal prep. You can store it in the fridge for up to three days. Just reheat it in a skillet or microwave. The flavors get better over time. To make this dish gluten-free, use gluten-free gnocchi. Many brands offer delicious options made from rice, quinoa, or other flours. Check the label to ensure it fits your needs. This blog post guides you through creating a creamy gnocchi dish. We covered the key ingredients, step-by-step preparation, and cooking tips. You learned how to enhance flavors and even make vegan options. I shared storage methods and reheating tips to keep your meal fresh. Experiment with this recipe, and make it your own. Enjoy exploring the many variations it offers! This dish is a great addition to your cooking repertoire. Happy cooking!

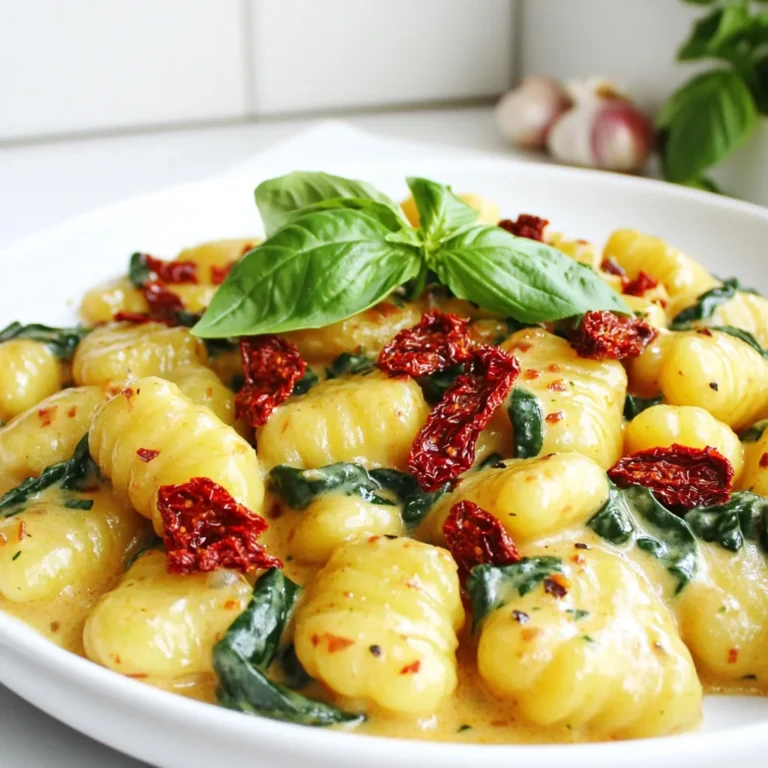
Sun Dried Tomato Gnocchi Skillet Creamy and Flavorful

For this dish, you need 4 bone-in, skin-on chicken thighs. The skin adds flavor and helps keep the meat juicy. The bones also give a rich taste. This choice makes every bite tender and savory. The marinade is key to great flavor. You will need: - 3 tablespoons olive oil - Zest and juice of 2 lemons - 4 cloves garlic, minced - 1 tablespoon fresh rosemary, finely chopped - 1 tablespoon fresh thyme, finely chopped - 1 teaspoon paprika - Salt and freshly ground black pepper to taste Combine these ingredients to make a zesty mix. The lemon gives a bright taste, while the herbs add depth. Garlic adds a nice kick. This marinade will soak into the chicken, making it delicious. You will also need vegetables to complete the meal. For this recipe, choose: - 1 pound baby potatoes, halved - 8 ounces green beans, trimmed The baby potatoes become creamy and soft, while the green beans stay crisp. Both add color and nutrition to your plate. Toss them with the leftover marinade for extra flavor. This mix of chicken and veggies makes a balanced dinner. Start by mixing the marinade. In a small bowl, whisk together 3 tablespoons of olive oil, the zest and juice of 2 lemons, and 4 minced garlic cloves. Add 1 tablespoon each of fresh chopped rosemary and thyme, then 1 teaspoon of paprika. Finally, sprinkle in some salt and pepper. This mix gives your chicken great flavor. Next, take 4 bone-in, skin-on chicken thighs and place them in a large bowl or a ziploc bag. Pour half of the marinade over the chicken. Make sure each piece is covered well. Let the chicken marinate for at least 30 minutes. For more flavor, you can let it sit in the fridge for up to 2 hours. While the chicken marinates, prepare your veggies. In another bowl, take 1 pound of halved baby potatoes and toss them with the rest of the marinade. Grab a large sheet pan and place the marinated chicken thighs skin side up. Scatter the marinated potatoes around the chicken. Preheat your oven to 425°F (220°C). Bake the sheet pan in the oven for 25 minutes. After that, add 8 ounces of trimmed green beans to the pan. Drizzle them with a little olive oil and season with salt and pepper. Bake for another 15-20 minutes. Check the chicken's internal temperature, which should be 165°F (74°C). Once done, take it out and let it rest for 5 minutes. Garnish with chopped parsley before serving. For this dish, fresh herbs are key. I love using rosemary and thyme. Their flavors mix well with lemon. You can also try oregano or basil for a twist. Dried herbs work, but fresh herbs give more flavor. Marinating the chicken is essential for great taste. I recommend at least 30 minutes. If you have time, let it marinate for up to 2 hours. This extra time lets the flavors soak in deeply. To get that crispy skin you crave, start with high heat. Preheat your oven to 425°F (220°C). Use skin-on chicken thighs, as they hold moisture and flavor. Don’t overcrowd the pan; give each piece space. This lets the heat circulate and makes the skin crispy. {{image_2}} You can change up the veggies for this dish. Try adding carrots, zucchini, or bell peppers. These options add different textures and flavors. Carrots bring sweetness, while zucchini adds moisture. Bell peppers can give a nice crunch. Make sure to cut them into similar sizes for even cooking. You do not have to stick to chicken thighs. Feel free to use chicken breasts or drumsticks. If you want a lighter option, turkey thighs work well too. For a vegetarian twist, try firm tofu or chickpeas. Just ensure they soak up the marinade well for great flavor. Want to spice things up? You can add chili flakes for heat. Smoky paprika adds depth and warmth. For a fresh twist, try using fresh dill or cilantro. These herbs can brighten the dish. You can even mix in a splash of balsamic vinegar for tang. This gives you endless possibilities to explore with flavors. After enjoying your meal, you may have leftovers. To keep them fresh, let the chicken and veggies cool down. Place them in an airtight container. They will stay good in the fridge for about 3 to 4 days. Make sure to separate the chicken from the vegetables if you prefer. This helps keep the veggies crisp. When you're ready to eat the leftovers, you can reheat them easily. The best way is to use the oven. Preheat it to 350°F (175°C). Place the chicken and veggies on a baking sheet. Heat them for about 15 to 20 minutes. This method keeps the skin crispy. You can also use a microwave if you're in a hurry. Just cover the dish and heat in short bursts. Check often to avoid overcooking. If you want to save some for later, freezing is a great option. First, let the dish cool completely. Then, wrap the chicken and vegetables tightly in plastic wrap. Place them in a freezer-safe bag or container. You can freeze these for up to 3 months. When you're ready to eat, thaw in the fridge overnight. Reheat as mentioned above, and enjoy your tasty meal again! Yes, you can use boneless chicken thighs. Boneless thighs will cook faster than bone-in ones. I recommend checking them after 20 minutes. Adjust the cooking time as needed. Lemon herb chicken pairs well with many sides. Try serving it with steamed rice, quinoa, or a fresh salad. You can also add roasted vegetables or garlic bread for a tasty meal. Cooking chicken thighs takes about 40 to 45 minutes. Bake them at 425°F (220°C). Always check for an internal temperature of 165°F (74°C) to ensure they are safe to eat. Yes, you can prepare this dish in advance. Marinate the chicken and veggies and store them in the fridge. You can cook them later, making it a great option for busy days. This post covered all you need for a great sheet pan chicken meal. We discussed the best ingredients, like tasty chicken thighs and fresh veggies. You learned to prep the marinade and bake the chicken for perfect results. I shared tips for crispier skin and fun flavor twists. Remember to store leftovers right and reheat carefully. You can use this guide to impress your family and friends. Enjoy your cooking and explore your own twists on this easy recipe!

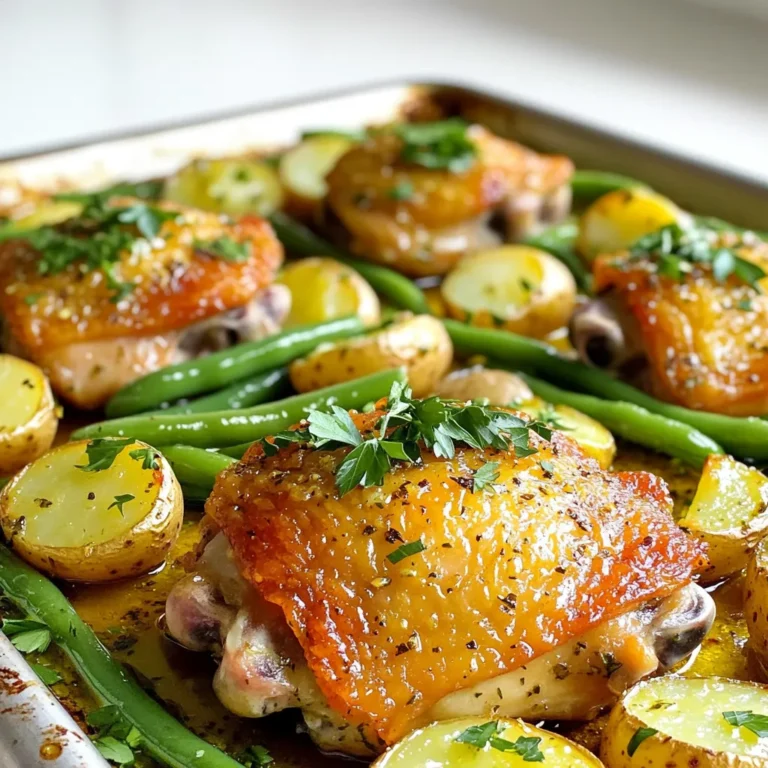
Sheet Pan Lemon Herb Chicken Thighs Flavorful Dish

- 1 package (15.5 oz) Oreo cookies - 1 cup pumpkin puree (not pumpkin pie filling) - 8 oz cream cheese, softened - 1 cup white chocolate chips I love using Oreo cookies in this recipe. They add a rich flavor. The cream cheese gives the truffles a creamy texture. Pumpkin puree adds moisture and a nice fall taste. Make sure to get pure pumpkin, not the filling. - 1 tablespoon coconut oil (optional, for thinning chocolate) - 1 teaspoon pumpkin pie spice - 1/4 cup crushed graham crackers (for garnish) - Pinch of sea salt You can add coconut oil to the chocolate. This helps it melt nicely. Pumpkin pie spice gives extra warmth to the flavor. Crushed graham crackers make a great topping. A pinch of sea salt enhances the sweetness of the truffles. - Crushing the Oreos: Start with a package of Oreo cookies. Place them in a food processor. Pulse until you have fine crumbs. This step is key for a smooth truffle. Pour the crumbs into a mixing bowl. - Mixing pumpkin and cream cheese: Add 1 cup of pumpkin puree to the Oreo crumbs. Use pumpkin puree, not pie filling. Next, add 8 oz of softened cream cheese. Sprinkle in 1 teaspoon of pumpkin pie spice and a pinch of sea salt. Mix well. You want a dough-like texture that holds together. - Forming the truffles: Use your hands to scoop the mixture. Roll it into balls, each about 1 inch wide. Place the balls on a lined baking sheet. Keep them evenly spaced for easy coating later. - Refrigeration process: Now, chill the truffles for about 30 minutes. This helps them firm up, making them easier to coat in chocolate. - Melting the chocolate: While the truffles chill, melt 1 cup of white chocolate chips. Use a microwave-safe bowl. Heat in 30-second bursts, stirring in between. If you want a thinner chocolate, add 1 tablespoon of coconut oil. - Dipping and garnishing: Take the chilled truffles out of the fridge. Dip each truffle in the melted chocolate, using a fork. Let excess chocolate drip off. While the chocolate is still wet, sprinkle crushed graham crackers on top. Place them back on the baking sheet. Allow the chocolate to set completely. Ensuring a smooth chocolate coating To get a great chocolate coat, melt the white chocolate slowly. Use a microwave-safe bowl. Heat the chocolate in 30-second bursts. Stir well between each burst until it’s smooth. If the chocolate is too thick, add coconut oil. This will help it coat the truffles evenly. Using the right pumpkin puree Always use pure pumpkin puree, not pumpkin pie filling. The filling has added sugar and spices, which can change the taste. Pure pumpkin gives the truffles a soft and rich flavor. Check the label to make sure you choose the right one. Pairing with beverages These truffles go well with warm drinks. Try serving them with a spiced chai or a pumpkin latte. The flavors mix well and create a cozy vibe. You can also pair them with milk or hot cocoa for a sweet treat. Presentation ideas Place the truffles on a nice platter. You can sprinkle extra crushed graham crackers on top for a nice look. Using colorful cupcake liners can also make them pop. For a festive touch, add small fall-themed decorations around the platter. {{image_2}} You can change the flavor of your truffles easily. Use different types of Oreos for fun. Try mint, peanut butter, or even birthday cake Oreos. Each one gives a new taste twist. You can also add spices or extracts. A dash of cinnamon or nutmeg can boost the fall flavor. You might even try almond or vanilla extract for a unique touch. These small changes can create new experiences. Making these truffles gluten-free is simple. Use gluten-free Oreos instead of regular ones. This way, everyone can enjoy them without worry. For a vegan version, swap out the cream cheese with a vegan cream cheese. You can also use dairy-free chocolate chips to coat the truffles. These options make the treat friendly for all diets. To keep your No-Bake Oreo Pumpkin Truffles fresh, store them in the fridge. Place them in an airtight container. This helps prevent them from drying out. If you have a large batch, separate layers with parchment paper. This avoids sticking. They will stay fresh for about one week. You can freeze these truffles for longer storage. First, line a baking sheet with parchment paper. Place the truffles on the sheet and freeze them for about one hour. Once frozen solid, transfer them into a freezer-safe bag or container. Make sure to remove as much air as possible. They can last up to three months in the freezer. When you want to enjoy them again, take them out and put them in the fridge overnight to thaw. Serve them chilled for the best taste. Can I use pumpkin pie filling instead of puree? No, you should not use pumpkin pie filling. It has added sugar and spices. This can change the taste and texture of your truffles. Stick with plain pumpkin puree for the best results. How long do the truffles last in the fridge? The truffles can last about one week in the fridge. Keep them in an airtight container. This helps keep them fresh and tasty. Can I make these truffles ahead of time? Yes, you can make these truffles ahead of time. They are great for parties or holidays. Just store them in the fridge until you are ready to serve. What to do if the chocolate won’t harden? If the chocolate won’t harden, it may be too warm or thin. Try placing the truffles in the fridge for a bit longer. You can also add a small amount of coconut oil to help the chocolate set better. How to fix a crumbly truffle mixture? If your truffle mixture is crumbly, it might need more moisture. Add a little more pumpkin puree or soften cream cheese. Mix well until it holds together better. To sum up, we covered all you need for pumpkin Oreo truffles. We discussed key ingredients like Oreo cookies, cream cheese, and pumpkin puree. You learned step-by-step instructions that included mixing, shaping, and coating. We shared useful tips, variations, and storage advice to keep your truffles fresh. Now, you can enjoy these treats at any gathering. They’re fun to make and share. With the right ingredients and steps, you can wow your friends and family. Try these truffles; they’re sure to impress!

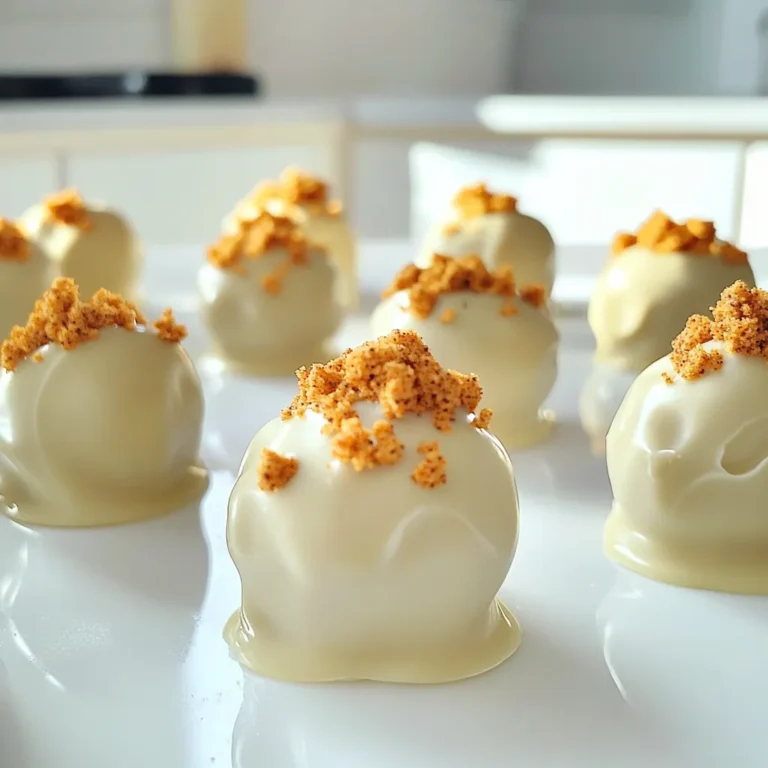
No-Bake Oreo Pumpkin Truffles Easy Fall Treat

To make Fifteen Minute Garlic Chili Noodles, gather these items: - 200g egg noodles - 3 tablespoons olive oil - 4 cloves garlic, minced - 1 red chili, thinly sliced - 1 tablespoon soy sauce - 1 tablespoon sesame oil - 1 teaspoon sugar - 1 green onion, chopped - Fresh cilantro, for garnish - Salt to taste You can swap ingredients based on what you have. Here are some ideas: - Use rice noodles instead of egg noodles for a gluten-free option. - Canola oil works well if you don't have olive oil. - For less heat, use bell pepper instead of red chili. - Coconut aminos can replace soy sauce for a soy-free option. - Swap sesame oil with peanut oil for a nutty flavor. - If you don't have green onions, use chives or shallots. To cook this dish, you'll need: - A large pot for boiling noodles - A large skillet or wok for sautéing - A cutting board and knife for chopping - A measuring spoon for accuracy - A serving plate to present your dish Start by boiling water in a pot. Add 200g of egg noodles to the pot. Cook them until they are al dente, which usually takes about 3 to 4 minutes. Check the package for specific times. Once done, drain the noodles and set them aside. This step is quick and helps you save time. Grab a large skillet or wok and heat 3 tablespoons of olive oil over medium-high heat. When the oil is hot, add 4 cloves of minced garlic. Stir it for about 30 seconds. You want it fragrant but not browned. Next, toss in 1 thinly sliced red chili. Sauté them together for another minute. This will make your kitchen smell amazing! Now, lower the heat a bit. Toss in the cooked noodles, along with 1 tablespoon of soy sauce, 1 tablespoon of sesame oil, and 1 teaspoon of sugar. Mix everything well so the noodles are coated evenly. Add salt to taste and fold in 1 chopped green onion. Stir-fry everything for another minute. When it’s all warm, transfer the noodles to a serving plate. Finally, garnish with fresh cilantro for a burst of color and taste. Enjoy your meal! To make your garlic chili noodles shine, use fresh ingredients. Fresh garlic packs a punch, while a ripe chili adds heat. Adjust the chili based on your spice level. If you want less heat, remove the seeds from the chili. The soy sauce adds depth and umami. Feel free to add more or less to match your taste. For a more complex flavor, try adding a splash of rice vinegar or lime juice. When cooking the noodles, follow the package instructions closely. Drain them as soon as they reach al dente. This keeps them from getting too soft later. Rinse the noodles briefly under cold water to stop the cooking process. This step helps keep the noodles firm. Toss them with a bit of olive oil before adding to your stir-fry. This prevents them from sticking together. Serve the noodles hot on a plate or in a bowl. Top with extra chopped green onions and fresh cilantro for color. You can also sprinkle sesame seeds for added crunch. Pair the noodles with a side of steamed veggies or a fresh salad. These sides balance the meal and add nutrients. For a fun twist, serve with lime wedges for an extra zing. {{image_2}} You can easily add protein to your garlic chili noodles. Chicken, shrimp, or tofu work well. Simply cook your chosen protein in the skillet before adding the garlic. For chicken, cut it into small pieces. For shrimp, peel and devein them. Tofu should be cubed. Cook until just done, then follow the rest of the recipe. This dish is great for both vegetarians and vegans. To make it vegetarian, stick with the egg noodles. For a vegan option, swap the egg noodles for rice noodles. Ensure your soy sauce is vegan-friendly. You can also add more veggies like bell peppers or broccoli. They will add color and nutrients to your meal. You can adjust the spice level to fit your taste. If you love heat, add more red chili or a splash of chili oil. For a milder dish, use less chili or omit it altogether. You can also add a sprinkle of black pepper or a dash of hot sauce at the end for a unique kick. After your meal, let the garlic chili noodles cool. Place them in an airtight container. Make sure to get rid of any extra air. Store the noodles in the fridge for up to three days. Keeping the noodles sealed helps them stay fresh and tasty. To reheat, you can use a skillet or microwave. If using a skillet, add a splash of water to keep them moist. Heat on medium until warm. If using a microwave, cover the noodles and heat in 30-second bursts. Stir in between to heat evenly. You can freeze the garlic chili noodles, but they may change texture. First, cool them completely. Then, place them in a freezer-safe bag. Remove as much air as possible. You can keep them in the freezer for up to a month. When ready to eat, thaw in the fridge overnight. Reheat as mentioned above. Yes, you can make this recipe gluten-free. Use gluten-free egg noodles or rice noodles instead. These options work well and taste great. Always check the labels to ensure they meet your needs. You can also swap soy sauce for gluten-free tamari. This keeps the flavors intact without the gluten. Garlic chili noodles pair well with many dishes. You can serve them with grilled chicken or shrimp for extra protein. A side of steamed vegetables adds color and nutrition. Try a light salad with a tangy dressing to balance the heat. These noodles also work well as a base for stir-fried vegetables. To adjust the spiciness, you can modify the chili. For less heat, use half a red chili or remove the seeds. If you want more spice, add a pinch of red pepper flakes. You can also drizzle some chili oil on top before serving. Taste as you go to find your perfect heat level. This guide took you through creating garlic chili noodles. We covered necessary ingredients, tools, and step-by-step cooking tips. I shared ways to adjust flavors, how to handle leftovers, and ideas for serving. Keep these tips in mind to make a tasty dish each time. Experiment with ingredients to find what you love. This dish is simple, fun, and adaptable. Enjoy your cooking adventure and make garlic chili noodles your own!

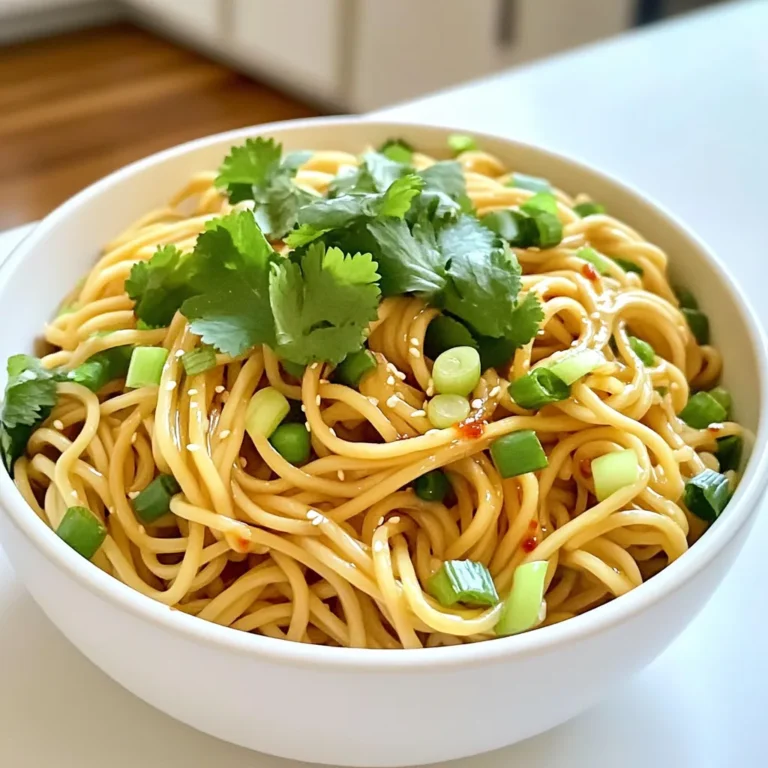
Fifteen Minute Garlic Chili Noodles Quick and Easy Meal

PREV 1 … 3 4 5 … 56 NEXT
go kitchen now

explore

DessertsDinnerAppetizersDrinks

Our Policies

  • Cookie Policy
  • Copyright Policy
  • Disclaimer
  • GDPR Policy
  • Terms Of Use
Back to Top
  • About
  • Contact Us
  • Privacy Policy
© 2025 go kitchen now