FREE DINNER EBOOK! Get your copy!
  • Cookie Policy
  • GDPR Policy
  • Disclaimer
  • Terms Of Use
  • Visit my other site: Fun Cookie Recipes
go kitchen now
  • Home
  • Dinner
  • Desserts
  • Drinks
  • Appetizers
  • Contact
  • About
  • Privacy Policy
  • Home
  • Dinner
  • Desserts
  • Drinks
  • Appetizers
  • Contact
  • About
  • Privacy Policy
  • Cookie Policy
  • GDPR Policy
  • Disclaimer
  • Terms Of Use
Visit my other site: Fun Cookie Recipes

HOME / CATEGORIES /

Latest

- 12 oz cheese tortellini - 1 lb large shrimp, peeled and deveined - 2 cups fresh spinach - 1 cup heavy cream - 1 cup chicken broth - 2 cloves garlic, minced - 1/4 cup grated Parmesan cheese - 1 tbsp olive oil - Salt and pepper to taste - 1 tsp Italian seasoning - Optional: crushed red pepper flakes for heat Using fresh ingredients makes this dish shine. Fresh spinach adds great flavor and nutrients. Choose large shrimp for the best texture and taste. Use high-quality cheese tortellini for a rich, creamy bite. Fresh garlic gives a strong aroma and taste. For the cream, choose heavy cream for a velvety sauce. Look for good Parmesan cheese for the best flavor. You can swap cheese tortellini for any pasta you like. Use frozen shrimp if fresh ones are not available. Fresh spinach can be replaced with kale or another leafy green. For a lighter sauce, use half-and-half instead of heavy cream. If you want a veggie boost, add mushrooms or bell peppers. If you prefer a dairy-free option, almond milk works in place of cream, but the sauce will be thinner. For spice lovers, add more crushed red pepper flakes for extra heat. Start by boiling water in a large pot. Add salt to the water. When the water boils, add 12 oz of cheese tortellini. Cook the tortellini according to the package instructions, usually about 3-5 minutes. Once cooked, drain the tortellini and set it aside. It’s important to let the tortellini sit so it doesn’t stick together. In a skillet, heat 1 tablespoon of olive oil over medium heat. Add 2 minced garlic cloves and sauté for about 1 minute. The garlic should smell fragrant. Next, add 1 lb of large shrimp that is peeled and deveined. Season the shrimp with salt, pepper, and 1 teaspoon of Italian seasoning. Cook the shrimp for about 3-4 minutes. Watch for the shrimp to turn pink and opaque. This means they are cooked through. Once the shrimp is ready, pour in 1 cup of chicken broth and bring it to a simmer. This adds a nice flavor base. Next, stir in 1 cup of heavy cream. Let the sauce cook for 2-3 minutes. This will help the sauce thicken slightly. Add 2 cups of fresh spinach to the sauce. Stir until the spinach wilts down. Finally, toss in the cooked tortellini and 1/4 cup of grated Parmesan cheese. Mix everything well, ensuring the tortellini is coated in the creamy sauce. Taste the dish and adjust the seasoning. If you like heat, add crushed red pepper flakes. Enjoy your meal! To get that rich, creamy sauce, start with heavy cream. It gives a great texture. When you add the chicken broth, stir it well. This step helps blend the flavors. Simmer the sauce for a few minutes. This allows it to thicken nicely. If the sauce seems too thick, add a splash of broth. If it's too thin, let it cook a bit longer. Seasonings make this dish pop. Use salt and pepper to taste. Italian seasoning adds a nice herbal touch. For more flavor, consider fresh herbs like basil or parsley. If you enjoy spice, sprinkle in crushed red pepper flakes. This small addition can make a big difference. Taste as you go along. Adjust the seasonings to suit your taste. Creamy shrimp and spinach tortellini pairs well with garlic bread. The bread soaks up the sauce perfectly. A light salad adds freshness to your meal. Try a simple mix of greens with a lemon vinaigrette. You can also serve it with steamed vegetables. Broccoli or asparagus complements the dish well. Enjoy experimenting with your favorite sides! {{image_2}} You can boost nutrition by adding more vegetables. Try bell peppers, zucchini, or broccoli. These veggies add color and crunch. You can sauté them with the garlic. This will enhance the meal's taste and health benefits. If you prefer chicken, it works great in this dish. Use boneless chicken breasts, cut into small pieces. Cook them in the same way as the shrimp. For a plant-based option, try tofu. Use firm tofu and cube it. Sauté until golden for a tasty twist. You can make this dish gluten-free easily. Just use gluten-free tortellini. Many brands offer great options. For a dairy-free version, replace heavy cream with coconut cream or almond milk. This keeps the meal creamy while fitting your diet needs. Enjoy your personalized dish! To store leftovers, first let the dish cool down. Use an airtight container to keep it fresh. This will help prevent any strong smells in your fridge. You can keep the creamy shrimp and spinach tortellini in the fridge for up to three days. If you want to enjoy it later, storing it properly is key. When you're ready to eat leftovers, you can reheat them on the stove or in the microwave. If using the stove, heat it gently over low heat. This helps keep the sauce creamy. Stir often to prevent sticking. If using the microwave, place it in a microwave-safe bowl, cover it, and microwave in short bursts. Stir between each burst to make sure it heats evenly. If you want to save the dish for a longer time, freezing is a great option. First, let the tortellini cool completely. Then, place it in a freezer-safe container or bag. Make sure to remove as much air as possible to avoid freezer burn. You can freeze it for up to two months. When ready to eat, thaw it in the fridge overnight before reheating. It takes about 10 minutes to prep and 15 minutes to cook. You can have this dish ready in just 25 minutes. This makes it a quick and easy dinner option for busy nights. Yes, you can use frozen shrimp. Just make sure to thaw them first. Place them in cold water for about 10-15 minutes. Pat them dry and they will be good to go. Frozen shrimp saves time and works well in this dish. To keep the sauce creamy and smooth, avoid boiling it. Cook the sauce on low heat after adding the cream. Stir it gently and don’t let it bubble too much. Adding the cheese slowly helps it melt evenly, keeping the sauce rich and creamy. This blog post covered everything you need for a delicious creamy shrimp and spinach tortellini dish. You learned about quality ingredients, cooking steps, and helpful tips. I shared variations to fit your diet and how to store leftovers, too. Remember, cooking is all about creativity and fun. Keep trying new things to make this dish your own. Enjoy your cooking and the tasty meals ahead!

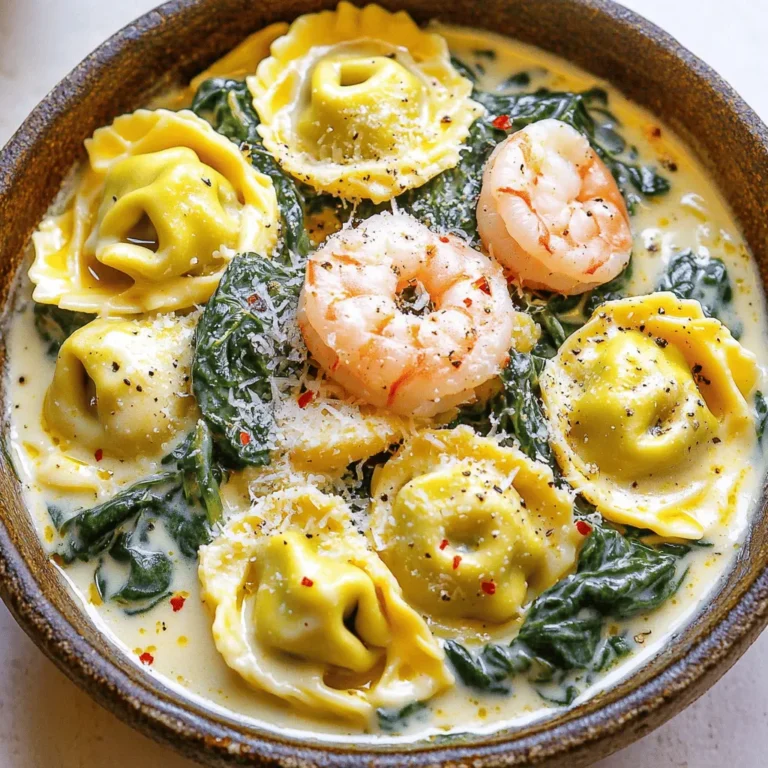
Creamy Shrimp and Spinach Tortellini Easy Dinner Recipe

- 1 large green cabbage, sliced into 1-inch thick steaks - 3 tablespoons olive oil - 1 teaspoon smoked paprika - 1 teaspoon garlic powder - ½ teaspoon onion powder - ½ teaspoon cumin - Salt and black pepper to taste - Fresh parsley, chopped for garnish - Optional: Chili flakes for an extra kick For this recipe, you need a large green cabbage. It should be fresh and firm. The spices add great flavor. Olive oil helps the spices stick. Smoked paprika gives a nice depth. Garlic powder and onion powder add savory notes. Cumin adds warmth and earthiness. Adjust salt and black pepper to your taste. Fresh parsley brightens the dish. If you like heat, sprinkle some chili flakes on top. Using high-quality ingredients makes a difference. Choose organic cabbage if you can. Fresh herbs bring a pop of color and flavor. This dish is simple yet tasty. Enjoy these roasted cabbage steaks as a side dish or a main dish. They are healthy and filling. Plus, they look great on the plate! - Preheat the oven to 425°F (220°C). - Remove the outer layers of the cabbage. - Slice the cabbage into 1-inch thick steaks. To start, preheating your oven is key. This ensures even cooking. Next, take your large green cabbage and peel off the tough outer layers. These layers can be thick and tough. You want soft and tender bites. When slicing, keep the core intact. This helps the steaks hold together during cooking. - Whisk together olive oil and spices. In a small bowl, combine 3 tablespoons of olive oil with the spices. This includes 1 teaspoon of smoked paprika, 1 teaspoon of garlic powder, ½ teaspoon of onion powder, and ½ teaspoon of cumin. Add salt and black pepper to taste. Whisk until smooth. The spices will give your steaks a rich flavor. - Brush cabbage steaks and roast in the oven, flipping halfway through. Place the cabbage steaks on a baking sheet lined with parchment paper. Brush both sides with the olive oil mixture. If you like heat, sprinkle chili flakes on top. Roast in your preheated oven for 25 to 30 minutes. Flip the steaks halfway through. Look for crispy edges and tender centers. Once done, let them cool a bit before serving. Garnish with fresh parsley for a pop of color. To get crispy edges on your cabbage steaks, you need high heat. Set your oven to 425°F (220°C). This temperature helps the edges brown nicely. Roast the steaks for about 25-30 minutes. Flip them halfway for even cooking. You want them tender but with a good crunch. Seasoning is key. Use smoked paprika for a deep flavor. Garlic powder and onion powder add warmth. Cumin gives a nice earthy note. Feel free to add herbs like thyme or rosemary for freshness. You can also try a marinade with soy sauce for a different twist. Personalize it to your taste! For serving, place the cabbage steaks on a nice platter. Drizzle with balsamic glaze for a pop of color and taste. Fresh parsley adds a nice touch too. Pair these steaks with roasted cherry tomatoes or a light tomato salad. They balance the flavors well and look great on the plate. {{image_2}} You can cook cabbage steaks in different ways. Grilling adds a nice smoky flavor. Just heat your grill and cook the steaks for about 5-7 minutes on each side. Watch them closely to avoid burning. The grill marks will make them look great! Sautéing is another fun option. Cut the cabbage into steaks, then heat some olive oil in a pan. Cook the steaks for about 5 minutes on each side. This method gives a nice, tender texture and allows you to control the heat easily. Want to spice things up? Try Asian-inspired cabbage steaks! Brush them with soy sauce and sprinkle sesame seeds on top. This adds a savory taste and a bit of crunch. For a Mediterranean twist, top your cabbage steaks with feta cheese and olives. The salty feta pairs well with the cabbage, making a fresh, tasty dish. You can even add a squeeze of lemon for extra zing. Using seasonal ingredients can elevate your cabbage steaks. In spring, add fresh asparagus or peas for color and texture. In summer, toss in cherry tomatoes or zucchini for a bright taste. This way, you enjoy the best flavors of the season while keeping your meals fun and exciting. You can also mix in proteins, like chickpeas or grilled chicken, to make it a complete dish. After you roast your cabbage steaks, let them cool. Place them in an airtight container. This keeps them fresh and tasty. Store the container in the fridge. Your roasted cabbage steaks last about 3 to 5 days in the fridge. Yes, you can freeze roasted cabbage steaks! First, cool them completely. Then, wrap each steak in plastic wrap. Place the wrapped steaks in a freezer bag. Squeeze out the air to prevent freezer burn. They can stay in the freezer for up to 3 months. To reheat after freezing, take the steaks out the night before. Let them thaw in the fridge. When ready, preheat your oven to 375°F (190°C). Bake the steaks for about 15-20 minutes until warm. Leftover cabbage can shine in other dishes. Try chopping it up for a stir-fry with other veggies. You can add it to soups for extra flavor and nutrients. Another idea is to mix it in a salad for a crunchy bite. You can also blend it into a smoothie for a healthy twist. To check if your cabbage steaks are done, look for a few signs: - The edges should be crispy and golden brown. - The center should feel tender when you poke it with a fork. - If they have a nice, caramelized look, they are ready to eat. Roasting them usually takes about 25-30 minutes at 425°F. Flip them halfway for even cooking. This helps achieve that delightful crispiness we all love. Yes, you can use various types of cabbage! Here are some great options: - Savoy cabbage: It has a more tender texture and sweet flavor. - Napa cabbage: It is softer and works well if you want a milder taste. - Red cabbage: It adds a pop of color and a slightly peppery taste. Feel free to experiment. Each type offers a unique flavor and texture. Roasted cabbage steaks are versatile and can pair with many dishes. Here are some ideas: - Grains: Serve with quinoa or brown rice for a hearty meal. - Proteins: Pair with grilled chicken, fish, or chickpeas for added protein. - Salads: A refreshing tomato salad or a light slaw can brighten the meal. Cabbage is low in calories and high in fiber, making it a healthy choice. Enjoy these steaks as a main dish or a side dish for a balanced meal! In this post, we explored how to make delicious roasted cabbage steaks. We discussed the ingredients, step-by-step instructions, tips for perfect roasting, and fun variations. You can grill, sauté, or add extra flavors to suit your taste. Remember to store leftovers properly to reduce waste. Cabbage steaks are versatile and tasty, making them a great dish for any meal. Enjoy trying out these ideas and make cabbage steaks a favorite in your kitchen!

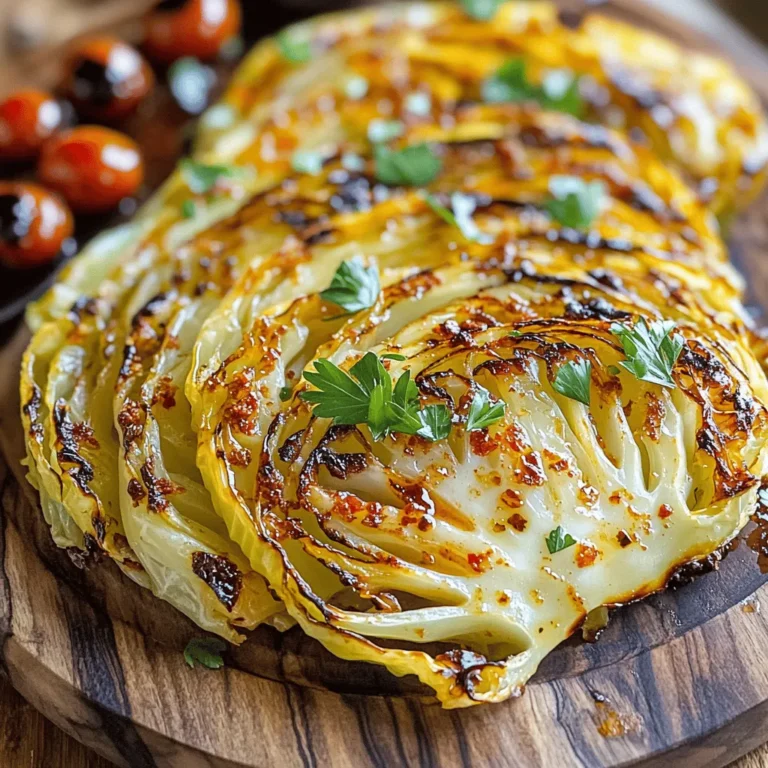
Roasted Cabbage Steaks Flavorful and Easy Recipe

- 1 cup cream cheese, softened - 1 cup canned pumpkin puree - 1/2 cup powdered sugar - 1 teaspoon vanilla extract - 1 teaspoon ground cinnamon - 1/2 teaspoon ground nutmeg - 1/4 teaspoon ground ginger - 1/2 cup graham cracker crumbs - 1/2 cup walnuts or pecans, finely chopped (optional) - 1/2 cup white chocolate chips (for coating) To make these no-bake pumpkin cheesecake balls, gather all your ingredients. Start with softened cream cheese. This helps create a smooth mix. The canned pumpkin puree brings that fall flavor. You can use fresh pumpkin too, but canned saves time. Add powdered sugar for sweetness. Vanilla extract enhances the taste. Ground cinnamon, nutmeg, and ginger add warmth. These spices make your cheesecake balls taste like autumn. Next, the graham cracker crumbs give a nice crunch. If you love nuts, chop walnuts or pecans and mix them in. They add texture and flavor. Finally, we need white chocolate chips for coating. Melt them to create a sweet outer layer. This will make the balls look fancy and taste delicious. - Calories per serving: Approximately 120 - Macros breakdown: - Fat: 7g - Carbs: 13g - Protein: 2g - Allergen information: Contains dairy and nuts (if using walnuts or pecans). Knowing the nutritional information helps you plan. Each serving has about 120 calories. You have a nice balance of fat, carbs, and protein. Remember, these treats are rich, so enjoy them in moderation! 1. In a large bowl, I mix the softened cream cheese and canned pumpkin puree. I stir until the mixture is smooth and creamy. This step is key for a great base. 2. Next, I add powdered sugar, vanilla extract, ground cinnamon, nutmeg, and ginger. I mix everything well until it becomes a uniform blend. Each spice brings warmth and flavor. 3. I gently fold in the graham cracker crumbs. This gives the balls a nice texture. If I want some crunch, I add finely chopped walnuts or pecans at this point. 1. Using my hands, I shape the mixture into small balls, about 1 inch wide. I place them on a baking sheet lined with parchment paper. This step is fun and allows for creativity. 2. Once all the balls are formed, I chill them in the fridge for at least 1 hour. This helps them firm up and makes them easier to coat. 1. While the cheesecake balls chill, I melt the white chocolate chips. I use a microwave-safe bowl and heat in 20-second intervals. I stir in between until it is completely melted. 2. After chilling, I dip each pumpkin cheesecake ball into the melted white chocolate. I let any extra chocolate drip off before placing them back on the baking sheet. 3. For a finishing touch, I sprinkle extra graham cracker crumbs or a dash of cinnamon on top. Then, I return them to the fridge for another 30 minutes to set. To make the best no-bake pumpkin cheesecake balls, start with cream cheese. Make sure it is soft. If it is too cold, your mixture will not blend well. Let it sit out for a bit. This helps create a smooth texture. Next, adjust the sweetness. Taste your mixture as you go. You can add more powdered sugar if you like it sweeter. Remember, pumpkin puree has a natural sweetness too. Want to speed up chilling? Try placing the cheesecake balls in the freezer for about 20 minutes. This way, they firm up faster. Just don’t forget to keep an eye on them! Use a cookie scoop for easy portioning. It helps form uniform balls. For mixing, a hand mixer can save time. It makes the cream cheese and pumpkin blend quickly. For serving, place the cheesecake balls on a pretty plate. A tiered stand looks great too. Drizzle some melted chocolate on top for flair. Garnish with whole nuts or a sprinkle of cinnamon. These little touches make your dish pop. You can also use extra graham cracker crumbs for an added crunch. Enjoy your beautiful creation! {{image_2}} You can easily change the taste of your pumpkin cheesecake balls. Adding spices like cloves or allspice gives them a warm, cozy flavor. Just a pinch can make a big difference. You might also try flavored extracts. Maple or almond can add a nice twist to the classic taste. Experimenting with these can make each batch unique and fun! If you need gluten-free options, use gluten-free graham cracker crumbs. They work just as well and keep the taste great. For vegan alternatives, swap cream cheese for a nut-based cream cheese. You can also use maple syrup instead of powdered sugar. These changes keep the deliciousness while fitting your diet needs. You can dress up these cheesecake balls for any holiday. Try festive decorations like colorful sprinkles or edible glitter. For pairing suggestions, serve them at parties with warm drinks like cider or coffee. They bring a delightful fall flavor that everyone will enjoy. No matter the season, these cheesecake balls can shine! To keep your no-bake pumpkin cheesecake balls fresh, store them in the fridge. Place them in an airtight container. Make sure they are not touching each other. This prevents sticking and keeps them neat. They stay fresh for about a week. If you want them to last longer, try covering them with plastic wrap before sealing the container. You can freeze these cheesecake balls for longer storage. First, place them on a baking sheet lined with parchment paper. Freeze them for about 1-2 hours until firm. Once frozen, transfer them to a freezer-safe bag. Make sure to remove as much air as you can. This helps avoid freezer burn. When you want to eat them, thaw the balls in the fridge overnight. Serve them cold for a refreshing treat. These cheesecake balls stay tasty for up to a week in the fridge. In the freezer, they can last for about three months. Keep an eye out for any signs of spoilage. If they develop an off smell, change in color, or texture, it's best to discard them. Fresh is always best when it comes to flavor. Enjoy your treats at their peak! Yes, you can use fresh pumpkin. Start by selecting a sugar pumpkin. Cut it in half and remove the seeds. Bake the halves at 350°F for about 45 minutes or until soft. Once cool, scoop out the flesh and blend until smooth. Use this puree in place of canned pumpkin. It may have a fresher taste, but make sure to drain excess moisture for the best results. You can use Greek yogurt or silken tofu as substitutes. Both provide creaminess while keeping the flavor nice. For a sweeter touch, you could also try mascarpone or a plant-based cream cheese. Adjust the sugar to balance the taste. Each option offers a unique twist, so feel free to experiment! Yes, you can prepare these cheesecake balls in advance. Make them up to two days ahead of time. Store them in an airtight container in the fridge. This also helps the flavors meld together beautifully. Just remember to coat them with chocolate shortly before serving for a fresh look. You can use dark chocolate or milk chocolate instead. Both options add a rich flavor. If you want a fun twist, try candy melts in different colors for a festive look. Just melt and dip as you would with white chocolate. To boost flavor, consider adding a pinch of cloves or allspice. You can also use flavored extracts like maple or almond. Topping with crushed nuts or a sprinkle of sea salt adds texture and depth. Even a drizzle of caramel can elevate your cheesecake balls to the next level! In this post, we covered how to make delicious cheesecake balls using cream cheese and pumpkin. I shared key ingredients, detailed steps, and helpful tips. Remember to adjust flavors to your taste and try different variations. These treats are perfect for any event, so get creative with your presentation. With proper storage, you can enjoy them longer. Experiment and have fun with this recipe!

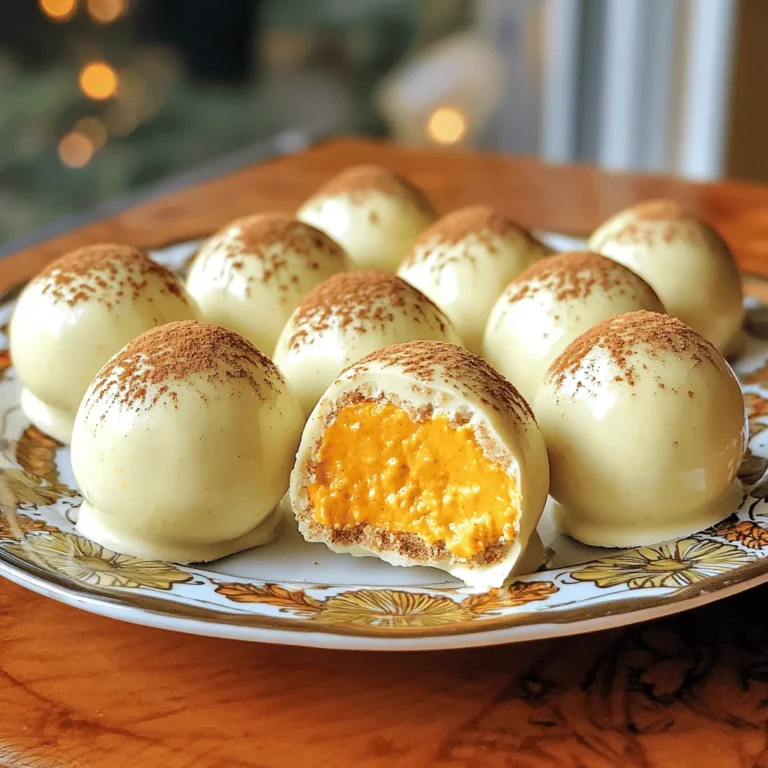
No-Bake Pumpkin Cheesecake Balls Flavorful and Easy

To make Apple Cinnamon Muffins, you need the following items: - 2 cups all-purpose flour - 1 cup granulated sugar - 1 tablespoon baking powder - 1 teaspoon baking soda - 1 teaspoon ground cinnamon - 1/2 teaspoon salt - 1 cup buttermilk (or milk with 1 tablespoon lemon juice added) - 2 large eggs - 1/2 cup unsalted butter, melted - 2 cups finely chopped apples (about 2 medium apples) - 1 teaspoon vanilla extract - Optional: 1/2 cup chopped walnuts or pecans These ingredients create a tasty treat that fills your kitchen with warm aroma. You can easily swap some ingredients if needed. Here are a few options: - Use whole wheat flour instead of all-purpose flour for a nuttier flavor. - Substitute brown sugar for granulated sugar to add a hint of molasses. - If you lack buttermilk, mix regular milk with a tablespoon of lemon juice or vinegar. - For a dairy-free option, use almond or oat milk with lemon juice. Adding extras can make your muffins even better. Consider these options: - Mix in 1/2 cup of chopped nuts for crunch. - Add 1/2 cup of raisins or dried cranberries for sweetness. - Spice it up with a pinch of nutmeg or ginger for warmth. These options let you customize your muffins to suit your taste. Enjoy experimenting with flavors! 1. Preheat the oven to 350°F (175°C). This helps your muffins rise and bake evenly. 2. Prepare your muffin tin by lining it with paper liners or lightly greasing it. This prevents the muffins from sticking. 3. In a large bowl, whisk together these dry ingredients: - 2 cups all-purpose flour - 1 cup granulated sugar - 1 tablespoon baking powder - 1 teaspoon baking soda - 1 teaspoon ground cinnamon - 1/2 teaspoon salt 4. In another bowl, mix the wet ingredients until smooth: - 1 cup buttermilk (or milk with 1 tablespoon lemon juice) - 2 large eggs - 1/2 cup melted unsalted butter - 1 teaspoon vanilla extract 5. Combine the wet and dry ingredients. Pour the wet mix into the dry mix. Gently fold until just combined. Be careful not to overmix! 6. Add the chopped apples. Fold in 2 cups of finely chopped apples and nuts if you want. This adds texture and flavor. 1. Fill the muffin cups. Using a scoop or spoon, fill each cup about 3/4 full with batter. This gives them space to rise. 2. Bake in your preheated oven for 18-20 minutes. Keep an eye on them! 3. Check for doneness by inserting a toothpick into the center of a muffin. If it comes out clean, they are done. 4. Avoid overbaking. Overbaked muffins can be dry. If they start to brown too much, check them earlier. 5. Cool the muffins in the tin for 5 minutes. Then, move them to wire racks to cool completely. Enjoy the warm smell of apples and cinnamon! How to prevent muffins from sinking: To stop your muffins from sinking, don’t overmix the batter. Mix just until combined. Also, use fresh baking powder and baking soda. Check their dates before you start. Ensuring a moist texture in muffins: Use buttermilk for moisture. It makes muffins soft and fluffy. You can add applesauce or yogurt to enhance moisture too. Always fold in chopped apples gently for the best texture. Techniques for achieving a golden brown top: For a golden top, use melted butter in the batter and brush some on top before baking. Bake at the right temperature, and watch them closely. A light dusting of sugar can also help create a nice crust. Suggestions for adding spices or extracts: You can add nutmeg or ginger for more flavor. A splash of almond extract gives a nice twist too. Just a little goes a long way. Pairing ideas with different types of apples: Use tart apples like Granny Smith for a balance of sweetness. Honeycrisp apples add a sweet crunch. Mix different types for a fun flavor blend. Using nuts or dried fruits: Chop some walnuts or pecans for a crunchy texture. Dried cranberries or raisins work well too. They add a sweet burst with every bite. {{image_2}} You can play with flavors in many ways. One fun idea is to make Apple Cinnamon Oatmeal Muffins. Just add 1 cup of rolled oats to your dry mix. This gives a heartier texture and extra fiber. Another option is Chocolate Chip Apple Muffins. Add 1 cup of chocolate chips when you fold in the apples. The chocolate melts beautifully and pairs well with cinnamon. You can also swap out cinnamon for other spices. Try nutmeg or cardamom for a unique twist. Each spice changes the taste but keeps that warm, cozy feel. Some people need different options. For a gluten-free version, use 2 cups of gluten-free flour instead. This change keeps the muffins tender and tasty. If you want a vegan version, replace the eggs with flax eggs. Mix 1 tablespoon of ground flaxseed with 3 tablespoons of water. Let it sit for a few minutes until it thickens. Use plant-based milk in place of buttermilk too. For those watching their sugar, use natural sweeteners. Replace granulated sugar with honey or maple syrup. This keeps the muffins sweet but a bit healthier. To keep your apple cinnamon muffins fresh, follow these tips: - Cool Completely: Let muffins cool on a wire rack before storing. This prevents moisture buildup, which can make them soggy. - Use Airtight Containers: Place cooled muffins in airtight containers. This helps keep them soft and moist. - Room Temperature: Store muffins at room temperature for up to 3 days. Place a paper towel at the bottom for extra moisture control. - Refrigeration: If you need to keep them longer, refrigerate for up to a week. Wrap them in plastic wrap first. For long-term storage, freezing is best: - Freezing Guidelines: Wrap muffins tightly in plastic wrap, then place them in a freezer bag. They can last up to 3 months. - Label and Date: Mark the bags with the date. This way, you’ll know when to enjoy them. To enjoy your leftover muffins, reheating is key: - Oven Method: Preheat the oven to 350°F (175°C). Place muffins on a baking sheet and heat for 10 minutes. This keeps them warm and soft. - Microwave Method: Heat muffins for 15-20 seconds in the microwave. This method is quick but may make them slightly chewier. - Serving Options: Try spreading a little butter or honey on warm muffins for extra flavor. Enjoy them with your favorite drink! Can I use other fruits in this muffin recipe? Yes, you can! Other fruits like pears or berries work well. Just chop them into small pieces. This adds new flavors and keeps the muffins moist. What can I substitute for buttermilk? If you don’t have buttermilk, mix 1 cup of regular milk with 1 tablespoon of lemon juice. Let it sit for five minutes. This will make a great substitute. How to fix muffins that are too dense? If your muffins are dense, you may have overmixed the batter. Gently fold the ingredients together. Also, check your baking powder for freshness. This helps the muffins rise better. How to make muffins without using eggs? You can replace each egg with 1/4 cup of unsweetened applesauce or 1/4 cup of mashed banana. This keeps your muffins moist and adds sweetness. What temperature should muffins be baked at for best results? Bake your muffins at 350°F (175°C). This temperature allows them to cook evenly and rise nicely. Can I double the recipe and freeze half? Absolutely! You can double the recipe and freeze half. Just let the muffins cool completely before freezing. Store them in an airtight container or a freezer bag. In this blog post, I shared how to make delicious Apple Cinnamon Muffins. You learned about necessary ingredients and helpful substitutes. I provided clear steps for mixing and baking. Tips for perfect muffins included storage and reheating advice. Lastly, I offered variations and answers to common questions. Remember, baking is all about experimenting and having fun. Don’t hesitate to try new flavors and enjoy your muffins fresh!

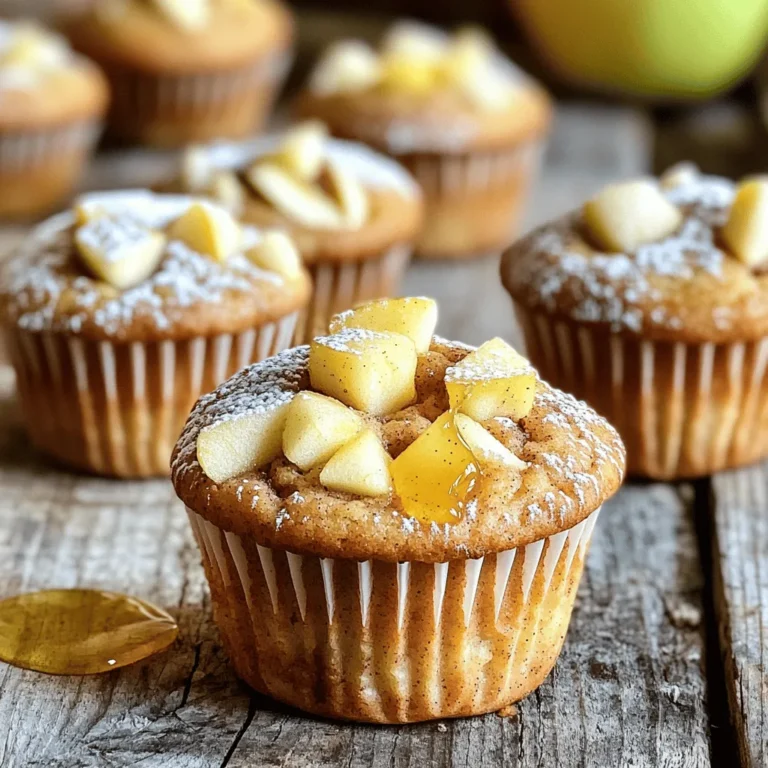
Apple Cinnamon Muffins Easy and Delicious Recipe

- 6 large eggs - 3 tablespoons mayonnaise - 1 teaspoon Dijon mustard - 1 teaspoon apple cider vinegar Eggs are the star of this dish. They provide a rich, creamy base. I prefer large eggs for their size and ease of handling. The mayonnaise adds smoothness, while Dijon mustard gives a nice kick. Apple cider vinegar adds a tangy note. - 1/2 teaspoon smoked paprika - 1/4 teaspoon garlic powder - Salt and pepper to taste Smoked paprika is a must. It brings a warm, smoky flavor that feels festive. Garlic powder adds depth without being too strong. Don’t forget salt and pepper; they enhance all the other flavors. - 2 tablespoons finely chopped celery - 2 tablespoons finely chopped green onion - 1 tablespoon chopped fresh parsley (for garnish) Celery adds a nice crunch and freshness. Green onion gives a mild bite, which complements the eggs. Finally, parsley is a great garnish. It brightens the dish and adds color. Hard Boiling Method To start, you need to hard boil the eggs. Place 6 large eggs in a saucepan. Cover the eggs with cold water. Heat the pot on medium until the water boils. Once boiling, cover the pot and take it off the heat. Let the eggs sit for 12 to 14 minutes. This method gives you firm and easy-to-peel eggs. Ice Bath Technique After the eggs sit, it's time for the ice bath. Fill a large bowl with ice and cold water. Carefully transfer the eggs from the pot to the ice bath. Let them cool for about 5 minutes. This stops the cooking and helps the shells come off easily. Mixing and Mashing the Yolk Mixture Once the eggs are cool, peel them gently. Cut each egg in half lengthwise. Scoop the yolks into a mixing bowl. Add 3 tablespoons of mayonnaise, 1 teaspoon of Dijon mustard, 1 teaspoon of apple cider vinegar, 1/2 teaspoon of smoked paprika, and 1/4 teaspoon of garlic powder. Season with salt and pepper to taste. Use a fork to mash everything until smooth and creamy. Adding Texture with Vegetables Now, add some crunch by folding in 2 tablespoons of finely chopped celery and 2 tablespoons of finely chopped green onion. This gives your filling a nice texture. Mix well, but don’t overdo it. You want some bits to stay intact for a great bite. Filling the Egg Whites Grab your egg white halves. You can spoon the yolk mixture into them, or use a piping bag for a fancy touch. Make sure to fill each half generously. Garnishing Tips To finish, sprinkle some smoked paprika on top. This adds color and flavor. You can also add a sprinkle of fresh parsley. It gives a nice pop and looks great on your Thanksgiving table. To get the best hard-boiled eggs, there are a few tricks. First, avoid adding eggs straight from the fridge to boiling water. This can crack the shells. Instead, start with cold water. Place eggs in a saucepan, cover with cold water, and bring to a boil. Once boiling, cover the pan and turn off the heat. Let them sit for 12-14 minutes. Common mistakes include overcooking or undercooking the eggs. Overcooked eggs can have a green ring around the yolk. This happens when eggs cook too long. On the other hand, undercooked eggs can be hard to peel. If you want an alternative cooking method, try steaming. Place eggs in a steamer basket over boiling water. Cover and steam for 12-15 minutes. Then, cool them in an ice bath. This method often makes peeling easier. To make your deviled eggs stand out, use unique ingredients. Instead of plain mayonnaise, try adding Greek yogurt for creaminess. You can also swap the Dijon mustard for a spicy brown mustard. This adds a nice kick. Balancing flavors is key. The smoked paprika adds a warm depth. The apple cider vinegar brings brightness. If you like more crunch, add diced pickles or jalapeños. This gives your eggs a fun twist and more taste. Serving your deviled eggs nicely makes a big difference. For Thanksgiving, arrange them on a festive platter. You can also use a fall-themed plate or tray. For creative plating, consider using a piping bag to fill the egg whites. This gives a nice swirl effect. Garnish with a sprinkle of smoked paprika and fresh parsley. You could even add tiny sprigs of thyme for a touch of elegance. These small details will impress your guests and make your dish unforgettable. {{image_2}} Thanksgiving is all about tradition. Classic deviled eggs mix creamy yolks with mayo and mustard. They bring comfort with each bite. You can add smoked paprika for warmth. This flavor is a nod to fire-roasted turkey. Now, if you want to be bold, try new flavors. How about adding bacon bits? They give a salty crunch. You can also mix in avocado for a creamy twist. It adds a fresh taste that’s hard to beat. Not everyone can enjoy classic deviled eggs. For gluten-free friends, this recipe is already safe. You can also switch mayo for a dairy-free option. Try using avocado or hummus for a vegan delight. If you want to keep it light, Greek yogurt is a good choice. It adds a tangy flavor while keeping it creamy. This way, you can enjoy deviled eggs without worry. Thanksgiving is a feast for the eyes, too! You can make themed deviled eggs that fit the season. Use pumpkin spice in the filling for a sweet twist. This adds a fun holiday vibe. Don’t forget the colors! Use vibrant toppings like diced red peppers or chives. They mimic the colors of autumn leaves. These little touches make your dish stand out on the table. To keep your Thanksgiving deviled eggs fresh, store them in the fridge. Use an airtight container. This helps prevent the eggs from drying out or absorbing other smells. Place a damp paper towel over the eggs. This adds moisture and keeps them tasty. Leftover deviled eggs last about three to four days in the fridge. If you notice any off smells or changes in texture, it's best to toss them. Safety first! Freezing deviled eggs is not recommended. The texture can change when thawed. The filling may become watery or grainy. It’s best to enjoy them fresh. If you accidentally freeze them, thaw them in the fridge overnight. Do not use a microwave. Once thawed, check the texture before serving. If it looks good, add fresh garnishes, like parsley. This can help make them more appealing. To make your deviled eggs creamier, use these simple tips: - Add more mayonnaise: Increase the amount of mayonnaise to boost creaminess. - Use sour cream: It adds a nice tang and smooth texture. - Include cream cheese: This creates a rich, creamy filling. - Blend well: Mix the yolks and other ingredients thoroughly for a smooth look. A creamy texture makes deviled eggs taste better. Try these tips to find the right balance for your taste. Yes, you can make deviled eggs a day ahead. Here’s how to do it: - Store in the fridge: Keep them in an airtight container. - Cover with plastic wrap: This prevents them from drying out. - Fill before serving: To keep the whites fresh, fill them just before serving. Making them ahead saves time. Just be sure to garnish them right before you enjoy them. If you want to skip mayonnaise, here are some great alternatives: - Greek yogurt: It’s thick and creamy, plus it adds protein. - Avocado: Mashed avocado gives a rich, buttery taste. - Hummus: This adds a unique flavor and is great for a twist. - Mustard and oil: Mix Dijon with a bit of olive oil for a zesty kick. These swaps can give your deviled eggs a fresh twist. Experiment to find what you love! Thanksgiving deviled eggs are a treat that can shine at your table. We covered essential ingredients, step-by-step instructions, and tips to make your eggs perfect. Remember, you can get creative with flavors and presentation to impress your guests. Don't shy away from trying new twists or dietary options. Storing and serving your deviled eggs properly ensures they stay fresh and delicious. Embrace the fun of making these iconic bites, and enjoy sharing them with loved ones this Thanksgiving.

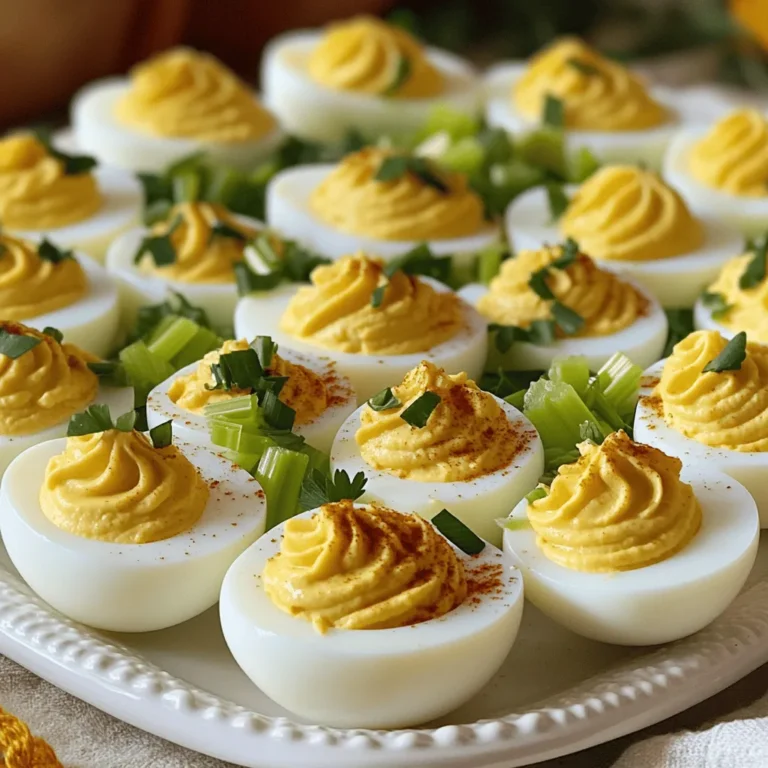
Thanksgiving Deviled Eggs Simple and Tasty Recipe

To make Italian Pastina Comfort Soup, you will need: - 1 cup pastina (tiny pasta like star or acini di pepe) - 4 cups low-sodium vegetable or chicken broth - 1 medium onion, finely chopped - 2 cloves garlic, minced - 2 medium carrots, diced - 1 celery stalk, diced - 1 cup fresh spinach, roughly chopped - 1 teaspoon dried Italian herbs (oregano, basil, thyme) - 2 tablespoons olive oil - Salt and pepper to taste You can add some fun twists to your soup, like: - 1/4 cup grated Parmesan cheese for creaminess - Fresh basil leaves for garnish - Lemon zest for a pop of brightness If you don’t have pastina, try small shells or orzo. You can use vegetable stock for a vegan option. Fresh herbs work well too, instead of dried. If you want it richer, add heavy cream instead of cheese. Adjust salt and pepper based on your taste. {{ingredient_image_1}} Start by chopping the onion, carrots, and celery. I like to do this first. It makes cooking easier. Heat olive oil in a large pot over medium heat. Add the chopped onion, carrot, and celery. Sauté them for 5 to 7 minutes. You want the veggies to soften and the onion to turn clear. This step builds a great flavor base. Next, add the minced garlic and dried Italian herbs. Stir for one minute until you smell the herbs. Now, pour in 4 cups of vegetable or chicken broth. Bring the mixture to a boil. Once it starts bubbling, it’s time for the next step. Add 1 cup of pastina. Reduce the heat to a simmer. Cook for about 6 to 8 minutes, stirring now and then. You want the pastina to be tender but not mushy. This is where the soup starts to come together. After the pastina cooks, stir in 1 cup of chopped spinach. Cook for another 2 to 3 minutes. You want the spinach to wilt but still be bright green. Taste the soup and add salt and pepper as needed. For extra creaminess, mix in 1/4 cup of grated Parmesan cheese, if you like. This makes the soup rich and comforting. Serve it hot, topped with fresh basil leaves for a lovely finish. To cook pastina well, you need a big pot. Use plenty of water and salt. This helps the tiny pasta stay firm. Stir often while cooking to prevent sticking. Cook it just until tender. Overcooking pastina makes it mushy. Aim for a perfect bite. Herbs and spices make this soup shine. I love using dried Italian herbs like oregano, basil, and thyme. They add warmth and depth. Fresh garlic gives a nice kick too. A sprinkle of black pepper adds a little heat. For a twist, add crushed red pepper flakes for spice. Serve the soup hot for the best taste. A sprinkle of grated Parmesan cheese adds creaminess. Fresh basil leaves on top look great and taste fresh. Pair this soup with crusty bread or a simple salad. Enjoy a cozy meal any day! Pro Tips Use Homemade Broth: For a richer flavor, consider using homemade vegetable or chicken broth instead of store-bought, as it can enhance the overall taste of the soup. Customize Your Vegetables: Feel free to add other vegetables such as zucchini or green beans for added nutrition and texture. Adjust Seasoning: Always taste the soup before serving and adjust the seasoning as needed, especially if you’re using store-bought broth which may contain salt. Store Wisely: If you have leftovers, store the pastina separately from the soup to prevent it from absorbing too much liquid and becoming mushy. {{image_2}} To make a vegan version of Italian Pastina Soup, swap the chicken broth for vegetable broth. Use olive oil for cooking. Skip the Parmesan cheese or replace it with nutritional yeast. This gives a cheesy flavor without dairy. You can also add more veggies, like zucchini or peas, for extra nutrition. You can add protein to your soup for a heartier meal. For a chicken version, add cooked, shredded chicken after the pasta is tender. This will warm the chicken without overcooking it. If you prefer beans, add canned white beans or chickpeas. Rinse them well and stir them in during the last few minutes of cooking. While pastina is a classic choice, you can use other tiny pasta types. Try ditalini, orzo, or even small shells. Just adjust the cooking time slightly based on the pasta. Each option brings a unique texture to the soup, making it fun to switch things up. To store leftover Italian Pastina Comfort Soup, let it cool first. Use a clean, airtight container. Pour the soup into the container, leaving some space at the top. This helps the soup stay fresh. Seal the container tightly and place it in the fridge. It will stay good for about three days. If you want to keep the soup longer, freezing is a great option. First, cool the soup completely. Then, use freezer-safe bags or containers. Pour the soup into these bags, removing as much air as possible. Label the bags with the date. You can freeze the soup for up to three months. To use it later, just thaw it in the fridge overnight. To reheat the soup, pour it into a pot. Heat it on medium-low until warm, stirring often. If it looks too thick, add a splash of broth or water. You can also microwave it in a microwave-safe bowl. Heat for one minute at a time, stirring in between. Enjoy your warm bowl of comfort! Pastina is tiny pasta. It comes in shapes like stars or little balls called acini di pepe. This pasta cooks quickly and adds a soft touch to soups. It is perfect for a cozy meal. Yes, you can. Make the soup ahead of time and store it. Just follow the recipe steps. Let it cool down before putting it in the fridge. It will taste great later. Italian Pastina Soup lasts about 3 to 4 days in the fridge. Make sure to keep it in an airtight container. This helps keep the flavors fresh and tasty. No, this soup is not gluten-free. Pastina is made from wheat. If you need a gluten-free option, choose gluten-free pasta. Then, you can still enjoy this warm soup. You can try many fun twists on this soup. Here are some ideas: - Add protein like chicken or beans for extra flavor. - Use different veggies like peas or zucchini for a colorful mix. - Swap in fresh herbs like parsley instead of basil. These changes keep the soup exciting and tasty! This blog post covered every step for making Italian Pastina Comfort Soup. We talked about required and optional ingredients, plus substitutions. You learned the best way to prepare vegetables and cook the soup base. I shared tips for cooking pastina and enhancing flavors. I also explored variations, storage info, and answered common questions. Using these ideas, you can create a soup that warms your heart. Enjoy your cooking adventure with Italian Pastina Soup!

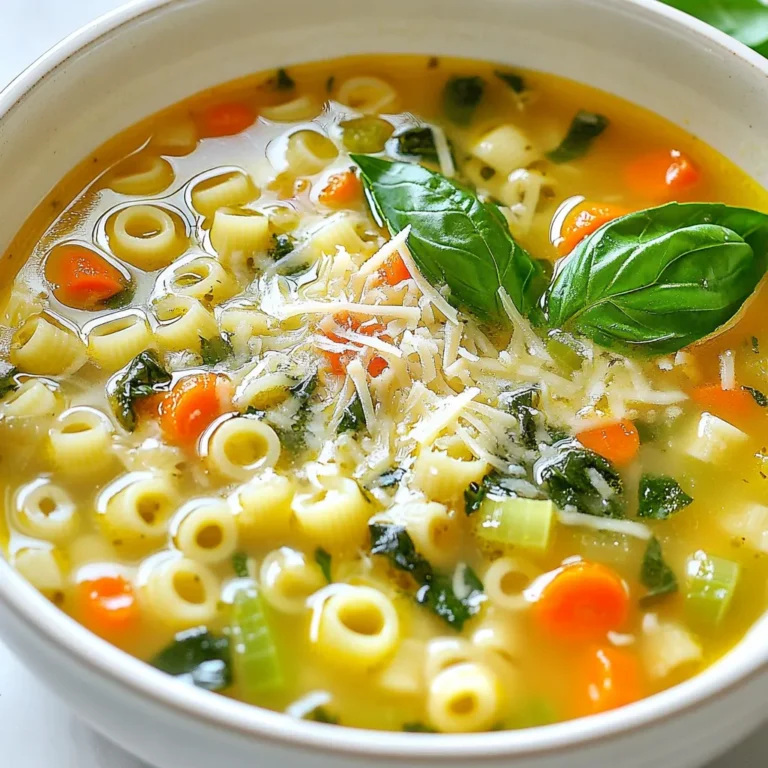
Italian Pastina Comfort Soup Simple and Cozy Dish

To make Pecan Pie Dump Cake, you need the following items: - 1 cup chopped pecans - 1 cup brown sugar - 1/2 cup granulated sugar - 1 cup butter, melted - 1 cup all-purpose flour - 1 cup vanilla cake mix - 4 large eggs - 1 cup milk - 1 tablespoon vanilla extract - 1 teaspoon baking powder - Pinch of salt When you gather your ingredients, pay attention to the measurements. You can swap some items if needed. For the butter, you can use margarine. If you want a lighter cake, try using applesauce for half of the butter. Use coconut sugar in place of brown sugar for a different taste, or try maple syrup for a fun twist. If you are allergic to nuts, just leave out the pecans. You can also add chocolate chips instead for a sweet touch. If you prefer gluten-free, use a gluten-free flour blend and a gluten-free cake mix. Quality matters in baking. I recommend using fresh eggs and real vanilla extract. Fresh eggs make a big difference in texture and taste. Look for unsalted butter for the best flavor control. Choose a good brand of vanilla cake mix to ensure it rises well and tastes great. For pecans, buy raw or lightly toasted ones. Toasting them just before use brings out more flavor, making your cake extra special. For the full recipe, you can check out the detailed instructions. First, set your oven to 350°F (175°C). This is the perfect temperature for baking. Next, take a 9x13 inch baking dish. Grease it well with butter or cooking spray. This step ensures that your cake comes out easily after baking. Grab a large mixing bowl. Combine the granulated sugar, brown sugar, and melted butter. Stir these ingredients until they blend well together. Then, add the eggs, milk, and vanilla extract to the bowl. Mix everything until it’s smooth and creamy. In a separate bowl, sift together the flour, baking powder, and a pinch of salt. Gradually fold this dry mix into the wet mixture. Be gentle and do not over mix. You want to keep the cake light and fluffy. Now, pour the batter into your greased baking dish. Spread it evenly with a spatula. Then, sprinkle the chopped pecans evenly over the top of the batter. Next, take the cake mix and sprinkle it over the pecans. Do not stir this layer. For added richness, drizzle any leftover melted butter on top. This will give your cake a nice golden color. Now, place the baking dish in the oven. Bake for 45 to 50 minutes. You’ll know it’s done when the top is golden brown and a toothpick inserted comes out clean. Let it cool for 10 to 15 minutes before serving. Enjoy this delightful Pecan Pie Dump Cake! For the complete recipe, check out the Full Recipe link. To get the right texture for your Pecan Pie Dump Cake, follow these tips: - Use room temperature ingredients. This helps them mix better. - Do not over mix the batter. Stir just until combined for a fluffier cake. - Check your oven temp. An oven thermometer can help ensure it’s accurate. - Tap the baking dish gently before baking. This helps remove air bubbles. Here are some common mistakes that can ruin your cake: - Skipping the greasing. Always grease your baking dish to prevent sticking. - Overbaking. Keep an eye on the time. Bake until golden brown. - Mixing in the cake mix. Remember not to stir it after sprinkling it on top. - Not cooling before serving. Let it cool for at least 10-15 minutes. Serving your Pecan Pie Dump Cake right can enhance its taste: - Serve warm. It tastes best when it’s still warm from the oven. - Add whipped cream. A dollop on top adds creaminess and flavor. - Try a scoop of ice cream. Vanilla pairs well with the warm cake. - Garnish with chopped pecans. This adds crunch and looks nice. For the complete recipe, check out the Full Recipe. {{image_2}} You can make your pecan pie dump cake even tastier! Try adding chocolate chips. They melt and mix in well. You can also use caramel sauce for a sweet twist. For a nutty touch, mix in some walnuts with the pecans. If you want a lighter dessert, try using a sugar substitute like stevia or erythritol. This makes it delicious without the extra sugar. If you need gluten-free options, use almond flour instead of all-purpose flour. It gives a nice texture and flavor. You can also swap the cake mix for gluten-free cake mix. This way, everyone can enjoy this treat. For a dairy-free version, use coconut oil instead of butter. Replace milk with almond or oat milk for a creamy finish. How you serve pecan pie dump cake can make it special. Serve it warm with whipped cream on top. A scoop of vanilla ice cream works great too. Drizzle some chocolate or caramel sauce over the cake for added richness. You can also sprinkle extra chopped pecans for crunch. This dessert is sure to impress your guests! For the full recipe, check out the details above. To keep your Pecan Pie Dump Cake fresh, store it in an airtight container. This helps keep moisture in while keeping out air. If you don’t have a container, wrap the cake with plastic wrap. Make sure it’s snug. Storing it in the fridge helps it last longer, especially if you won’t eat it all at once. When you want to enjoy leftovers, reheating is simple. Preheat your oven to 350°F (175°C). Place a piece of the cake in an oven-safe dish. Cover it with foil to keep it from drying out. Heat for about 10-15 minutes, or until warm. You can also use the microwave. Just heat for 20-30 seconds. Add a scoop of ice cream or whipped cream for a special treat! Pecan Pie Dump Cake lasts for about 4-5 days in the fridge. If you want to keep it longer, freezing is a great option. Cut the cake into pieces and wrap each slice in plastic wrap. Then, place them in a freezer-safe bag. It can stay frozen for up to 3 months. When you’re ready to eat, thaw it in the fridge overnight before reheating. This way, you can enjoy this delightful dessert anytime! Pecan Pie Dump Cake lasts about four days in the fridge. Store it in an airtight container. Keeping it cool helps maintain its flavor and texture. If you want to enjoy it longer, freeze it. Wrap it tightly in plastic wrap and foil. It can last up to three months in the freezer. Just remember to thaw it in the fridge before you serve it. Yes, you can make Pecan Pie Dump Cake ahead of time. You have two options. You can bake it fully and store it in the fridge. Or, you can prepare the batter and store it before baking. If you choose the second option, bake it fresh when you are ready. This gives you the best taste and texture. The best toppings for Pecan Pie Dump Cake add flavor and texture. Here are some great options: - Whipped cream - Vanilla ice cream - Caramel sauce - Chocolate drizzle - Extra chopped pecans Each topping brings something unique to the dish. Experiment with different combinations to find your favorite! For the full recipe, check out the details above. This blog post covered everything about making Pecan Pie Dump Cake. We explored ingredients, measurements, and good quality options. You learned step-by-step instructions to bake it perfectly. Tips helped you avoid common mistakes and serve it well. Lastly, we shared variations, storage tips, and frequently asked questions. Enjoy baking this treat. With these ideas, you can impress family and friends with ease. Happy baking!

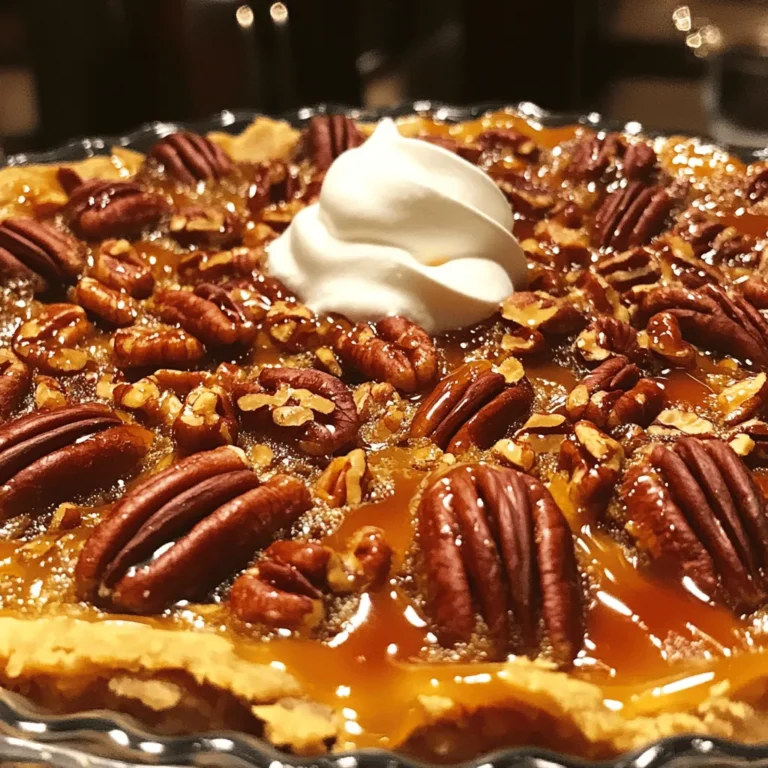
Pecan Pie Dump Cake Irresistible Dessert Recipe

To make classic pumpkin bread, you need a few simple ingredients. Here’s what you’ll need: - 1 cup pumpkin puree (canned or fresh) - ¾ cup granulated sugar - ½ cup brown sugar, packed - ½ cup vegetable oil - 3 large eggs - 2 cups all-purpose flour - 1 teaspoon baking soda - ½ teaspoon baking powder - ½ teaspoon salt - 1 teaspoon ground cinnamon - ½ teaspoon ground nutmeg - ¼ teaspoon ground ginger - ¼ teaspoon ground cloves - 1 cup chopped walnuts or pecans (optional) - ½ cup raisins or chocolate chips (optional) Each ingredient plays a key role. The pumpkin puree adds moisture and flavor. The sugars sweeten the bread and help it brown. Eggs help bind everything together. Baking soda and baking powder create the rise, while spices bring warmth and depth to the taste. You can add nuts or chocolate chips for extra texture. If you want to dive deeper into the process, check the Full Recipe to get all the steps in detail. - Preheat your oven to 350°F (175°C) and prepare the loaf pan. You can grease it or line it with parchment paper. - In a large bowl, combine the wet ingredients: 1 cup of pumpkin puree, ¾ cup of granulated sugar, ½ cup of brown sugar, and ½ cup of vegetable oil. Mix well. - In another bowl, mix the dry ingredients: 2 cups of all-purpose flour, 1 teaspoon of baking soda, ½ teaspoon of baking powder, ½ teaspoon of salt, and the spices: 1 teaspoon of ground cinnamon, ½ teaspoon of ground nutmeg, ¼ teaspoon of ground ginger, and ¼ teaspoon of ground cloves. - Gradually add the dry ingredients into the wet mixture. Stir gently until just combined. Do not overmix. - If you want to add extra flavor, fold in 1 cup of chopped walnuts or pecans and ½ cup of raisins or chocolate chips. - Pour the batter into the prepared loaf pan. Smooth the top with a spatula. - Bake in the preheated oven for 60-70 minutes. Insert a toothpick into the center to check for doneness. If it comes out clean, the bread is ready to enjoy! For the Full Recipe, refer back to the ingredients list above. When making pumpkin bread, keep a few key points in mind. First, do not overmix the batter. Overmixing makes the bread dense and tough. Mix just until you see no dry flour. Second, bake at 350°F (175°C) for 60-70 minutes. This temperature ensures the bread cooks through without burning. Classic pumpkin bread is delightful warm or at room temperature. Slice it thick and serve it with butter. You can also add a sprinkle of cinnamon on top for an extra kick. For a fun twist, pair it with cream cheese or honey. It makes a great snack or breakfast treat! To keep your pumpkin bread fresh, wrap it in plastic wrap or foil. Store it at room temperature for up to three days. If you want to keep it longer, freeze it. Slice the bread first, then wrap each piece. To reheat, place a slice in the microwave for about 15 seconds. Enjoy the warmth and flavor again! You can find the Full Recipe above. {{image_2}} You can easily change the flavor of your pumpkin bread. Adding extra spices makes a big difference. Try using allspice, cardamom, or even a pinch of cayenne for some heat. Each spice brings a new taste to the bread. Nuts add great texture too. You can use walnuts or pecans. If you want a sweeter touch, add chocolate chips or raisins. Each mix-in gives a unique twist. Play around until you find your favorite blend! If you need gluten-free options, use a gluten-free flour blend. This works well and keeps the bread moist. For a vegan version, swap eggs with flax eggs or applesauce. Replace the oil with applesauce or a plant-based oil. You can still enjoy this bread without any animal products. Pumpkin bread is not just for breakfast. You can turn it into a delicious dessert. Slice it, and layer it with cream cheese frosting. Add some caramel sauce for extra sweetness. You can also toast slices and serve them with ice cream. This gives a warm and cool contrast that is delightful. Enjoy your classic pumpkin bread in new and fun ways! What is the best way to make pumpkin puree at home? To make pumpkin puree, cut a small pumpkin in half. Scoop out the seeds and strings. Roast the halves face down on a baking sheet at 350°F for about 45 minutes. Once soft, let it cool, then scoop out the flesh and blend until smooth. This gives you fresh, creamy pumpkin puree for your bread. Can I use other types of sugar substitutes? Yes, you can use coconut sugar or maple syrup instead of granulated sugar. Just keep in mind that the texture might change slightly. If using liquid sweeteners, reduce other liquids slightly to maintain the right batter consistency. How do I know when my pumpkin bread is done? To check if your pumpkin bread is done, insert a toothpick into the center. If it comes out clean or with a few moist crumbs, it's ready. The edges should pull away from the pan slightly, and the top should be a deep golden-brown. Can I use applesauce instead of oil? Yes, you can use unsweetened applesauce instead of vegetable oil. This swap makes the bread moist and adds a hint of apple flavor. Use the same amount, but be aware that the bread might be a bit denser. What are alternatives for eggs in this recipe? If you want to skip the eggs, try using flaxseed meal or chia seeds. Mix 1 tablespoon of flaxseed meal or chia seeds with 3 tablespoons of water. Let it sit for about 5 minutes until it thickens. This will help bind the ingredients together. How long does pumpkin bread last at room temperature? Pumpkin bread lasts about 3 to 4 days at room temperature. Make sure to store it in an airtight container to keep it fresh. If you notice it getting too dry, try wrapping it in plastic wrap. Can I freeze pumpkin bread? Yes, you can freeze pumpkin bread! Wrap it tightly in plastic wrap and then in aluminum foil. It can last for about 3 months in the freezer. To enjoy, simply thaw it overnight in the fridge or at room temperature. To make classic pumpkin bread, you need some key ingredients. Gather these items: - 1 cup pumpkin puree (canned or fresh) - ¾ cup granulated sugar - ½ cup brown sugar, packed - ½ cup vegetable oil - 3 large eggs - 2 cups all-purpose flour - 1 teaspoon baking soda - ½ teaspoon baking powder - ½ teaspoon salt - 1 teaspoon ground cinnamon - ½ teaspoon ground nutmeg - ¼ teaspoon ground ginger - ¼ teaspoon ground cloves - 1 cup chopped walnuts or pecans (optional) - ½ cup raisins or chocolate chips (optional) Start by preheating your oven to 350°F (175°C). Grease a 9x5-inch loaf pan. In a large bowl, mix the pumpkin puree, sugars, and oil. Add the eggs one at a time. In another bowl, sift the dry ingredients. Combine the dry mix with the wet mix gently. If you want, fold in nuts or chocolate chips for extra flavor. Pour the batter into the pan and bake for 60-70 minutes. Check with a toothpick; it should come out clean. Let it cool for about 10 minutes in the pan, then move it to a wire rack. For a special touch, serve your pumpkin bread warm with butter and a sprinkle of cinnamon. Feel free to refer to the full recipe for more details. Enjoy this delightful treat! This recipe for pumpkin bread is simple and fun. We covered all the key ingredients, from pumpkin puree to spices and optional add-ins. You learned how to mix and bake the batter for perfect results. Remember the tips for great flavor and texture. You can even make tasty variations or dietary changes. Enjoy your homemade pumpkin bread fresh or stored for later. You now have everything you need to create a warm, delicious treat. Enjoy and share this recipe with others!

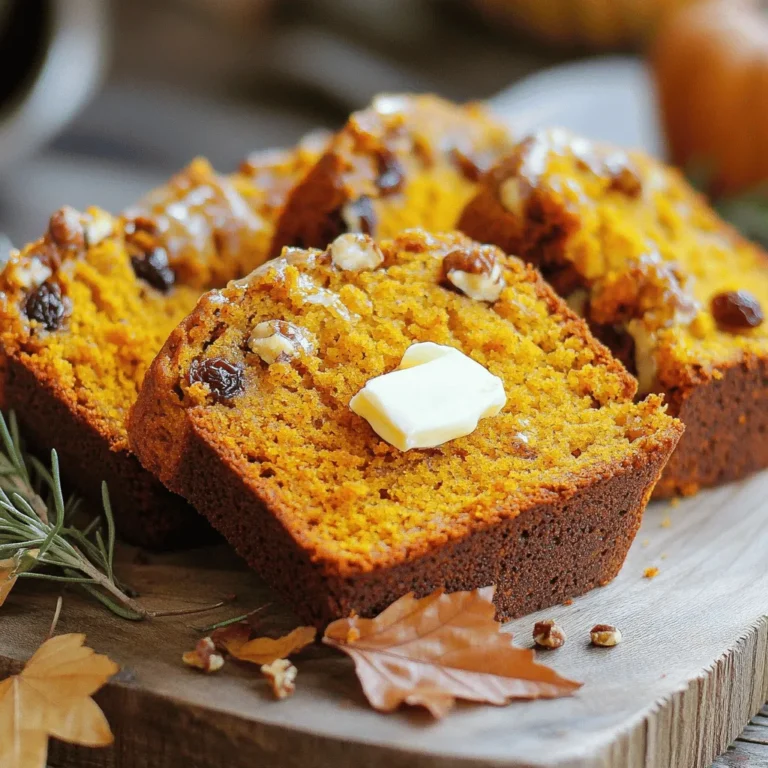
Classic Pumpkin Bread Delightful and Simple Recipe

- 2 medium-sized eggplants, cubed - 3 tablespoons olive oil - Salt and pepper to taste - 3 cloves garlic, minced - 1 teaspoon red pepper flakes (optional) - 12 oz pasta (penne or rigatoni work well) - 1 can (14 oz) crushed tomatoes - 1 teaspoon dried oregano - ½ teaspoon dried basil - ¼ cup fresh basil leaves, chopped - Grated Parmesan cheese for serving (optional) The star of this dish is the eggplant. Choose medium-sized eggplants for the best flavor. They should be firm and shiny. The olive oil adds richness, while salt and pepper enhance the taste. Garlic gives a great aroma and flavor. I often add red pepper flakes for heat, but it’s optional. For the pasta, penne or rigatoni work best. They hold the sauce nicely. Crushed tomatoes provide a savory base. Oregano and basil add depth to the sauce. Fresh basil is a must for a bright finish. Finally, if you like cheese, Parmesan is a nice touch. Gathering these ingredients sets you up for a delightful meal that’s both tasty and simple to make! {{ingredient_image_1}} First, preheat your oven to 400°F (200°C). This helps the eggplant roast nicely. Next, take your two medium-sized eggplants and cut them into cubes. Place them in a large bowl. Add two tablespoons of olive oil, along with salt and pepper. Toss the eggplant until it is well coated. Spread the cubed eggplant evenly on a baking sheet. Now, roast the eggplants in the preheated oven for about 25 to 30 minutes. Make sure to turn them halfway through. You want them to be golden brown and tender. While the eggplants roast, bring a large pot of salted water to a boil. Add 12 ounces of pasta, like penne or rigatoni. Cook the pasta according to the package instructions until it is al dente. Don’t forget to save half a cup of pasta water before draining. In a large skillet, heat one tablespoon of olive oil over medium heat. Add three cloves of minced garlic and red pepper flakes if you like some heat. Sauté for one to two minutes until you smell the garlic. Then, pour in a 14-ounce can of crushed tomatoes. Add one teaspoon of dried oregano and half a teaspoon of dried basil. Let the sauce simmer for about five minutes. Once the eggplant is done, mix it into the sauce. Now it’s time to mix everything together. Add the drained pasta to the skillet with the sauce and eggplant. Toss everything well. If the dish feels dry, slowly add reserved pasta water until it reaches the right texture. Just before serving, stir in a quarter cup of fresh chopped basil. Adjust the flavors with more salt and pepper if needed. Now, serve the pasta in bowls. You can top it with grated Parmesan cheese and an extra sprinkle of fresh basil for a nice touch. Enjoy your delicious roasted eggplant pasta! Choosing the right eggplant When picking eggplants, look for firm ones. They should have smooth, shiny skin. A good eggplant feels heavy for its size. Avoid any that have soft spots or wrinkles. Salting eggplant for better texture Salting eggplant helps draw out excess water. This step makes your dish less soggy. Cut the eggplants into cubes, then sprinkle salt on them. Let them sit for about 30 minutes. Rinse off the salt and pat them dry before cooking. Achieving al dente pasta For perfect pasta, use a large pot of boiling salted water. Add the pasta and stir it. Check the package for cooking time. Taste it a minute before it's done. It should be firm but not hard. Reserving pasta water properly Before draining the pasta, save about half a cup of the cooking water. This starchy water helps thicken your sauce. You can add it to the pasta as needed. Adjusting seasonings Taste your sauce while cooking. Add salt, pepper, or more herbs as needed. This way, you can get the flavors just right. You can also add a touch of sugar if the tomatoes taste too acidic. Pairing with additional herbs Fresh herbs add extra flavor to your dish. Try adding parsley or thyme along with the basil. These can brighten the taste and give it a fresh feel. Don't be afraid to experiment! Pro Tips Choose the Right Eggplant: Look for firm, glossy eggplants with vibrant skin. Avoid those with blemishes or soft spots for the best texture and flavor. Don't Skip the Salt: Salting the eggplant before roasting helps draw out moisture and bitterness, resulting in a more flavorful dish. Reserve Pasta Water: Always save some pasta cooking water. It’s great for adjusting the sauce consistency and can help it cling better to the pasta. Fresh Herbs Matter: Using fresh basil at the end of cooking preserves its bright flavor and aroma, enhancing the overall taste of your pasta. {{image_2}} You can make this dish fit many diets. For gluten-free options, use gluten-free pasta. Many brands offer tasty choices that work well. You can also use zucchini noodles for a low-carb option. If you follow a vegan diet, skip the cheese. Instead, add nutritional yeast for a cheesy flavor. You can also use cashew cream or a vegan cheese product. Both will give you a creamy texture without dairy. To enhance the taste of your roasted eggplant pasta, think about adding cheese alternatives. Vegan cheese melts nicely and adds a rich flavor. You can use almond or coconut-based cheese. Incorporating other vegetables can also add depth. Consider using bell peppers, spinach, or mushrooms. Just roast them with the eggplant for extra flavor. You can mix and match to find your favorite combo. Not all pasta has to be penne or rigatoni. You can try spaghetti for a classic feel. Fettuccine also works well with this sauce. For a unique twist, use whole wheat or chickpea pasta. These options add more protein and fiber. They also offer a different taste and texture. Remember to adjust cooking times based on the pasta you choose. After you enjoy your roasted eggplant pasta, store any leftovers right away. Use an airtight container to keep it fresh. This helps prevent any bad smells from mixing with your food. Leftovers stay good in the fridge for about 3 to 5 days. Make sure to cool the pasta fully before you store it. You can freeze cooked roasted eggplant pasta, but it’s best to do it without cheese. Put the cooled pasta in a freezer-safe container. Leave some space for expansion. Seal it tightly, and it will last for up to 3 months. When you’re ready to eat it, thaw it in the fridge overnight. Reheat it on the stove over low heat. Add a splash of water or olive oil to keep it moist. This way, you’ll enjoy a tasty meal without losing flavor. Can I use different vegetables? Yes, you can use other veggies. Try zucchini, bell peppers, or mushrooms. Each adds a unique flavor and texture. Mix and match to suit your taste! How can I make it spicier? To heat things up, add more red pepper flakes. You can also use fresh chili peppers. Spice it to your liking for a flavorful kick. What side dishes complement roasted eggplant pasta? Pair this dish with a fresh salad or garlic bread. A light green salad adds crunch and freshness. Garlic bread gives a nice, warm touch to the meal. How to tell when eggplant is cooked? Eggplant is ready when it turns golden and feels tender. A fork should slide in easily. Look for a soft texture, but avoid overcooking. Tips for reheating without drying out? Reheat your pasta gently. Use a skillet with a splash of water or olive oil. Cover it to keep moisture in and stir often for even heating. Caloric content per serving Each serving has about 350 calories. This makes it a filling option without being too heavy. It’s a great choice for lunch or dinner. Health benefits of eggplant and tomatoes Eggplant is low in calories and high in fiber. It helps with digestion and weight control. Tomatoes are rich in vitamins and antioxidants, which support heart health. Together, they create a nutritious meal! This recipe combines simple ingredients like eggplants, pasta, and tomatoes to create a delicious dish. You learned how to roast eggplants, cook pasta, and make a tasty sauce. Tips on cooking and storing will help you make the most of your meal. With variations to fit your taste, this dish can suit anyone's needs. Enjoy exploring this tasty recipe and feel free to make it your own! Remember, cooking is about fun and flavor.

Roasted Eggplant Pasta Flavorful and Simple Dish

To make caramel apple pretzel bites, you will need the following ingredients: - Mini Pretzel Twists: Use 1 cup of classic mini pretzel twists for a crunchy base. - Apple Selection: Choose 1 large Granny Smith apple. Core and dice it into small pieces for a tart flavor. - Caramel Sauce: Get 1 cup of caramel sauce. You can use store-bought or make your own for a richer taste. - Additional Ingredients: - 1/2 cup semi-sweet chocolate chips for a sweet drizzle. - 1/4 teaspoon sea salt to enhance flavor. - 1 teaspoon cinnamon for a warm spice note. - 1/4 cup chopped pecans or walnuts (optional) for extra crunch. These ingredients create a perfect blend of sweet and salty. They bring out the best in each other, making your treat delightful. For the full recipe, check out the details earlier. 1. Preheating the oven: Start by setting your oven to 350°F (175°C). This is the perfect heat for baking your pretzel bites. A hot oven helps the pretzels warm and the apples soften just right. 2. Preparing the baking sheet: Line your baking sheet with parchment paper. This step is key. It keeps the pretzels from sticking and makes cleanup super easy. 1. Tossing apples with cinnamon and salt: In a small bowl, mix your diced apple with one teaspoon of cinnamon and a pinch of sea salt. This step adds flavor and balance. The salt brings out the sweetness of the apples. 2. Heating caramel sauce: Take your caramel sauce and place it in a microwave-safe bowl. Heat it for about 30 seconds. This makes the caramel warm and pourable. Stir it well so it becomes smooth and easy to drizzle. 1. Coating the pretzels: Spread the mini pretzel twists on your lined baking sheet. Drizzle the warm caramel sauce over the pretzels. Make sure each pretzel gets an even coat. This way, every bite will taste sweet and delicious. 2. Baking time and temperature: Bake your pretzel bites for 10 to 12 minutes. Keep an eye on them. You want the pretzels warm and the apples slightly soft. When they look perfect, take them out of the oven and let them cool before serving. For the full recipe, refer to the provided list. Enjoy making these delightful treats! To achieve a perfect caramel drizzle, start with warm caramel sauce. Heat it gently in the microwave. Stir to keep it smooth. Drizzle it over the pretzels while it is still warm. This helps it spread evenly. Preventing pretzels from getting soggy is key. Make sure to coat the pretzels lightly. Too much caramel can lead to a mushy mess. After drizzling, add the apple pieces quickly. Bake them right away. This keeps the pretzels crunchy. To boost flavor, consider adding spices. A pinch of nutmeg or allspice can elevate the taste. These spices pair well with caramel and apples. Optional toppings add fun textures. Try adding crushed graham crackers for a pie vibe. Chopped pecans or walnuts give a nice crunch. You can also sprinkle some sea salt on top for contrast. These extras make your treat even more delightful. For the Full Recipe, check out the main article! {{image_2}} You can change the taste by using different apple types. Each apple has a unique flavor. Granny Smith apples give a tart taste. Honeycrisp apples are sweet and crunchy. Fuji apples are sweet and juicy. Try a mix for a fun twist! You can also use various toppings. Chopped pecans add crunch and flavor. Walnuts bring a rich taste. For a sweeter bite, try crushed almonds. Each nut gives a new twist to the pretzel bites. Want to make it gluten-free? Use gluten-free pretzels. They taste just as good! You can also make these bites vegan. Replace the caramel sauce with a vegan version. Look for plant-based chocolate chips too. If you want less sugar, try sugar alternatives. Agave syrup or maple syrup works well. These options keep the flavor but reduce sugar. You can enjoy the treat without guilt! For the full recipe, check out the [Full Recipe]. To keep your caramel apple pretzel bites fresh, store them in an airtight container. Glass or plastic containers work well. You can also use resealable plastic bags. Make sure to remove as much air as possible before sealing. This helps prevent them from becoming soft. You can keep them at room temperature for up to two days. If you want to keep them longer, place them in the fridge. They will last for about a week when refrigerated. Just remember, the colder they get, the more the caramel may harden. To enjoy these bites warm again, you can reheat them easily. Use your oven or microwave. If using the oven, preheat it to 300°F (150°C). Place the pretzel bites on a baking sheet and heat them for about 5-7 minutes. This keeps the pretzels crispy and the caramel soft. If using a microwave, heat them for about 10-15 seconds. Be careful not to overheat, as this can make the pretzels chewy. Enjoy your treats warm for the best flavor! How to make the caramel sauce from scratch? To make caramel sauce, start with sugar. Heat it in a pan over low heat. Stir until it melts and turns golden. Next, add butter and cream, stirring until smooth. This homemade sauce is rich and tasty! Can I substitute the chocolate chips with something else? Yes, you can use white chocolate or butterscotch chips. You could also skip the chocolate and top with extra nuts. Get creative with flavors that you enjoy! What are the best apples to use for this recipe? Granny Smith apples are the best choice. They are tart and balance the sweet caramel. Other good options are Honeycrisp or Fuji apples for a sweeter bite. Ideal occasions and pairings for caramel apple pretzel bites Caramel apple pretzel bites are perfect for parties, fall gatherings, or movie nights. Pair them with warm cider or hot chocolate for a cozy treat. They bring a fun twist to any event! How to serve them for maximum presentation Serve the bites on a colorful platter. Drizzle extra caramel and chocolate over them for a nice look. You can sprinkle a few nuts on top for texture and flavor. Caloric intake per serving Each serving has around 200 calories. This can vary based on portions and toppings. Keep this in mind while enjoying your treats! Breakdown of ingredients for dietary preferences - Mini pretzel twists: contain gluten - Apples: naturally gluten-free - Caramel sauce: can be made vegan with coconut cream - Chocolate chips: choose dairy-free for vegan options - Nuts: provide healthy fats and protein If you're interested in making these delightful bites, check out the Full Recipe for detailed steps! In this blog post, we explored how to make delicious caramel apple pretzel bites. We covered essential ingredients like mini pretzel twists and the best apples to use. I shared step-by-step instructions to help you prepare, mix, and bake. Tips and tricks ensured your bites would turn out great. We also looked at fun variations and storage methods. Now, you are ready to create a tasty treat. Enjoy the process, and share them with your friends!

Caramel Apple Pretzel Bites Delightful and Easy Treat

PREV 1 … 40 41 42 … 56 NEXT
go kitchen now

explore

DessertsDinnerAppetizersDrinks

Our Policies

  • Cookie Policy
  • Copyright Policy
  • Disclaimer
  • GDPR Policy
  • Terms Of Use
Back to Top
  • About
  • Contact Us
  • Privacy Policy
© 2025 go kitchen now