FREE DINNER EBOOK! Get your copy!
  • Cookie Policy
  • GDPR Policy
  • Disclaimer
  • Terms Of Use
  • Visit my other site: Fun Cookie Recipes
go kitchen now
  • Home
  • Dinner
  • Desserts
  • Drinks
  • Appetizers
  • Contact
  • About
  • Privacy Policy
  • Home
  • Dinner
  • Desserts
  • Drinks
  • Appetizers
  • Contact
  • About
  • Privacy Policy
  • Cookie Policy
  • GDPR Policy
  • Disclaimer
  • Terms Of Use
Visit my other site: Fun Cookie Recipes

HOME / CATEGORIES /

Latest

To make a tasty creamy Cajun sausage pasta, gather these simple ingredients: - 8 oz penne pasta - 2 tablespoons olive oil - 12 oz smoked sausage, sliced - 1 small onion, diced - 3 cloves garlic, minced - 1 bell pepper (any color), diced - 1 teaspoon Cajun seasoning - 1/2 teaspoon paprika - 1 cup heavy cream - 1/2 cup chicken broth - 1 cup grated Parmesan cheese - Salt and pepper to taste - Fresh parsley for garnish You need some basic tools to whip up this dish: - Large pot for boiling pasta - Large skillet for cooking sausage and veggies - Wooden spoon or spatula for stirring - Measuring cups and spoons for accuracy - Knife and cutting board for chopping Choosing fresh ingredients makes your dish even better. Here are some tips: - Pasta: Look for high-quality penne with no broken pieces. - Sausage: Pick smoked sausage with a good aroma. It should feel firm. - Veggies: Choose bell peppers with smooth skin. Onions should be dry and firm. - Garlic: Look for garlic bulbs that are plump and free of sprouts. - Cream: Buy heavy cream with a long expiration date for the best taste. - Cheese: Freshly grated Parmesan melts better than pre-grated. These simple choices will enhance the flavor of your creamy Cajun sausage pasta! {{ingredient_image_1}} 1. Cook the Pasta: Start by boiling salted water in a large pot. Add the penne pasta and cook it according to the package. Drain the pasta and set it aside. 2. Sauté the Sausage: Heat two tablespoons of olive oil in a large skillet on medium heat. Once it’s hot, add the sliced smoked sausage. Cook it until it's browned, about 5 to 7 minutes. 3. Add Veggies: Now, add the diced onion, minced garlic, and diced bell pepper to the skillet. Sauté these for another 5 minutes until they soften. 4. Season It Up: Sprinkle one teaspoon of Cajun seasoning and a half teaspoon of paprika over the mixture. Stir well and let the spices cook for about 1 minute. 5. Make It Creamy: Pour in one cup of heavy cream and a half cup of chicken broth. Stir everything together and bring it to a gentle simmer for 3 to 5 minutes. 6. Cheesy Goodness: Add one cup of grated Parmesan cheese to the skillet. Stir until it melts and becomes creamy. Taste it and add salt and pepper as needed. 7. Combine Pasta and Sauce: Finally, add the cooked penne pasta to the skillet. Toss everything together until the pasta is well coated with the creamy sauce. 8. Serve & Garnish: Serve your creamy Cajun sausage pasta hot. Top it with freshly chopped parsley for a burst of color and flavor. In this dish, sautéing brings out the flavors of the sausage and veggies. It cooks them quickly and adds color. Simmering helps meld all the flavors together in the sauce. It thickens the cream and lets the spices shine. Both techniques help create a rich and tasty dish. To save time, start cooking the pasta while you prepare the sausage and veggies. This way, everything finishes at the same time. Gather all your ingredients before you start. This makes cooking smooth and enjoyable. If you have everything ready, you will finish in about 30 minutes! To make your sauce creamy, use heavy cream. It adds rich flavor and smoothness. After adding the cream, let it simmer gently. This helps the sauce thicken nicely. Stir in the Parmesan cheese until it melts. This step makes the sauce even creamier. If you want more flavor, add a pinch of Cajun seasoning at the end. One common mistake is cooking the sauce too quickly. High heat can cause the cream to curdle. Always use medium heat when simmering. Another mistake is not seasoning enough. Taste your sauce before serving. Add salt and pepper as needed. Lastly, don’t skip the pasta cooking water. Mixing a little in can help the sauce cling better. Cooking in batches can save time. Make a double or triple batch of the sauce. Store it in the fridge for later. You can cook fresh pasta when you're ready to eat. This way, you’ll always have a quick meal on hand. If you freeze the sauce, thaw it overnight before reheating. Always reheat gently to keep the cream smooth. Pro Tips Use Fresh Ingredients: Fresh vegetables and high-quality sausage will enhance the flavor of your dish significantly. Adjust Spice Levels: Feel free to increase or decrease the Cajun seasoning based on your spice tolerance. Leftover Pasta: This dish reheats well. Store any leftovers in an airtight container for up to 3 days. Garnish for Freshness: Adding fresh parsley not only adds color but also a burst of freshness to the rich dish. {{image_2}} You can change the flavor of this dish easily. Try different sausages like andouille or chorizo. Both add a nice kick. You can also swap the Cajun seasoning for Italian herbs. This change gives a new twist to the dish. If you want more heat, add crushed red pepper flakes. They boost the spice level quickly. To make this dish vegetarian, replace the sausage with plant-based sausage. It gives a similar texture. For a vegan option, use coconut cream instead of heavy cream. Also, choose a vegan cheese or skip it entirely. This way, you keep rich flavors without animal products. Want to pack in more veggies? Add spinach, zucchini, or mushrooms to the skillet. They add color and nutrients. For extra protein, toss in some cooked chicken or shrimp. Both blend well with the creamy sauce and enhance the meal. You can even add beans for a hearty touch. Enjoy experimenting! To keep your creamy Cajun sausage pasta fresh, store it in an airtight container. Let it cool down first. Then, place the container in the fridge. It will stay good for about 3-4 days. If you want to save it longer, freezing is the best option. When you are ready to eat leftovers, use the stove for the best taste. Put the pasta in a skillet over low heat. Add a splash of chicken broth or cream to keep it creamy. Stir it often until it warms up. You can also use the microwave, but check every minute to avoid drying it out. To freeze creamy Cajun sausage pasta, first cool it completely. Then, portion it into freezer-safe bags. Remove as much air as you can before sealing. Label the bags with the date. It can last up to 3 months in the freezer. When you’re ready to eat, thaw it overnight in the fridge before reheating. You can use milk mixed with butter. This mix gives creaminess. Use about 3/4 cup of milk and 1/4 cup of melted butter. You can also try half-and-half for a lighter option. If you want a dairy-free choice, consider coconut cream. It adds a nice flavor and richness too. Yes, you can! Any pasta works well. You can use rotini, fettuccine, or even gluten-free pasta. Just remember to cook it according to package instructions. Each pasta shape holds sauce differently, so choose what you enjoy most. To add heat, increase the Cajun seasoning. You can also add red pepper flakes. Start with a pinch and taste as you go. For more heat, use hot sausage instead of smoked sausage. Fresh jalapeños or diced chili peppers can add a nice kick too. Salads work great! A simple green salad with vinaigrette balances the dish. Garlic bread is a classic choice too. You might also try roasted vegetables for a healthy option. Each side enhances the pasta's rich flavors while keeping the meal light. In this post, we explored how to make creamy Cajun sausage pasta. You learned about the key ingredients, tools, and techniques needed for great cooking. We shared tips for making a creamy sauce and avoiding common mistakes. You can also explore different flavors and adapt the dish to your taste. Finally, we covered how to store leftovers and answered your questions. Cooking can be fun and rewarding. Enjoy your pasta dish and let your taste buds guide you.

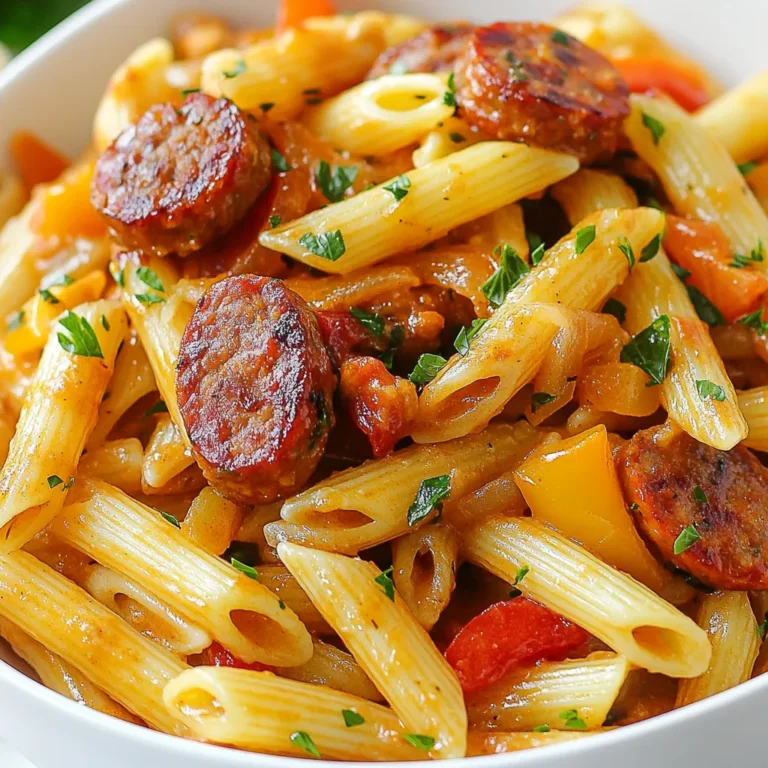
Creamy Cajun Sausage Pasta Savory Delight Recipe

To make a tasty Cheesy Ranch Rotini Bake, you will need: - 3 cups rotini pasta - 1 cup cooked chicken, shredded - 1 cup ranch dressing - 1 cup shredded mozzarella cheese - 1 cup shredded cheddar cheese - 1/2 cup cream cheese, softened - 1/2 cup frozen peas (optional) - 1/2 teaspoon garlic powder - 1/4 teaspoon onion powder - Salt and pepper to taste - Fresh parsley, chopped (for garnish) These main ingredients work together to create a creamy, cheesy, and flavorful dish. The rotini pasta holds the sauce well, while the chicken adds protein. Cream cheese makes it rich and smooth. You can customize your Cheesy Ranch Rotini Bake with some optional add-ins. Consider these: - Cooked bacon for extra flavor - Spinach for a healthy boost - Bell peppers for crunch and color - Mushrooms for an earthy taste Adding these can change the flavor profile. Feel free to mix and match based on what you have at home. For added flavor, consider these toppings before serving: - Extra mozzarella and cheddar cheese - Crushed crackers for a crunchy texture - Fresh chives or green onions for a pop of color - Additional ranch dressing for those who love it These toppings can elevate your dish and make it more appealing. Personalize it to your taste! {{ingredient_image_1}} Start by preheating your oven to 350°F (175°C). Next, cook 3 cups of rotini pasta. Follow the package instructions to get it just right. Aim for al dente, which means the pasta should be firm yet cooked. Drain the pasta and set it aside. Now, take 1 cup of cooked chicken and shred it into small pieces. This adds great flavor and texture to our dish. In a large mixing bowl, combine the shredded chicken and 1 cup of ranch dressing. Add 1 cup of shredded mozzarella cheese and 1 cup of shredded cheddar cheese. For creaminess, mix in 1/2 cup of softened cream cheese. Sprinkle in 1/2 teaspoon of garlic powder and 1/4 teaspoon of onion powder. Season with salt and pepper to taste. Stir everything together until it blends well. This cheesy ranch base is the heart of our bake. Now it's time to bring it all together. Add the cooked rotini pasta into the cheesy ranch mixture. If you want, toss in 1/2 cup of frozen peas for a pop of color and nutrition. Gently fold the pasta into the mixture to coat every piece. Next, transfer everything into a greased 9x13 inch baking dish. Spread the mixture evenly across the dish. If you like extra cheese, sprinkle more mozzarella and cheddar cheese on top. Bake in the preheated oven for 25-30 minutes. You want the cheese to bubble and turn golden. Once done, take it out and let it cool for a few minutes. Finally, garnish with freshly chopped parsley before serving. Enjoy your cheesy ranch rotini bake! To get that creamy texture, you need to mix well. Start with softened cream cheese. It blends easier into the ranch dressing. This step helps avoid lumps. Also, use warm chicken, as it adds to the creaminess. When you bake, the cheese melts beautifully. Keep an eye on it in the oven. You want a bubbly top without overcooking. For this dish, I love using mozzarella and cheddar. They melt perfectly and give a great flavor. Mozzarella makes it stretchy, while cheddar adds sharpness. You can also try pepper jack for a little heat. If you want something different, gouda or fontina are tasty too. Mix and match to find your favorite combo! Don’t be shy with your seasonings! Garlic powder and onion powder add depth. A pinch of salt and pepper brings all the flavors together. You can add some fresh herbs too. Chopped parsley on top looks good and tastes fresh. If you like more zing, try adding a splash of hot sauce or a squeeze of lemon juice. These little touches can take your dish to the next level! Pro Tips Cook Pasta Al Dente: This ensures the pasta retains its texture after baking and doesn't become mushy. Mix in Extra Veggies: Feel free to add more vegetables like bell peppers or spinach for additional flavor and nutrition. Use Leftover Chicken: This dish is perfect for using up leftover rotisserie chicken or any cooked chicken you have on hand. Customize Your Cheese: Experiment with different cheese blends, such as pepper jack for a spicy kick or gouda for a smoky flavor. {{image_2}} You can make a tasty vegetarian version of Cheesy Ranch Rotini Bake. Simply swap out the chicken for a mix of beans or lentils. You can use one cup of black beans or chickpeas. This adds protein and keeps it filling. You can also add more veggies like bell peppers or mushrooms to make it hearty. If you want to switch up the protein, there are many choices. You can use shredded turkey instead of chicken. You might also try diced ham, cooked sausage, or even ground beef. Each protein brings its own flavor to the dish. Just make sure it's cooked before mixing it in. Customizing with different veggies is easy and fun. You can add broccoli, spinach, or zucchini to the mix. Just chop them small so they cook well. If you like some crunch, add in some bell peppers or carrots. Frozen or fresh veggies work well. They add color and nutrients to your bake without much effort. After enjoying your Cheesy Ranch Rotini Bake, store any leftovers in an airtight container. Make sure to let it cool first. This will help keep the flavors fresh. Place the container in the fridge, where it can last for 3 to 4 days. When you're ready to enjoy your leftovers, preheat your oven to 350°F (175°C). Place the rotini bake in an oven-safe dish. Cover it with foil to help keep it moist. Heat for about 20 minutes, or until it's warm all the way through. You can also microwave it for a quicker option. Use a microwave-safe bowl and heat in 30-second bursts, stirring in between. If you want to save some for later, freezing is a great option. First, let the dish cool completely. Then, portion it into freezer-safe containers or bags. Squeeze out any extra air before sealing. This helps prevent freezer burn. It will stay fresh for up to 3 months. When you're ready to eat, thaw it in the fridge overnight before reheating. It takes about 25 to 30 minutes to bake this dish. You want the cheese to melt and bubble. Keep an eye on it. When the top is golden, it is ready to serve. Yes, you can use other pasta shapes if you like. Penne, fusilli, or even shells work well. Just cook them until they are al dente. This helps keep the pasta from getting mushy. You can use other dressings or sauces if you want. Try blue cheese, Italian dressing, or a homemade herb mix. Each will add a unique taste to your dish. You can prepare the dish a day before serving. Just mix the ingredients and put them in the baking dish. Cover it and keep it in the fridge. When you are ready, bake it straight from the fridge. Adjust the baking time as needed. In this blog post, we covered how to make a cheesy ranch rotini bake. We discussed the main ingredients, optional add-ins, and tasty toppings. You learned step-by-step instructions for preparation, mixing, and baking. Tips for getting a creamy texture and the best cheese options were also shared. We explored variations like vegetarian and different protein choices, plus how to store leftovers and reheat them. Enjoy creating this dish your way. It’s a quick, yummy meal that everyone will love!

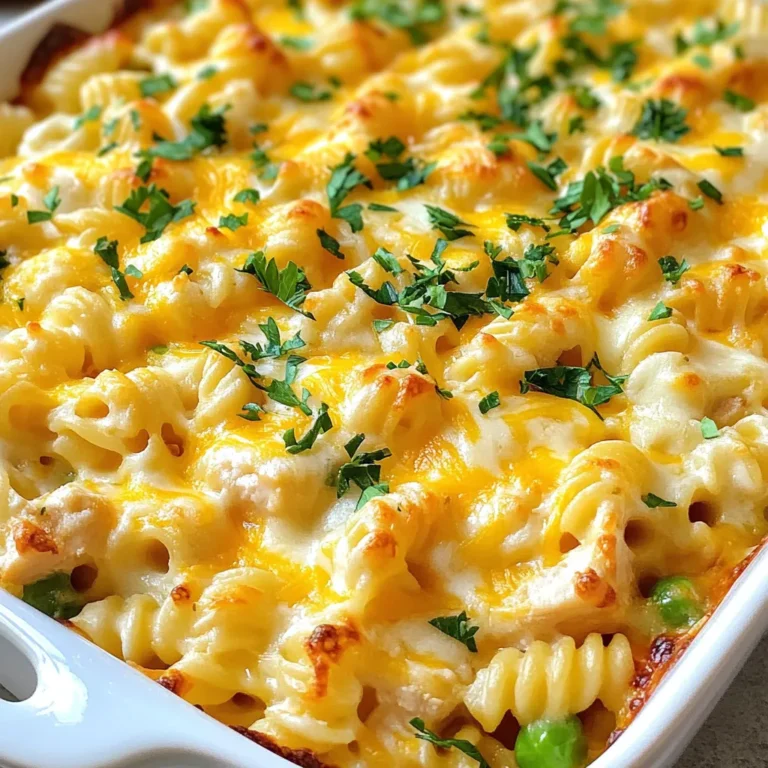
Cheesy Ranch Rotini Bake Flavorful Family Meal

To make a tasty rotisserie chicken casserole, you need these main ingredients: - 1 rotisserie chicken, shredded - 2 cups cooked quinoa (or rice) - 1 cup broccoli florets, steamed - 1 cup frozen corn - 1 cup shredded cheddar cheese - 1 cup cream of mushroom soup (or homemade equivalent) - 1/2 cup milk - 1 teaspoon garlic powder - 1 teaspoon onion powder - Salt and pepper to taste - 1/2 cup breadcrumbs (optional for topping) - 2 tablespoons olive oil These ingredients come together to create a warm, hearty meal. The rotisserie chicken offers great flavor and saves time. The quinoa or rice is filling and provides a nice base. Broccoli and corn add color and nutrients. I always suggest using rotisserie chicken for this dish. It is already cooked and full of flavor. You can use any cooked chicken if you prefer. Grilled or baked chicken works well too. Just make sure to shred it into bite-sized pieces. The key is to have tender chicken that blends well with the other ingredients. If you want to switch things up, here are some alternatives for quinoa or rice: - Couscous - Orzo - Cauliflower rice Each option brings a different texture and taste. Couscous cooks quickly and adds a nice chew. Orzo gives a pasta-like feel, while cauliflower rice is great for a low-carb version. Choose what fits your family’s taste and dietary needs! {{ingredient_image_1}} Start by preheating your oven to 350°F (175°C). This step is crucial. A hot oven helps cook the casserole evenly. Next, take a 9x13-inch baking dish. Grease it with two tablespoons of olive oil. This prevents sticking and makes cleaning easier later on. In a large mixing bowl, gather your main ingredients. Add 1 shredded rotisserie chicken, 2 cups of cooked quinoa, 1 cup of steamed broccoli florets, and 1 cup of frozen corn. Pour in 1 cup of cream of mushroom soup and 1/2 cup of milk. This mix gives the dish a creamy texture. Now, sprinkle in 1 teaspoon of garlic powder and 1 teaspoon of onion powder. Season with salt and pepper to taste. Stir everything well until it is nicely combined. Pour the mixture into your greased baking dish. Spread it evenly across the bottom. Top with 1 cup of shredded cheddar cheese. If you want a crunchy top, add 1/2 cup of breadcrumbs. Place the dish in your preheated oven. Bake for 25 to 30 minutes. You want it hot and bubbly. If the top isn't golden brown, broil it for 2 to 3 minutes. Keep an eye on it to prevent burning. Once done, let the casserole cool for a few minutes before serving. Enjoy your meal! To shred a rotisserie chicken, first let it cool for a bit. This makes it safer to handle. Use your hands or two forks to pull apart the meat. Start with the breast, then move to the thighs and wings. Shredded chicken should be bite-sized, making it easy to mix into your casserole. To make your casserole creamy, use a good amount of cream of mushroom soup. Combine it with milk to create a smooth mix. If you want extra creaminess, add a bit of sour cream or cream cheese. Mixing these well helps create a rich texture that coats every ingredient. Seasoning is key to a tasty casserole. Use garlic powder and onion powder for depth. Don't forget salt and pepper; they make a big difference. You can also add herbs like thyme or rosemary for more flavor. Experiment with spices to find what you love. A little extra seasoning can turn a good dish into a great one! Pro Tips Use Leftover Chicken: This recipe is perfect for utilizing leftover rotisserie chicken. It saves time and enhances flavor! Customize Your Veggies: Feel free to swap out the broccoli and corn for your favorite vegetables like bell peppers or spinach for a different twist. Make it Creamier: For a creamier texture, add an extra 1/4 cup of milk or a dollop of sour cream to the mixture before baking. Store for Later: This casserole can be made ahead of time and stored in the fridge for up to 3 days or frozen for up to 2 months. Just reheat before serving! {{image_2}} If you want a meatless meal, try using chickpeas instead of chicken. Chickpeas add protein and fiber. You can use one can (15 ounces) of rinsed chickpeas. Mix them with quinoa, broccoli, corn, and cream of mushroom soup. This option keeps the dish hearty while being plant-based. To give your casserole a kick, add Mexican spices. Use chili powder, cumin, and paprika. You can also add black beans and diced tomatoes for extra flavor. This twist gives the dish a fiesta feel. Top it with jalapeños and cilantro for a fresh taste. If you need a gluten-free version, swap out regular breadcrumbs for gluten-free breadcrumbs. You can also use a gluten-free cream of mushroom soup. Quinoa is a great choice here since it is naturally gluten-free. This way, everyone can enjoy the casserole without worry. To keep your rotisserie chicken casserole fresh, store it in an airtight container. Let the casserole cool first. This helps prevent moisture build-up that can cause sogginess. If you leave it in the baking dish, cover it tightly with plastic wrap or foil. When you are ready to enjoy leftovers, heat the casserole in the oven. Preheat it to 350°F (175°C). Place the casserole in a baking dish if it’s not already. Cover it with foil to keep it moist. Bake for about 20-25 minutes or until it is warm throughout. If you want a crispy top, remove the foil for the last 5 minutes. You can freeze the casserole for later use. Make sure it is fully cooled before freezing. Use a freezer-safe container or wrap it tightly in plastic wrap, then foil. Label the container with the date. It can last in the freezer for up to three months. To reheat, thaw it overnight in the fridge and follow the reheating instructions above. Yes, you can use leftover chicken. Just shred it into small pieces. This saves time and reduces waste. It works well in the casserole. You may want to add some extra seasoning. This helps boost the flavor if your chicken is plain. You can use cream of chicken soup or make your own. A mix of sour cream and broth also works well. This keeps the dish creamy. You can try a homemade white sauce too. Just mix butter, flour, and milk until thick. You can store it in the fridge for about three to four days. Make sure to cover it tightly with plastic wrap or a lid. To enjoy it later, reheat in the oven or microwave. This keeps the flavors fresh and tasty. In this article, I covered how to make a tasty rotisserie chicken casserole. We discussed key ingredients, from chicken types to alternatives for quinoa and rice. I provided step-by-step baking instructions and shared tips for perfect texture and flavor. I also suggested fun variations, storage tips, and answered common questions. This dish is easy to adapt and great for any night. With simple changes, everyone can enjoy it!

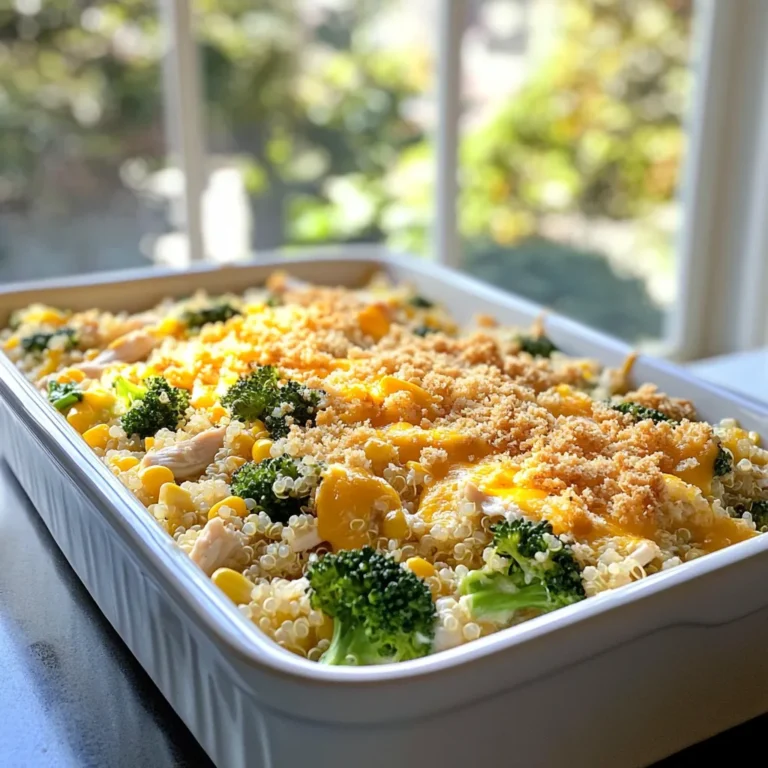
Rotisserie Chicken Casserole Easy Family Meal Idea

- 2 boneless, skinless chicken breasts, cooked and shredded - 1 ripe avocado, mashed - 1 cup shredded cheese (cheddar or a Mexican blend) - 1 small red onion, finely chopped - 1 bell pepper (any color), diced - 2 teaspoons ground cumin - 1 teaspoon garlic powder - 1 teaspoon paprika - Olive oil, salt, and pepper - 4 large flour tortillas - Fresh cilantro, chopped (for garnish) - Sour cream (for serving) These ingredients create a tasty and satisfying meal. The chicken provides protein, while the avocado adds creaminess. Cheese melts beautifully and ties everything together. The red onion and bell pepper give color and crunch. The spices bring depth and flavor. Olive oil helps with cooking and adds richness. Don't forget the cilantro and sour cream for freshness and tang! Feel free to mix and match ingredients based on what you have. You can swap chicken for beans or tofu if you prefer. Enjoy the process of making these delicious quesadillas! {{ingredient_image_1}} Start by heating a tablespoon of olive oil in a large skillet over medium heat. Add the finely chopped red onion and diced bell pepper. Sauté them for about 3 to 4 minutes. You want them softened but not mushy. The smell will fill your kitchen with a warm aroma. In a mixing bowl, combine the shredded chicken and mashed avocado. Add ground cumin, garlic powder, paprika, salt, and pepper. Mix everything well. This step brings all the flavors together. The creamy avocado pairs perfectly with the tender chicken. Lay a flour tortilla flat on a clean surface. Spread a quarter of the chicken and avocado mixture over half of the tortilla. Top with a quarter of the shredded cheese. Fold the tortilla in half over the filling and press down gently. Repeat this with the other tortillas. In the same skillet, add a little more olive oil if needed. Heat it over medium heat. Carefully place one folded quesadilla in the skillet. Cook for 3 to 4 minutes on each side. You want them golden brown and crispy. Once done, remove them from the skillet and let them cool for a minute. Cut the quesadillas into wedges. Garnish with chopped cilantro for a fresh touch. Serve them with sour cream on the side for dipping. Enjoy your delicious creation! - Achieving the ideal crispness For great quesadillas, use medium heat. This helps the outside get crisp while the inside warms up. Don’t rush the cooking. A slow cook gives a golden, crunchy finish. - Managing cooking temperature Always preheat your skillet before adding your quesadilla. A hot pan helps to seal the edges and keeps everything inside warm. If it cooks too fast, the cheese may not melt properly. - Best dips and sides Serve your quesadillas with sour cream, salsa, or guacamole. These dips add flavor and creaminess. A fresh side salad also pairs well. It adds crunch and freshness to the meal. - Pairing with drinks Enjoy your quesadillas with a light drink. A cold lemonade or iced tea balances the flavors. For adults, a light beer or margarita can be a fun choice. - Using different proteins Try using turkey, shrimp, or even beans. They all work well with the other flavors. This gives you new tastes and options for your quesadilla. - Vegan options for cheese If you want a vegan quesadilla, use plant-based cheese. You can also skip the cheese and add more avocado. This keeps the dish creamy without dairy. Pro Tips Use Fresh Ingredients: Always opt for fresh vegetables and ripe avocados to enhance the flavor and texture of your quesadillas. Don’t Overfill: Be cautious not to overload the tortillas with filling. This helps in achieving a perfectly crisp quesadilla without spills. Adjust the Heat: Cook the quesadillas on medium heat to ensure the cheese melts evenly without burning the tortilla. Experiment with Cheese: Try different types of cheese like Monterey Jack or Pepper Jack for a unique twist on flavor. {{image_2}} You can turn up the heat in your quesadillas. Just add jalapeños or a splash of hot sauce. This adds a fun kick to each bite. The creaminess of avocado balances the spice well. Use fresh jalapeños for a brighter flavor. If you prefer liquid heat, try a few drops of your favorite hot sauce. This simple twist makes a big difference. Not a meat lover? No problem! You can easily swap chicken for beans or tofu. Black beans are a great choice for added protein and fiber. Tofu gives a nice texture and absorbs flavors well. Just season them like you would the chicken. This lets you enjoy all the flavors while keeping it meat-free. Cheese is key in quesadillas. While cheddar is delicious, many cheeses can work. Try Monterey Jack for a milder taste. Or go bold with pepper jack for extra spice. You can even mix cheeses to create a unique flavor. The right cheese can change your whole meal. So, don’t be afraid to experiment! To keep your chicken avocado quesadillas fresh, store leftovers in the fridge. Place them in an airtight container. They can last for up to three days. If you want to freeze them, wrap each quesadilla in plastic wrap. Then, place them in a freezer bag. They can stay in the freezer for up to three months. - Best practices for refrigeration: - Allow quesadillas to cool before storing. - Keep them in a single layer to avoid sogginess. - Freezing quesadillas: Tips: - Make sure to label your bags with the date. - Thaw in the fridge overnight before reheating. When you're ready to eat, reheating quesadillas can bring back their crispiness. Here are some methods to try: - Skillet Method: Heat a skillet over medium heat. Place the quesadilla in the skillet and cover it. Cook for about 3-4 minutes on each side. - Oven Method: Preheat your oven to 375°F (190°C). Place the quesadilla on a baking sheet and bake for 10-15 minutes until hot and crispy. - Microwave Method: This method is quick but can make them soft. Place the quesadilla on a microwave-safe plate. Heat for about 30-60 seconds. Use a paper towel to absorb moisture. By following these tips, you can enjoy your chicken avocado quesadillas just like they were fresh! Yes, you can make these quesadillas ahead of time. Prepare them and store them in the fridge. Wrap them in foil or plastic wrap. You can also freeze them for later. Just remember to cook them before eating. If you don’t have tortillas, use pita bread or flatbreads. You can even try lettuce wraps for a low-carb option. Just make sure they can hold the filling without tearing. Look for a golden brown color on both sides. The cheese should melt inside and the outside should be crispy. You can also carefully lift a corner to check the color. Absolutely! Feel free to add mushrooms, spinach, or zucchini. Just chop them small. Sauté them with the onion and bell pepper before adding to the filling. I recommend using cheddar or a Mexican cheese blend. They melt well and add great flavor. You can also mix in mozzarella for extra stretchiness. This blog covered the key ingredients and steps to make tasty quesadillas. We explored main ingredients like chicken and avocado and added the crunch of red onion and bell pepper. I shared tips to achieve the right texture and even offered fun variations. You can enjoy these dishes fresh or store extras for later. Remember, you can always adjust spices and veggies to fit your taste. Get creative, have fun, and enjoy your delicious quesadillas!

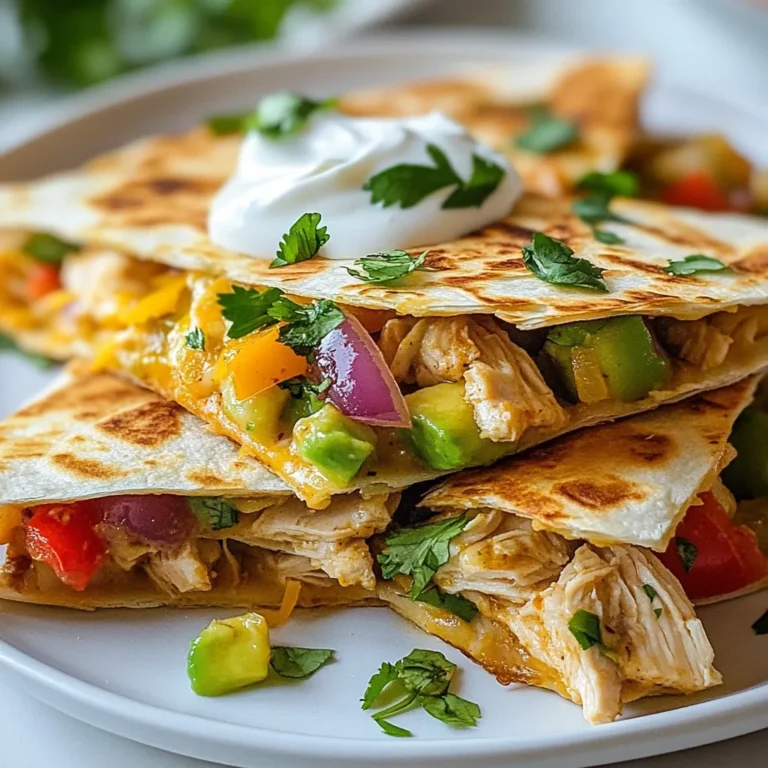
Chicken Avocado Quesadillas Quick and Tasty Meal

To make BBQ cheddar meatloaf, you need these key ingredients: - 1 lb ground beef - 1 cup breadcrumbs - 1/2 cup sharp cheddar cheese, shredded - 1/2 cup BBQ sauce (plus more for topping) - 1/2 cup onion, finely chopped - 1/4 cup milk - 1 large egg - 1 tablespoon Worcestershire sauce - 1 teaspoon garlic powder - 1 teaspoon smoked paprika - Salt and pepper to taste These ingredients blend well to create a moist and tasty meatloaf. The ground beef forms the base, while breadcrumbs add texture. Sharp cheddar cheese brings that cheesy flavor you crave. BBQ sauce, both in the mix and as a topping, gives the meatloaf a sweet and smoky kick. The onion adds a nice crunch. For a bit of color and freshness, you can use: - Fresh parsley for garnishing Garnishing with parsley looks nice and adds a fresh taste to your dish. Pair your BBQ cheddar meatloaf with sides that complement its flavors: - Coleslaw - Roasted vegetables - Extra BBQ sauce for dipping These sides balance the richness of the meatloaf. They add crunch and brightness to each bite. Enjoying it on a rustic wooden platter makes the meal feel special. {{ingredient_image_1}} 1. Preheat your oven to 350°F (175°C). This step is key for even cooking. 2. In a large bowl, mix the ground beef, breadcrumbs, and sharp cheddar cheese. 3. Add the finely chopped onion, milk, egg, and BBQ sauce. 4. Next, include Worcestershire sauce, garlic powder, smoked paprika, salt, and pepper. 5. Mix all the ingredients until they are well combined. Don’t overmix; it keeps the meatloaf tender. 6. Transfer the meat mixture into a loaf pan and shape it into a loaf. 7. Spread a thin layer of BBQ sauce on top for extra flavor. 1. Place the loaf pan in the preheated oven. 2. Bake for one hour. This allows the meatloaf to cook through. 3. Check the internal temperature. It should be 160°F (70°C) for safe eating. 4. After baking, remove the meatloaf from the oven. 5. Let it rest for ten minutes before slicing. This helps the juices redistribute. 6. For serving, drizzle extra BBQ sauce over each slice for a tasty touch. 7. You can garnish with freshly chopped parsley if you like. To check if your meatloaf is done, use a meat thermometer. Insert it into the center. If it reads 160°F (70°C), it’s safe to eat. If not, put it back in the oven for a few more minutes. Letting it rest is also important. It makes the meatloaf easier to slice and keeps it moist. To keep your meatloaf moist, use the right balance of ingredients. The ground beef should have some fat, ideally 80/20 or 85/15. This fat helps lock in moisture. Add milk and breadcrumbs to the mix; they soak up juice and keep your meatloaf tender. Be gentle when mixing. Overmixing can lead to a tough texture. Seasonings are key to great taste. Don't skip the garlic powder and smoked paprika; they add depth. Worcestershire sauce gives a savory kick. You can also play with flavors. Try adding herbs like thyme or oregano for a fresh twist. A touch of hot sauce can spice things up, too. Slice the meatloaf and serve it hot. Drizzle more BBQ sauce on top for added flavor. A sprinkle of fresh parsley brightens the dish. Pair it with coleslaw or roasted veggies for a complete meal. You can also serve it on a rustic platter for a fun presentation. Add a small bowl of BBQ sauce for dipping, and enjoy! Pro Tips Use Fresh Ingredients: Always opt for fresh ground beef and high-quality cheddar cheese for the best flavor and texture in your meatloaf. Don’t Overmix: When combining the ingredients, mix just until combined to keep the meatloaf tender and avoid a dense texture. Rest Before Slicing: Allow the meatloaf to rest for at least 10 minutes after baking. This helps the juices redistribute for a moister slice. Experiment with BBQ Sauces: Try different flavors of BBQ sauce for unique twists. A sweet or smoky sauce can dramatically change the flavor profile. {{image_2}} You can switch up the meat in your BBQ Cheddar Meatloaf. Ground turkey works well if you want a leaner dish. Ground pork adds a nice flavor too. You can even use a mix of meats for a unique taste. Just remember, cooking times may vary slightly based on the meat you choose. While sharp cheddar is a classic choice, feel free to explore other cheeses. Mild cheddar gives a creamier taste. Pepper jack adds a spicy kick. For a rich flavor, try gouda or mozzarella. Mix and match to find your perfect cheese blend. The BBQ sauce you use can change the whole dish. Sweet sauces add a nice glaze, while tangy ones give a bold flavor. Try a smoky BBQ sauce for a more robust taste. You can also make your own sauce with ketchup, vinegar, and spices for a personal touch. Experiment to discover your favorite BBQ flavor! To store leftover BBQ cheddar meatloaf, let it cool first. Wrap it tightly in plastic wrap or foil. You can also place it in an airtight container. Store it in the fridge for up to four days. This keeps the meatloaf fresh and tasty. For longer storage, freeze the meatloaf. Slice it into portions for easy use later. Wrap each slice separately in plastic wrap, then place them in a freezer bag. Remove as much air as possible. You can freeze it for up to three months. Always label the bag with the date. To reheat, use the oven for best results. Preheat your oven to 350°F (175°C). Place the meatloaf on a baking sheet. Cover it with foil to keep it moist. Heat for about 20 minutes or until warm throughout. You can also microwave individual slices. Heat them for 1-2 minutes, checking often. Enjoy your tasty meatloaf! The key to a juicy meatloaf lies in the ingredients and mix. Use ground beef with some fat. This helps keep it moist. Adding milk, eggs, and BBQ sauce also helps. Be sure not to overmix; this can make the meatloaf tough. Mixing gently keeps it tender and juicy. Also, let it rest after baking. This allows the juices to settle back into the meat. Yes, you can use ground turkey! It works well in this recipe. However, turkey is leaner than beef. To keep it moist, add extra milk or a bit more BBQ sauce. You can also mix in some chopped veggies for added moisture and flavor. Just remember that turkey may cook faster, so keep an eye on the time. To check if the meatloaf is done, use a meat thermometer. The internal temperature should reach 160°F (70°C). If you don’t have a thermometer, look for a firm texture and no pink in the center. Let the meatloaf rest for 10 minutes after baking. This helps with slicing and keeps it juicy. BBQ Cheddar Meatloaf goes well with many sides. Some great options are: - Coleslaw - Roasted vegetables - Mashed potatoes - Baked beans - Cornbread These sides complement the rich flavors of the meatloaf and add variety to your meal. Enjoy mixing and matching! In this blog post, we explored the best ingredients, steps, and tips for BBQ Cheddar Meatloaf. You learned about key ingredients and how to cook the meatloaf to perfection. I shared ideas for variations to suit your taste and how to store leftovers. Remember, a juicy meatloaf starts with the right mix of ingredients and careful cooking. Enjoy your BBQ Cheddar Meatloaf on its own or with tasty sides for a meal everyone will love. Happy cooking!

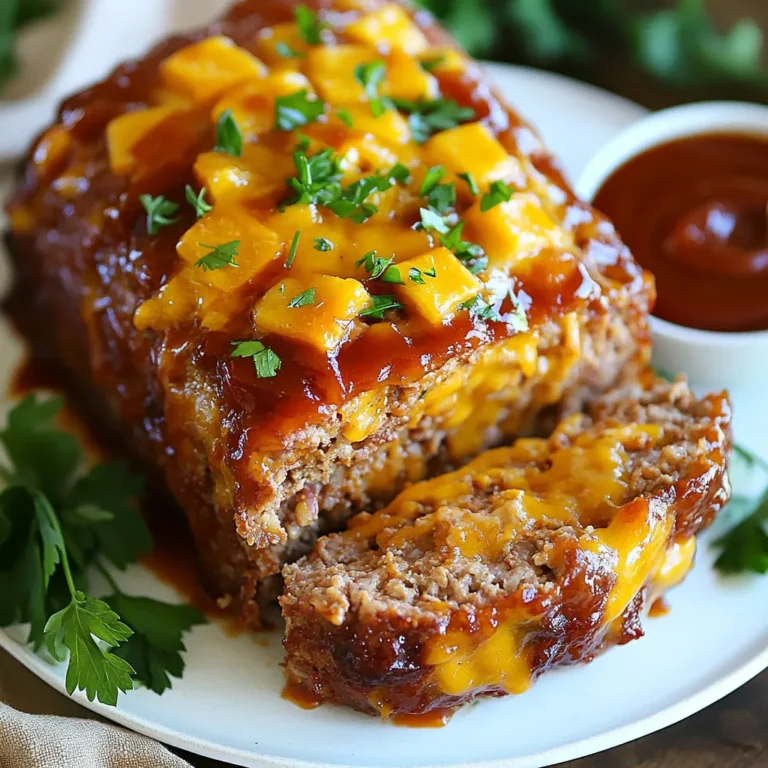
BBQ Cheddar Meatloaf Flavorful and Filling Delight

- 1 cup uncooked long-grain rice - 1 pound ground turkey or beef - 1 tablespoon olive oil - 1 small onion, diced - 2 cloves garlic, minced - 1 packet taco seasoning - 1 can (15 oz) black beans, rinsed and drained - 1 can (14.5 oz) diced tomatoes (with green chilies for extra flavor) - 2 cups chicken broth - 1 cup corn (fresh or frozen) - 1 cup shredded cheddar cheese (plus more for topping) - Salt and pepper to taste - Fresh cilantro or green onions, chopped (for garnish) Use cheddar cheese for its great melt and flavor. You can add more cheese on top for a cheesier experience. For fresh flavor, top with chopped cilantro or green onions. They bring color and a fresh taste. You will need a large skillet and measuring cups for this recipe. The skillet helps cook everything evenly. I suggest using good quality olive oil for sautéing. It adds a nice flavor to the dish. {{ingredient_image_1}} First, grab a large skillet. Heat one tablespoon of olive oil over medium heat. Once the oil is hot, add one small diced onion. Cook the onion for about three to four minutes. You want it soft and fragrant. Next, stir in two minced garlic cloves. Then, add one pound of ground turkey or beef. Cook the meat until it is browned and crumbled. If there’s extra fat, drain it away. Now, it’s time to add flavor. Sprinkle one packet of taco seasoning over the meat. Mix it well for about one minute. This step makes the meat tasty. Next, add one cup of uncooked long-grain rice to the skillet. Stir the rice into the meat mixture. Now, pour in one can of diced tomatoes (with juices), two cups of chicken broth, one can of black beans, and one cup of corn. Make sure to stir everything together well. Bring the mixture to a boil. Once it bubbles, reduce the heat to low. Cover the skillet with a lid. Let it simmer for about twenty to twenty-five minutes. This time lets the rice cook well. Check it to see if the rice is tender and the liquid is mostly gone. When it’s done, stir in one cup of shredded cheddar cheese. Mix until the cheese melts completely. Add salt and pepper to taste. To adjust the seasoning, taste your dish as you cook. If it needs more flavor, add more taco seasoning or salt. Mix well and let it cook a bit longer to blend the taste. For fluffy rice, rinse it before cooking. This removes excess starch. Use a 2:1 ratio of broth to rice for the right texture. Avoid stirring too much while it cooks. Let it simmer gently for best results. Add extra ingredients like bell peppers or jalapeños for a kick. You can also mix in avocado for creaminess. For a fresh side, serve it with a green salad. A simple corn salad pairs well too. These sides balance the rich flavors of the dish. Serve the cheesy taco rice in colorful bowls. Top with extra cheese for a cheesy finish. Fresh cilantro or green onions add a nice touch. For extra crunch, serve with tortilla chips on the side. You can even use chips to scoop the rice. This makes it fun to eat! Pro Tips Use Brown Rice: For a healthier option, substitute white rice with brown rice. Just remember to adjust the cooking time, as brown rice takes longer to cook. Customize Your Meat: Feel free to use other proteins like shredded chicken or plant-based meat alternatives for a different flavor profile. Add More Veggies: Incorporate additional vegetables like bell peppers, zucchini, or spinach to boost the nutritional content and add more color to your dish. Make It Spicy: If you love heat, add diced jalapeños or a dash of hot sauce to the mixture for an extra kick. {{image_2}} You can swap the meat in this dish for beans. Black beans provide a great protein source and keep the meal hearty. Simply add 2 cans of beans instead of meat. You can also try chicken or pork. For chicken, use ground or shredded meat. For pork, ground pork works well too. Each option adds its own flavor and texture. Add more veggies to boost flavor and nutrition. Bell peppers, zucchini, or spinach blend well in this dish. You can also mix in spices like cumin or paprika for depth. For cheese, try pepper jack or Monterey Jack for a kick. Mixing different cheeses creates a creamy texture and adds flavor. If you need a gluten-free dish, use gluten-free taco seasoning. Most rice is gluten-free, so you’re safe there. For dairy-free options, use dairy-free cheese. Coconut milk can replace chicken broth for a different taste. These adjustments ensure everyone can enjoy this meal without worry. After you enjoy your Cheesy Taco Rice Skillet, you can store the leftovers. Place them in an airtight container. This helps keep the flavors fresh. The dish lasts in the fridge for about 3 to 4 days. When you want to eat it again, just reheat it on the stove or in the microwave. If you want to save some for later, you can freeze the Cheesy Taco Rice Skillet. First, let it cool completely. Then, divide it into portions and place them in freezer-safe bags. Squeeze out as much air as you can before sealing. This way, it stays fresh. To thaw, move it to the fridge overnight. You can reheat it on the stove or in the microwave until hot. Leftovers are great for new meals! You can use them in burritos or tacos. Just spoon some rice onto a tortilla and add your favorite toppings. You can also mix it into a salad for a hearty lunch. For meal prep, pack individual portions in containers. This makes it easy to grab a meal on busy days. This dish is quick and easy! It takes about 35 minutes in total. You spend 10 minutes getting ready and then 25 minutes cooking. This means you can have a yummy dinner on the table fast! Yes, you can use brown rice! Just remember, it takes longer to cook. You will need about 45-50 minutes instead of 25. Make sure to add extra liquid, too, as brown rice absorbs more. Use 2 ½ cups of chicken broth for best results. The spice level depends on the taco seasoning you use. Some brands are mild, while others can be hot. If you want less heat, choose a mild seasoning. You can also add less seasoning or mix in some extra cheese to cool it down. Enjoy your meal just how you like it! In this blog post, we explored how to make Cheesy Taco Rice Skillet using ground meat, pantry staples, and delicious cheese. I shared tips to enhance flavor, perfect texture, and make this dish your own. Remember, cooking is creative. You can mix ingredients to suit your taste. Whether you keep it simple or add extra flair, you will enjoy this meal. With easy storage tips, this dish can stretch into multiple meals. Embrace the joy of cooking and enjoy every bite!

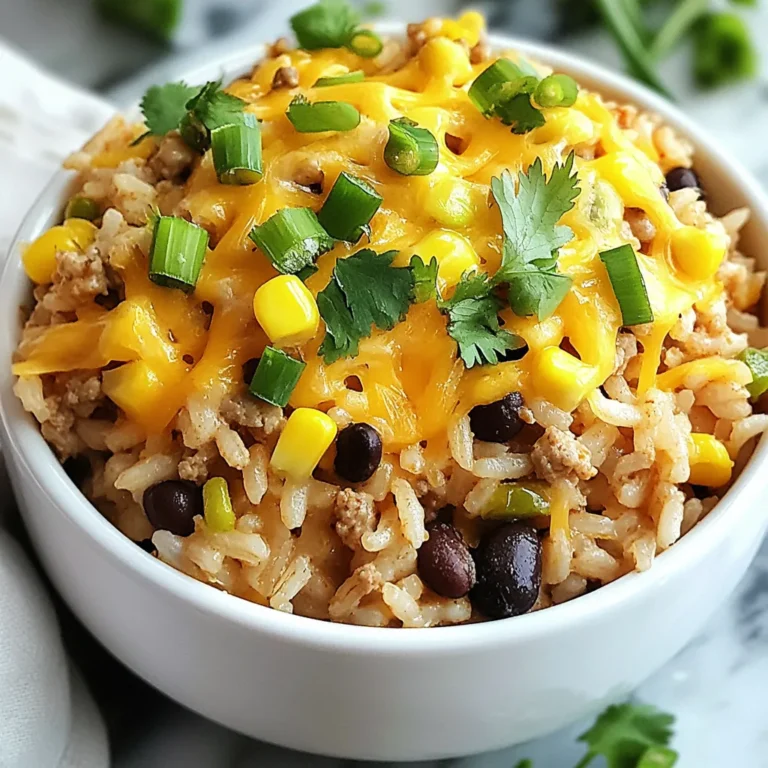
Cheesy Taco Rice Skillet Quick One-Pan Dinner

- 12 oz pasta (penne or fettuccine) - 1 cup cherry tomatoes, halved - 1 zucchini, thinly sliced - 1 bell pepper (any color), julienned - 1 cup broccoli florets - 1 carrot, julienned - 3 cloves garlic, minced - 1/4 cup olive oil - 1 teaspoon dried Italian herbs (basil, oregano, thyme) - Salt and pepper to taste - Fresh basil leaves for garnish - Grated Parmesan cheese, to serve (optional) Pasta Primavera shines with fresh, vibrant ingredients. The choice of pasta helps hold the sauce and veggies. I love using penne or fettuccine for their great texture. Cherry tomatoes add a sweet burst of flavor. Zucchini brings a nice crunch, while bell pepper adds color and taste. Broccoli florets offer a slight bitterness that balances the dish. Carrots add sweetness and a lovely orange hue. Garlic is key for flavor. It gives a warm, rich taste. Olive oil adds richness and helps to sauté the veggies. The dried Italian herbs tie everything together with classic flavors. Don't forget the salt and pepper. They enhance all the other tastes. Fresh basil leaves add a bright finish, while grated Parmesan offers a creamy touch if you choose to add it. This dish is all about using fresh, seasonal ingredients. Choose what you love and make it your own! {{ingredient_image_1}} - Bring a large pot of salted water to a boil. - Add 12 oz of pasta and cook until al dente. This usually takes about 8-10 minutes. - Reserve 1/2 cup of the pasta cooking water, then drain the pasta. Set it aside in a large bowl. - In a large skillet, heat 1/4 cup olive oil over medium heat. - Add 3 cloves of minced garlic and sauté for about 1 minute until it smells great. - Next, add 1 zucchini (thinly sliced), 1 bell pepper (julienned), 1 cup of broccoli florets, and 1 carrot (julienned). - Sauté these veggies for about 5-7 minutes. You want them tender, but still crisp. - Stir in 1 cup of halved cherry tomatoes and cook for 2-3 minutes until they soften. - Add the cooked pasta to the skillet. - Pour in the reserved pasta water and sprinkle in 1 teaspoon of dried Italian herbs. - Toss everything together until well mixed and heated through. - Season with salt and pepper to taste. - Remove from heat and garnish with fresh basil leaves. Serve hot with grated Parmesan cheese if you like. Cooking pasta to al dente is key. Al dente means the pasta is firm but not hard. It gives texture and holds sauce well. To achieve this, boil salted water, and cook the pasta just until it has a slight bite. Always check the package for timing. To sauté vegetables properly, use medium heat. Heat the olive oil first, then add minced garlic. This brings out flavor. After a minute, add your vegetables. Stir frequently but do not overcrowd the pan. You want them to be tender yet crisp. For a beautiful presentation, use large bowls. After plating, add a sprinkle of fresh Parmesan on top. This adds a nice touch. A few extra basil leaves will brighten the dish. Drizzle some olive oil for extra flavor and shine. Pair Pasta Primavera with a crisp white wine like Pinot Grigio. It complements the vegetables nicely. If you prefer bread, a fresh baguette works well. It’s perfect for soaking up any sauce. Garnishes can change the look of your dish. Fresh herbs, like parsley or basil, add a pop of color. You can also sprinkle some grated cheese on top. It introduces a savory flavor. For visual appeal, consider colorful vegetables. Red bell peppers, green zucchini, and yellow carrots create a vibrant plate. The mix of colors makes the dish more inviting and fun. Pro Tips Use Seasonal Vegetables: Opt for vegetables that are in season to enhance flavor and nutrition. This will also make your dish more vibrant and colorful. Perfect Pasta Cooking: Always cook pasta in a large pot of salted water to ensure even cooking and optimal flavor. Al dente pasta holds up better when tossed with sauce. Customize Your Herbs: Feel free to experiment with different herbs like parsley or thyme based on your preference. Fresh herbs can be added at the end for a burst of flavor. Presentation Matters: For a restaurant-style presentation, twirl the pasta into nests on the plate and top with vegetables and a sprinkle of cheese for an appealing look. {{image_2}} For Pasta Primavera, you can switch up the pasta. Try using gluten-free pasta made from rice or quinoa. It's just as tasty! You can also choose different vegetables based on the season. In summer, add fresh corn or peas. In fall, consider using butternut squash or Brussels sprouts. To make this dish even better, add some protein. Grilled chicken, shrimp, or tofu works well. You can also spice it up! A pinch of red pepper flakes adds heat. A bit of lemon zest gives a bright flavor that pops. If you want to make this dish vegan, skip the cheese. Use nutritional yeast for a cheesy flavor instead. For nut-free diets, keep an eye on ingredients like tofu that may contain nuts. You can also swap regular pasta for zucchini noodles for a low-carb option. This keeps it light and fresh! To store Pasta Primavera, let it cool first. Use an airtight container. This keeps the dish fresh. You can keep it in the fridge for up to three days. For best taste, eat it soon. If you want to freeze it, use freezer-safe containers. It will last for about two months. Make sure to label the containers with the date. This way, you know when to use them. When it’s time to eat the leftovers, you can reheat them. The best way is to use a skillet. Add a splash of water to keep it moist. Heat over medium-low heat for about five minutes. Stir often to avoid sticking. You can also use the microwave. Place the pasta in a bowl and cover it. Heat it for one minute, then stir. Repeat until warm. This helps keep the texture and flavor nice. Leftovers of Pasta Primavera last for three days in the fridge. In the freezer, they can last for up to two months. Always check for signs of spoilage before eating. If it smells bad or looks odd, throw it away. Enjoy your colorful dish while it’s fresh! Pasta Primavera is a fresh and colorful pasta dish. It originated in Italy. The name means "spring pasta" in Italian. It celebrates the fresh veggies of spring. Chefs crafted it in the 1970s in New York. It quickly became popular for its lightness and bright flavors. You can enjoy it as a main dish or a side. Yes, you can switch up the veggies! Seasonal vegetables work well. Try asparagus, peas, or spinach for spring. In summer, add eggplant or bell peppers. Fall brings squash or mushrooms. Use what you love or what you have. This dish is versatile and fun to customize. To make Pasta Primavera healthier, consider these tips: - Use whole grain pasta for more fiber. - Add more veggies to boost nutrients. - Swap olive oil for a lighter cooking spray. - Use less cheese or skip it for fewer calories. - Add lean protein like grilled chicken or chickpeas for balance. These changes keep the dish tasty while enhancing its health benefits. This blog post covered a tasty Pasta Primavera recipe. You learned about the ingredients and step-by-step cooking tips. I shared helpful storage advice and answered common questions. Remember, you can swap ingredients to fit your diet or use seasonal veggies. Final thoughts: Pasta Primavera is flexible, healthy, and full of flavor. Give it a try and enjoy!

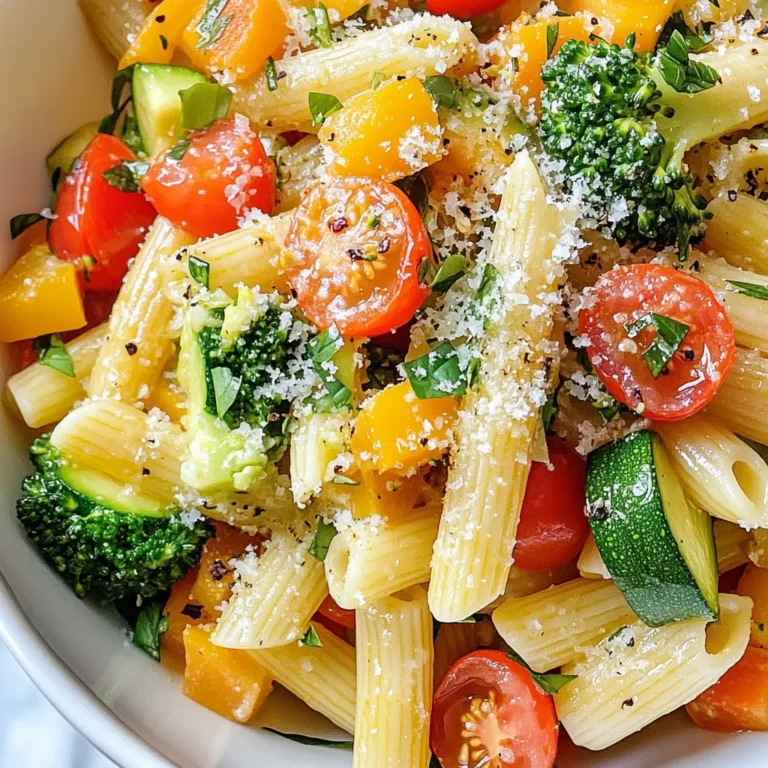
Pasta Primavera Flavorful and Colorful Vegetable Dish

To make a Spicy Ground Beef Stir-Fry Bowl, gather these fresh items: - 1 pound ground beef - 2 tablespoons soy sauce - 1 tablespoon sriracha (adjust for spice preference) - 1 tablespoon sesame oil - 3 cloves garlic, minced - 1-inch piece of ginger, grated - 1 bell pepper (red or yellow), sliced - 1 medium carrot, julienned - 2 green onions, sliced (for garnish) - 1 cup cooked rice (jasmine or brown) - 1 tablespoon sesame seeds (for garnish) - Salt and black pepper to taste The soy sauce adds a savory touch. Sriracha brings heat and flavor. Garlic and ginger give a warm, aromatic base. Together, they create a rich, bold taste. You can adjust the sriracha based on your spice level. More sriracha means more heat! The balance of savory and spicy is key to this dish. You can swap ground beef for turkey or chicken. Both are leaner options. For a vegetarian twist, try firm tofu or tempeh. Use tamari instead of soy sauce for a gluten-free option. If you lack sriracha, a mix of chili paste and hot sauce works too. Feel free to change veggies as well. Snow peas, broccoli, or snap peas add great crunch! {{ingredient_image_1}} To start, gather all your ingredients. This makes cooking smooth and fun. Here’s what you need: - 1 pound ground beef - 2 tablespoons soy sauce - 1 tablespoon sriracha - 1 tablespoon sesame oil - 3 cloves garlic, minced - 1-inch piece of ginger, grated - 1 bell pepper, sliced - 1 medium carrot, julienned - 2 green onions, sliced - 1 cup cooked rice - 1 tablespoon sesame seeds - Salt and black pepper to taste Next, wash and chop the bell pepper and carrot. Slice the green onions and set them aside for later. This keeps everything neat. Heat a large skillet or wok over medium-high heat. Pour in the sesame oil and warm it up. Add the minced garlic and grated ginger. Stir them for about 30 seconds until they smell great. This step wakes up the flavors. Now, add the ground beef. Use a spatula to break it apart. Cook for 5 to 7 minutes until it turns brown. If there is extra grease, drain it. Then, stir in the soy sauce and sriracha. Mix well so the beef is coated evenly. Add the sliced bell pepper and julienned carrot. Stir-fry them for 3 to 4 minutes. You want the veggies to be tender but still crisp. Finally, season with salt and pepper to your taste. Time to serve! Take a scoop of cooked rice and place it in a bowl. Top it with the spicy ground beef stir-fry. For the finishing touch, sprinkle on the sliced green onions and sesame seeds. This adds color and crunch. Enjoy your meal! To get the spice just right, start with one tablespoon of sriracha. This gives a mild heat. If you want more heat, add an extra teaspoon. Taste as you go. Adjusting the spice is key to your liking. Remember, you can always add more, but you can't take it out. Use a large skillet or wok for even cooking. Heat the sesame oil first, then add garlic and ginger. This gives a nice flavor base. When adding the ground beef, break it apart with your spatula. Cook until it's browned, about 5-7 minutes. Drain any excess grease for a leaner meal. Stir in the soy sauce and sriracha for flavor while the beef is still hot. Garnish makes your dish pop! For a fresh touch, slice green onions thinly and sprinkle them on top. Add a dash of sesame seeds for crunch. You can also add lime wedges on the side for a tangy kick. These small details make your bowl look and taste great. Pro Tips Use Lean Ground Beef: Opt for 90% lean ground beef to reduce excess fat while retaining flavor. Customize Your Spice Level: Adjust the amount of sriracha based on your spice tolerance; start with less and add more as desired. Add More Vegetables: Feel free to incorporate other vegetables like broccoli, snap peas, or zucchini for added nutrition and color. Serve with Fresh Herbs: Fresh cilantro or basil can enhance the dish’s flavor profile and add a refreshing touch. {{image_2}} You can swap ground beef for plant-based options. Try using textured vegetable protein or lentils. Both give a great texture and flavor. For a vegan twist, use tofu or tempeh. Just crumble or cube them and sauté until golden. Be sure to adjust the seasoning to keep it tasty! Feel free to add more veggies to your stir-fry. Broccoli, snap peas, and zucchini work well. They add color and crunch. You can also try mushrooms for a meaty flavor. Just chop them up and toss them in with the beef or your meat substitute. If you want a change from beef, try chicken or turkey. Ground chicken or turkey can be a lighter option. You can also use shrimp for a seafood twist. Just cook shrimp until they turn pink. Each protein brings its own unique flavor, so experiment to find your favorite! To store your spicy ground beef stir-fry, let it cool first. Place it in an airtight container. This helps keep it fresh. You can store it in the fridge for up to three days. Make sure to label it with the date. This way, you know when to eat it. When you're ready to eat your leftovers, reheat them on the stove. Use a pan over medium heat. Stir the beef and veggies often. This helps them heat evenly. You can also use a microwave. Place the stir-fry in a microwave-safe bowl. Heat for one to two minutes. Stir halfway through to ensure even heating. If you want to save some for later, freezing is a great option. Place the cooled stir-fry in a freezer-safe bag or container. Make sure to push out as much air as possible. This helps prevent freezer burn. You can freeze it for up to three months. When you are ready to eat, thaw it in the fridge overnight before reheating. Yes, you can use other meats. Ground turkey or chicken works well. You can also try pork or beef strips. Each meat has its own flavor, but it will still be tasty. To reduce the spice, cut back on sriracha. Start with half a tablespoon. You can also add more vegetables like bell peppers or carrots. This will balance the heat. A touch of honey can add sweetness without spice. You can pair the stir-fry with cooked rice, quinoa, or noodles. Fresh veggies like cucumber or snap peas make a great side. A light salad with a tangy dressing adds a nice touch too. This blog post covered key ingredients and step-by-step instructions for creating a tasty dish. We explored important spices and seasoning tips, plus helpful substitutions. You learned about cooking techniques to get the best ground beef and how to present your meal beautifully. Variations like vegetarian options and extra veggies were discussed too. Lastly, we looked at storage tips and common questions. With these insights, you can now cook with confidence and impress your family and friends. Enjoy your cooking adventure!

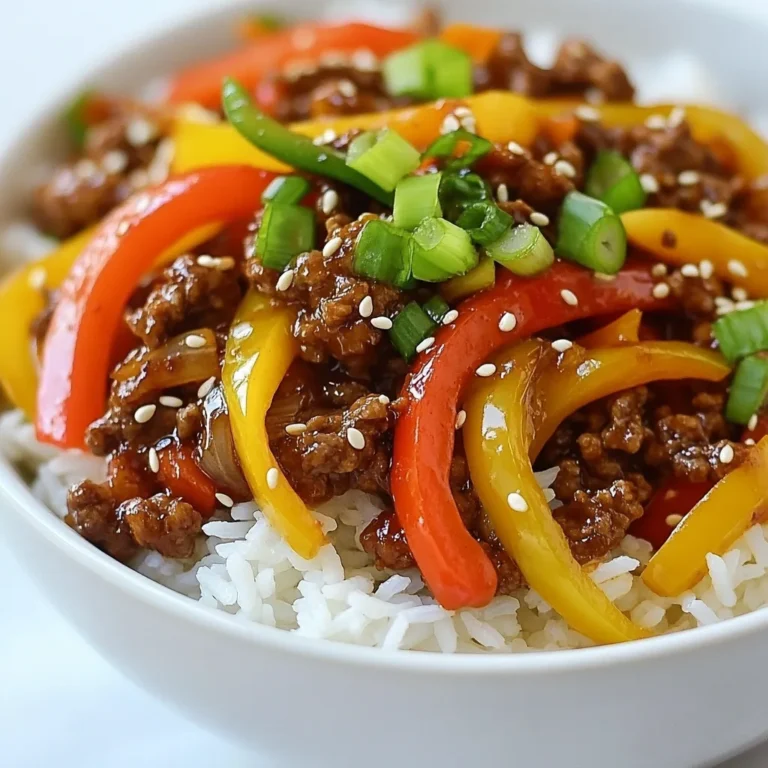
Spicy Ground Beef Stir-Fry Bowl Flavorful and Easy

To make this potato sausage chowder, gather these ingredients: - 4 large russet potatoes, peeled and diced - 1 pound smoked chicken sausage, sliced (or any preferred sausage) - 1 medium onion, diced - 2 cloves garlic, minced - 3 cups chicken broth - 1 cup heavy cream - 1 cup corn kernels (fresh, frozen, or canned) - 2 tablespoons olive oil - 1 teaspoon dried thyme - 1 teaspoon paprika - Salt and pepper to taste - 1/4 cup fresh chives or parsley, chopped for garnish You can swap some ingredients to make this chowder your own: - Sausage: Use turkey sausage or a plant-based sausage for a lighter option. - Potatoes: Yukon gold potatoes work well if you prefer a creamier texture. - Cream: Replace heavy cream with coconut milk for a dairy-free version. - Corn: If corn is not your thing, try adding peas or diced carrots for sweetness. This chowder can fit various diets with a few tweaks: - Gluten-Free: The ingredients are naturally gluten-free. Just check your broth. - Dairy-Free: Use coconut milk instead of heavy cream for a dairy-free chowder. - Low-Carb: Substitute potatoes with cauliflower for a low-carb option. These changes keep the chowder delicious while catering to your needs. Enjoy crafting your own version! {{ingredient_image_1}} Start by heating olive oil in a large pot over medium heat. Add the diced onion and cook until it turns soft and clear, about five minutes. This step builds the base flavor for your chowder. Next, add the minced garlic. Stir it in and cook for one more minute. You want to smell that lovely garlic aroma filling your kitchen. Now, it’s time to add your sausage. I like using smoked chicken sausage for a nice flavor. Slice it up and stir it into the pot. Cook for three to four minutes. This step warms the sausage and allows it to brown just a bit. The goal is to mix the flavors well, so everything tastes great together. After the sausage is ready, it’s time to add the star of the show: potatoes. Toss in your diced russet potatoes along with thyme, paprika, salt, and pepper. Mix it all up. Then, pour in chicken broth until everything is covered. Bring the pot to a boil, then lower the heat to a simmer. Cover it and let it cook for about 15 to 20 minutes. You want the potatoes to become tender. Once they are soft, stir in the corn and heavy cream. Heat everything for another five minutes. Now your chowder is rich and creamy! To make your chowder smooth, follow a few simple steps. First, dice your potatoes into small, even pieces. This helps them cook evenly. Second, cook the onions until they are soft and clear. This adds a nice base flavor. When blending, you can use an immersion blender for a creamy texture. If you prefer some chunks, blend only half of the chowder. Always remember to stir gently to keep the cream from curdling. To boost flavor, consider adding more herbs or spices. Fresh herbs like thyme or rosemary can add depth. A touch of cayenne pepper brings warmth and some kick. For a smoky twist, try adding smoked paprika. You can also mix in some fresh lemon juice for brightness. These little changes can make a big difference in taste. Avoid these common pitfalls to ensure your chowder shines. First, don't skip the sauté step for the onions and garlic. This step builds a rich flavor. Second, be careful not to overcook the potatoes. They should be tender but not mushy. Lastly, don't forget to taste your chowder before serving. Adjust salt and pepper as needed. Small tweaks can elevate your dish from good to great. Pro Tips Use Fresh Ingredients: Fresh potatoes and corn will enhance the flavor and texture of your chowder, making it taste more vibrant and hearty. Customize Your Sausage: Experiment with different types of sausage, such as spicy or herb-infused varieties, to add unique flavors to your chowder. Thicken the Chowder: For a creamier texture, you can mash a portion of the potatoes before adding the cream, which will give the chowder a rich consistency. Garnish for Flavor: Fresh herbs like chives or parsley not only add a pop of color but also enhance the overall flavor of the chowder when sprinkled on top just before serving. {{image_2}} You can adjust the cream in your chowder to change the texture. If you want a creamy chowder, use the full cup of heavy cream. This will give you a rich and smooth texture. For a lighter chowder, reduce the cream to half a cup. You can also use milk for a less thick option. This change makes the chowder feel less heavy but still tasty. Adding more veggies boosts the nutrition and flavor. You can include carrots, celery, or even spinach. For a sweet twist, add peas or bell peppers. These veggies cook well with the potatoes. They add color and crunch to your chowder. Just chop them fine and toss them in when you add the potatoes. This way, they cook through and blend nicely. If you like heat, spice up your chowder. Adding red pepper flakes can give it a nice kick. You can also use spicy sausage instead of smoked sausage. This will change the flavor and make it more exciting. Just be careful not to overdo it. Start with a small amount and taste as you go. You want the heat but not to overpower the other flavors. After enjoying your Potato Sausage Chowder, cool it down quickly. Place the chowder in an airtight container. Make sure to seal it well to keep it fresh. Store it in the fridge if you plan to eat it within three days. If you want to keep it longer, freezing is a good choice. To reheat, pour the chowder into a pot. Heat it over medium-low heat. Stir gently to help it warm evenly. You can add a splash of chicken broth or cream to restore its creamy texture. If you prefer, you can also microwave it in a bowl. Heat in short bursts, stirring in between. This keeps the chowder from getting too hot in some spots. Freezing is a great way to save chowder for later. Let the chowder cool completely before you freeze it. Pour it into freezer-safe containers or bags. Leave some space at the top for expansion. Seal tightly and label with the date. You can freeze it for up to three months. When ready to eat, thaw in the fridge overnight before reheating. Yes, you can make Potato Sausage Chowder in a slow cooker. Just follow these steps: - Heat olive oil in a pan and sauté onion and garlic until soft. - Add the sausage and cook until slightly brown. - Transfer the mixture to the slow cooker. - Add diced potatoes, chicken broth, thyme, paprika, salt, and pepper. - Cook on low for 6-8 hours or on high for 3-4 hours. - Stir in corn and heavy cream about 30 minutes before serving. This method gives the chowder a deep flavor. You can serve many tasty sides with Potato Sausage Chowder. Here are some great options: - Crusty bread or rolls for dipping. - A fresh green salad for a light touch. - Grilled cheese sandwiches for a fun twist. - Roasted vegetables for added texture. These sides balance the chowder's rich flavor. To thicken your chowder, try these methods: - Add more diced potatoes and let them cook down. - Mix a little cornstarch with water and stir it in. - Cook it longer to reduce liquid. To thin your chowder, do this: - Add more chicken broth or cream until you reach the desired consistency. - Stir well and heat through. These tips help you achieve the right texture for your chowder. This blog post covered how to make delicious Potato Sausage Chowder. We discussed ingredients, substitutions, and dietary options. You learned step-by-step instructions, tips for smooth chowder, and variations to try. I also shared how to store leftovers and answered common questions. In the end, chowder is easy and fun to make. Enjoy creating your own tasty version!

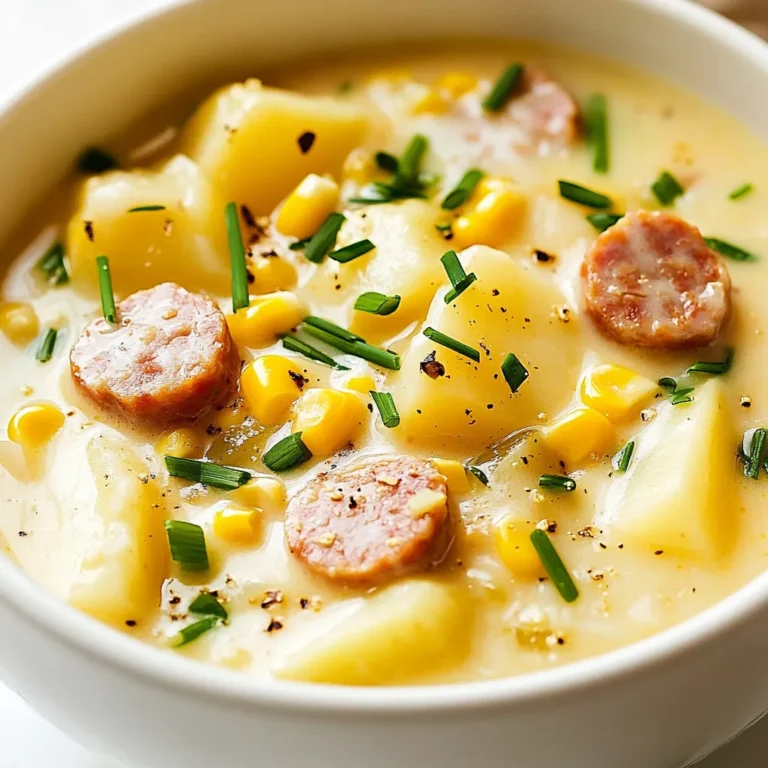
Potato Sausage Chowder Hearty and Comforting Meal

To make Creamy White Chicken Enchiladas, gather these key ingredients: - 2 cups cooked shredded chicken - 1 cup sour cream - 1 cup cream cheese, softened - 1 cup shredded Monterey Jack cheese (plus more for topping) - 1 can (10 oz) green enchilada sauce - 1/2 cup diced onion - 1 teaspoon garlic powder - 1 teaspoon cumin - Salt and pepper to taste - 8-10 flour tortillas - Fresh cilantro leaves for garnish Choose fresh ingredients for the best flavor. Look for bright green cilantro with no brown spots. When buying chicken, select meat that feels firm and looks pink. Soft cream cheese should be smooth and without cracks. When selecting onions, pick ones that are firm and have dry skin. Fresh tortillas should feel soft and pliable. You can make simple swaps to fit dietary needs. For a lighter version, use Greek yogurt instead of sour cream. If you want a dairy-free option, try using vegan cream cheese and dairy-free cheese. For gluten-free diets, choose corn tortillas. Adjust spices to suit your taste if you prefer milder flavors. {{ingredient_image_1}} To start, gather your ingredients. You need cooked shredded chicken, sour cream, cream cheese, shredded Monterey Jack cheese, diced onion, garlic powder, cumin, salt, and pepper. In a large bowl, combine the chicken, sour cream, cream cheese, and one cup of Monterey Jack cheese. Add the onion, garlic powder, cumin, salt, and pepper next. Mix everything well until it's smooth and creamy. This mixture is the heart of your enchiladas. Now, take a flour tortilla. Spoon about 1/4 cup of the chicken mixture into the center. Roll the tortilla tightly around the filling. Place it seam-side down in a greased baking dish. Repeat this for all the tortillas. Make sure they fit snugly in the dish. Once done, pour the green enchilada sauce evenly over the top of the rolled tortillas. Sprinkle extra Monterey Jack cheese on top for a cheesy finish. Preheat your oven to 350°F (175°C) before baking. Cover the baking dish with aluminum foil. Bake for 20 minutes. After that, remove the foil and bake for another 10 minutes. Keep an eye on it. You want the cheese to be melted, bubbly, and slightly golden. Once finished, let the dish sit for 5 minutes before serving. This helps the enchiladas set a bit. Garnish with fresh cilantro leaves for a pop of color and flavor. To make the best enchiladas, focus on the filling. Use tender, shredded chicken. Ensure your cream cheese is soft for easy mixing. Mix in spices like garlic powder and cumin for great flavor. Taste the filling before rolling. Adjust salt and pepper as needed. You can add more veggies to the filling. Try bell peppers or spinach for extra color. For heat, add jalapeños to the mixture. If you love cheese, mix in some pepper jack. You can also switch up the sauce. A red enchilada sauce adds a different flavor. Sautéing the onions first brings out their sweetness. You can also toast the tortillas briefly. This makes them crispier and less soggy. Pouring the sauce over the enchiladas before baking helps them soak up flavor. Bake until the top is golden and bubbly for the best texture. Pro Tips Use Rotisserie Chicken: For a quicker preparation, consider using store-bought rotisserie chicken. It saves time and adds great flavor. Customize the Heat: If you like a bit of spice, add diced jalapeños or a dash of cayenne pepper to the chicken mixture before filling the tortillas. Make Ahead: Assemble the enchiladas the night before and refrigerate. Just pour the sauce and cheese on top before baking for a convenient meal. Experiment with Cheeses: Try using different types of cheese like Pepper Jack or Cheddar for a unique twist on flavor and richness. {{image_2}} You can easily make these enchiladas vegetarian. Replace the chicken with cooked beans or sautéed veggies. Black beans, bell peppers, and zucchini work well. For a vegan version, swap sour cream and cream cheese with plant-based alternatives. Use cashew cream or coconut yogurt for creaminess. This change keeps the dish rich and tasty without meat. While green enchilada sauce is classic, you can try other kinds. Red enchilada sauce adds a different flavor. You can even use salsa if you like a fresh taste. For cheese, Monterey Jack is great, but cheddar or pepper jack can add a nice twist. Mix and match sauces and cheeses for a unique meal each time. If you love heat, add some spice! Mix diced jalapeños or green chilies into the chicken filling. A dash of hot sauce in the sauce can kick up the flavor. You can also sprinkle red pepper flakes on top before baking. Adjust the spice to your liking for a meal that packs a punch. To keep your Creamy White Chicken Enchiladas fresh, place them in an airtight container. Make sure they cool down before you seal them up. You can also wrap them tightly in plastic wrap. Store them in the fridge for up to three days. This way, you can enjoy them later without losing flavor. When you are ready to eat, preheat your oven to 350°F (175°C). Place the enchiladas in a baking dish. If they seem dry, add a splash of broth or sauce. Cover the dish with foil to prevent drying out. Bake for 20 minutes or until they are hot all the way through. You can also use the microwave. Heat on medium power for about 2-3 minutes, checking to ensure they warm evenly. For longer storage, you can freeze the enchiladas. Wrap each one tightly in plastic wrap, then place them in a freezer bag. Remove as much air as possible to prevent freezer burn. They will stay good for up to three months. When you're ready to eat, thaw them in the fridge overnight. Then, reheat them in the oven or microwave as described above. Enjoy your tasty meal anytime! Yes, you can use rotisserie chicken. It saves time and adds great flavor. Just shred the chicken and mix it with the other ingredients. This makes the dish quick and easy. Plus, rotisserie chicken is juicy and full of taste. To spice up your enchiladas, add diced jalapeños or green chiles to the filling. You can also mix in some hot sauce or cayenne pepper for extra heat. If you love spicy foods, consider using pepper jack cheese instead of Monterey Jack. This will give your dish a nice kick. These enchiladas pair well with a fresh salad or rice. A side of black beans adds protein and fiber. You can also serve them with tortilla chips and salsa for a tasty crunch. For drinks, try serving a refreshing limeade or a light beer. This blog post covered everything you need for creamy white chicken enchiladas, including ingredients, step-by-step preparation, and tips for success. Remember, using fresh ingredients is key. Also, don’t hesitate to customize the recipe to fit your taste. Proper storage and reheating tips will keep your leftovers tasty. With these techniques, you can make a dish that impresses friends and family. Enjoy your cooking journey, and happy eating!

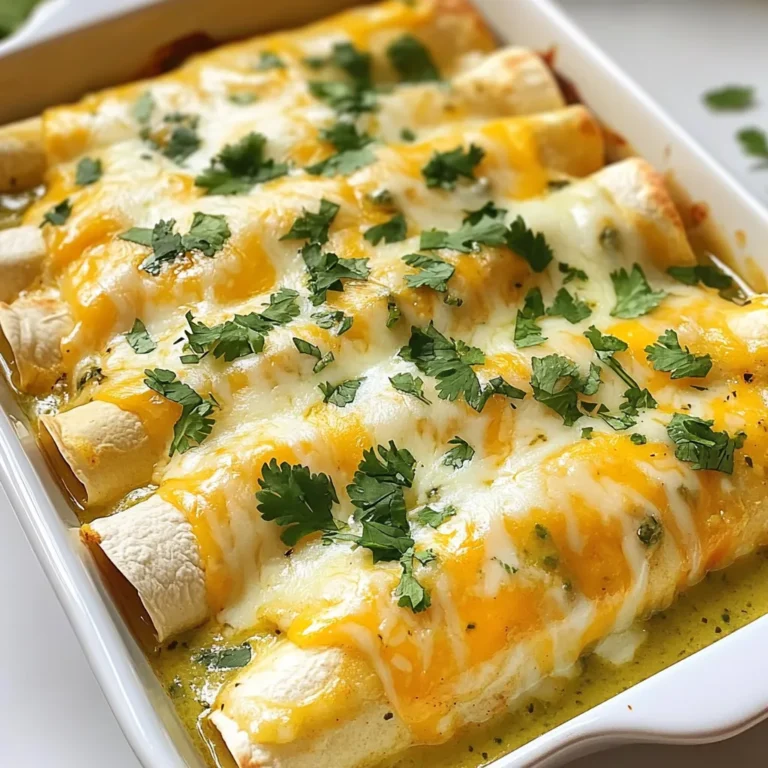
Creamy White Chicken Enchiladas Tasty and Simple Meal

PREV 1 … 42 43 44 … 56 NEXT
go kitchen now

explore

DessertsDinnerAppetizersDrinks

Our Policies

  • Cookie Policy
  • Copyright Policy
  • Disclaimer
  • GDPR Policy
  • Terms Of Use
Back to Top
  • About
  • Contact Us
  • Privacy Policy
© 2025 go kitchen now