FREE DINNER EBOOK! Get your copy!
  • Cookie Policy
  • GDPR Policy
  • Disclaimer
  • Terms Of Use
  • Visit my other site: Fun Cookie Recipes
go kitchen now
  • Home
  • Dinner
  • Desserts
  • Drinks
  • Appetizers
  • Contact
  • About
  • Privacy Policy
  • Home
  • Dinner
  • Desserts
  • Drinks
  • Appetizers
  • Contact
  • About
  • Privacy Policy
  • Cookie Policy
  • GDPR Policy
  • Disclaimer
  • Terms Of Use
Visit my other site: Fun Cookie Recipes

HOME / CATEGORIES /

Latest

To make tasty ground beef tostadas, you need a few key items. Here’s what you’ll need: - 1 lb ground beef - 1 tablespoon olive oil - 1 small onion, diced - 2 cloves garlic, minced - 1 teaspoon chili powder - 1 teaspoon cumin - ½ teaspoon smoked paprika - Salt and pepper to taste - 8 tostada shells - 1 cup refried beans - 1 cup shredded lettuce - 1 cup diced tomatoes - ½ cup crumbled queso fresco - ½ cup sour cream - 1 avocado, sliced - Fresh cilantro for garnish - Lime wedges for serving These ingredients come together to create a delicious meal. The ground beef provides the main flavor. The spices like chili powder, cumin, and smoked paprika add depth. While the basic tostada is great, you can always add more fun toppings. Here are some ideas: - Jalapeños for heat - Black olives for a briny touch - Corn for sweetness - Sliced radishes for crunch - Fresh salsa for added zest Feel free to mix and match these toppings to fit your taste. Each one adds its own twist to the dish. To make your meal even better, consider these sides: - Mexican rice for a filling option - Guacamole for a creamy dip - Refried beans for extra protein - Chips and salsa for snacking These sides balance the meal well. They also offer more flavor and texture to enjoy with your tostadas. {{ingredient_image_1}} Start by heating 1 tablespoon of olive oil in a large skillet over medium heat. Add 1 small diced onion and 2 minced cloves of garlic. Sauté these until the onion turns soft and clear. Then, add 1 pound of ground beef to the skillet. Break the meat apart with a spatula. Cook the beef for about 5 to 7 minutes, until it turns brown. Make sure to stir it well so it cooks evenly. After browning the beef, mix in 1 teaspoon of chili powder, 1 teaspoon of cumin, and ½ teaspoon of smoked paprika. Add salt and pepper to taste. Cook for another 2 to 3 minutes to blend the spices with the meat. Remove the skillet from heat once the mixture smells good. While the beef cooks, preheat your oven to 375°F (190°C). Take 8 tostada shells and lay them flat on a baking sheet. Warm the tostada shells in the oven for about 5 minutes. This step makes them nice and crispy. Keep an eye on them so they do not burn. Crispy shells make the tostadas extra tasty. Once the tostada shells are warm, it’s time to put everything together. Start by spreading 1 cup of refried beans on each tostada shell. Then, add a generous scoop of the seasoned ground beef mixture right on top. Next, pile on 1 cup of shredded lettuce and 1 cup of diced tomatoes. Sprinkle ½ cup of crumbled queso fresco over the top. For the finishing touch, drizzle some sour cream and add slices of 1 avocado. Garnish each tostada with fresh cilantro. Serve the tostadas with lime wedges on the side for a zesty kick. Enjoy your creation! To brown ground beef well, heat olive oil in a skillet over medium heat. Add diced onion and minced garlic. Cook until the onion is clear. Next, add ground beef. Use a spatula to break it apart. Cook for 5-7 minutes until it turns brown. The meat should not steam; it needs space in the pan. If the pan is crowded, the beef cooks unevenly. You can change the flavor of your tostadas easily. For a spicy kick, add more chili powder or some diced jalapeños. For a sweeter taste, mix in some corn or bell peppers. Fresh herbs like cilantro can brighten the dish. You can even try different spices, like oregano or taco seasoning. Always taste as you go, adjusting flavors to fit your preference. To keep your tostadas crispy, warm them in the oven just before serving. Place them on a baking sheet at 375°F (190°C) for about 5 minutes. This step makes them crunchy and ready for toppings. Avoid piling on too many wet toppings at once. Layer ingredients carefully to prevent sogginess. You want to enjoy every bite without them getting soft. Pro Tips Fresh Ingredients: Always use fresh vegetables for toppings to enhance the flavor and texture of your tostadas. Layer Wisely: Spread the refried beans evenly on the tostada shells to create a solid base that will hold the toppings without getting soggy. Customize Spices: Feel free to adjust the amount of chili powder and cumin according to your heat preference for a personalized kick. Make Ahead: Prepare the beef mixture and refried beans in advance for a quick assembly when you're ready to serve. {{image_2}} If you want a meatless option, try using lentils or black beans. Both add great taste and texture. You can also use a mix of veggies like bell peppers and zucchini. Sauté them with the same spices for a delicious twist. For a cheesy touch, add some shredded cheese on top. To adjust the heat, you can add more chili powder or jalapeños. For a milder version, skip the chili powder or use sweet paprika. Adding fresh cilantro can also tone down the spice. If you like it hot, try adding hot sauce or diced serrano peppers. Ground turkey or chicken works well in place of beef. These proteins are leaner and still taste great. For a unique flavor, use chorizo or ground pork. You could even try tofu for a plant-based option. Just remember to cook it until it’s nice and browned. After you enjoy your tostadas, store leftovers in a sealed container. Keep the beef and toppings separate from the tostada shells. This keeps them from getting soggy. Store the beef mixture in the fridge for up to three days. The toppings can also last for about three days. To reheat the beef, warm it in a skillet over medium heat. Stir until hot. For the tostada shells, pop them in the oven at 375°F for about five minutes. This makes them crispy again. Avoid using the microwave, as it can make the shells soft. You can freeze the beef mixture if you want to save it for later. Place it in a freezer-safe bag. Remove as much air as possible before sealing. It can last up to three months in the freezer. When ready to eat, thaw it overnight in the fridge. Reheat it on the stove before serving. Yes, you can prepare some parts in advance. Cook the ground beef and store it in the fridge. You can also warm the tostada shells before serving. Just wait to add fresh toppings until right before you eat. This keeps everything fresh and tasty. If you don’t have refried beans, try black beans or pinto beans. You can mash them up for a similar texture. Hummus is another fun option for a twist. It adds creaminess and goes well with the beef. Making tostadas is easy. Start with corn tortillas. Brush them lightly with olive oil. Then, bake them in the oven at 375°F (190°C) for about 10 minutes. Flip them halfway through for even crispiness. You can use a skillet to fry them, too, if you prefer. You learned how to make tasty ground beef tostadas today. We covered the main ingredients, cooking steps, and helpful tips. You can also explore fun variations to fit your taste. Don't forget to store leftovers properly for later enjoyment. Tostadas are versatile and can satisfy many cravings. Enjoy creating your own versions with different flavors and textures. Dive in, experiment, and make these dishes your own! You're now ready to impress with your cooking skills.

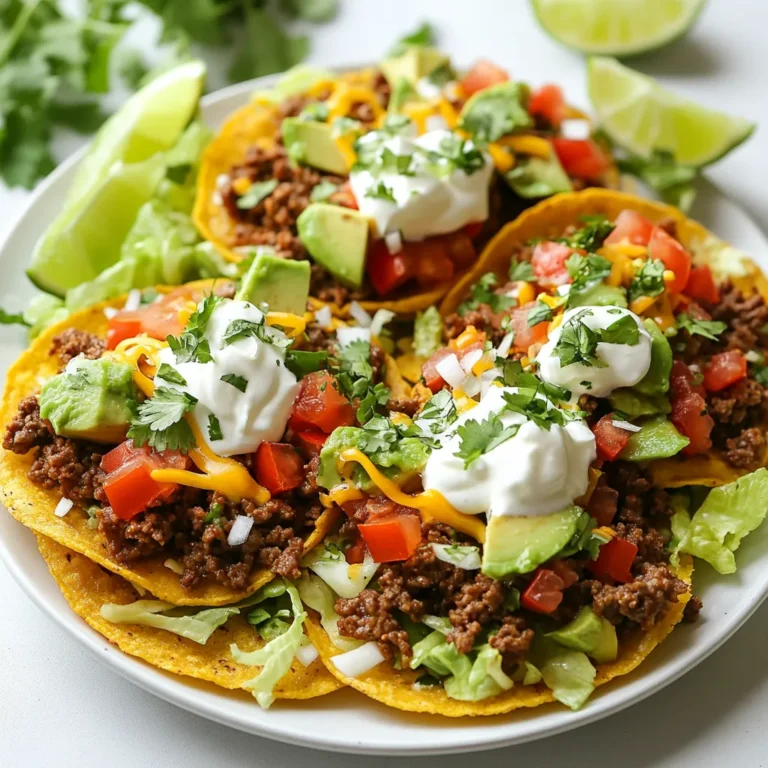
Ground Beef Tostadas Flavorful and Simple Recipe

To make Summer Garden Pasta, gather these key ingredients: - 12 oz spaghetti or your favorite pasta - 1 cup cherry tomatoes, halved - 1 medium zucchini, sliced into half-moons - 1 medium yellow bell pepper, diced - 1 cup fresh spinach leaves - 1 cup edamame, shelled (frozen is fine, thawed) - 3 cloves garlic, minced - 1/4 cup olive oil - 1 tablespoon balsamic vinegar - 1 teaspoon dried oregano - 1 teaspoon fresh basil, chopped (plus more for garnish) - Salt and pepper to taste - Grated Parmesan cheese (optional for serving) Fresh vegetables and herbs make this dish special. Each adds flavor, color, and nutrition. - Cherry tomatoes bring sweetness. They burst in your mouth while you eat. - Zucchini adds a soft texture. Its mild taste blends well with other veggies. - Yellow bell pepper offers a sweet crunch. It brightens the dish visually and taste-wise. - Fresh spinach gives a pop of green. It wilts quickly, adding volume and nutrients. - Edamame gives protein and a nutty flavor. It also adds a lovely green color. - Garlic adds depth. It brings a warm, savory note to every bite. - Basil adds a hint of sweetness. It complements the other flavors perfectly. Choosing the right pasta is key to a great dish. Here are some tips: - Spaghetti is classic and works well. It holds the sauce nicely. - Fusilli or penne can also be great. They catch bits of veggies in their grooves. - Use whole wheat or gluten-free pasta if needed. They work just as well. - Always cook pasta al dente. This keeps it firm and gives a nice bite. - Reserve some pasta water before draining. It helps bind the sauce and pasta together. {{ingredient_image_1}} Start by boiling a large pot of salted water. Add 12 ounces of spaghetti or your favorite pasta. Cook it according to the package instructions until it is al dente. This usually takes about 8 to 10 minutes. Before draining, reserve one cup of pasta water. This water will help later on. Drain the pasta and set it aside. In a large skillet, heat 1/4 cup of olive oil over medium heat. Once the oil is hot, add 3 minced garlic cloves. Sauté them for about one minute. You want to smell that garlic! Next, toss in 1 cup of halved cherry tomatoes, 1 sliced zucchini, and 1 diced yellow bell pepper. Sauté these vegetables for 5 to 7 minutes. Cook them until they soften. Now, stir in 1 cup of fresh spinach and 1 cup of shelled edamame. Cook these for another 2 to 3 minutes. You want the spinach to wilt and the edamame to heat up. Next, add your cooked pasta to the skillet. Drizzle 1 tablespoon of balsamic vinegar over it. Sprinkle in 1 teaspoon of dried oregano and some fresh basil. If the pasta seems dry, pour in a bit of the reserved pasta water. Toss everything together until it mixes well. Season with salt and pepper to your taste. Enjoy! To cook pasta, start with a big pot of water. Use enough salt to make it taste like the sea. Bring the water to a rolling boil before adding the pasta. Check the package for cooking times. Cook until the pasta is al dente. That means it has a slight bite. Save one cup of the pasta water before draining. This water helps to mix everything later. Flavor is key in Summer Garden Pasta. I love using fresh herbs like basil. Fresh herbs brighten the dish. Dried oregano adds depth. A splash of balsamic vinegar gives a sweet tang. Always taste as you go. Add salt and pepper to balance the flavors. If you want more garlic, add an extra clove. Remember, the right seasonings can change everything. Serve your pasta warm and fresh. A sprinkle of grated Parmesan adds creaminess. Pair the dish with a simple green salad. A crisp white wine goes well too. If you like, add grilled chicken or shrimp for protein. This dish is great for sharing. Enjoy it with family or friends on a warm evening. The vibrant colors make it a feast for the eyes! Pro Tips Perfect Pasta Texture: Always cook your pasta until al dente for the best texture. This means it should be firm to the bite, which helps it hold up better when mixed with the sauce and vegetables. Season Your Water: When boiling pasta, add a generous amount of salt to the water. This enhances the flavor of the pasta itself, making every bite delicious. Fresh Herbs Boost Flavor: Use fresh herbs like basil at the end of cooking for a burst of flavor. Dried herbs can lose potency, so fresh ones should be added last. Save Pasta Water: Reserve some pasta cooking water before draining. This starchy water can be added to your sauce to help it adhere better to the pasta and enhance creaminess. {{image_2}} You can easily make this dish gluten-free. Just swap the regular pasta for gluten-free pasta. Many brands offer great options that taste good. Look for brown rice or chickpea pasta. They hold up well and keep the dish tasty. Feel free to change the veggies based on what you have. If you don’t like zucchini, use bell peppers or mushrooms. Broccoli or asparagus can also add great flavor. Try adding corn for a sweet crunch. Just remember to keep the colors bright for a beautiful dish. Want to add protein to your Summer Garden Pasta? You can mix in cooked chicken, shrimp, or even tofu. For a plant-based option, add beans or lentils. These will add texture and make the dish more filling. Store any leftover Summer Garden Pasta in an airtight container. Make sure it cools down first. Place it in the fridge for up to three days. This keeps the flavors fresh and safe to eat. If you want to enjoy it later, you can freeze it. To freeze your pasta, let it cool completely. Divide it into portions. Use freezer-safe containers or bags. Remove as much air as possible to prevent freezer burn. It can stay frozen for up to three months. When you're ready, just thaw it in the fridge overnight. Reheat your pasta either on the stove or in the microwave. For the stove, add a splash of water to a pan. Heat it gently over medium heat, stirring often. For the microwave, place it in a bowl and cover it. Heat in 30-second bursts until warm. Add a touch of olive oil for extra flavor if needed. Yes, you can use many types of pasta. I often choose penne or fusilli. These shapes hold sauce well. You can also try whole wheat or gluten-free pasta. Just cook it according to the package directions. This dish is flexible and tasty with any pasta. You can add many veggies to this dish. Bell peppers, carrots, and peas work great. You could also use asparagus or broccoli for more crunch. Fresh herbs like parsley or cilantro can add flavor. Feel free to mix and match based on what you have. The goal is to enjoy fresh, seasonal produce. To make this dish vegan, skip the Parmesan cheese. You can add nutritional yeast for a cheesy flavor. Be sure all pasta is egg-free if needed. You can also add more protein with chickpeas or lentils. This way, you keep it hearty and satisfying without dairy. Enjoy your vegan Summer Garden Pasta! This blog covered the key ingredients, step-by-step cooking, and useful tips for Summer Garden Pasta. You learned how to select fresh veggies and herbs, cook pasta perfectly, and enhance flavors. We explored variations for gluten-free and vegan options and discussed storage tips for leftovers. Remember, with simple steps and fresh ingredients, you can enjoy a delicious meal. Keep experimenting to find your favorite mixes and enjoy your cooking journey!

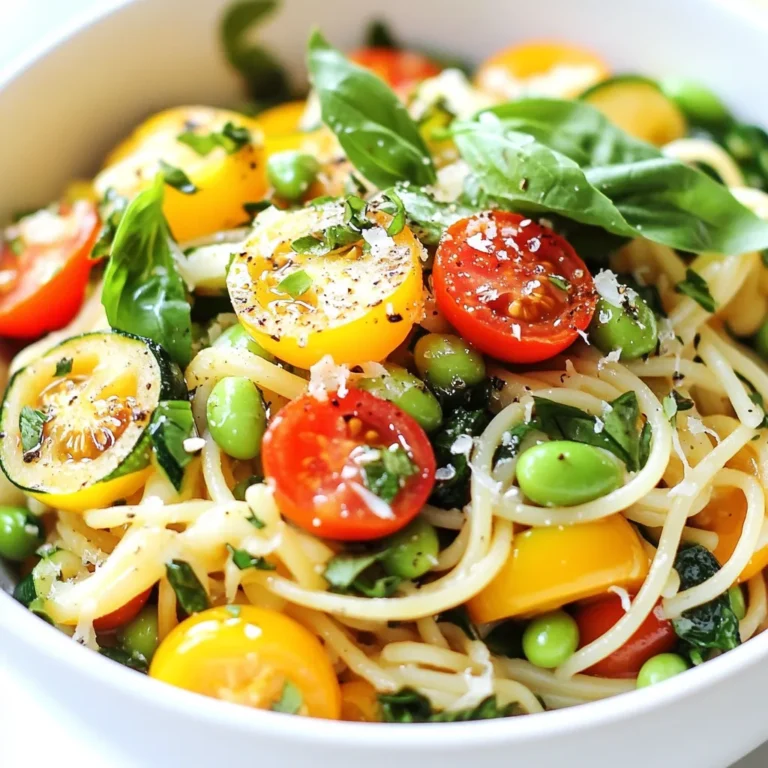
Savory Summer Garden Pasta Fresh and Flavorful Dish

- 4 medium zucchinis - 2 cups cooked chicken, shredded - 1 cup marinara sauce (sugar-free) - 1 cup shredded mozzarella cheese - 1/2 cup grated Parmesan cheese - 1 teaspoon Italian seasoning - 1 teaspoon garlic powder - 1/2 teaspoon salt - 1/4 teaspoon black pepper - Fresh basil leaves for garnish Gather these ingredients before you start cooking. Fresh zucchinis are key for this dish. They hold the filling well and add great taste. Use cooked chicken to save time. You can shred rotisserie chicken for ease. Choose sugar-free marinara sauce to keep it keto-friendly. The cheese adds a creamy texture, so don’t skip it! - Calories per serving: Approximately 350 - Macronutrient breakdown: - Protein: 32g - Fat: 20g - Carbohydrates: 8g - Fiber: 3g This meal is low in carbs, making it perfect for a keto diet. Each serving gives you a good amount of protein, which is great for muscle health. The fiber from zucchinis helps digestion. Enjoy this dish guilt-free! {{ingredient_image_1}} - Preheat the oven to 375°F (190°C). - Cut the zucchinis in half lengthwise. Use a spoon to scoop out the center. This creates boats for your filling. Save the scooped-out flesh for later. - In a mixing bowl, combine the shredded chicken with marinara sauce. Add garlic powder, Italian seasoning, salt, and pepper. Mix until well blended. - Stir in the reserved zucchini flesh until the mixture is fully combined. This adds flavor and texture to your filling. - Place the zucchini boats on a baking sheet with the cut side facing up. Fill each boat evenly with the chicken mixture. - Generously sprinkle mozzarella and Parmesan cheese over the top of each filled zucchini boat. This will create a delicious cheesy crust as it bakes. - Bake in the preheated oven for about 25-30 minutes. Look for melted, bubbly cheese and tender zucchinis. - Once done, take them out and let them cool for a few minutes. - Garnish with fresh basil leaves before serving for an extra touch of flavor. How to ensure zucchinis are tender To make sure zucchinis are soft, bake them until they are tender. The best time is about 25 to 30 minutes at 375°F. You want the cheese to melt and bubble, too. If you find that your zucchinis are still hard, you can cook them a bit longer. Just keep an eye on the cheese so it doesn’t burn. Best practices for uniformly filling boats To fill the zucchini boats evenly, use a spoon or a small scoop. Start by placing the chicken mixture in the center of the boat. Then, spread it out to the edges. This way, every bite has the same great taste. If you have leftover filling, you can mix it with some extra marinara and serve it on the side. Ideal side dishes to complement the dish Keto Chicken Parmesan Zucchini Boats pair well with a fresh salad. A simple green salad with lemon vinaigrette adds a nice crunch. You can also serve them with cauliflower rice for a low-carb option. Both sides will balance the meal nicely. Garnishing tips for presentation For a lovely finish, add fresh basil leaves on top right before serving. You can also sprinkle some extra Parmesan cheese for a touch of flavor. This little detail makes the dish look bright and fresh, making it more inviting. Pro Tips Choose Firm Zucchini: Select zucchinis that are firm and free of blemishes for the best texture and flavor. Customize the Filling: Feel free to add vegetables or spices to the chicken filling for extra flavor and nutrition. Don’t Overbake: Keep an eye on the zucchini boats while baking; overcooking can make them mushy. Use Fresh Herbs: Garnish with fresh basil or parsley right before serving for a burst of freshness. {{image_2}} You can change the protein in this dish to fit your taste. Ground turkey or beef works great. You can also use canned chicken for a quicker option. If you're looking for a plant-based choice, try using shredded jackfruit. It has a nice texture and absorbs flavors well. For those who avoid dairy, there are many cheese substitutes. Look for dairy-free mozzarella and Parmesan. These options melt nicely and still give a great taste. You can also use nut-based cheeses for a unique flavor twist. Adding herbs and spices makes this dish even better. Fresh basil or oregano can brighten the flavors. You might also want to try some crushed red pepper for heat. Experimenting with smoked paprika or fresh thyme can add a fun twist. Incorporate more vegetables into the filling for added nutrition. Chopped bell peppers or spinach blend well with the chicken. You can also add mushrooms for an earthy flavor. These veggies not only enhance taste but also make your meal more colorful and appealing. Store leftovers in an airtight container. This keeps the zucchini boats fresh. Use glass or plastic containers for easy storage. They help avoid any spills in the fridge. Leftovers can last up to three days. Always let them cool before sealing. This prevents moisture buildup. To freeze, first assemble the zucchini boats but do not bake them. Place them in a single layer in a freezer-safe dish. Cover with plastic wrap, then aluminum foil. This helps protect against freezer burn. You can freeze them for up to three months. To thaw, move the boats to the fridge overnight. For reheating, bake them straight from the fridge at 375°F (190°C) until heated through. This usually takes about 20-25 minutes. You might want to cover them with foil to keep the cheese from browning too fast. Enjoy your meal even later! Yes, you can make this dish ahead. Prepare the zucchini boats, fill them, and cover with foil. Store them in the fridge for up to 24 hours. Bake them just before serving. This saves time and makes dinner easier. Great side dishes include a fresh garden salad or steamed broccoli. You can also serve garlic bread made with keto-friendly bread. These sides add color and flavor to your meal. To adjust for more servings, simply double the ingredients. Use more zucchinis and enough chicken to fill all the boats. This way, everyone enjoys a tasty meal without leftovers. Yes, you can use pre-cooked frozen chicken. Just thaw and shred it before mixing. This can save time and makes cooking even easier. No, you do not need to peel the zucchinis. The skin adds texture and nutrients. Plus, it helps hold the shape of the boats while baking. You now know how to make Keto Chicken Parmesan Zucchini Boats. We covered the best ingredients and how to prepare them. I shared tips to enhance flavor and create variations. You also learned storage methods to keep leftovers fresh. This dish is simple, tasty, and good for you. Grab some zucchinis, and get cooking. Enjoy every bite!

Keto Chicken Parmesan Zucchini Boats Savory Low-Carb Meal

- 2 pounds beef stew meat, cut into 1-inch cubes - 4 medium carrots, sliced - 3 potatoes, diced - 1 onion, chopped - 3 cloves garlic, minced - 4 cups beef broth - 2 tablespoons tomato paste - 1 teaspoon dried thyme - 1 teaspoon dried rosemary - 1 bay leaf - Salt and pepper to taste These main ingredients create a hearty base. The beef stew meat gives rich flavor. Carrots and potatoes add sweetness and texture. Onion and garlic bring depth to the stew. The broth makes it all come together. - 2 cups all-purpose flour - 2 teaspoons baking powder - 1/2 teaspoon salt - 1/2 cup milk - 1/4 cup unsalted butter, melted - 1 tablespoon fresh parsley, chopped (for garnish) For the dumplings, flour and baking powder are key. Milk and melted butter keep them moist. The parsley adds a fresh touch for garnish. Fluffy dumplings complete the stew perfectly. - 1 cup frozen peas (optional) Frozen peas add color and sweetness. You can stir them in the last few minutes of cooking. They give the stew a nice pop. If you want a bit more flavor, try adding them! {{ingredient_image_1}} Start by cutting 2 pounds of beef stew meat into 1-inch cubes. This size helps the beef cook evenly. Sprinkle salt and pepper over the meat for flavor. Next, slice 4 medium carrots and dice 3 potatoes. Chop 1 onion and mince 3 cloves of garlic. Layer these veggies over the beef in your slow cooker. This mix creates a tasty base. In a bowl, whisk together 4 cups of beef broth and 2 tablespoons of tomato paste. Add 1 teaspoon of dried thyme, 1 teaspoon of dried rosemary, and 1 bay leaf. Stir the mixture well to blend the flavors. Pour this broth over the beef and veggies in the slow cooker. This broth adds depth to the dish. Cover the slow cooker and set it to low for 7-8 hours. If you're in a hurry, you can cook it on high for 4-5 hours. The beef is done when it’s tender. This slow cooking lets the flavors meld together beautifully. While the stew cooks, make the dumplings about 30 minutes before you plan to serve. In a large bowl, mix 2 cups of all-purpose flour, 2 teaspoons of baking powder, and 1/2 teaspoon of salt. Pour in 1/2 cup of milk and 1/4 cup of melted unsalted butter. Stir until just combined, but don’t overmix. This keeps the dumplings fluffy. Remove the lid from the slow cooker. Drop spoonfuls of the dumpling mixture on top of the stew. Cover the cooker again and switch it to high. Cook for another 30 minutes. The dumplings should be fluffy and cooked through at this point. If you want, stir in 1 cup of frozen peas during the last 5 minutes of cooking. This adds color and sweetness. Once done, remove the bay leaf from the stew. Serve the stew in bowls and top with fresh chopped parsley. This garnish adds freshness and looks great! For a great beef stew, you want cuts that cook well in liquid. I recommend using chuck roast. This cut has a good amount of fat. The fat helps keep the meat moist and tasty. You can also use brisket or round. These cuts also work well but can be leaner. To make tender dumplings, do not overmix the dough. Mix just until the dry and wet ingredients blend. This keeps the dumplings light. Also, drop spoonfuls directly on the stew. This way, they steam as they cook. You can add a bit of baking powder for extra fluffiness. To boost the flavor of your stew, add a splash of red wine. It adds depth and richness. Adding Worcestershire sauce can also help. Fresh herbs like thyme or rosemary add great flavor, too. You can even toss in some mushrooms or bell peppers for added taste. Pro Tips Choose the Right Cut: Using chuck roast or similar cuts will yield the best results because they break down beautifully during slow cooking, making the stew tender and flavorful. Layer Flavors: For a richer taste, sauté the beef and vegetables in a skillet before adding them to the slow cooker. This enhances the overall flavor profile of your stew. Customize Your Vegetables: Feel free to add other vegetables like parsnips or turnips. Just remember to adjust cooking times based on their size and type for optimal texture. Perfect Dumpling Consistency: Mix the dumpling batter just until combined. Overmixing can lead to dense dumplings instead of the desired fluffy texture. {{image_2}} You can create a tasty vegetarian stew. Replace the beef with hearty mushrooms or lentils. Use vegetable broth instead of beef broth. Carrots, potatoes, and onions still work great. Add some beans for protein. Use herbs like thyme and rosemary for flavor. This option is just as comforting and filling. You can try different dumpling recipes. For a lighter option, mix in whole wheat flour. You can also use biscuit dough for a quick fix. For a unique flavor, add cheese or herbs to the dough. These changes keep the dish exciting and fun. Feel free to swap ingredients based on what you have. If you don't have beef stew meat, chicken works well. Use sweet potatoes if you prefer a sweeter taste. Fresh herbs can replace dried ones for a stronger flavor. For a twist, add different vegetables like parsnips or turnips. Each swap adds a new touch to your stew. To keep your beef stew fresh, let it cool first. Then, transfer it to an airtight container. Store it in the fridge. It stays good for about three to four days. If you want to save it longer, consider freezing. To freeze beef stew, use freezer-safe containers or bags. Split it into smaller portions for easy thawing. Make sure to leave some space at the top of the container. This allows for expansion. Label the bags with the date. The stew can last up to three months in the freezer. When you’re ready to enjoy your stew again, thaw it in the fridge overnight. Reheat it on the stove over medium heat. Stir it often to heat it evenly. You can also use the microwave. Heat in short bursts, stirring in between. Make sure it’s hot all the way through before serving. Enjoy! Yes, you can make this recipe in a regular pot. Use a large pot on the stove. Brown the beef first in a bit of oil. Then add the veggies and broth. Simmer on low heat for about 2 to 3 hours. Stir occasionally until the beef is tender. This method gives you a nice, hearty stew. You can serve many sides with beef stew. Here are some ideas: - Crusty bread for dipping - Mashed potatoes for a creamy side - Steamed green beans for crunch - A simple salad for freshness These sides balance the rich flavors of the stew. The beef is done when it is tender. You can check it with a fork. If it falls apart easily, it is ready. Cooking times vary, but aim for 7-8 hours on low or 4-5 hours on high. Always ensure the meat reaches at least 145°F for safety. Yes, you can add other vegetables to the stew! Great options include: - Celery for crunch - Peppers for sweetness - Mushrooms for earthiness Feel free to mix and match your favorites. Just remember to cut them into similar sizes for even cooking. Beef stew is simple to cook and very tasty. We covered the main ingredients, tasty dumplings, and some optional extras. I shared tips on the best beef cuts and how to make dumplings soft. You can even try a vegetarian version if you like. Store any leftovers safely and reheat them for another meal. I hope you enjoy making this meal as much as I do! Happy cooking!

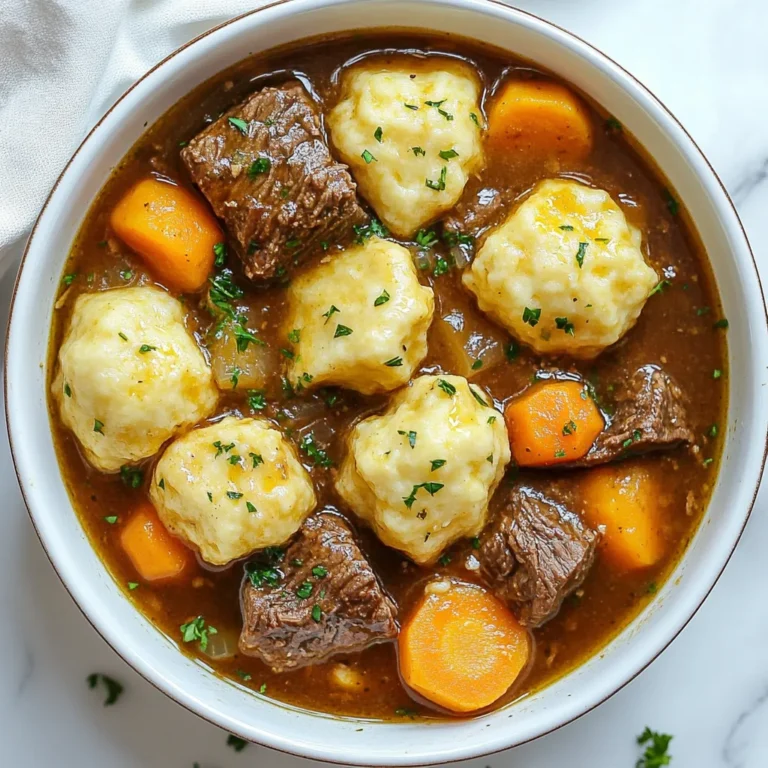
Savory Slow Cooker Beef Stew and Dumplings Recipe

For a tasty Tomato Spinach Gnocchi, gather these key ingredients: - 1 pound fresh gnocchi (store-bought or homemade) - 2 cups fresh spinach, washed and chopped - 2 large tomatoes, diced - 2 cloves garlic, minced - 1 tablespoon olive oil - 1 teaspoon dried basil - 1 teaspoon paprika - Salt and pepper to taste - 1/2 cup grated Parmesan cheese (for serving) - Fresh basil leaves for garnish Each ingredient plays a role in making this dish flavorful and vibrant. The fresh tomatoes and spinach bring color and nutrition. The garlic adds depth, while the spices enhance the taste. To change things up, consider these optional ingredients: - Cherry tomatoes for sweetness - Red pepper flakes for heat - Mushrooms for umami - Zucchini for extra veggies - Chicken or shrimp for protein These additions can spice up your gnocchi dish. You can mix and match based on what you like or have on hand. If you run out of something, don’t worry! Here are some substitutions: - Use frozen gnocchi instead of fresh. - Swap spinach for kale or Swiss chard. - Replace tomatoes with salsa or canned tomatoes. - Use any cheese if you don’t have Parmesan. These swaps keep the dish easy to make. You can enjoy Tomato Spinach Gnocchi, even if you lack some ingredients. {{ingredient_image_1}} First, grab a large skillet. Heat one tablespoon of olive oil over medium heat. Once hot, add two minced garlic cloves. Sauté them for about one minute. You want them to smell good but not burn. Next, add two diced tomatoes. Stir them in and let them cook for about five minutes. They will soften and start breaking down. Now, toss in two cups of chopped spinach. Sprinkle in one teaspoon of dried basil and one teaspoon of paprika. Cook this mix for an extra two to three minutes. Stir until the spinach wilts. Finally, season with salt and pepper to taste. While your sauce simmers, bring a pot of salted water to a boil. Add one pound of fresh gnocchi to the boiling water. Cook according to the package instructions. If using fresh gnocchi, they will float to the top in about two to three minutes. That’s when you know they’re done. Once cooked, drain the gnocchi in a colander. Now, it’s time to bring everything together. Add the drained gnocchi directly to the skillet with your tomato and spinach sauce. Gently toss them together. You want the gnocchi to be well-coated in the sauce. Serve this delicious mix on plates. Top each serving with half a cup of grated Parmesan cheese. For a finishing touch, add fresh basil leaves as a garnish. Enjoy your meal! To cook gnocchi perfectly, use a large pot. Fill it with water and add salt. Bring the water to a rolling boil before adding the gnocchi. Fresh gnocchi cooks quickly. Watch for them to float to the surface, which takes about 2-3 minutes. This means they are ready! Drain them gently to avoid breaking. For a richer taste, use fresh ingredients. Fresh spinach adds a nice color and texture. Choose ripe tomatoes for natural sweetness. Dried basil and paprika give the dish warmth. You can also add a pinch of red pepper flakes for heat. Always taste as you cook. Adjust salt and pepper to fit your preference. Serve the gnocchi warm right from the skillet. Top each plate with freshly grated Parmesan cheese. Add fresh basil leaves for a pop of color. This dish pairs well with a simple green salad or crusty bread. You can also serve it with a splash of balsamic glaze for extra flavor. Enjoy your meal! Pro Tips Use Fresh Ingredients: Opt for ripe, in-season tomatoes and fresh spinach for the best flavor and nutrition. Don’t Overcook Gnocchi: Fresh gnocchi cooks quickly; remove them from boiling water as soon as they float to maintain a perfect texture. Adjust Seasoning: Taste the sauce before serving and adjust the salt and pepper to your preference for a well-balanced dish. Garnish for Presentation: Adding fresh basil leaves not only enhances the look of the dish but also adds a burst of flavor. {{image_2}} You can add protein to make the dish heartier. Chicken or shrimp work well. Cook the protein in the skillet before adding garlic. This way, it absorbs all those tasty flavors. If you prefer plant-based options, try tofu or chickpeas. They also soak up the sauce nicely. While the tomato spinach sauce is great, you can switch it up. Try a creamy Alfredo or a pesto sauce instead. For a spicy kick, mix in some chili flakes with your favorite sauce. You can also use simple olive oil and lemon for a fresh taste. Each sauce brings its own flair to the gnocchi. This recipe is mostly vegetarian, thanks to the cheese. To make it vegan, skip the Parmesan. You can use nutritional yeast instead for that cheesy flavor. Check that your gnocchi is egg-free too, as some brands include eggs. This way, everyone can enjoy the dish, no matter their diet. To store your leftover Tomato Spinach Gnocchi, place it in an airtight container. Make sure to let it cool completely before sealing. This keeps the dish fresh. You can store it in the fridge for up to three days. If you notice any moisture, use a paper towel to absorb it before sealing the container. When you’re ready to enjoy the leftovers, reheat them gently. You can use a skillet over low heat. Add a splash of water or broth to keep it moist. Stir often to avoid sticking. If you prefer the microwave, use a microwave-safe dish. Heat it in 30-second intervals, stirring in between. This helps warm it evenly. If you want to freeze the gnocchi, it’s best to do so before cooking. Place the uncooked gnocchi on a baking sheet, ensuring they don’t touch each other. Freeze them for about an hour. Once frozen, transfer them to a freezer bag. This way, they won’t stick together. You can keep them frozen for up to three months. When ready to cook, add them directly to boiling water without thawing. Yes, you can use frozen gnocchi. Just cook it according to the package instructions. Frozen gnocchi usually takes a bit longer to cook than fresh gnocchi. They may also have a different texture but will still work well in this dish. You can add many veggies to your gnocchi. Try mushrooms, zucchini, or bell peppers. These add color and flavor. You can also use kale or arugula for a twist. Just make sure to cook them until soft. Gnocchi is done when it floats to the top of the boiling water. This usually takes about 2 to 3 minutes for fresh gnocchi. If you're using frozen gnocchi, it may take a bit longer. Always check for a slightly firm texture. In this article, we explored how to make Tomato Spinach Gnocchi. We covered the main ingredients, optional variations, and substitutions. I detailed the steps to prepare the sauce, cook the gnocchi, and combine everything. You learned tips for the best results, storage methods, and even FAQs to clarify doubts. Enjoy experimenting with this recipe. Each bite brings warmth and flavor to your table. Try different variations to find your favorite twist. Cooking should be fun and simple!

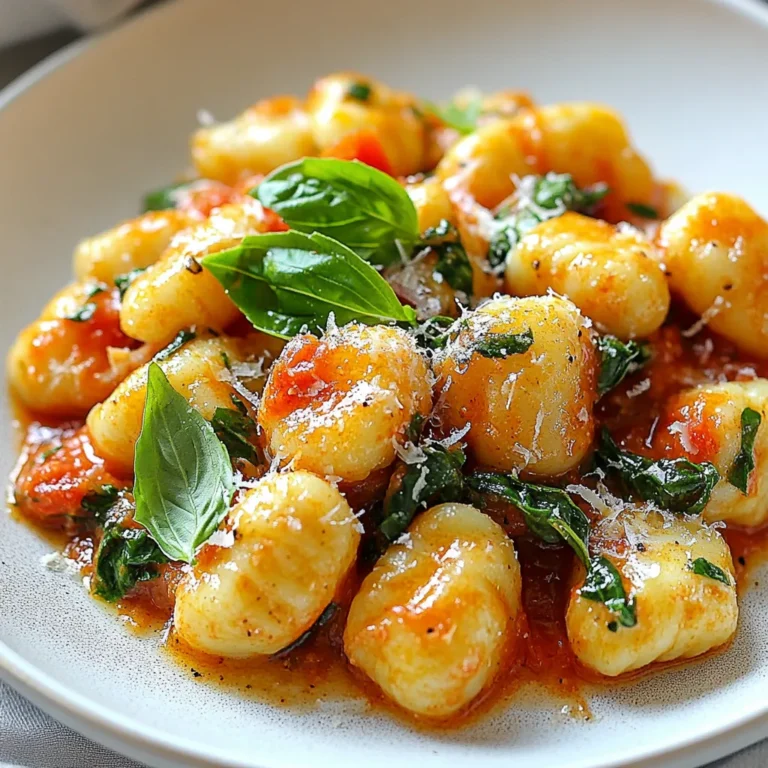
Tomato Spinach Gnocchi Easy and Flavorful Recipe

- 2 boneless, skinless chicken breasts - 1 cup cooked brown rice - 1 can black beans, rinsed and drained - 1 cup corn (frozen or canned) - 1 avocado, sliced - 1 cup shredded lettuce - 1 cup diced tomatoes - ½ cup shredded cheese (cheddar or Mexican blend) - 4 large flour tortillas The main stars of our burrito are the chicken, rice, beans, and corn. Each bite bursts with flavor and texture. The chicken brings protein and heartiness, while rice and beans add fiber. Corn gives a sweet crunch that balances the dish. Avocado, lettuce, tomatoes, and cheese provide freshness and creaminess. - 1 tablespoon olive oil - 1 tablespoon chipotle powder - 1 teaspoon garlic powder - 1 teaspoon onion powder - 1 teaspoon cumin - Salt and pepper to taste - ½ cup chipotle ranch dressing (store-bought or homemade) Seasonings make this burrito stand out. Chipotle powder adds a smoky kick, while garlic and onion powders enhance the savory notes. Cumin brings warmth and depth, tying everything together. Olive oil helps the chicken marinate well and keeps it juicy. Don't forget a sprinkle of salt and pepper for balance! - Alternative toppings like jalapeños or sour cream - Homemade chipotle ranch dressing Feel free to get creative! Add jalapeños for heat or sour cream for creaminess. You can also whip up your own chipotle ranch dressing for a personal touch. Tailor your burrito to your taste, making it your own delicious creation! {{ingredient_image_1}} To start, make the marinade. In a bowl, mix olive oil, chipotle powder, garlic powder, onion powder, cumin, salt, and pepper. This mix gives the chicken a rich, smoky flavor. Add the chicken breasts and coat them well. Cover the bowl and let it rest in the fridge for at least 30 minutes. This step is key for juicy and tasty chicken. Next, heat your grill to medium-high. Once hot, place the marinated chicken on the grill. Cook for about 6-8 minutes on each side. You want the chicken to reach a safe temperature, so juices should run clear. After grilling, let the chicken rest for 5 minutes. This helps keep it moist. Slice it into thin strips for the burrito. Now, let’s make the filling. In a large bowl, combine cooked brown rice, black beans, and corn. You can use frozen or canned corn, whichever you prefer. Drizzle in a few tablespoons of chipotle ranch dressing. Mix everything well to blend the flavors. This filling is hearty and full of goodness. Warm the flour tortillas first. You can do this in a dry skillet or microwave. This makes the tortillas easy to roll. Place some of the rice and bean mixture in the center of each tortilla. Add sliced grilled chicken, avocado, shredded lettuce, diced tomatoes, and shredded cheese. Drizzle more chipotle ranch dressing on top. If you want a crispy exterior, grill the assembled burritos. Heat a skillet over medium heat. Place the burritos seam-side down and grill for 2-3 minutes on each side. They should turn golden brown and crispy. This step adds a nice texture to your burrito. To make juicy grilled chicken, marinate it for at least 30 minutes. A longer marination time, up to two hours, helps the flavors soak in. Use a mix of olive oil, chipotle powder, garlic powder, onion powder, and cumin. This blend gives the chicken a great taste. Always grill the chicken on medium-high heat. Cook it for 6 to 8 minutes on each side. Make sure the juices run clear when it is done. Letting the chicken rest for five minutes before slicing helps it stay moist. To prevent filling from spilling, warm your tortillas first. This makes them easier to roll. Lay the filling in the center, but don’t overstuff. Start by folding in the sides of the tortilla, then roll it from the bottom up. Make sure the seam is down when you place it on the plate. If you want a crispy burrito, grill it seam-side down for 2 to 3 minutes. Serve your burritos with extra chipotle ranch dressing on the side for dipping. This adds a burst of flavor. You can also pair your burritos with sides like tortilla chips and fresh salsa. A simple salad with lime dressing works well, too. Enjoying these sides makes the meal more fun and tasty! Pro Tips Marinate Longer for More Flavor: For the best flavor, marinate the chicken for at least 2 hours or overnight. This will allow the spices to penetrate the meat deeply. Use Fresh Ingredients: Fresh vegetables like ripe tomatoes and crisp lettuce will enhance the burrito's taste and texture. Choose the freshest ingredients available. Customize Your Filling: Feel free to add other ingredients such as sautéed peppers or onions, grilled shrimp, or even a dollop of sour cream for a unique twist on your burrito. Perfect Burrito Folding: Ensure you fold in the sides of the tortilla tightly to prevent any filling from spilling out while rolling. This helps to keep your burrito intact. {{image_2}} You can make this burrito lighter. Try grilled turkey or tofu instead of chicken. They both have fewer calories and still taste great. For toppings, use plain Greek yogurt instead of sour cream. You can also add extra veggies like bell peppers or spinach for more fiber and nutrients. If you want a veggie burrito, skip the chicken. Use black beans, lentils, or chickpeas for protein. You can replace cheese with avocado or nutritional yeast for a cheesy flavor. For the dressing, look for a vegan chipotle ranch or make your own with plant-based ingredients. You can spice things up! Try different dressings like ranch or cilantro-lime sauce. For heat, add jalapeños or a dash of hot sauce. Experiment with spices like smoked paprika or cayenne pepper to change the flavor profile. You can even switch up the rice with cilantro-lime or Spanish rice for a new twist. You can store your burritos in the fridge for up to three days. Wrap them in foil or plastic wrap. This keeps them fresh and flavorful. If you want, place them in an airtight container too. This helps avoid any funny smells from other foods. To freeze your burritos, wrap each one in foil. Then place them in a freezer-safe bag. Make sure to remove as much air as possible. They can stay frozen for up to three months. When you are ready to eat, let them thaw in the fridge overnight. For the best taste, reheat your burritos in the oven. Preheat your oven to 350°F (175°C). Wrap the burrito in foil and heat for about 20 minutes. This keeps the outside crispy and the inside warm. You can also use a microwave. Just remember, the burrito might get a bit soggy. Yes, you can! Try using steak, pork, or shrimp. Each will give a unique taste. For chicken lovers, grilled thighs add more flavor. For a lighter option, turkey works well too. Just remember to adjust the cooking time based on the protein you choose. Making chipotle ranch dressing is easy! Combine these ingredients in a bowl: - ½ cup mayonnaise - ½ cup sour cream - 1 tablespoon chipotle powder - 1 teaspoon garlic powder - 1 teaspoon onion powder - 1 tablespoon lime juice - Salt and pepper to taste Mix until smooth. This dressing adds a nice kick to your burrito! To reheat your burritos, wrap them in foil and place in the oven at 350°F for 15-20 minutes. This method keeps them soft. You can also use a microwave. Heat for 1-2 minutes, but be careful; it may get soggy. Yes! You can prep the chicken and fillings a day in advance. Store each separately in the fridge. When ready to eat, just assemble and grill the burritos. This saves time and makes dinner easy. Enjoy your tasty meal! This guide shows you how to make delicious burritos from scratch. We started with the key ingredients, like juicy chicken and fresh toppings. Then, I walked you through marinating and grilling the chicken alongside filling prep and assembly tips. I shared tricks for perfecting your burrito and ideas for healthier variations. Finally, you learned about storing and reheating leftovers. Enjoy your cooking journey, and let these burritos become a favorite meal in your home.

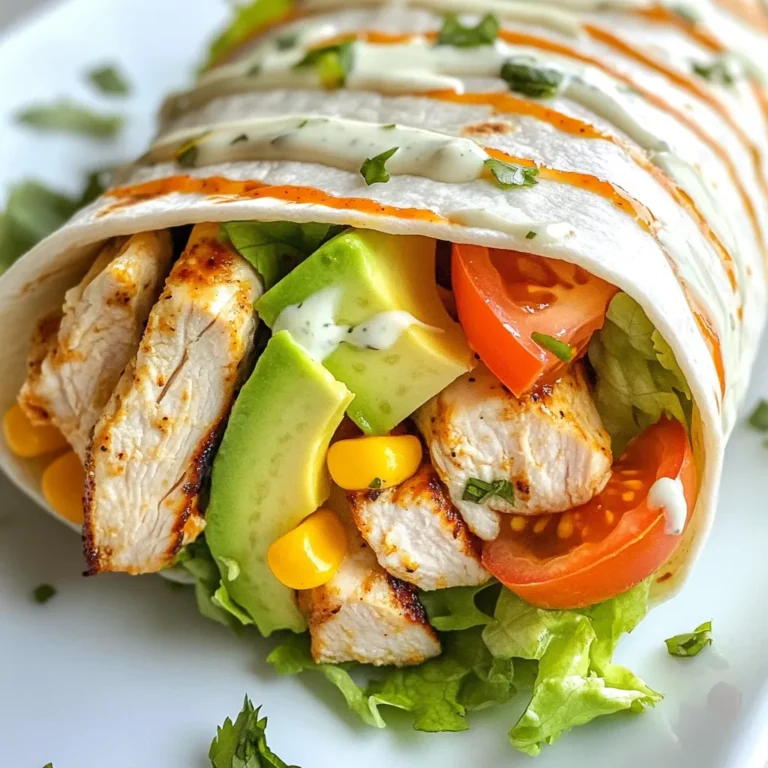
Chipotle Ranch Grilled Chicken Burrito Delight

- 1 lb boneless chicken thighs, cut into bite-sized pieces - 1/2 cup cornstarch - 1/4 cup all-purpose flour - 1 teaspoon garlic powder - 1 teaspoon ginger powder - Salt and pepper to taste - 1/4 cup vegetable oil (for frying) - Zest of 1 orange - 1/2 cup fresh orange juice - 2 tablespoons soy sauce - 1 tablespoon honey - 1 tablespoon rice vinegar - 1 teaspoon red pepper flakes (optional) - Sliced green onions and sesame seeds for garnish If you need to change a few items, here are some easy swaps. You can use chicken breast instead of thighs. It will work well, but thighs stay juicier. For the cornstarch, try potato starch if you have it. You can replace honey with maple syrup for a vegan option. If you do not have rice vinegar, use apple cider vinegar instead. Fresh ingredients make your meal taste better. Look for bright orange zest. It should smell sweet and citrusy. Choose chicken that looks pink and moist. The texture should feel firm. Use fresh orange juice for the best flavor. If you can, squeeze the juice yourself. Finally, check your spices. They should not be old or stale. Fresh spices add a big punch of flavor. {{ingredient_image_1}} First, gather your chicken thighs. Cut them into bite-sized pieces. This helps them cook evenly. Next, take a mixing bowl. Combine cornstarch, all-purpose flour, garlic powder, ginger powder, salt, and pepper. Mix all these dry ingredients well. Now, toss the chicken pieces into this mixture. Make sure each piece is well coated. This coating gives the chicken a crispy texture when fried. Heat a large skillet or wok over medium-high heat. Add the vegetable oil. Wait until the oil is hot. Carefully add the coated chicken pieces in batches. Avoid overcrowding the pan. Fry the chicken until it turns golden brown. This should take about 5 to 7 minutes. Once cooked, remove the chicken and drain it on paper towels. This step helps keep it crispy. In a separate bowl, whisk together the orange zest, orange juice, soy sauce, honey, and rice vinegar. If you like a little heat, add red pepper flakes. Pour this sauce into the same skillet over medium heat. Bring it to a simmer. Scrape the bottom of the pan to mix in the fried bits. Cook the sauce for about 3 to 4 minutes until it thickens slightly. Finally, add the fried chicken back into the skillet. Toss to coat the chicken in the orange sauce. Cook for an additional 2 to 3 minutes to heat it through. Enjoy your flavorful meal! Frying chicken can be simple and fun. Start with dry chicken. Pat it with paper towels. This removes moisture, making it crispier. Use a mix of cornstarch and flour. This duo gives a good crunch. Heat the oil well before adding chicken. If the oil is too cold, the chicken will soak it up. Fry in batches to keep the temperature steady. Do not crowd the pan. This ensures even cooking and browning. For a crispy coating, coat chicken well in the dry mix. Shake off any excess. Fry until golden brown, about 5-7 minutes. Let the chicken rest on paper towels after frying. This helps drain any extra oil. You can also double coat the chicken. After the first fry, dip it back in the mix and fry again. This adds extra crunch. Orange chicken shines with simple sides. Serve it over steamed rice or fried rice. Add some stir-fried veggies for color and nutrition. Green onions and sesame seeds make great garnishes. They add flavor and texture. You can also pair it with a fresh salad. This adds a nice crunch and balance to the meal. Pro Tips Coating Consistency: Make sure the chicken pieces are evenly coated in the cornstarch and flour mixture for a crispy texture. Oil Temperature: Ensure the oil is hot enough before adding the chicken; a drop of batter should sizzle immediately upon contact. Scraping the Pan: Don’t skip scraping the bottom of the pan while making the sauce; those browned bits add incredible flavor. Garnish for Freshness: Adding sliced green onions and sesame seeds just before serving enhances both the presentation and flavor. {{image_2}} You can make this dish even better by adding veggies. Vegetables add color and crunch. Try adding bell peppers, broccoli, or snap peas. Just chop them into bite-sized pieces. Add them to the pan when you fry the chicken. Cook them for a few minutes before adding the sauce. This way, they stay crisp and fresh. If you want a new taste, switch up the sauce. You can add teriyaki sauce or sweet and sour sauce. These sauces will give you a different flavor profile. Just mix them in with the orange sauce, or swap them out completely. You can also try a spicy chili sauce for heat. Adjust the sauce to fit your mood or meal. If you like heat, add more red pepper flakes. Start with a pinch and taste as you go. For less spice, leave out the flakes. You can also add a splash of sriracha to the sauce. This adds flavor without too much heat. Adjust the spice to what you enjoy and make it your own! To store leftovers, first let the orange chicken cool down. Then, place it in an airtight container. Make sure to seal it well to keep it fresh. You can keep it in the fridge for up to three days. If you want to keep it longer, consider freezing it. When you are ready to eat, reheat the chicken in a skillet. Heat it over medium heat. Add a splash of water or orange juice to the pan. This helps keep the chicken moist. Stir it often until it is hot. You can also use a microwave, but the skillet keeps it crispier. To freeze orange chicken, first put it in a freezer-safe container. Make sure it is sealed tightly. It can stay in the freezer for up to three months. When you are ready to eat, thaw it in the fridge overnight. Then, reheat as mentioned above. Orange Chicken stays good in the fridge for about 3 to 4 days. Store it in an airtight container to keep it fresh. You can enjoy it cold or reheat it for a warm meal. If you want to keep it longer, consider freezing it. Yes, you can use chicken breast instead of thighs. Chicken breast will be leaner and still taste great. Just remember to cut it into bite-sized pieces for even cooking. The cooking time may be a bit shorter, so watch it closely. You can serve Orange Chicken with many sides. Here are some great options: - Steamed rice - Fried rice - Noodles - Stir-fried vegetables - A fresh salad These sides will balance the flavors and make a complete meal. In this post, we covered the key ingredients and steps to make orange chicken. We also discussed tips for fresh ingredients and how to achieve the perfect fry. You can customize your dish with veggies or different sauces. Don’t forget storage tips to keep leftovers tasty. Cooking should be fun and rewarding, so try new ideas and enjoy your meals. Keep learning and experimenting for the best flavor every time.

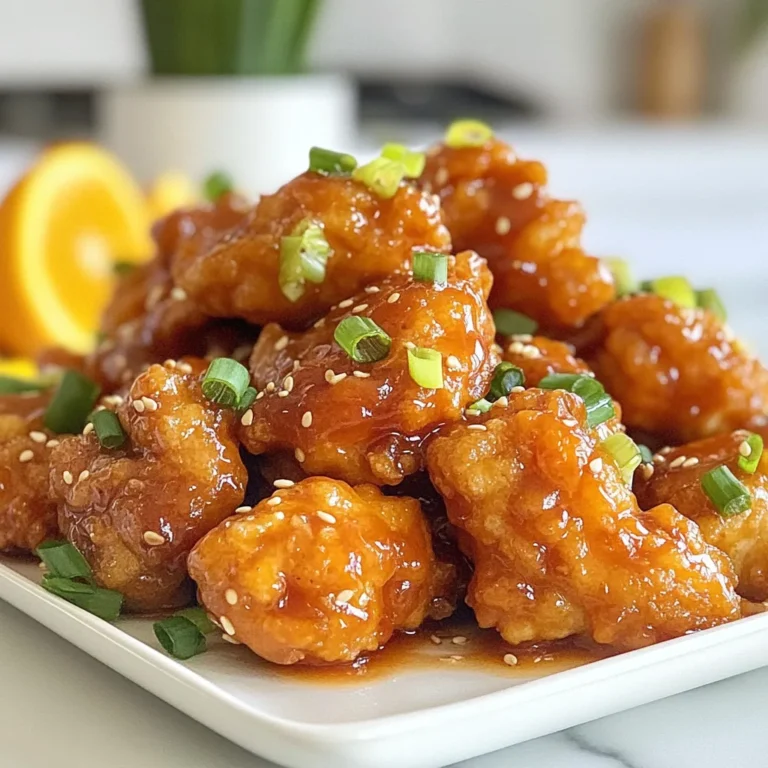
Orange Chicken Quick Fry Easy and Flavorful Recipe

- 2 cups jasmine rice - 4 cups chicken broth - 1.5 lbs boneless, skinless chicken thighs - 1/4 cup soy sauce - 1/4 cup honey - 2 tablespoons sesame oil - 3 cloves garlic, minced - 1 inch piece of fresh ginger, grated - 1 tablespoon rice vinegar - 1/4 teaspoon crushed red pepper flakes (optional) - 1/4 cup green onions, chopped (for garnish) - 1 tablespoon sesame seeds (for garnish) The heart of a great Sticky Chicken Rice Bowl lies in its ingredients. Jasmine rice adds a lovely aroma. Chicken thighs bring juicy flavor. For the marinade, soy sauce and honey create a rich taste. Sesame oil gives a nutty hint, while garlic and ginger add depth. Rice vinegar brightens the mix, and crushed red pepper flakes add a kick, if you like spice. - You can swap jasmine rice for basmati or brown rice. - If you prefer, use chicken breasts instead of thighs. - For a gluten-free option, try tamari or coconut aminos instead of soy sauce. These swaps keep the meal delicious. Basmati rice offers a different texture. Chicken breasts are leaner but still tasty. Tamari or coconut aminos work well for those avoiding gluten. - Measuring cups and spoons - Non-stick skillet or grill pan - Mixing bowls and utensils Having the right tools makes cooking easier. Measuring cups and spoons help get your amounts right. A non-stick skillet or grill pan cooks the chicken evenly. Mixing bowls are great for whisking the marinade. These tools set you up for success in the kitchen. {{ingredient_image_1}} Start by rinsing the jasmine rice. Place it in a bowl and cover it with cold water. Swirl the rice around. Drain the water when it looks clear. This step removes extra starch. Next, boil the chicken broth in a saucepan. Add the rinsed rice to the boiling broth. Cover the pot and reduce the heat to low. You will simmer it for 15-20 minutes until the liquid is gone. After that, remove it from the heat. Let it sit covered for 5 minutes. Finally, fluff the rice with a fork before serving. In a bowl, mix the marinade ingredients. Combine the soy sauce, honey, sesame oil, minced garlic, grated ginger, rice vinegar, and optional red pepper flakes. Whisk the mixture well. Now, take the chicken thighs. Place them in a large bowl or a resealable bag. Pour the marinade over the chicken. Make sure each piece is well coated. Let it marinate for at least 30 minutes. For deeper flavor, marinate it for up to 2 hours. Heat a non-stick skillet or grill pan over medium-high heat. Remove the chicken from the marinade, but keep the marinade for later. Cook the chicken for about 6-7 minutes on each side. The inside should reach 165°F (75°C). Once done, remove the chicken from the pan. Let it rest for a few minutes before slicing it. Resting helps keep the juices in the chicken. To get the right thickness for the sticky sauce, keep it simple. You can simmer it longer to make it thicker. If it's too thick, add a little water or chicken broth. Taste it as you go to get the flavor just right. Safety is key when handling raw chicken. Always wash your hands after touching it, and use separate cutting boards for meat and veggies to avoid cross-contamination. Want to spice things up? You can add more garlic, ginger, or even a squeeze of lime to the marinade. This twist brightens the taste. If you love heat, add more crushed red pepper flakes. Pair the bowls with a fresh salad or steamed veggies for a complete meal. These sides balance the richness of the chicken and rice. Cooking times vary based on chicken size. Thicker chicken thighs may need a few extra minutes. Always use a meat thermometer to check if the chicken is safe to eat. It should reach 165°F (75°C) inside. After cooking, let the chicken rest for a few minutes. This keeps it juicy and makes slicing easier. Pro Tips Marinate Longer for Flavor: For the best flavor, marinate the chicken thighs for up to 2 hours. This allows the marinade to penetrate the meat, resulting in a more flavorful dish. Use Fresh Ingredients: Fresh garlic and ginger enhance the overall taste of the dish. Whenever possible, opt for fresh over pre-minced or powdered options. Thicken the Sauce: If you prefer a thicker sauce, let it reduce a bit longer in the skillet until it reaches your desired consistency before drizzling over the chicken. Serving Suggestions: Pair the sticky chicken rice bowls with steamed vegetables or a side salad for a complete meal that adds color and nutrients. {{image_2}} You can add many vegetables to your Sticky Chicken Rice Bowls. Bell peppers, carrots, and snap peas work well. Slice bell peppers into thin strips for crunch. Grate carrots for sweetness and color. Slice snap peas diagonally for a fresh bite. You can stir-fry these veggies in the pan after cooking the chicken. This adds flavor and makes your meal more colorful. Try using seasonal vegetables for variety and flavor. If you want a different protein, try using tofu, shrimp, or pork. For tofu, choose firm blocks and press out the water. Cut it into cubes and marinate like the chicken. For shrimp, use large shrimp and sauté them for about 3-4 minutes until pink. Pork can also shine here; thinly slice pork tenderloin and cook it the same way as chicken. Each option brings a unique taste to your rice bowls. Explore global flavors by changing sauces or spices. For a Thai twist, add coconut milk and lime juice to the marinade. You can also use teriyaki sauce for a sweet and savory flavor. For a spicy kick, try adding sriracha or gochujang. Each sauce adds its own character to the dish. Experimenting with spices like cumin or coriander can also bring a new dimension. Don't be afraid to mix and match! Store any leftover Sticky Chicken Rice Bowls in an airtight container. The rice and chicken should cool down first. Place them in the fridge within two hours of cooking. This keeps them fresh and safe to eat. Leftovers can last up to four days in the fridge. For longer storage, you can freeze the chicken and rice. Use freezer-safe bags or containers. They can stay good for up to three months in the freezer. Remember to label them with the date. To reheat, I suggest using the microwave or stovetop. If using the microwave, place the rice and chicken in a bowl. Add a splash of water to keep it moist. Cover the bowl with a lid or microwave-safe wrap. Heat in short bursts, stirring in between. This keeps the chicken tender. If using the stovetop, warm them in a skillet over low heat. Stir often and add a bit of broth or water if needed. Here’s how long the main ingredients last: - Jasmine rice: lasts indefinitely if kept dry in a cool place. - Chicken thighs: fresh chicken lasts 1-2 days in the fridge. Cooked chicken can last 3-4 days. - Soy sauce: lasts for years when stored in a cool, dark place. - Honey: lasts indefinitely due to its natural preservative qualities. - Sesame oil: best used within 6 months after opening for freshness. - Garlic and ginger: last about 1-2 weeks when stored in the fridge. Knowing how to store and reheat your meal helps you enjoy it later. You can prep Sticky Chicken Rice Bowls in advance. Start by cooking the rice and chicken. Store them separately in airtight containers. Keep the rice in the fridge for up to four days. The chicken lasts up to three days. When ready to eat, simply reheat the rice and chicken. You can add the sticky sauce just before serving. This method saves time and keeps your meal fresh. Yes, you can use brown rice. However, brown rice takes longer to cook. Use a 1:2.5 rice-to-water ratio. This means you will need 5 cups of chicken broth for 2 cups of brown rice. Cook it for about 45 minutes instead of 20. Brown rice adds more fiber and a chewy texture. It also makes the dish more filling. Sticky Chicken Rice Bowls pair well with many sides. Here are some ideas: - Steamed broccoli - Quick pickled cucumbers - Asian slaw - Edamame - Roasted vegetables These options add color, crunch, and more nutrition. They also enhance the meal's flavor. Enjoy getting creative with your sides! You now have all the key steps to make delicious Sticky Chicken Rice Bowls. We covered the main ingredients, simple cooking techniques, and tips for flavor. I highlighted how to customize your dish and store leftovers properly. Enjoy experimenting with different flavors and textures for a fun meal. Follow these steps, and you'll impress everyone at your table. Happy cooking!

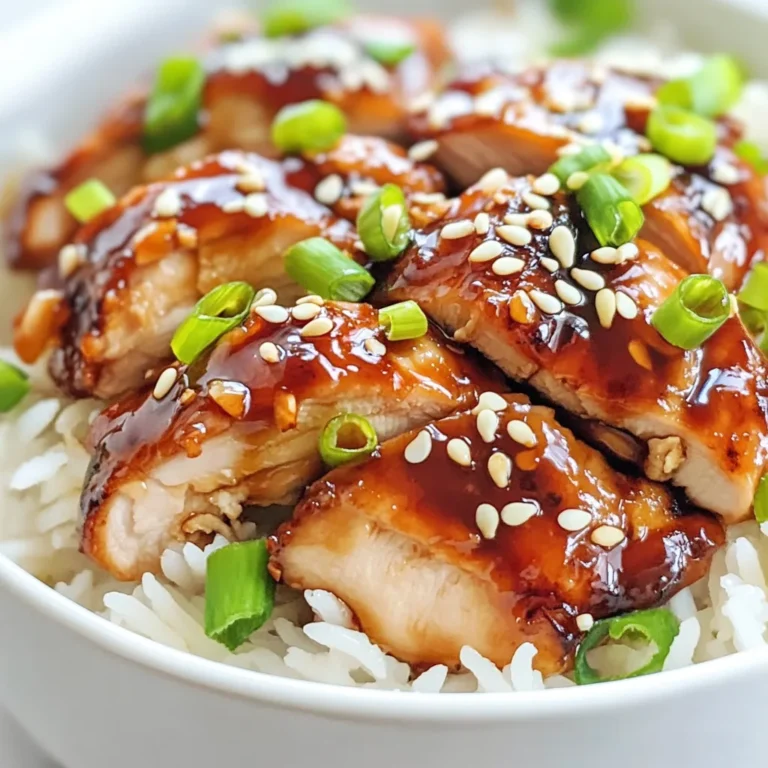
Sticky Chicken Rice Bowls Easy and Flavorful Meal

To make this dish, you need simple, fresh ingredients: - 1 lb chicken thighs, boneless and skinless, cut into bite-sized pieces - 1 cup cornstarch - 2 large eggs, beaten - ½ cup all-purpose flour - ½ teaspoon baking powder - 1 teaspoon garlic powder - 1 teaspoon ginger powder - ½ teaspoon salt - 1 cup vegetable oil (for frying) These chicken thighs give a juicy bite. Cornstarch helps create that crispy coating we love. The right seasonings and sauces make the dish shine. Here’s what you need: - 3 tablespoons soy sauce - 2 tablespoons hoisin sauce - 2 tablespoons rice vinegar - 2 tablespoons honey - 1 teaspoon red chili flakes (adjust based on heat preference) Soy sauce adds saltiness, while hoisin gives sweetness. Rice vinegar brings tang, and honey balances it all out. Garnishes lift the dish to new heights. For this recipe, you should have: - 2 green onions, chopped for garnish - Sesame seeds for garnish Serve your General Tso's Chicken on a bed of steamed white rice. You can also add broccoli for color and health. This makes it look as good as it tastes! {{ingredient_image_1}} Start by cutting 1 pound of boneless, skinless chicken thighs into bite-sized pieces. Place the chicken in a bowl and sprinkle with ½ teaspoon salt, 1 teaspoon ginger powder, and 1 teaspoon garlic powder. Mix well to coat the chicken evenly. Cover the bowl and let the chicken marinate for at least 15 minutes. This step helps to infuse great flavors into the meat. Next, you'll need to create a battering station. Take three bowls and set them up in a line. In the first bowl, add 1 cup of cornstarch. In the second bowl, beat 2 large eggs. In the third bowl, mix ½ cup of all-purpose flour and ½ teaspoon baking powder. This setup makes coating the chicken easy and fun! Now it’s time to fry the chicken. Heat 1 cup of vegetable oil in a deep frying pan over medium-high heat. You want the oil to reach about 350°F (175°C). Once hot, carefully add the coated chicken pieces. Make sure not to overcrowd the pan. Fry each piece for about 4-5 minutes until they turn golden brown and crispy. Remove the chicken and let it drain on paper towels. While the chicken fries, let’s make the sauce. In a separate bowl, whisk together 3 tablespoons of soy sauce, 2 tablespoons of hoisin sauce, 2 tablespoons of rice vinegar, 2 tablespoons of honey, and 1 teaspoon of red chili flakes. This mix gives the dish its signature sweet and spicy kick. Once the chicken is fried, grab a large skillet. Place the fried chicken in the skillet over medium heat. Pour the sauce over the chicken and toss everything together. Cook for an additional 2-3 minutes until the chicken is heated through and well-coated with the sauce. To serve, transfer the General Tso’s Chicken to a nice plate. Garnish with chopped green onions and sesame seeds. For a full meal, serve it on a bed of steamed white rice or alongside broccoli. Arrange the chicken in a circular pattern and drizzle any remaining sauce over it for a beautiful finish. Enjoy your dish with friends and family! To get crispy chicken, start with boneless chicken thighs. Thighs give better flavor and texture. Marinate the chicken with salt, garlic powder, and ginger powder. This adds great taste. Use cornstarch for coating. It makes the chicken extra crispy. Dip the chicken pieces in cornstarch, then egg, and finally flour. This three-step coating is key. Fry the chicken in hot oil at 350°F (175°C) for 4-5 minutes until golden brown. Chili flakes add spice to General Tso's Chicken. Start with 1 teaspoon for a mild kick. If you love heat, add more! Mix the flakes into the sauce for even flavor. Taste the sauce before adding it to the chicken. You can always add more chili flakes later, but you can't take them out. Marination is crucial for flavor. I suggest at least 15 minutes, but longer is better. If you can, marinate the chicken for 30 minutes to 1 hour. This time allows the spices to soak in. If you're short on time, even 15 minutes makes a difference. Always cover the bowl with plastic wrap while it marinates. This keeps the moisture in and helps the flavors blend. Pro Tips Marinate for Flavor: Allowing the chicken to marinate longer than 15 minutes, preferably up to an hour, enhances the flavor significantly. Maintain Oil Temperature: Use a thermometer to ensure the oil stays at 350°F (175°C) for optimal frying, which results in crispy chicken without excess oil absorption. Adjust Spice Levels: Feel free to modify the amount of red chili flakes based on your heat preference; you can also add fresh chopped chilies for an extra kick. Presentation Matters: For an appealing presentation, serve the chicken on a platter with a sprinkle of sesame seeds and a drizzle of sauce to make it look even more appetizing. {{image_2}} If you want a vegetarian twist, try using tofu. Tofu soaks up flavors well. Choose firm tofu for the best results. Cut the tofu into bite-sized pieces, just like chicken. Marinate the tofu in soy sauce, garlic powder, and ginger powder. Then, coat it in cornstarch and fry until golden. The sauce stays the same, so you get that tasty flavor without meat. For a healthier take, you can bake the chicken instead of frying. Start by marinating as usual. After coating the chicken, place it on a baking sheet lined with parchment paper. Bake at 400°F (200°C) for about 25 minutes. Flip halfway to ensure even cooking. This method cuts down on oil and still gives you a nice crunch. You can enjoy the same great taste with less guilt! If you need a gluten-free option, swap the soy sauce for tamari. Tamari is a gluten-free soy sauce. Use cornstarch and rice flour instead of regular flour for coating. This keeps the crispy texture intact. Always read labels for sauces and ingredients to ensure they are gluten-free. You can still enjoy General Tso's Chicken without the gluten! To store leftover General Tso's chicken, let it cool first. Place it in an airtight container. Keep it in the fridge for up to three days. Make sure to separate the chicken from the sauce to keep it crispy. When you are ready to eat, use the oven to reheat. Preheat the oven to 350°F (175°C). Place the chicken on a baking sheet. Heat for about 10-15 minutes. This keeps the chicken crispy. You can also use the microwave. Heat it in short bursts, stirring in between. The chicken will lose some crispiness, but it will still taste good. If you have more leftovers, you can freeze General Tso's chicken. Place it in a freezer-safe bag or container. Remove as much air as possible. It can last up to three months in the freezer. To reheat, thaw it in the fridge overnight. Then use the oven to warm it. This way, you can enjoy it later without losing flavor! General Tso's Chicken is named after a Chinese general, Tso Tsung-t'ang. He lived during the Qing Dynasty. The dish is not from China but became popular in the United States. Chefs created it to suit American tastes, mixing sweet and spicy flavors. It gained fame in the 1970s and remains a favorite. To lower the spice level, reduce or skip the red chili flakes. You can add more honey for sweetness. Another option is to use less soy sauce, as it can enhance heat. For a milder sauce, try adding a touch of water or chicken broth. Yes, you can use chicken breasts instead of thighs. The taste will change a bit, as thighs are juicier. Just remember to cook the chicken until it is fully done. Cut the breasts into similar bite-sized pieces for even cooking. General Tso's Chicken pairs well with steamed white rice or fried rice. Broccoli, bok choy, or stir-fried vegetables add color and nutrients. You can also serve it with dumplings or spring rolls for a complete meal. Each side adds balance to the rich flavors of the chicken. In this article, we explored how to make General Tso's Chicken from scratch. You learned about the main ingredients, seasonings, and the garnishes that elevate your dish. I shared step-by-step instructions, tips for crispy chicken, and variations like vegetarian and gluten-free options. In closing, with the right approach, you can enjoy this tasty meal at home. Experiment with flavors to make it your own. Enjoy cooking and savor each bite!

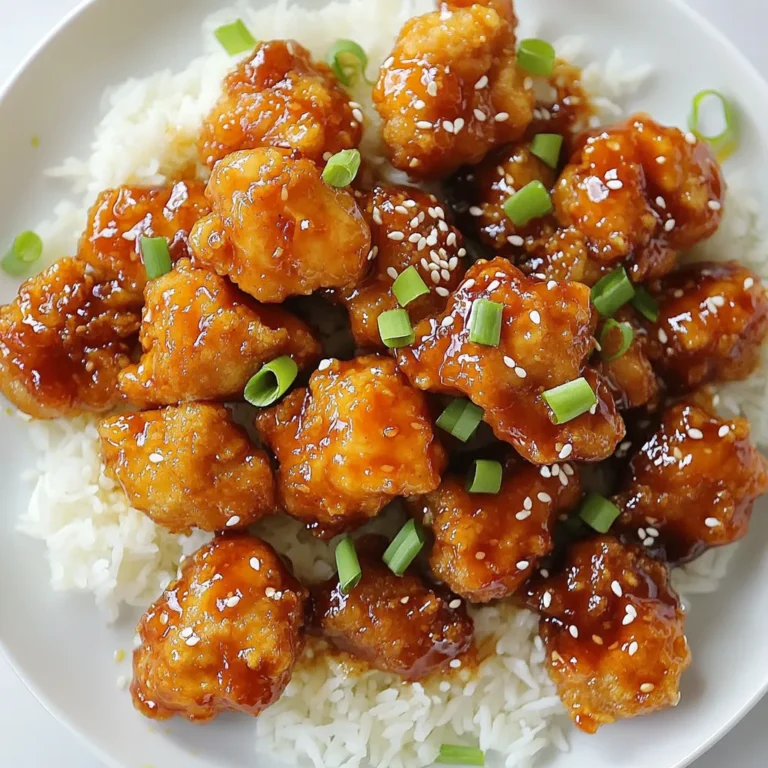
General Tso’s Chicken Tasty and Simple Recipe Guide

To make Slow Cooker Lemon Herb Chicken and Rice, gather these ingredients: - 4 boneless, skinless chicken thighs - 2 cups jasmine rice - 4 cups chicken broth - 1 medium onion, diced - 3 garlic cloves, minced - 2 lemons (zest and juice) - 2 teaspoons dried thyme - 1 teaspoon dried oregano - 1 teaspoon salt - 1/2 teaspoon black pepper - 1 cup frozen peas - 1/4 cup fresh parsley, chopped (for garnish) These quantities serve four people. You can swap some ingredients if needed: - Use brown rice instead of jasmine rice. Just remember to adjust the cooking time. - Chicken breast can replace chicken thighs. Just keep an eye on cooking time. - Vegetable broth works well instead of chicken broth for a vegetarian option. - Fresh herbs can replace dried herbs if you have them. Use three times the amount of fresh herbs. - Frozen mixed veggies can replace peas if you like a variety. When selecting ingredients, focus on freshness: - Look for chicken thighs that are pink and firm. Avoid any that look dull or have dark spots. - Pick jasmine rice that is free of cracks or holes. - Choose firm, smooth lemons. They should feel heavy for their size. This means they are juicy! - For onions, look for dry, firm ones without soft spots or sprouts. - Fresh parsley should be vibrant green and not wilted. Choosing good ingredients makes a big difference in flavor. Happy cooking! {{ingredient_image_1}} First, take the chicken thighs. Season them with salt, pepper, thyme, and oregano. This will give them a nice flavor. Make sure every piece is well coated. Set them aside for a moment. Now, let’s sauté the aromatics. In a skillet, heat a bit of olive oil over medium heat. Add the diced onion and cook it until it is soft and clear, which takes about 4-5 minutes. Then, add in the minced garlic and cook for another minute. The smell will be amazing! Once done, place the seasoned chicken thighs in your slow cooker. Pour the sautéed onion and garlic mixture over the chicken. Next, add the jasmine rice, chicken broth, lemon juice, and lemon zest. Stir everything gently to mix it well. Cover your slow cooker and set it to low heat. Let it cook for 4-5 hours. If you are short on time, you can set it to high for 2-3 hours. The chicken should be fully cooked, and the rice should be tender. In the last 15 minutes of cooking, add the frozen peas. This step adds color and nutrition. Remember to stir gently after adding them. When the cooking time is up, fluff the rice with a fork. This makes it light and airy. Serve the chicken and rice on a plate, then sprinkle fresh parsley on top. This adds a lovely finish. Enjoy your meal! To boost the flavor, use fresh herbs when you can. Fresh thyme and parsley add bright notes. You can also add a splash of white wine to the broth. This gives depth to the dish. Try marinating the chicken in lemon juice for an hour before cooking. This step adds zest and tenderness to the meat. One common mistake is overcooking the rice. Jasmine rice cooks quickly, so stick to the time. If you cook it too long, it can turn mushy. Another tip is to avoid skipping the sauté step. Sautéing the onion and garlic adds a rich, savory base to the dish. Lastly, always taste before adding more salt. The broth may be salty enough. Serve the chicken and rice with a light salad. A simple salad with mixed greens and a lemon vinaigrette works well. You can also pair it with roasted veggies for extra flavor. For a cozy touch, add a warm slice of crusty bread. This dish is great on its own, but these sides make it even better! Pro Tips Use Fresh Herbs: Fresh herbs can enhance the flavor profile of your dish. Consider using fresh thyme and parsley instead of dried for a brighter taste. Rice Texture: For a creamier texture, you can substitute half of the chicken broth with coconut milk. This adds a delightful richness to the dish. Chicken Thighs vs. Breasts: Chicken thighs are more forgiving in slow cooking, remaining moist and tender. If using chicken breasts, reduce the cooking time slightly to prevent drying out. Meal Prep Friendly: This recipe is perfect for meal prep! Make a double batch and freeze leftovers in individual portions for quick future meals. {{image_2}} You can switch up the rice in this dish. Jasmine rice works great, but other types are fun too. Try long-grain white rice if you want a bit of fluff. Brown rice adds a nutty taste and more fiber. Just remember, cooking times may change. Brown rice takes longer, so adjust your cooking time to 6-7 hours on low. Adding veggies boosts flavor and nutrition. You can toss in carrots, bell peppers, or spinach. Frozen mixed veggies are easy and quick. Add them in the last 30 minutes of cooking. This way, they stay bright and tasty. You can also use fresh vegetables, just chop them small for even cooking. If you're looking for protein swaps, there are many options. Use boneless, skinless chicken breasts instead of thighs. Turkey works well too and keeps it lean. For a vegetarian option, try chickpeas or tofu. These will soak up all the flavors and add protein. Adjust the cooking time based on the protein you choose, especially with tofu, which cooks faster. To store leftover chicken and rice, let it cool completely. Use an airtight container. This keeps the dish fresh and safe. You can store it in the fridge for up to three days. Always label your container with the date. This way, you know when to eat it. When ready to enjoy leftovers, take out the chicken and rice. Place it in a microwave-safe dish. Cover it to keep moisture in. Heat on medium power for about 2-3 minutes. Stir halfway through to warm evenly. If you prefer, you can reheat it on the stove. Just add a splash of broth to keep it moist. If you want to save the dish for later, freezing is a great option. Use a freezer-safe container or a heavy-duty freezer bag. Make sure to remove as much air as possible. Label it with the date and contents. You can freeze the chicken and rice for up to three months. When ready to eat, thaw it overnight in the fridge. Reheat it thoroughly before serving. Yes, you can. If you don’t have a slow cooker, try using a pot on the stove. Just simmer the chicken on low heat. The key is to cook it slowly to keep the chicken moist. You can follow the same steps but reduce the cooking time. Cook for about 30 to 40 minutes until the chicken is tender and the rice is cooked. In the slow cooker, chicken takes about 4 to 5 hours on low heat. If you set it on high, it will take around 2 to 3 hours. The chicken should be cooked through, and the rice should be tender. Make sure to check the chicken's internal temperature. It should reach 165°F for safety. This dish pairs well with a green salad or steamed veggies. You can also serve it with crusty bread to soak up the tasty juices. A side of roasted vegetables works great too. For drinks, consider a light lemony beverage or a refreshing iced tea to match the flavors. In this article, we covered the essential ingredients for Slow Cooker Lemon Herb Chicken and Rice. We discussed quantities, substitutes, and tips for choosing the best ingredients. The step-by-step instructions guided you through preparation and cooking methods. We shared tips to enhance flavor and avoid mistakes. Finally, we explored variations with different rice, veggies, and protein options. Understanding storage and reheating ensures you enjoy leftovers. With these insights, you're ready to make a delicious meal with ease. Enjoy cooking!

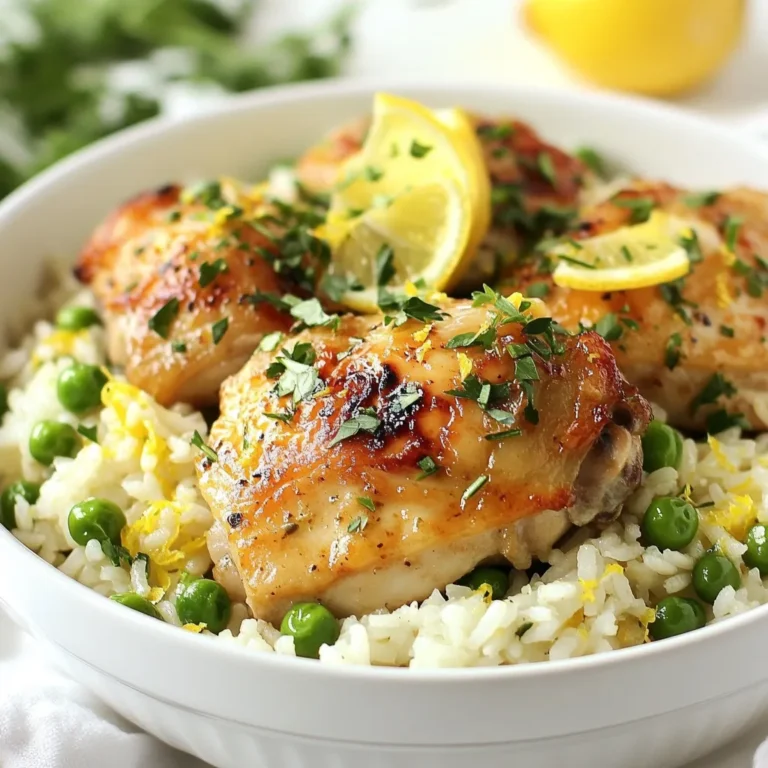
Slow Cooker Lemon Herb Chicken and Rice Delight

PREV 1 … 46 47 48 … 56 NEXT
go kitchen now

explore

DessertsDinnerAppetizersDrinks

Our Policies

  • Cookie Policy
  • Copyright Policy
  • Disclaimer
  • GDPR Policy
  • Terms Of Use
Back to Top
  • About
  • Contact Us
  • Privacy Policy
© 2025 go kitchen now