FREE DINNER EBOOK! Get your copy!
  • Cookie Policy
  • GDPR Policy
  • Disclaimer
  • Terms Of Use
  • Visit my other site: Fun Cookie Recipes
go kitchen now
  • Home
  • Dinner
  • Desserts
  • Drinks
  • Appetizers
  • Contact
  • About
  • Privacy Policy
  • Home
  • Dinner
  • Desserts
  • Drinks
  • Appetizers
  • Contact
  • About
  • Privacy Policy
  • Cookie Policy
  • GDPR Policy
  • Disclaimer
  • Terms Of Use
Visit my other site: Fun Cookie Recipes

HOME / CATEGORIES /

Latest

To make Coconut Crusted Chicken, you need: - 2 boneless, skinless chicken breasts - 1 cup shredded coconut (unsweetened) - 1 cup panko breadcrumbs - 1/2 cup all-purpose flour - 2 large eggs - 1 teaspoon garlic powder - 1 teaspoon paprika - Salt and pepper to taste - 1 tablespoon lime juice - Cooking oil (for frying) These ingredients create a tasty crust and juicy chicken. The coconut gives it a tropical twist. Panko breadcrumbs add a light crunch. The garlic and paprika add nice flavor. You can enhance the dish with: - Fresh cilantro for garnish - Chili powder for heat - A splash of coconut milk for moisture - Mango salsa for a sweet touch These extras make the dish even better. They add fresh tastes and colors to your plate. You will need a few tools: - A meat mallet or rolling pin - Three shallow bowls for breading - A large skillet for frying - A baking sheet for the oven - A spatula to flip the chicken Having the right tools helps you cook with ease. It makes the process smooth and fun. {{ingredient_image_1}} Start by preheating your oven to 375°F (190°C). Take two boneless, skinless chicken breasts. Place them between two sheets of plastic wrap. Use a meat mallet to gently pound the chicken. Aim for an even thickness of about 1/2 inch. This step helps the chicken cook evenly. Next, set up your breading station. Grab three shallow bowls. In the first bowl, add 1/2 cup of all-purpose flour. In the second bowl, beat two large eggs with 1 tablespoon of lime juice. In the third bowl, mix 1 cup of shredded coconut, 1 cup of panko breadcrumbs, 1 teaspoon of garlic powder, 1 teaspoon of paprika, salt, and pepper. This station makes the breading process neat and easy. Now, it's time to bread the chicken. Dip each chicken breast into the flour first. Shake off any extra flour. Next, coat the chicken in the egg mixture, letting the excess drip off. Finally, press the chicken into the coconut-panko mixture. Make sure to coat it evenly for the best crunch. Heat a large skillet over medium heat. Add a layer of cooking oil to the skillet. Once the oil is hot, place the breaded chicken in the skillet. Cook for about 4-5 minutes on each side. You want them to be golden brown and cooked through. After frying, transfer the chicken to a baking sheet. Bake in the preheated oven for 10 minutes. This step ensures the chicken is crispy and fully cooked. To get that satisfying crunch, focus on the breading. Use fresh, dry panko breadcrumbs. They give a light, airy feel. Make sure to press the chicken into the coconut mixture firmly. This helps it stick well. Fry the chicken on medium heat. Too high a heat burns the outside before the inside cooks. Lastly, finish in the oven. This step makes it extra crispy. One mistake is not pounding the chicken. It should be even for best cooking. Another error is rushing the breading. Each layer should coat fully. Don't skip the resting time after frying. This allows the juices to settle. Finally, be careful with the oil. Too little oil can lead to soggy chicken. Coconut crusted chicken pairs well with many sauces. A sweet chili sauce adds a nice kick. A classic ranch dressing is always a favorite. For a tropical twist, try a mango salsa. You can also serve it with a lime yogurt dip. Each sauce enhances the chicken’s flavor. Pro Tips Keep It Even: Ensure chicken breasts are pounded to an even thickness for uniform cooking. Use Unsweetened Coconut: Opt for unsweetened shredded coconut to avoid excess sugar and enhance the savory flavor. Rest Before Serving: Allow the chicken to rest for a few minutes after cooking to retain its juices and flavor. Experiment with Dips: Pair the chicken with various dipping sauces like sweet chili, mango salsa, or a spicy aioli for a flavor boost. {{image_2}} You can change up the flavor of your coconut crusted chicken. Instead of garlic powder, try onion powder or cayenne for heat. For a hint of sweetness, add brown sugar to the coconut mixture. You can also use fresh herbs like cilantro or parsley for a bright taste. Experiment with spices like curry powder or cumin for a unique twist. You have two great options for cooking your chicken. Pan-frying gives a crispy, golden crust. Use enough oil to cover the pan. Cook each side for about 4-5 minutes. Baking is a healthier choice. Preheat the oven to 375°F. After frying, bake for 10 minutes to finish cooking. Both methods yield delicious results. Pair your coconut crusted chicken with tasty sides. A fresh mango salsa adds sweetness and crunch. For a salad, try a simple mixed greens salad with lime vinaigrette. You can also serve rice or quinoa for a filling meal. Add roasted vegetables for color and flavor. These sides complement the chicken well. After enjoying your coconut crusted chicken, let it cool. Place the leftovers in an airtight container. Store it in the fridge for up to three days. This keeps the chicken fresh and tasty for your next meal. To reheat, place the chicken in a skillet over medium heat. Cook for about 3-4 minutes on each side until hot. You can also use an oven. Preheat it to 350°F (175°C). Bake the chicken for about 10 minutes. This method helps keep the crust crispy. If you want to keep the chicken longer, freezing works well. Wrap each piece tightly in plastic wrap. Then, place them in a freezer bag. Label the bag with the date. You can freeze the chicken for up to three months. To thaw, place it in the fridge overnight before reheating. To make Coconut Crusted Chicken gluten-free, swap the all-purpose flour and panko breadcrumbs. Use gluten-free flour and gluten-free breadcrumbs instead. These options work well and provide the right texture. Be sure to check labels for hidden gluten. This way, anyone can enjoy this dish. Yes, you can use chicken thighs for this recipe. Thighs have more fat, which makes them juicy. They also stay moist during cooking. Just make sure to adjust the cooking time. Thighs may need a few extra minutes. If you don’t have panko, try regular breadcrumbs or crushed cornflakes. Both options provide a nice crunch. You can also use crushed nuts, like almonds or cashews, for a different flavor. Just ensure that the substitute is dry enough to coat the chicken well. You now have all the steps to make great coconut crusted chicken. Remember the key ingredients and equipment needed. Prepare your chicken well and set up a proper breading station for best results. Avoid common mistakes to achieve the perfect crunch. Don't forget to explore variations and tasty dips. Store leftovers properly and use the right reheating methods. With these tips, you can enjoy this dish anytime. It's easy to customize, so have fun with it!

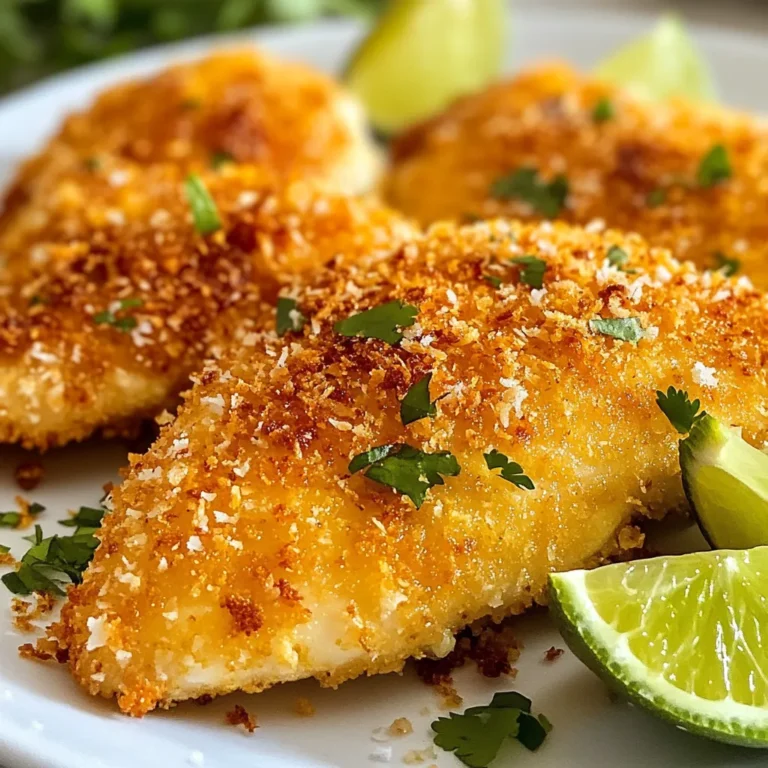
Coconut Crusted Chicken Simple and Delightful Dish

- Chicken and dairy components - 2 boneless, skinless chicken breasts - 1 cup fresh mozzarella cheese, sliced - 1 cup heavy cream - 1/2 cup chicken broth - Seasoning and aromatics - 2 tablespoons olive oil - 2 cloves garlic, minced - Salt and pepper to taste - Optional ingredients for added flavor - 1/2 teaspoon red pepper flakes (for heat) - 1/4 cup fresh basil leaves, chopped - Fresh basil sprigs for garnish (optional) Each ingredient plays a key role in making the dish shine. The chicken gives you a juicy base. The heavy cream adds richness and depth. Fresh mozzarella melts beautifully atop the chicken, making it gooey and delicious. Garlic and basil bring fresh, vibrant flavors that elevate the dish. Don't skip the red pepper flakes if you enjoy a little kick! {{ingredient_image_1}} First, season the chicken breasts. Use salt and pepper on both sides. This simple step adds great flavor. Next, heat two tablespoons of olive oil in a large skillet. Cook the chicken over medium-high heat for about 6-7 minutes on each side. Look for a nice golden brown color. The chicken should be cooked through. Once done, remove it from the skillet and set it aside. This keeps the chicken juicy and tender. Now, let's make the cream sauce. Start by lowering the heat to medium. Add two cloves of minced garlic to the same skillet. Sauté the garlic for about one minute. You want it fragrant but not burnt. Next, pour in half a cup of chicken broth. Scrape up any bits stuck to the bottom. This adds extra flavor to the sauce. After that, add one cup of heavy cream and red pepper flakes if you like heat. Stir everything to combine. Bring it to a gentle simmer. It's time for the delicious finishing touches. Stir in a quarter cup of chopped fresh basil. Season the sauce with salt and pepper to taste. This adds freshness and brightness. Now, return the cooked chicken to the skillet. Place slices of fresh mozzarella cheese on top of each chicken breast. Cover the skillet with a lid. Cook for about 3-4 minutes. The cheese should melt and become bubbly. To serve, carefully take the chicken out of the skillet. Spoon the creamy basil sauce over the chicken. For presentation, use a warm plate. Drizzle extra sauce around the chicken and garnish with fresh basil sprigs. This makes your dish not only tasty but also beautiful. - Recommended cooking temperature: Cook chicken breasts to an internal temperature of 165°F. This ensures they are safe to eat and juicy. Use a meat thermometer for accuracy. - Signs of doneness for chicken breasts: Look for a golden-brown color on both sides. The juices should run clear when you cut into the chicken. If you see pink, keep cooking. - Alternative herbs or spices to consider: You can try thyme, oregano, or parsley for a different flavor. Each herb brings a unique twist to the sauce. - Adjusting creaminess to taste: If you want a richer sauce, add more heavy cream. For a lighter version, use half-and-half or reduce the amount of cream. - Best side dishes to accompany the dish: Serve your Mozzarella Chicken with garlic bread or a light salad. Steamed vegetables also make a great side. - Wine pairings for a gourmet experience: Pair this dish with a crisp white wine, like Chardonnay or Sauvignon Blanc. The wine's acidity complements the creamy sauce well. Pro Tips Chicken Tenderness: To ensure juicy chicken, let it rest for a few minutes after cooking before slicing. Cheese Melting: Use a lid to trap steam when melting the mozzarella for an evenly gooey texture. Fresh Basil Flavor: Add fresh basil at the end of cooking for maximum flavor, as heat can diminish its taste. Sauce Consistency: If the sauce is too thick, thin it with a bit more chicken broth or cream to reach your desired consistency. {{image_2}} You can change the cheese for different tastes. Provolone adds a sharp kick. Gouda brings a smoky flavor. Both work well in the basil cream sauce. If you want to switch proteins, try pork or turkey. They will soak up the sauce nicely, offering new flavors to enjoy. For a gluten-free dish, double-check your chicken broth. Make sure it is gluten-free. You can also make this dish dairy-free. Use coconut cream instead of heavy cream. For a vegetarian option, swap the chicken for eggplant or tofu. Both absorb flavors well and add substance. You can use a slow cooker for this dish. Just place seasoned chicken in the cooker. Add the sauce ingredients and cook on low for 6 hours. The chicken becomes tender and flavorful. If you need a quicker option, try an Instant Pot. Cook the chicken and sauce for about 10 minutes under high pressure. This method saves time while keeping the dish delicious. To keep your Mozzarella Chicken tasty, use airtight containers. Glass or plastic containers work well. Make sure the chicken is cool before sealing. Store it in the fridge for up to three days. If you want to keep it longer, freeze it. In the freezer, it stays good for about two months. When reheating, make sure to use low heat. You can use a skillet or microwave. If using a skillet, add a splash of chicken broth to keep it moist. Heat until warmed through, but don’t overcook. For the microwave, cover the dish to trap steam. This helps keep the chicken juicy and the cheese melted. Enjoy your meal again without losing flavor! Yes, you can prepare this dish ahead of time. Cook the chicken and make the cream sauce. Let them cool, then store them in separate containers. Keep them in the fridge for up to two days. When you're ready to eat, just reheat the chicken and sauce together. This method keeps the flavors fresh. If you don’t have fresh basil, try using dried basil. Use about one teaspoon of dried basil for every tablespoon of fresh. You can also use other herbs like parsley or oregano for a different taste. These herbs won’t taste the same, but they’ll still add flavor. To add some heat, sprinkle in red pepper flakes while making the sauce. You can also add diced jalapeños for a fresh kick. If you want a smoky flavor, try adding a dash of smoked paprika. Adjust the spice level to your liking for the perfect dish. This blog covered how to make a tasty chicken dish with a creamy sauce. I explained the key ingredients and shared step-by-step cooking methods. I also included tips to boost flavor and suggestions for nice pairings. Remember, you can swap ingredients to suit your taste or diet. Proper storage and reheating will keep your leftovers fresh. Enjoy trying this dish and making it your own! Cooking can be fun, and I hope you feel inspired to experiment!

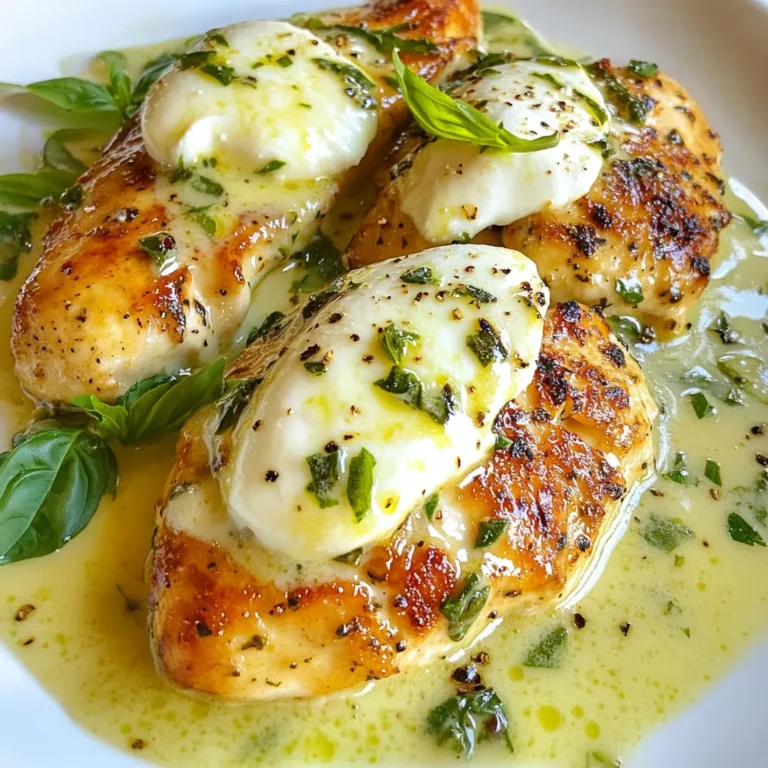
Mozzarella Chicken in Basil Cream Sauce Delight

To make this dish, you need simple yet fresh ingredients. Here’s what you’ll need: - 250g pasta (your choice: spaghetti, penne, or fusilli) - 1 cup fresh basil leaves - 1/3 cup pine nuts (toasted) - 1/3 cup grated Parmesan cheese - 1/2 cup heavy cream - 2 tablespoons olive oil - 2 cloves garlic, minced - Salt and pepper to taste These ingredients work together to create a rich, creamy pesto sauce. The pasta serves as a perfect base, while fresh basil gives it a bright flavor. Pine nuts add a nice crunch, and Parmesan brings in a savory note. Adding garnishes can enhance both the taste and the look of your dish. Here are some options: - Cherry tomatoes, halved - Extra basil leaves These garnishes add color and freshness. They make your plate more appealing and add a burst of flavor. To prepare this meal, you will need a few basic tools: - Large pot for boiling pasta - Food processor for making the pesto - Large skillet for mixing everything together - Measuring cups and spoons for accuracy Having these tools will make your cooking smooth and enjoyable. They help you create a delicious meal with ease. {{ingredient_image_1}} Start by boiling water in a large pot. Add a pinch of salt to the water. Once it boils, add 250g of your favorite pasta. I love using penne for this dish. Cook the pasta according to the package instructions until it is al dente. This usually takes about 8 to 10 minutes. Remember to stir the pasta occasionally. When the pasta is ready, save 1/2 cup of the cooking water. Drain the pasta in a colander but don’t rinse it. Rinsing washes away the starch that helps the sauce stick. While the pasta cooks, it’s time to make the pesto. Use a food processor for this. Add 1 cup of fresh basil leaves, 1/3 cup of toasted pine nuts, and 1/3 cup of grated Parmesan cheese. Include 2 cloves of minced garlic and 2 tablespoons of olive oil. Blend this mix until smooth. If the pesto is too thick, add a bit of the reserved pasta water. This gives it a nice creamy texture. In a large skillet, pour in 1/2 cup of heavy cream. Heat it over medium until it gently simmers. Stir in your freshly made pesto. Mix well until it’s fully combined. Add the drained pasta to the skillet and toss everything together. If the sauce seems too thick, just add more of that reserved pasta water. Season your dish with salt and pepper to taste. Cook for another 2 to 3 minutes. This allows all the flavors to come together. Serve it hot, garnished with halved cherry tomatoes and fresh basil leaves. Enjoy your delicious meal! To get that rich, creamy texture, start with heavy cream. It blends well with pesto, giving your pasta a smooth feel. Heat the cream gently in your skillet. This helps the sauce mix well without burning. If your sauce is thick, add a bit of the reserved pasta water. This makes it silky and easy to coat your pasta. Keep your prep quick by using a food processor for the pesto. It saves a lot of time. You can also use pre-toasted pine nuts if you find them. Another tip is to cook the pasta while making the sauce. This way, everything is ready at once. Have your ingredients measured out before cooking. This keeps you organized and fast. To boost flavor, try adding a squeeze of lemon juice to your pesto. It brightens the dish and adds freshness. You can also mix in some crushed red pepper for a little heat. For more depth, consider adding sautéed mushrooms or spinach to the pasta. Don't forget to taste and adjust the salt and pepper. This final touch makes a big difference! Pro Tips Use Fresh Ingredients: Always opt for fresh basil and high-quality Parmesan cheese for the best flavor in your pesto. Adjust Creaminess: If you prefer a lighter sauce, feel free to use half-and-half or a combination of cream and vegetable broth. Perfect Pasta Cooking: Make sure to salt your pasta water generously; it should taste like the sea for optimal flavor. Garnish Smartly: Add a squeeze of lemon juice or a sprinkle of red pepper flakes before serving for an extra flavor boost. {{image_2}} You can easily make this dish vegetarian by skipping the Parmesan cheese. Instead, use nutritional yeast for a cheesy flavor. If you want a vegan option, swap the heavy cream with coconut cream or a plant-based cream. Both choices keep the dish creamy while fitting your diet. Adding a bit of lemon juice can also brighten the flavors. If you need gluten-free pasta, there are many great options. Try rice pasta or chickpea pasta. Both types cook well and taste great with the creamy pesto sauce. Follow the package instructions for the best results. Just remember to reserve some pasta water for the sauce. Feel free to mix things up with your ingredients! Instead of basil, try spinach or arugula for a different taste. You can also switch pine nuts with walnuts or almonds for a unique twist. For a spicy kick, add red pepper flakes into the pesto. Experimenting with these swaps can lead to new flavors you’ll love! To keep your leftover creamy pesto pasta fresh, place it in an airtight container. Make sure the pasta cools down to room temperature first. This helps prevent moisture buildup. Store the container in the fridge. It will last for about three to four days. Always check for any signs of spoilage before eating. When you're ready to enjoy your leftover pasta, reheating it properly is key. I recommend using a skillet over medium heat. Add a splash of water or a bit of olive oil to keep it moist. Stir gently until it heats through. This method helps maintain the creamy texture. You can also microwave it, but cover it with a damp paper towel. This keeps moisture in and avoids drying out the pasta. If you want to save your creamy pesto pasta for later, freezing is a great option. First, let the pasta cool completely. Then, scoop it into a freezer-safe container or bag. Remove as much air as possible to prevent freezer burn. Label the container with the date. It’s best used within two to three months for optimal flavor. When you’re ready to eat, thaw it in the fridge overnight before reheating. Yes, you can! Pine nuts add a nice crunch. If you skip them, try using walnuts or sunflower seeds. They give a different taste, but they work well. Just blend them in your food processor as you would with pine nuts. You still get a creamy and tasty pesto! Absolutely! If you want a lighter option, use half-and-half or whole milk. For a vegan choice, try coconut cream or cashew cream. These swaps still give a creamy texture without heavy cream. Just remember to adjust the amount to keep the sauce thick. Leftover creamy pesto pasta can last for about 3 to 4 days in the fridge. Be sure to store it in an airtight container. When you're ready to eat, reheat it gently on the stove or in the microwave. Add a splash of water or extra cream to keep it moist. Enjoy your tasty leftovers! You can create a delicious Minute Creamy Pesto Pasta with simple ingredients and easy steps. We explored essential ingredients, cooking techniques, and quick tips to enhance flavors. Don't forget the variations for dietary needs and smart storage methods. Now, get in the kitchen and make this dish your own! Enjoy the rich taste and creamy texture. You'll impress everyone with your cooking skills. Happy cooking!

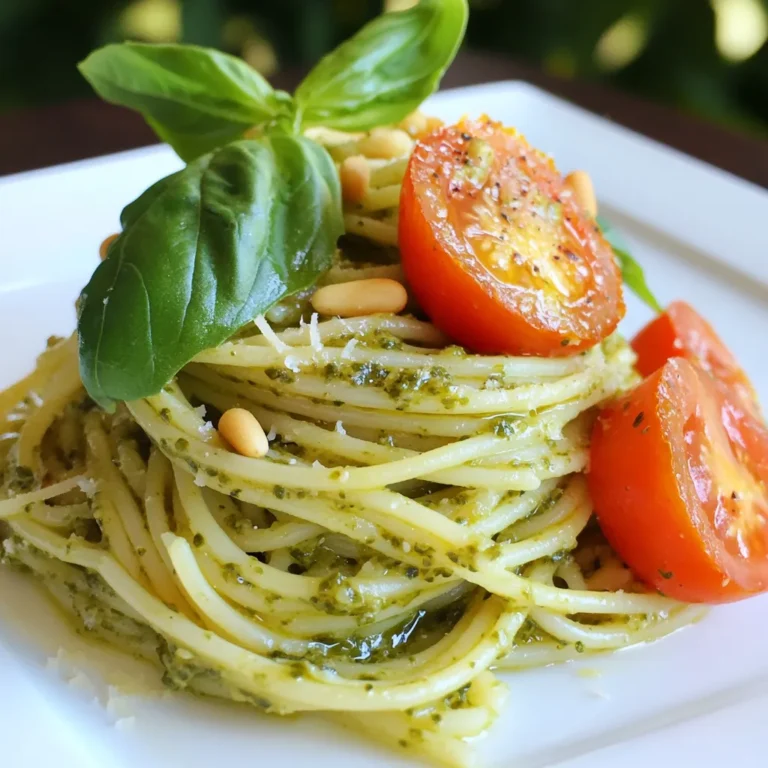
Minute Creamy Pesto Pasta Quick and Tasty Recipe

- 4 boneless, skinless chicken breasts - 1 cup grated Parmesan cheese - 1 cup breadcrumbs - 3 cloves garlic, minced - 1/2 cup fresh basil leaves, finely chopped - 1/2 teaspoon salt - 1/2 teaspoon black pepper - 1/2 teaspoon paprika - 2 large eggs - 2 tablespoons olive oil - Fresh basil leaves for garnish I love using fresh ingredients in this recipe. The chicken breasts are the perfect protein. Grated Parmesan cheese adds a creamy, salty flavor. Breadcrumbs give the chicken a nice crunch. Fresh basil brings a bright taste that makes every bite special. Garlic adds depth and warmth to the dish. For seasoning, I use salt, pepper, and paprika. These spices enhance the flavor without overpowering it. They help create a perfect balance in each bite. The eggs help the breadcrumbs stick to the chicken. Olive oil adds richness and helps the chicken brown nicely. For garnish, I recommend using fresh basil leaves. They not only look great but also boost the flavor. This combination of ingredients makes Parmesan Basil Chicken both savory and easy to prepare. Each item plays a role in creating a dish that is sure to impress. {{ingredient_image_1}} 1. Preheating the oven Start by turning your oven to 375°F (190°C). This step is key for even cooking. 2. Mixing dry ingredients In a bowl, add 1 cup of grated Parmesan cheese, 1 cup of breadcrumbs, 1/2 cup of finely chopped fresh basil, 3 cloves of minced garlic, 1/2 teaspoon of salt, 1/2 teaspoon of black pepper, and 1/2 teaspoon of paprika. Mix these ingredients well. 1. Egg mixture preparation In another bowl, whisk 2 large eggs until they are smooth and well combined. This mixture helps the breadcrumbs stick. 2. Coat chicken with breadcrumb mixture Take each boneless, skinless chicken breast and dip it into the egg mixture. Let the extra egg drip off. Then, coat the chicken with the breadcrumb mixture, pressing gently to make sure it sticks well. 1. Searing the chicken Heat 2 tablespoons of olive oil in a large oven-proof skillet over medium heat. Once hot, add the coated chicken breasts. Sear them for about 3-4 minutes on each side until they turn golden brown. 2. Baking instructions After searing, transfer the skillet to your preheated oven. Bake for about 20-25 minutes. Make sure the chicken reaches an internal temperature of 165°F (75°C). This ensures it is fully cooked and safe to eat. To ensure an even coating on chicken, you need to be careful. First, dip the chicken in the egg mixture. Let the extra egg drip off. Then, press the chicken into the Parmesan breadcrumb mix. This helps the crumbs stick well. For golden-brown chicken, heat your skillet before adding the chicken. Use medium heat and add olive oil. Sear each side for about 3-4 minutes. This creates a nice crust. For presentation ideas, serve the chicken on a bed of sautéed spinach. It adds color and flavor. You can also use a bright arugula salad. Drizzle balsamic reduction on top for a fancy touch. Pair this dish with simple sides. Roasted veggies or a light salad work well. You can also serve it with pasta for a heartier meal. If your chicken is overcooked, don’t worry. Slice it thinly and serve it with a sauce. A creamy sauce can add moisture and flavor. For uneven coating, try a different method. Use one hand for the wet mix and the other for the dry. This keeps things clean and helps with even coverage. If crumbs fall off, press them back on before cooking. Pro Tips Perfectly Coat: Make sure to press the breadcrumb mixture onto the chicken firmly to ensure a thick, even coating that stays in place during cooking. Resting Time: Allow the chicken to rest for 5 minutes after baking; this helps retain juices and enhances flavor. Herb Variations: Feel free to mix in other herbs like parsley or oregano for different flavor profiles and freshness. Make Ahead: Prep the chicken and breadcrumb mixture in advance, then store in the fridge for a quick dinner option on busy nights. {{image_2}} If you need gluten-free options, use crushed rice cakes or almond flour instead of breadcrumbs. These work well to create that crispy texture. For a dairy-free choice, try nutritional yeast or a plant-based cheese. Both options can give you a savory taste without dairy. You can add sun-dried tomatoes for a rich, tangy flavor. They pair great with the chicken and basil. Mozzarella can also enhance the dish. Just sprinkle it on top before baking for a cheesy finish. If you like spice, consider adding red pepper flakes or cayenne pepper. This will give the dish a nice kick. Air frying is a great option for a crispy outside with less oil. Set your air fryer to 375°F and cook the chicken for about 15-20 minutes, flipping halfway. For grilling, preheat the grill to medium heat. Cook the chicken for about 6-7 minutes on each side. This gives it a nice smoky flavor and great grill marks. Store leftovers in an airtight container. This keeps the chicken fresh and moist. I recommend glass containers or BPA-free plastic ones. These are great for quick access and easy reheating. Make sure to let the chicken cool before sealing it. This prevents condensation, which can make the chicken soggy. To freeze, wrap each piece of chicken tightly in plastic wrap. Then place them in a freezer bag. This helps avoid freezer burn. When you want to eat it, thaw the chicken in the fridge overnight. For reheating, bake it at 350°F (175°C) for about 20 minutes. You can also microwave it on a low setting until warm. In the fridge, Parmesan Basil Chicken lasts about 3 to 4 days. If you freeze it, aim to eat it within 2 to 3 months. This keeps the flavor and texture at their best. Always check for signs of spoilage, like off smells or changes in color, before eating. You can make Parmesan Basil Chicken healthier by using a few simple tips. First, swap regular breadcrumbs for whole wheat or almond flour. This change reduces empty carbs. Next, use less oil during cooking. A light spray of cooking oil can help cut fat. Choose skinless chicken breasts to avoid extra fat. Lastly, serve with a side of veggies. This adds nutrients without many calories. Yes, you can use chicken thighs instead of breasts. Thighs are juicier and can add more flavor. When using thighs, cook them for about 25-30 minutes. Make sure they reach 165°F (75°C). This ensures they are safe to eat. Adjust the cooking time since thighs may take longer than breasts. Several side dishes pair well with Parmesan Basil Chicken. Here are some popular options: - Sautéed spinach - Garlic mashed potatoes - Roasted vegetables - A fresh arugula salad - Quinoa or brown rice These options add color and nutrition to your meal. This blog post covered all you need for Parmesan Basil Chicken. You learned about key ingredients, from chicken to seasonings, and how to coat and cook it. I shared tips for a perfect finish and ideas for variations. I hope these tips help you create a delicious meal at home. Enjoy your cooking, and don't hesitate to experiment with flavors and methods. Your kitchen adventures will be exciting and tasty!

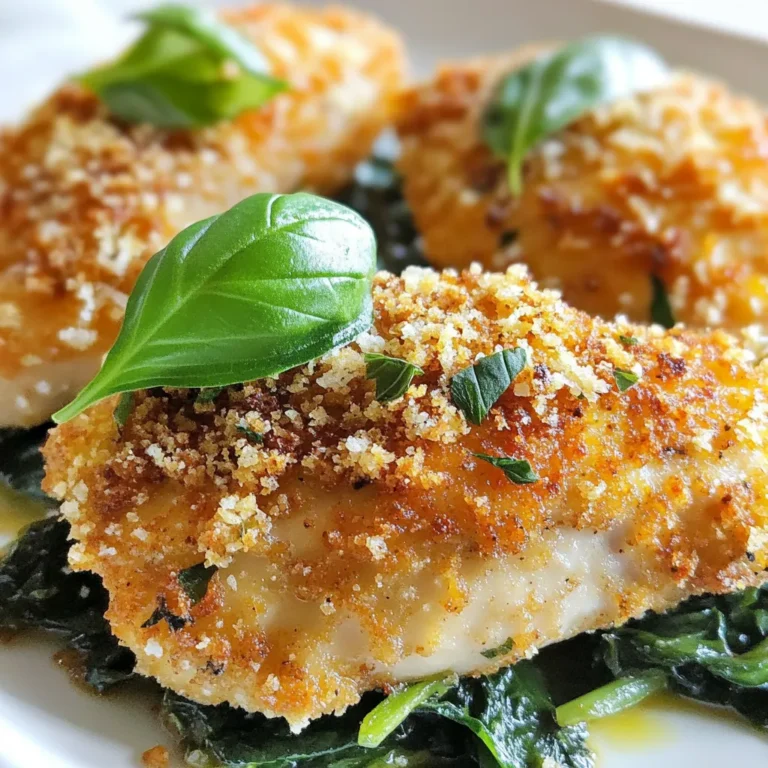
Parmesan Basil Chicken Savory and Simple Recipe

To make Crockpot Chicken Tortellini, you'll need the following items: - 2 boneless, skinless chicken breasts - 3 cups low-sodium chicken broth - 1 medium onion, diced - 2 cloves garlic, minced - 1 cup carrots, sliced - 1 cup frozen peas - 1 teaspoon Italian seasoning - 1 teaspoon dried basil - 1 cup heavy cream - 9 oz cheese tortellini (fresh or frozen) - Salt and pepper to taste - Fresh parsley, chopped (for garnish) This dish serves 4-6 people. Each serving provides a hearty meal packed with protein and flavor. Here’s a rough estimate of the nutritional values per serving: - Calories: 450 - Protein: 30g - Carbohydrates: 35g - Fat: 22g - Fiber: 4g This meal is satisfying and loaded with nutrients from the chicken, vegetables, and tortellini. You can easily swap some ingredients to fit your taste or diet. Here are a few ideas: - Chicken: Use turkey or tofu for a different protein. - Broth: Vegetable broth works well for a vegetarian option. - Cream: Substitute heavy cream with half-and-half or coconut milk for a lighter version. - Tortellini: You can use any pasta shape if you can’t find tortellini. - Veggies: Add spinach, zucchini, or bell peppers for more variety. Feel free to mix and match based on what you have at home! {{ingredient_image_1}} Start with two boneless, skinless chicken breasts. Place them at the bottom of your crockpot. Season the chicken with salt, pepper, Italian seasoning, and dried basil. This adds great flavor. Next, dice one medium onion and mince two cloves of garlic. Slice one cup of carrots and measure out one cup of frozen peas. Layer the diced onion, minced garlic, sliced carrots, and frozen peas evenly over the chicken. This mix brings color and nutrients to your dish. Now, pour in three cups of low-sodium chicken broth. Make sure it covers most of the chicken and veggies. Cover the crockpot with its lid. Set it on low heat for six hours or high for three hours. This slow cooking makes the chicken tender and tasty. When the chicken is cooked through, it’s time to take it out. Be careful, as it will be hot. Use two forks to shred the chicken into bite-sized pieces. Return the shredded chicken back to the pot. This makes it easier to enjoy in each bite. Next, stir in one cup of heavy cream and nine ounces of cheese tortellini. Cover again and cook on high for an additional 20 to 30 minutes. This step allows the tortellini to become tender. Taste your dish and adjust seasonings as needed. Add more salt or pepper if you like. Serve hot and garnish with fresh chopped parsley. This adds a nice touch and flavor! To shred chicken well, wait until it is cool enough to touch. Take two forks and pull the chicken apart. Use one fork to hold the chicken steady. Use the other to shred. This method works fast and gives you nice, even pieces. You can also use your hands if you prefer. Just be careful not to burn yourself. Shredded chicken blends well with the other ingredients. Taste your dish before serving. You can add more salt or pepper if you like. If you enjoy herbs, add more Italian seasoning or basil. Just make sure to add a little at a time. This way, you won’t overpower the flavors. You can also add some red pepper flakes for heat. It’s all about what you enjoy most. One common mistake is not seasoning the chicken enough. Always season the chicken with salt and pepper. Another mistake is overcooking the tortellini. Keep an eye on them in the last 20 to 30 minutes. If you use frozen tortellini, they may cook faster. Lastly, don’t skip the heavy cream. It adds a rich taste and creamy texture that makes the dish special. Pro Tips Use Homemade Broth: For deeper flavor, consider using homemade chicken broth instead of store-bought. It can enhance the overall taste of the dish. Don’t Overcook the Tortellini: Keep an eye on the cooking time for the tortellini. Overcooking can make them mushy, so check for doneness a few minutes early. Add More Veggies: Feel free to customize this recipe by adding other vegetables like bell peppers or spinach to increase the nutritional value. Store Leftovers Properly: If you have leftovers, store them in an airtight container in the fridge. This dish can last up to 3 days and can be reheated gently on the stovetop. {{image_2}} You can make this dish gluten-free. Use gluten-free tortellini instead of regular. Many brands now offer tasty options. Check your local store or online for choices. Additionally, you can use rice or quinoa in place of tortellini. This keeps the meal gluten-free while still being filling. Want to boost nutrition? Add more veggies! Spinach or kale works well in this dish. Just toss them in during the last 20 minutes of cooking. You can also try bell peppers, zucchini, or mushrooms. They add flavor and color, making your meal more vibrant. Chicken isn't the only option for this recipe. You can swap it for turkey or pork. Use boneless, skinless pieces to keep it simple. If you prefer, try shredded rotisserie chicken. It saves time and adds great flavor. Just mix it in with the other ingredients after shredding. To store leftovers, let the meal cool down first. Then, place it in an airtight container. Make sure to seal it well to keep the flavors fresh. You can keep it in the fridge for up to four days. Label the container with the date so you remember when you made it. If you want to freeze the dish, it’s best to do it before adding the cream and tortellini. Freeze the base in a freezer-safe container for up to three months. When you’re ready to eat, thaw it overnight in the fridge. Then, heat it on the stove and add the cream and tortellini. To reheat leftovers, you have a few options. You can use the microwave for quick warming. Just heat it in short bursts and stir often. For a tastier option, heat it on the stove over medium heat. Add a splash of broth or cream to keep it moist. Stir until it’s hot and ready to serve again! Yes, you can use frozen chicken breasts in this recipe. Just place them in the crockpot without thawing. The cooking time will stay the same. The slow heat will cook them evenly. This makes meal prep easier. You can store leftovers in the fridge for up to four days. Make sure to keep them in an airtight container. If you want to keep them longer, freeze the leftovers. They can last up to three months in the freezer. Crockpot Chicken Tortellini pairs well with a simple salad or garlic bread. You can also serve it with steamed vegetables for added nutrition. For a twist, try a side of roasted asparagus. Enjoy the flavors together for a great meal! In this post, we explored the key ingredients and their nutritional values for your dish. You learned about step-by-step instructions for prep, cooking, and mixing. We shared tips for shredding chicken perfectly and avoiding common mistakes. You discovered ways to adjust the dish with gluten-free options and extra vegetables. Lastly, we covered storage methods and answered your FAQs. By following these ideas, you can create a tasty meal with ease. Enjoy cooking!

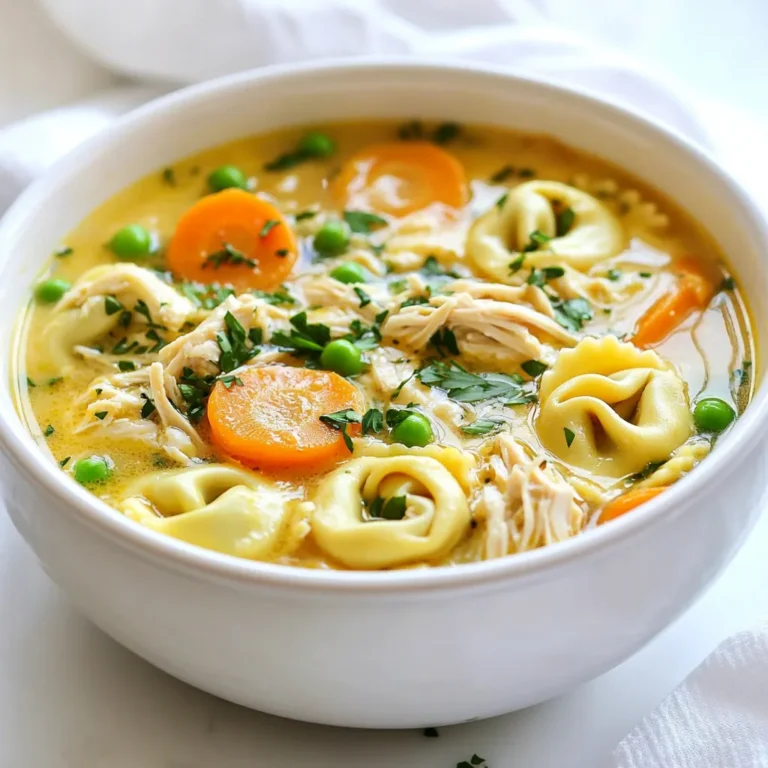
Crockpot Chicken Tortellini Delightful and Easy Meal

You need 1 pound of ground turkey. This lean meat cooks fast and takes on flavors well. It gives you a protein boost while keeping the dish light. Ground turkey is easy to find in stores. For the veggies, gather: - 1 red bell pepper, sliced - 1 cup broccoli florets - 1 carrot, peeled and sliced into thin rounds - 3 green onions, chopped - 3 cloves garlic, minced - 1 inch piece of ginger, grated These vegetables add color and crunch. The bell pepper brings sweetness, while broccoli adds a nice texture. Carrots give a slight earthiness. Green onions and garlic pack a punch of flavor, and ginger adds warmth. For the sauce, you will need: - 1/4 cup low-sodium soy sauce - 2 tablespoons honey - 1 tablespoon rice vinegar - 1 teaspoon sesame oil - Salt and pepper to taste This combination makes a tasty teriyaki sauce. Low-sodium soy sauce keeps it healthier. Honey adds sweetness, while rice vinegar gives a tangy kick. Sesame oil adds depth and rounds out the taste. Adjust salt and pepper to fit your taste. Serve your stir fry hot over cooked rice or quinoa. Garnish with sesame seeds and more green onions for a finishing touch. This meal is quick, tasty, and good for you! {{ingredient_image_1}} First, grab a small bowl. In this bowl, mix together these ingredients: - 1/4 cup low-sodium soy sauce - 2 tablespoons honey - 1 tablespoon rice vinegar - 1 teaspoon sesame oil Stir them well until they blend nicely. Set the sauce aside for later. Now, take a large skillet or wok and heat 2 tablespoons of vegetable oil over medium-high heat. Once the oil is hot, add 1 pound of ground turkey. Use a spatula to break it apart. Cook for about 5 to 7 minutes. You want it to turn brown and cook through. Season it with a pinch of salt and pepper. Next, add 3 cloves of minced garlic and 1 inch of grated ginger. Stir these in for about a minute until you can smell the great aroma. Time to add some crunch! Toss in the sliced red bell pepper, 1 cup of broccoli florets, and the sliced carrot. Stir-fry these for about 3 to 4 minutes. You want them to be tender but still crisp. Now, pour in the teriyaki sauce you made earlier. Toss everything to coat the turkey and vegetables. Cook for an extra 2 minutes. This step helps the sauce become thicker. Just before serving, stir in the chopped green onions. Reserve some for garnish. Serve your stir fry hot over cooked rice or quinoa. Top it with sesame seeds and extra green onions for a nice touch. Enjoy! Cooking ground turkey takes just a few simple steps. First, use a large skillet or wok. Heat it over medium-high heat with vegetable oil. Once hot, add the ground turkey. Break it apart with a spatula for even cooking. Brown it for about 5-7 minutes. This method gives you a nice texture. Stir constantly to prevent burning. To boost flavor, add minced garlic and grated ginger right after the turkey. Cook these for about one minute. This step releases their aroma and makes the dish pop. For extra richness, drizzle sesame oil at the end. It adds a nutty taste that pairs well with teriyaki sauce. Feel free to swap the ground turkey for other meats. Chicken or beef work great too. For a vegan option, use tofu or tempeh. If you want different veggies, try snap peas or bell peppers. You can also adjust the sauce. Use maple syrup instead of honey for a vegan twist. Always taste and tweak for your preference. Pro Tips Use Fresh Ingredients: Fresh vegetables and high-quality ground turkey enhance the flavor and texture of your stir fry. Customize Your Veggies: Feel free to substitute or add other vegetables like snap peas, zucchini, or baby corn based on your preference. Adjust Sweetness: Modify the amount of honey in the sauce to suit your taste; you can add more for a sweeter teriyaki flavor. Meal Prep Friendly: This stir fry can be cooked in advance and stored in the refrigerator for up to three days, making it perfect for meal prep. {{image_2}} You can switch the ground turkey for other meats. Chicken or pork works well. If you prefer a plant-based dish, try using tofu or tempeh. These options provide different flavors and textures while keeping the dish healthy. Feel free to mix and match your veggies. Snap peas, zucchini, or mushrooms add variety. You can also use frozen mixed vegetables if you're short on time. Just remember to adjust cooking time for each type of vegetable. While teriyaki sauce is delicious, you can explore other flavors. Try sweet and sour sauce for a tangy twist. If you like spice, add some sriracha or chili garlic sauce. You can even make a peanut sauce for a creamy, nutty flavor. After cooking your ground turkey teriyaki stir fry, let it cool. Store it in an airtight container. It will stay fresh in the fridge for up to three days. Make sure it cools to room temperature before sealing it. This helps prevent moisture buildup. You can freeze leftovers for future meals. Place the stir fry in a freezer-safe container. It will keep well in the freezer for up to three months. To avoid freezer burn, wrap it tightly in plastic wrap before sealing it. Label the container with the date to track freshness. When you're ready to eat, thaw the stir fry in the fridge overnight. Reheat it in a skillet over medium heat. Stir it often to warm evenly. You can also use the microwave. Heat in short bursts, stirring in between, until hot. Always check the internal temperature reaches 165°F for safety. Enjoy your meal! It takes about 5 to 7 minutes to cook ground turkey. Start by heating your skillet over medium-high heat. Once hot, add the ground turkey. Break it apart with a spatula as it cooks. You want it to be browned and fully cooked. Make sure to check for any pink color. This ensures it is safe to eat. Yes, you can use frozen vegetables in this dish. Frozen veggies are quick and easy. They save time and still taste great. Just add them directly to the skillet when you add the fresh vegetables. Cook them a bit longer, about 5 to 7 minutes. This helps them warm through and blend well with the turkey. I recommend serving this stir fry over cooked rice or quinoa. Both options soak up the sauce well. You can also serve it with noodles for a fun twist. Add a side of steamed veggies or a fresh salad. This will balance the meal and add more color to your plate. This blog post covered how to create a tasty ground turkey stir fry. We explored essential ingredients like vegetables and sauce. I gave you step-by-step instructions for each cooking stage. Plus, I shared tips to boost flavor and suggested variations for customization. In summary, you can make this dish your own while enjoying how easy it is. Grab the ingredients, follow the steps, and create a wonderful meal. Enjoy your cooking adventure!

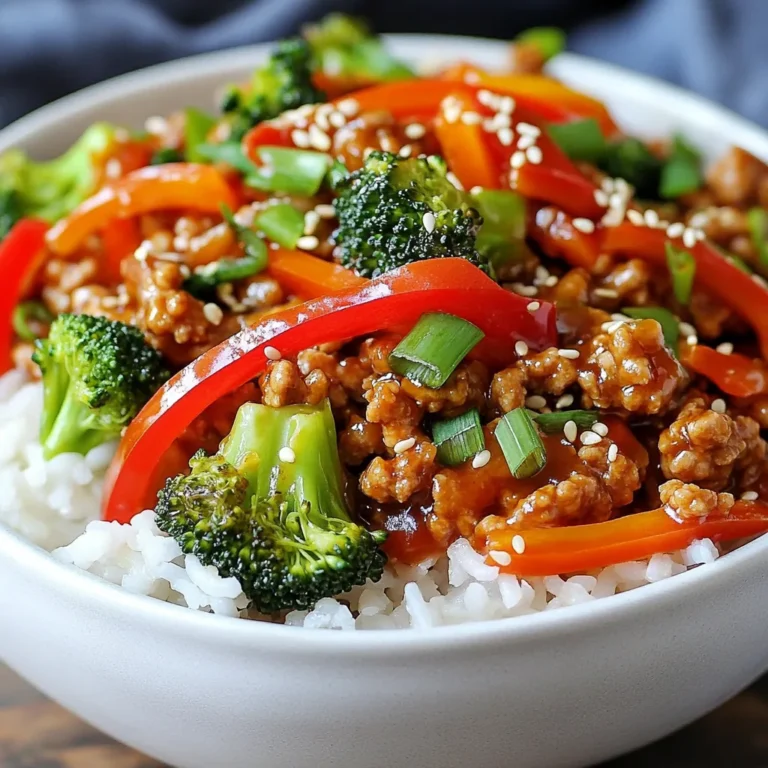
Ground Turkey Teriyaki Stir Fry Quick and Simple Meal

- 4 chicken thighs, bone-in and skin-on - 4 chicken drumsticks - 2 tablespoons olive oil - 1 large onion, sliced - 4 cloves garlic, minced - 1 red bell pepper, sliced - 1 green bell pepper, sliced - 1 teaspoon red pepper flakes (adjust for spice level) - 1/2 teaspoon dried oregano - 1/2 cup chicken broth - 1 tablespoon lemon juice - Salt and pepper to taste - Fresh parsley, chopped for garnish In Chicken Scarpariello, the main star is the chicken. I love using chicken thighs and drumsticks for their flavor and juiciness. Bone-in and skin-on pieces keep the dish rich and hearty. Fresh vegetables like onions and bell peppers add sweetness and crunch. Each slice of onion adds a tasty base for the sauce. Garlic is a must in this recipe. Its aroma makes the dish even better. I use both red and green bell peppers to give color and flavor. For spice, I add red pepper flakes, but you can adjust this to your liking. The seasoning matters too. Olive oil helps to sear the chicken and adds depth. Chicken broth keeps things moist and tasty. A splash of lemon juice brightens the flavors. Salt and pepper bring it all together. Finally, I like to top it with fresh parsley for a pop of color and freshness. This dish is all about layers of flavor. Each ingredient plays a role, making Chicken Scarpariello a delight to eat. {{ingredient_image_1}} Start with the chicken. I use 4 chicken thighs and 4 drumsticks. Make sure they are bone-in and skin-on for the best flavor. Season them with salt, pepper, and 1/2 teaspoon of dried oregano. Let the chicken sit for a few minutes. This helps the flavors soak in. When choosing chicken, look for meat that feels firm and has a fresh smell. Avoid any chicken that looks or smells off. Next, heat 2 tablespoons of olive oil in a large skillet over medium-high heat. Once the oil is hot, add the chicken pieces skin-side down. Let them cook for 5-7 minutes until they turn golden brown. This step is key. The golden skin adds rich flavor. Afterward, flip the chicken and cook for another 5-7 minutes. This searing process renders the fat, making the chicken juicy and tasty. Now, it’s time for the vegetables. In the same skillet, add 1 large sliced onion, 1 sliced red bell pepper, and 1 sliced green bell pepper. Sauté them for about 5 minutes until they soften. Then, add 4 minced garlic cloves and 1 teaspoon of red pepper flakes for some heat. Cook for another 1-2 minutes. This will fill your kitchen with a wonderful aroma. After the vegetables are ready, it’s time to deglaze the pan. Pour in 1/2 cup of chicken broth and 1 tablespoon of lemon juice. Use a wooden spoon to scrape the bottom of the pan. This lifts the browned bits that add flavor. Return the seared chicken to the skillet. Nestle it into the veggies and liquid. Bring everything to a gentle simmer. Cover and cook for 30-35 minutes until the chicken reaches 165°F (75°C). To make Chicken Scarpariello, frying and simmering are key. Start by searing the chicken in a heavy skillet. Use medium-high heat to get a nice golden brown. This step adds flavor. After that, let the chicken simmer in the sauce. It makes the meat tender and juicy. For utensils, a heavy skillet works best. It holds heat well and cooks evenly. A good spatula helps flip the chicken without breaking it. Use a wooden spoon to stir the veggies and sauce too. Want to spice things up? Try adding more red pepper flakes. You can adjust the amount based on your taste. For a twist, add some smoked paprika. It brings a nice depth to the dish. Fresh herbs also boost flavor. Consider adding thyme or rosemary. A splash of balsamic vinegar can add brightness and depth. Just remember to balance the flavors. Garnishing makes your dish pop. Fresh parsley is perfect for this recipe. Chop it finely and sprinkle it on just before serving. It adds color and freshness. For serving, use a large, flat plate. Arrange the chicken and veggies nicely. Drizzle some sauce on top for a glossy finish. Pair it with crusty bread or rice to soak up the sauce. Enjoy your meal! Pro Tips Choose the Right Chicken: Opt for bone-in, skin-on chicken for maximum flavor and tenderness during cooking. Adjust Spice Level: Feel free to modify the amount of red pepper flakes to suit your spice tolerance; you can also add fresh hot peppers for extra heat. Resting Time: Let the chicken rest for a few minutes after cooking; this helps retain moisture and improves texture. Perfect Garnish: Fresh parsley not only adds a pop of color but also enhances the dish's flavor; consider adding a squeeze of fresh lemon juice before serving for brightness. {{image_2}} You can switch up the cuts of chicken in this dish. Bone-in pieces bring great flavor, but you can use boneless chicken too. Boneless chicken cooks faster. Just be careful not to overcook it. For vegetables, feel free to swap based on what is fresh or in season. Zucchini or mushrooms work well. You can also add spinach for more color and nutrients. Using seasonal veggies makes the dish even better. Chicken Scarpariello pairs nicely with rice or crusty bread. Both soak up the tasty sauce perfectly. You can also serve it with a light salad. A simple arugula salad adds a nice peppery kick. For a fun appetizer, try bruschetta. The fresh tomatoes and basil will complement the flavors. These variations and serving ideas can make your Chicken Scarpariello meal unique and fun! To store leftovers, place Chicken Scarpariello in an airtight container. This keeps it fresh. Make sure to let the dish cool before sealing. Store it in the fridge for up to 3 days. For freezing, let the Chicken Scarpariello cool completely. Then, place it in freezer-safe bags. Remove as much air as you can. It will stay good for up to 3 months. To reheat, thaw it in the fridge overnight. Then, warm it in a skillet over low heat. Stir often to keep it juicy. You can also use a microwave. Heat it in short bursts, stirring in between. Enjoy your tasty meal! Chicken Scarpariello is a tasty dish from Southern Italy. It combines chicken with peppers, onions, and spices. This dish has roots in the Italian-American community. It brings bold flavors and warmth to your table. The name "Scarpariello" means "shoemaker" in Italian, hinting at its humble origins. Cooks made it with simple, local ingredients. Yes, you can use boneless chicken for this dish. Boneless thighs or breasts work well. They will cook faster and still taste great. Just remember to adjust the cooking time. You want the chicken to reach 165°F inside. This way, you ensure it is safe to eat. You can easily change the spice level in Chicken Scarpariello. Use less red pepper flakes for a milder taste. If you like heat, add more flakes. You can also try using fresh hot peppers. Just slice them and add them with the vegetables. Start small and taste as you go. This way, you can find your perfect balance. Chicken Scarpariello pairs well with many sides. Try serving it with crusty bread to soak up the sauce. A light salad with greens and lemon dressing is refreshing. You can also serve it over rice or pasta for a filling meal. For drinks, a chilled white wine complements the dish nicely. In this blog post, we covered the key ingredients for Chicken Scarpariello, including juicy chicken and fresh vegetables. I shared step-by-step instructions for preparing, cooking, and enhancing the dish's flavor. You learned about tips for perfect cooking techniques and ways to store leftovers. Remember, experimenting with chicken cuts or spices can lead to new flavors. Whether you use boneless chicken or swap out veggies, enjoy creating this flavorful dish. With the right techniques, you can impress everyone at your table. Happy cooking!

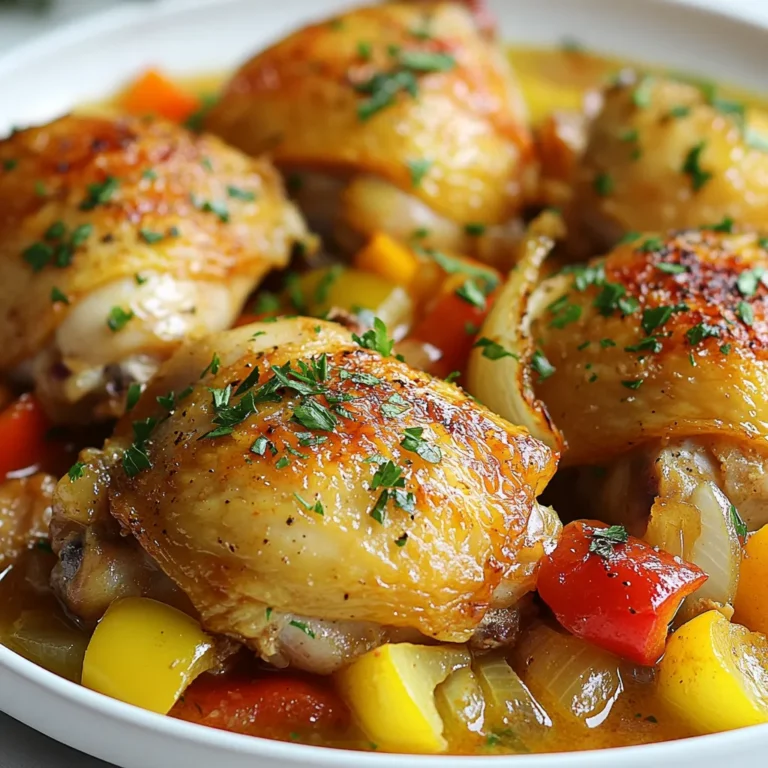
Chicken Scarpariello Flavorful and Hearty Recipe

To make a perfect Italian pastina soup, gather these main ingredients: - 1 cup small pastina pasta - 4 cups vegetable broth - 1 cup diced tomatoes (canned or fresh) - 1 small onion, finely chopped - 2 cloves garlic, minced - 1 medium carrot, diced - 1 celery stalk, diced - 1 cup fresh spinach, roughly chopped - 1 teaspoon dried basil - 1 teaspoon dried oregano - Salt and pepper to taste - 2 tablespoons olive oil - Grated Parmesan cheese for serving - Fresh basil leaves for garnish These ingredients come together to create warmth and comfort. The small pastina pasta adds a delightful texture. The broth serves as a flavorful base. Fresh veggies bring color and nutrients. You can enhance the flavor of your soup with these optional ingredients: - A pinch of red pepper flakes for heat - A squeeze of lemon juice for brightness - Chopped parsley for freshness - Bay leaves for depth These additions can elevate your dish. A little heat can make the soup exciting. Fresh herbs can add a burst of flavor. If you have dietary needs, here are some substitutions: - Use gluten-free pasta if needed. - Swap vegetable broth for chicken broth for more flavor. - Replace spinach with kale or Swiss chard. - Use nutritional yeast instead of cheese for a vegan option. These swaps keep the soup tasty while fitting your needs. You can enjoy this soup no matter your diet. {{ingredient_image_1}} Start by gathering all your veggies. You need onion, carrot, and celery. Dice them small. Finely chop the onion. This helps it mix well. In a large pot, heat two tablespoons of olive oil over medium heat. Add the chopped onion, carrot, and celery to the pot. Sauté for about 5-7 minutes. You want the veggies to be soft and fragrant. Next, mince two cloves of garlic. Add the garlic to the pot along with one teaspoon each of dried basil and oregano. Cook for another 1-2 minutes. You want the garlic to smell nice but not burn. Now, pour in four cups of vegetable broth. This is the base of your soup. Add one cup of diced tomatoes, either fresh or canned. Bring everything to a gentle simmer. Once it starts simmering, it’s time to add the small pastina pasta. Cook according to the package, usually about 5-7 minutes. You want the pasta to be al dente, which means firm but not hard. After the pasta is cooked, stir in one cup of roughly chopped fresh spinach. It will wilt quickly in the hot soup. Season with salt and pepper to taste. This is where you can adjust the flavor to your liking. Remove the pot from heat. Ladle your soup into bowls. Top each bowl with grated Parmesan cheese and fresh basil leaves. This adds a lovely touch and flavor. Enjoy your warm, cozy Italian pastina soup! To cook pastina perfectly, use plenty of water. Bring it to a boil before adding the pasta. Stir it well to prevent sticking. Follow the time on the package, usually 5-7 minutes. Taste it a minute early to check. It should be tender but still firm. This is called al dente. If you overcook it, it will turn mushy. No one wants that in their soup! Serve your pastina soup hot. Ladle it into bowls and top with grated Parmesan cheese. This adds a nice salty flavor. Fresh basil leaves make a lovely garnish. You can also serve it with crusty bread on the side. Dip the bread into the soup for extra flavor. A simple salad pairs well too. It balances the warm soup nicely. Herbs and spices make your soup shine. Dried basil and oregano are great in this recipe. They add depth and warmth. If you want more brightness, try adding fresh herbs. Parsley or thyme works well. You can also add a pinch of red pepper flakes for a kick. Adjust salt and pepper to your taste. A splash of lemon juice at the end adds freshness too. Pro Tips Use Homemade Broth: For a richer flavor, consider making your own vegetable broth. This will enhance the overall taste of the soup. Al Dente Pasta: Be careful not to overcook the pastina. It should be al dente to maintain its texture in the soup. Fresh Herbs: Adding fresh basil at the end of cooking brings a vibrant flavor. You can also experiment with other fresh herbs like parsley or thyme. Customize Your Vegetables: Feel free to add other vegetables such as zucchini or peas to personalize your soup and increase its nutritional value. {{image_2}} You can make your Italian Pastina Soup heartier by adding protein. Cooked chicken works well. Just shred it and stir it in when the soup is almost done. If you prefer beans, use canned or cooked beans like cannellini or chickpeas. They add a nice texture and boost protein. This makes the soup filling and nutritious. For a vegan option, skip the cheese and use vegetable broth. You can also add extra veggies like zucchini or bell peppers. Tofu is another great choice. Cube it and sauté it with the onions and garlic. This adds protein and keeps the meal light. You can change the soup based on what is fresh. In spring, add peas or asparagus. In summer, toss in zucchini or fresh tomatoes. In fall, consider adding butternut squash or kale. Each change brings a new flavor and keeps the soup exciting. Using seasonal vegetables also makes your meal fresh and bright. To store leftover Italian Pastina Soup, let it cool first. Transfer it to an airtight container. You can keep it in the fridge for up to three days. If you want to save it longer, consider freezing it. The soup tastes best when fresh, but it still holds flavor after storage. When ready to eat, reheat the soup on the stove. Pour the soup into a pot and warm over low heat. Stir it often to avoid burning. You can add a splash of broth or water if it seems too thick. This helps restore its creamy texture. If you prefer, use a microwave. Heat it in a microwave-safe bowl for one to two minutes. Stir halfway through to heat evenly. For long-term storage, freeze the soup in portions. Use freezer-safe bags or containers. Leave some space in the container. This allows for expansion as it freezes. Label the container with the date and type of soup. It can last up to three months in the freezer. When you’re ready to use it, thaw the soup in the fridge overnight. Always reheat well before serving for the best taste. Pastina is a tiny type of pasta. It looks like little stars or dots. This pasta is great for soups. It cooks fast and is very soft. Kids love it because it is fun to eat. In this soup, pastina adds a nice texture. Yes, you can use other small pasta shapes. Try orzo, ditalini, or even small shells. Just remember to adjust cooking time. Pasta shapes can change the soup’s feel. Each shape brings its own charm. Italian Pastina Soup lasts about 3 to 4 days in the fridge. Store it in an airtight container. The flavors will blend together over time. This will make the soup even more tasty. No, this soup is not gluten-free. Pastina is made from wheat. However, you can use gluten-free pasta. Just make sure to check the label. This way, everyone can enjoy this cozy soup. Italian Pastina Soup is simple yet full of flavor. We explored key ingredients, from the main ones to tasty options and substitutions. I shared step-by-step instructions for making it easy. You learned tips for cooking pasta perfectly and serving it in style. We discussed heartier variations and how to store leftovers well. In closing, this soup is a warm hug in a bowl, perfect for any time. Enjoy making it your way!

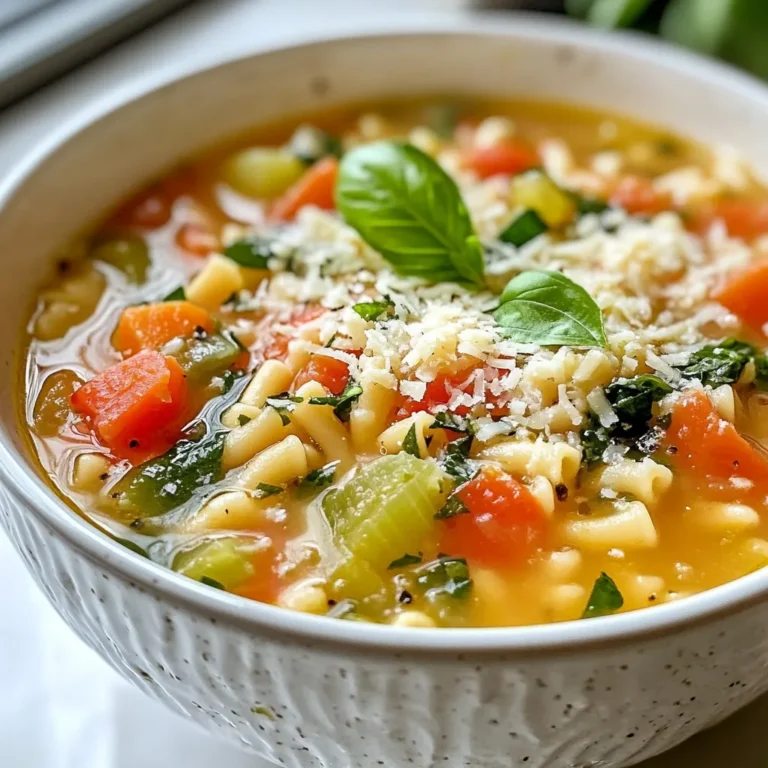
Italian Pastina Soup Comforting and Easy Recipe

- 8 ounces pasta (fusilli or penne work great) - 1 tablespoon olive oil - 3 cloves garlic, minced - 1 can (14 ounces) crushed tomatoes - 1 teaspoon dried oregano - 1 teaspoon sugar (optional) - 1/2 cup heavy cream or coconut cream - 1 teaspoon salt - 1/2 teaspoon black pepper - 1 cup fresh basil leaves, chopped - 1/4 teaspoon red pepper flakes for heat - 1 teaspoon balsamic vinegar for depth - 1/2 cup spinach for added greens - A splash of white wine for flavor - Extra fresh basil leaves - Grated Parmesan cheese - A drizzle of olive oil - Cracked black pepper for a finishing touch {{ingredient_image_1}} To cook the pasta just right, start with a large pot. Fill it with water and add a good amount of salt. Bring the water to a boil. Once boiling, add 8 ounces of your favorite pasta. I like fusilli or penne. Cook the pasta as the package says until it is al dente. This means it should be firm but not hard. Drain the pasta in a colander, but keep 1/2 cup of the pasta water. This water will help later. Now, let’s make the sauce. In a large skillet, pour in 1 tablespoon of olive oil. Heat it over medium heat. Add 3 cloves of minced garlic. Sauté the garlic for about 1-2 minutes. You want it to smell good but not brown. Then, add a 14-ounce can of crushed tomatoes to the skillet. Stir and mix in 1 teaspoon of dried oregano, 1 teaspoon of sugar (if you want), 1 teaspoon of salt, and 1/2 teaspoon of black pepper. Let this simmer for 5-7 minutes. This helps the sauce thicken and develop its flavor. After your sauce thickens, it’s time to add the cream. Lower the heat and pour in 1/2 cup of heavy cream or coconut cream. Stir well until it is all mixed together. Let it simmer for 3-4 minutes. The sauce should be creamy and warm. Now, add the cooked pasta to your skillet with the sauce. Toss everything together, adding some of the reserved pasta water if needed. This helps make the sauce cling to the pasta. Finally, stir in 1 cup of chopped fresh basil. Make sure everything is well-coated. Taste your dish and adjust the seasoning as needed. Enjoy your creamy tomato pasta! To get a smooth and creamy sauce, use heavy cream. You can also use coconut cream for a dairy-free version. Stir the cream in slowly. This helps the sauce blend well. If your sauce is too thick, add a little pasta water. This will thin it out without losing flavor. To boost flavor, add more spices. Try a pinch of red pepper flakes for heat. You can also mix in some fresh herbs like thyme or parsley. A splash of balsamic vinegar adds depth. If your sauce tastes too acidic, add a teaspoon of sugar. This balances the flavors nicely. One common mistake is overcooking the pasta. Always cook it al dente. This keeps the pasta firm and helps it hold the sauce better. Another mistake is adding cream too early. Wait until the sauce simmers before mixing it in. Lastly, don’t forget to taste! Adjust seasoning as needed. This is key for a great dish. Pro Tips Use Fresh Ingredients: Fresh basil and garlic significantly enhance the flavor of your dish. Opt for fresh tomatoes if possible for a more vibrant sauce. Adjust Creaminess: Depending on your preference, you can add more cream for a richer sauce or substitute with vegetable broth for a lighter option. Perfect Pasta Cooking: Make sure to cook the pasta al dente, as it will continue to cook slightly when mixed with the sauce, ensuring it retains a perfect bite. Save Pasta Water: Always reserve some pasta water before draining. This starchy water can help adjust the sauce's consistency and helps it cling better to the pasta. {{image_2}} You can make this creamy tomato pasta dairy-free by using coconut cream. Coconut cream adds a rich texture and a hint of sweetness. It blends well with the tomatoes and basil. To use it, simply replace the heavy cream with an equal amount of coconut cream. This will keep your dish creamy without the dairy. If you want a lighter taste, use light coconut milk instead. It still works great! Adding protein to your creamy tomato pasta makes it heartier. You can use cooked chicken, shrimp, or even plant-based proteins like tofu. For chicken, grill or sauté pieces until cooked through. For shrimp, sauté them in olive oil until pink and tender. Stir your chosen protein into the sauce just before adding the pasta. This way, the flavors meld nicely. You can also add cooked sausage for a spicy kick! Boost the nutrition of your pasta by adding vegetables. Spinach, zucchini, or bell peppers are great choices. Start by sautéing your veggies in the olive oil before adding the garlic. This way, they get tender and soak up the flavors. You can also stir in some peas or broccoli at the end for a pop of color and health. These additions not only enhance the taste but also make your meal more balanced. To store your creamy tomato pasta, let it cool down first. Transfer it to an airtight container. Refrigerate it within two hours of cooking. This keeps it fresh for up to three days. When you’re ready to eat, check for any off smells or changes in texture. Freezing is a great way to save leftover creamy tomato pasta. Place it in a freezer-safe container. Leave some space at the top for expansion. Seal it tightly and label it with the date. It can last up to three months in the freezer. When you’re ready to eat it, thaw it overnight in the fridge. To reheat, use a microwave-safe dish or a skillet. For the microwave, heat in short bursts, stirring in between. This helps it heat evenly. If using a skillet, add a splash of water or broth to keep it moist. Heat over low to medium heat until warmed through. Add fresh basil or cheese for a flavor boost! Yes, you can use any pasta you love. Fusilli and penne work well, but spaghetti, farfalle, or even gluten-free pasta are great choices. Just remember to cook the pasta until al dente. The shape can change the look and feel of your creamy tomato pasta, but the taste stays delicious. This recipe is already vegetarian since it does not contain meat. To keep it that way, use vegetable broth instead of chicken broth if you are thinking of adding any broth. You can also add more veggies, like spinach or mushrooms, to boost flavors and nutrition. Creamy tomato pasta pairs well with many sides. A fresh side salad adds crunch and balance. Garlic bread is another favorite that complements the sauce nicely. You can also serve it with roasted vegetables or a light soup for a hearty meal. Enjoy! In this blog post, we covered the key ingredients for creamy tomato pasta, both required and optional. I shared step-by-step instructions to cook the pasta and make a rich sauce. We also discussed tips to enhance flavor and avoid mistakes. Variations included dairy-free and protein options, plus ways to add veggies. Finally, we highlighted storage tips for leftovers and answered common questions. You now have the tools to create your own creamy tomato pasta. Enjoy making it your own!

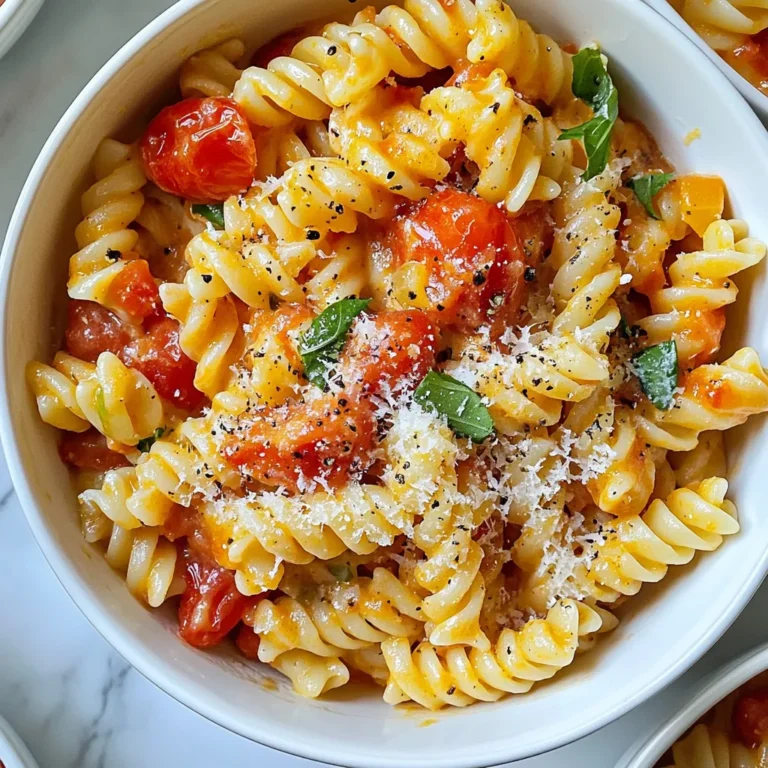
Creamy Tomato Pasta Flavorful and Simple Recipe

- 4 cod fillets (6 oz each) - 2 tablespoons olive oil - 1 teaspoon garlic powder - 1 teaspoon onion powder - 1 teaspoon smoked paprika - 1 teaspoon dried thyme - 1 teaspoon dried parsley - 1 lemon, zested and juiced - Salt and pepper to taste - Fresh parsley, chopped (for garnish) - Lemon wedges (for serving) For this recipe, I love using fresh cod. The fillets are firm and cook well in the air fryer. The olive oil adds richness, while the garlic and onion powders give a nice base flavor. Each seasoning brings something special. Smoked paprika adds warmth, while thyme and parsley bring freshness. The lemon zest and juice brighten the dish, making it feel light and vibrant. When it comes to garnishes, salt and pepper enhance all the flavors. Fresh parsley on top adds color and a fresh taste. Lemon wedges are perfect for squeezing on top of the cod before eating. This mix of ingredients makes for a delicious, crispy dish that is sure to impress. {{ingredient_image_1}} - In a large bowl, combine 2 tablespoons of olive oil with the spices: 1 teaspoon of garlic powder, 1 teaspoon of onion powder, 1 teaspoon of smoked paprika, 1 teaspoon of dried thyme, and 1 teaspoon of dried parsley. - Add the zest and juice from 1 lemon into the bowl. Mix well to create a tasty herb-infused marinade. - Take 4 cod fillets and coat them in the marinade. Make sure each fillet gets a nice layer of flavor. - Let the cod marinate for at least 15 minutes. This step helps the fish soak up all the great tastes. - Preheat your air fryer to 400°F (200°C) for about 5 minutes. This helps the cod cook evenly. - Place the marinated cod fillets in the air fryer basket in a single layer. Do not overlap them. - Air fry the cod for 10-12 minutes. Flip the fillets halfway to ensure they crisp up nicely. They are ready when they turn golden brown and reach an internal temperature of 145°F (63°C). To get that crispy finish, avoid overcrowding the air fryer basket. When you place too many fillets together, they steam instead of fry. Give each piece room to breathe. Set your air fryer to 400°F (200°C) for the best results. This high heat helps create a golden crust. Adding fresh herbs before serving boosts the flavor even more. Chopped parsley is a great choice. You can also play with different spices or marinades. Try adding a pinch of cayenne for heat, or use dill for a fresh taste. Experiment and find what you love! To ensure your cod is safe to eat, check the internal temperature. It should reach 145°F (63°C). You can use a meat thermometer for this. Look for signs of doneness too. The fish should be opaque and flake easily with a fork. Pro Tips Marinate Longer for Deeper Flavor: If time allows, marinate the cod for up to an hour to enhance the flavor profile even more. Check for Freshness: Always choose fresh cod fillets with a mild scent. Fresh fish will yield a better taste and texture. Don’t Overcrowd the Basket: Air fry in batches if necessary. Overcrowding can lead to uneven cooking and less crispiness. Adjust Cooking Time for Thicker Fillets: If your cod fillets are thicker than 1 inch, you may need to increase the cooking time by a few minutes. {{image_2}} You can easily change the taste of your air fryer cod. For a spicy kick, add cayenne pepper to the marinade. This will give your cod a nice heat that many enjoy. If you want a light and fresh flavor, try a lemon-dill mix. Just add fresh dill to the marinade. This keeps your cod bright and tasty. Choosing between frozen and fresh cod can change your dish. Frozen cod works well if you are in a hurry. Just make sure to thaw it properly. Fresh cod gives better flavor and texture. Both options can be air-fried to perfection. You can also switch up oils for marinating. Olive oil is great, but you might try avocado or sesame oil. Each oil offers a different taste to your cod. When serving air fryer cod, think about light sides. Fresh salads pair well. You might enjoy a simple green salad with lemon dressing. Grain bowls are another fun choice. Quinoa or brown rice with veggies adds a nice touch. These sides enhance your meal without overpowering the fish. To store leftover cod in the fridge, let it cool first. Place the fillets in an airtight container. You want to use a container that seals well to keep moisture in. I recommend glass or BPA-free plastic containers. This helps the cod stay fresh for up to three days. For freezing cooked cod, wrap each fillet in plastic wrap. Then, place the wrapped cod in a freezer bag to prevent freezer burn. It’s best to freeze cod right after cooking for the best flavor and texture. When you’re ready to eat, defrost the cod in the fridge overnight. This helps keep it flaky and tender. To reheat quickly, use your air fryer. Set it to 350°F (175°C) and heat for about 5 minutes. This keeps the cod crispy. If you don’t have an air fryer, you can use an oven. Preheat your oven to 350°F (175°C) and bake the cod for about 10 minutes. Both methods will keep your cod tasty and enjoyable. Cooking cod in an air fryer usually takes about 10 to 12 minutes. Preheat your air fryer to 400°F (200°C) before cooking. Flip the fillets halfway through for even cooking. Check for a golden brown color and an internal temperature of 145°F (63°C) to ensure it's done. Yes, you can use other fish like tilapia, haddock, or salmon. These fish have a similar texture and cook well in the air fryer. Adjust the cooking time slightly, as thicker fish may take longer. Always check for doneness with a thermometer. If your cod is overcooked, it may become dry. To prevent this, watch the cooking time closely. Use a meat thermometer to check the internal temperature. If it’s done at 145°F (63°C), remove it right away. You can also marinate longer for added moisture or serve with a sauce to enhance flavor. In this post, I shared a simple cod recipe using fresh ingredients and easy steps. I explained how to marinate and cook the cod in an air fryer, ensuring a crispy texture. You also learned about variations, side dishes, and storage tips to make your meal last. Cooking is fun and rewarding. I hope you try this recipe and enjoy great flavors!

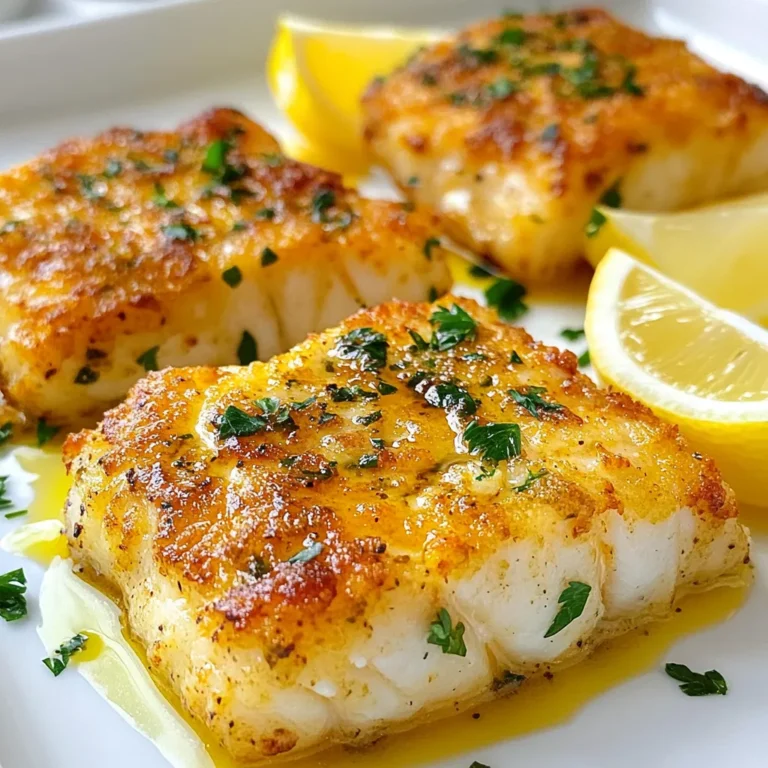
Air Fryer Cod Crispy and Flavorful Dinner Option

PREV 1 … 48 49 50 … 56 NEXT
go kitchen now

explore

DessertsDinnerAppetizersDrinks

Our Policies

  • Cookie Policy
  • Copyright Policy
  • Disclaimer
  • GDPR Policy
  • Terms Of Use
Back to Top
  • About
  • Contact Us
  • Privacy Policy
© 2025 go kitchen now