FREE DINNER EBOOK! Get your copy!
  • Cookie Policy
  • GDPR Policy
  • Disclaimer
  • Terms Of Use
  • Visit my other site: Fun Cookie Recipes
go kitchen now
  • Home
  • Dinner
  • Desserts
  • Drinks
  • Appetizers
  • Contact
  • About
  • Privacy Policy
  • Home
  • Dinner
  • Desserts
  • Drinks
  • Appetizers
  • Contact
  • About
  • Privacy Policy
  • Cookie Policy
  • GDPR Policy
  • Disclaimer
  • Terms Of Use
Visit my other site: Fun Cookie Recipes

HOME / CATEGORIES /

Latest

- 1 lb ground turkey - 1/4 cup low-sodium soy sauce - 2 tablespoons honey or maple syrup - 1 tablespoon rice vinegar - 1 tablespoon sesame oil - 2 cloves garlic, minced - 1 inch ginger, grated - 1 cup broccoli florets - 1 red bell pepper, sliced - 1 carrot, julienned - 2 green onions, chopped - Sesame seeds for garnish - 2 cups cooked jasmine rice (or brown rice) This recipe uses simple and fresh ingredients. Ground turkey is lean and cooks quickly. The soy sauce adds saltiness, while honey or maple syrup brings sweetness. Rice vinegar gives a nice tang. Sesame oil adds a nutty flavor that brings everything together. For vegetables, I love using broccoli, red bell pepper, and carrot. They add color and crunch to your bowls. The ginger and garlic give an extra kick. Green onions and sesame seeds make great toppings. They add flavor and texture to each bite. For the base, jasmine rice is fluffy and pairs well. Brown rice is a healthy choice, too. You can use what you have on hand. With these ingredients, you can create a tasty meal in no time. {{ingredient_image_1}} To make the teriyaki sauce, grab a medium bowl. In that bowl, mix these ingredients: - 1/4 cup low-sodium soy sauce - 2 tablespoons honey or maple syrup - 1 tablespoon rice vinegar - 1 tablespoon sesame oil - 2 cloves garlic, minced - 1 inch ginger, grated Stir well until everything blends together. This sauce gives the dish its sweet and savory taste. Next, take a large skillet and heat it over medium. Add 1 lb of ground turkey to the skillet. Cook for about 5-7 minutes. Break up the turkey with a spatula. You want it fully cooked and no longer pink. Once cooked, pour the teriyaki sauce over the turkey. Stir it well. Let it simmer for about 3-5 minutes. This helps the flavors mix and absorb into the meat. While the turkey cooks, steam the veggies. In a separate pan, add a splash of water and bring it to a simmer. Add the broccoli florets, sliced bell pepper, and julienned carrot. Cover the pan and steam for about 4-5 minutes. You want the veggies tender but still bright in color. Now it's time to build your bowls! Start with 1/2 cup of cooked jasmine rice in each bowl. Top the rice with the teriyaki ground turkey. Next, arrange the steamed vegetables on the side. For a finishing touch, garnish each bowl with chopped green onions and a sprinkle of sesame seeds. This adds a nice crunch and flavor. Enjoy your meal! To boost the flavor of your teriyaki ground turkey bowls, try adding some spices. A dash of black pepper gives warmth. You can also add red pepper flakes for heat. Consider a splash of sriracha for a spicy kick. If you love garlic, add more minced garlic to the teriyaki sauce. A sprinkle of five-spice powder brings an Asian twist. You can even mix in a bit of hoisin sauce for depth. These small changes make a big difference. When cooking ground turkey, even cooking is key. Start with a hot skillet. Add the ground turkey and break it apart right away. Stir it often to avoid clumps. Ensure it cooks for about 5-7 minutes. Look for an internal temperature of 165°F to know it's safe. This method keeps the meat juicy and tender. If you find it dry, consider adding a splash of water or broth. When you serve your teriyaki ground turkey bowls, think about sides. Steamed rice is a classic choice. Jasmine rice or brown rice both work well. You can also serve with a side of edamame for extra protein. For a fresh touch, add sliced avocado or a simple salad. Garnish with sesame seeds and chopped green onions for crunch and color. These additions make your meal even more enjoyable. Pro Tips Use Fresh Ingredients: Fresh vegetables and herbs enhance the flavor and nutritional value of your teriyaki bowls. Customize Your Veggies: Feel free to swap in your favorite vegetables such as snap peas, zucchini, or bell peppers for a personal touch. Meal Prep Friendly: This dish is great for meal prep; just store the sauce separately to keep the turkey fresh and juicy. Adjust the Sweetness: Depending on your taste, you can modify the amount of honey or maple syrup in the sauce for a sweeter or more savory flavor. {{image_2}} You can switch ground turkey with chicken, beef, or tofu. Each option brings a unique flavor. Ground chicken works well and keeps a similar texture. Beef adds a richer taste, while tofu offers a plant-based choice. Just cook them the same way as the turkey. For tofu, make sure to press it first to remove extra water. Feel free to mix in different veggies. Snap peas add a nice crunch. Zucchini is another great choice, and it cooks quickly. Use colorful bell peppers for a pretty bowl. Carrots, broccoli, or even corn can make good options. The key is to keep the veggies bright and tender. If you need a gluten-free meal, it’s easy to adapt. Use gluten-free soy sauce or tamari instead of regular soy sauce. Check that your rice is also gluten-free. This way, you can enjoy the same great taste without worry. Always read labels to ensure all ingredients fit your diet. To store leftovers, let the bowls cool first. Place the turkey and veggies in airtight containers. This keeps them fresh and tasty in the fridge. You can store them for up to 3 days. If you have rice left, store it separately to avoid sogginess. When it's time to eat again, reheat the turkey on the stove. Use medium heat and add a splash of water. This method keeps the turkey moist and full of flavor. You can also use a microwave, but cover the bowl. Heat for one to two minutes, checking often. If you want to save for later, freeze the turkey and veggies separately. Use freezer-safe containers or bags. They can last up to three months. When ready to use, thaw in the fridge overnight. Reheat as mentioned above for a quick meal. Yes, you can prep this dish ahead of time. For meal prep, cook the turkey and veggies. Store them in separate airtight containers. You can keep them in the fridge for up to four days. Cook the rice fresh or store it too. Reheat everything in a pan or microwave before serving. This makes it easy to enjoy a quick meal on busy days. You can use several proteins instead of ground turkey. Ground chicken is a great choice and has a similar taste. Ground beef works well too, but it can be richer. If you prefer a plant-based option, try crumbled tofu or tempeh. These alternatives absorb the teriyaki sauce well, making them tasty too. To make this dish gluten-free, swap the soy sauce for gluten-free soy sauce or tamari. This change keeps the flavor intact. Most other ingredients are naturally gluten-free. Always check labels on sauces and rice to ensure they fit your needs. With these swaps, you can enjoy this meal without worry. If you want more heat, add red pepper flakes to the teriyaki sauce. Start with a pinch and taste as you go. You can also incorporate Sriracha or chili garlic sauce into the mix. For an extra kick, add sliced jalapeños to the steamed veggies. Adjust the heat to match your taste! This blog post shared how to make a tasty teriyaki bowl. You learned about key ingredients like ground turkey, fresh veggies, and rice. I provided step-by-step instructions for easy cooking, plus tips to boost the flavor. You also saw variations to suit different diets and preferences. Remember, you can store leftovers and reheat them, so nothing goes to waste. Enjoy creating your dish and make it perfect for your taste!

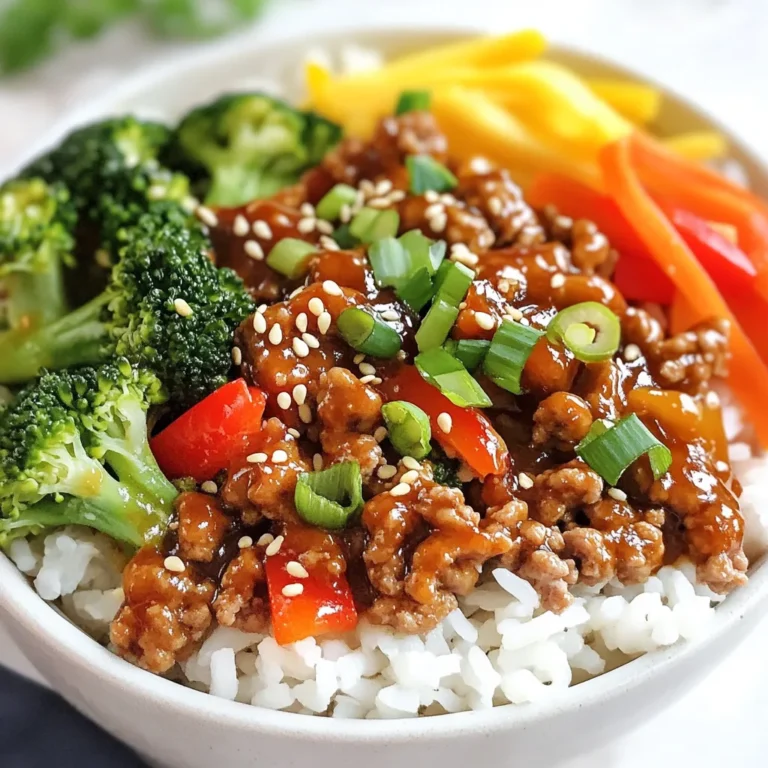
Teriyaki Ground Turkey Bowls Perfect for Quick Meals

- 1 pound beef tenderloin or sirloin, cut into bite-sized cubes - 4 tablespoons unsalted butter - 6 cloves garlic, minced - 1 tablespoon fresh rosemary, finely chopped - 1 tablespoon fresh parsley, chopped - 1 teaspoon smoked paprika - Salt and black pepper to taste The main ingredients are key to making these beef bites shine. You want good beef, so choose tenderloin or sirloin. These cuts are soft and cook well. The unsalted butter adds a rich, creamy flavor that mixes perfectly with the garlic. Use fresh garlic for the best taste. Fresh herbs like rosemary and parsley bring bright notes that balance the dish. Smoked paprika gives a warm, smoky flavor, while salt and black pepper enhance all the tastes. - Crushed red pepper flakes for heat - Additional garnishes for presentation If you like some heat, add crushed red pepper flakes. They give a nice kick to the dish. For a pretty finish, consider extra garnishes. Fresh herbs work well here, making your dish look great on the table. These small touches add a lot to the overall feel of your meal. {{ingredient_image_1}} First, we need to season the beef cubes. Take your pound of beef tenderloin or sirloin. Cut it into bite-sized pieces. Generously sprinkle salt, black pepper, and smoked paprika over them. This adds great flavor. Next, heat a large skillet over medium-high heat. Melt 2 tablespoons of unsalted butter until it bubbles. Place the seasoned beef in a single layer. Sear the beef for about 3-4 minutes on each side. Look for a nice brown crust. This step seals in the juices. Once browned, remove the beef bites from the skillet. Set them aside on a plate. This keeps them warm while you make the sauce. In the same skillet, lower the heat to medium. Add the remaining 2 tablespoons of butter. Let it melt completely. Then, add 6 cloves of minced garlic. Sauté for about 30 seconds. Be careful not to burn the garlic; we want a fragrant aroma. Now, return the beef bites to the skillet. Toss them in the garlic butter. Make sure every piece is well coated. This is where the magic happens! Add the finely chopped rosemary and parsley. Stir to combine. If you like spice, sprinkle in some crushed red pepper flakes. Cook everything for an additional 1-2 minutes. This allows the flavors to meld together. The beef absorbs the garlic butter goodness. It’s a wonderful mix of savory and fresh. Now it’s time to serve! For a great presentation, use a wooden platter or a cast-iron skillet. Garnish with extra herbs for color. If you serve these as an appetizer, add toothpicks for easy grabbing. Enjoy your delicious garlic butter beef bites! To get beef bites just right, first, think about doneness. For medium-rare, aim for an internal temp of 130°F to 135°F. Use a meat thermometer for the best results. Sear the beef cubes for about 3-4 minutes on each side. This creates a nice brown crust while keeping the inside tender. Next, manage your cooking temperature. Start with medium-high heat to brown the beef. Once browned, reduce the heat to medium when adding garlic. This prevents burning and keeps flavors fresh. Fresh ingredients make a big difference. Use high-quality beef for great taste. Fresh garlic and herbs like rosemary and parsley add zest to the dish. They bring life to the garlic butter sauce. For presentation, serve the beef bites on a wooden platter or in a cast-iron skillet. This gives a rustic look. Garnish with extra herbs for color. If hosting, add toothpicks for easy serving. This makes it fun and simple for guests to enjoy. Pro Tips Choosing the Right Cut: Opt for beef tenderloin or sirloin for the best flavor and tenderness in your beef bites. Perfect Searing: Ensure the skillet is hot enough before adding the beef to achieve a nice crust; avoid overcrowding the pan. Garlic Timing: Add the minced garlic only after the beef is removed from the pan to prevent burning and bitterness. Herb Freshness: Use fresh rosemary and parsley for the best flavor; dried herbs will not provide the same aromatic quality. {{image_2}} You can mix it up with different cuts of beef. Try using ribeye or flank steak. These cuts have great flavor and can work well. Just remember to cut them into bite-sized pieces. You can also change the herbs and spices. Instead of rosemary, use thyme or oregano. They add a nice touch. If you want a bit of heat, try cayenne pepper instead of smoked paprika. Adjust based on what you like. To make this dish gluten-free, check your spices for hidden gluten. Use gluten-free seasoning if needed. The rest of the ingredients are already gluten-free. For a vegetarian version, you can swap the beef for mushrooms. Portobello or shiitake mushrooms work well. They soak up the garlic butter and taste amazing. Just adjust the cooking time to ensure they’re tender. To keep your garlic butter beef bites fresh, store them right. First, let them cool to room temperature. Then, place them in an airtight container. This will keep them from drying out. You can also use glass containers for easy reheating later. Remember to label the container with the date. Refrigerate your beef bites for up to three days. If you want to store them longer, consider freezing. Just make sure to wrap them tightly in plastic wrap or foil before placing them in a freezer bag. They will stay good for up to three months in the freezer. Reheating beef bites is easy! Start by taking them out of the fridge or freezer. If frozen, let them thaw in the fridge overnight. To reheat, use the stovetop for the best flavor. Heat a skillet over medium heat. Add a little butter or oil to the pan. Then, place the beef bites in the skillet. Heat them for about five minutes, turning them often. This way, they will warm up evenly and stay juicy. If you are in a hurry, you can use the microwave. Place the beef bites in a microwave-safe dish. Cover the dish with a damp paper towel to keep moisture in. Heat in short bursts of 30 seconds. Check often to avoid overcooking. Enjoy your tasty beef bites! For this dish, I recommend using beef tenderloin or sirloin. Both cuts are tender and flavorful. Tenderloin is softer, while sirloin has more beefy taste. When picking your beef, look for bright red color and some marbling. The marbling adds flavor and juiciness. Always choose high-quality beef for the best results. Yes, you can use frozen beef. Just remember to thaw it properly first. The best way is to place it in the fridge overnight. If you're in a hurry, you can use the microwave on defrost. Cook times might change slightly. Be sure to check the beef's doneness. Use a meat thermometer for best results. These beef bites pair well with many sides. Try serving them with: - Creamy mashed potatoes - Garlic bread - A fresh garden salad - Roasted vegetables - Rice or quinoa You can also place them on a charcuterie board for a fun appetizer. Add some cheese and olives for a tasty spread. This blog post covered a quick and tasty garlic butter beef bites recipe. We looked at key ingredients like beef, butter, garlic, and fresh herbs. You learned how to prepare, cook, and serve these bites perfectly. I shared tips on achieving the right doneness and enhancing flavor. You also discovered storage methods and answers to common questions about the dish. Now you are ready to impress friends and family with this delicious recipe. Enjoy making it, and have fun in your kitchen!

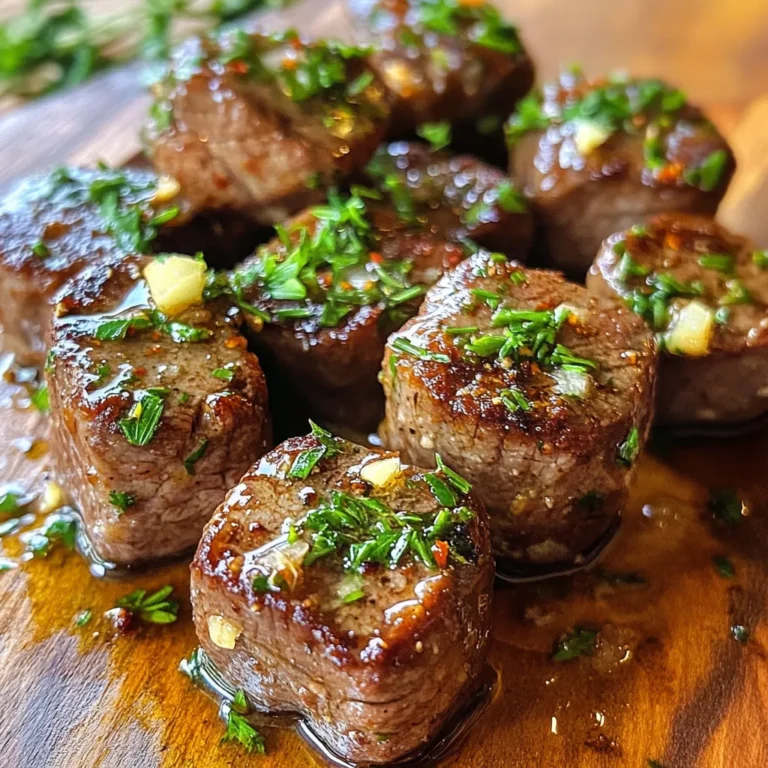
Garlic Butter Beef Bites Flavorful and Easy Dish

- 2 medium zucchinis - ¾ cup grated Parmesan cheese - 1 cup breadcrumbs - 1 teaspoon garlic powder - 1 teaspoon onion powder - ½ teaspoon paprika - Salt and pepper to taste - 2 eggs - Olive oil spray When I prepare Air Fryer Parmesan Zucchini Chips, I love choosing fresh zucchinis. Two medium zucchinis work best for this recipe. They should be firm and bright green. I slice them thinly to ensure they get crispy. Next, I grab ¾ cup of grated Parmesan cheese. This cheese adds a savory flavor. For crunch, I use 1 cup of breadcrumbs. Whole wheat breadcrumbs give a nice, hearty taste. To spice things up, I add 1 teaspoon each of garlic powder and onion powder. These spices bring out the zucchini flavor. I also sprinkle in ½ teaspoon of paprika for a hint of warmth. For seasoning, I use salt and pepper to taste. I want to enhance the flavors without overpowering them. To bind the coating, I beat 2 eggs in a bowl. This step helps the cheese and breadcrumbs stick. Lastly, I use an olive oil spray for a crispy finish. This step is key! It makes the chips golden and crunchy without adding too much fat. These simple ingredients create a delicious and healthy snack. {{ingredient_image_1}} - Preheat your air fryer to 400°F (200°C). This step is key for crispiness. - Slice the zucchinis thinly. Aim for about 1/4 inch thick. Thin slices cook better. - Mix Parmesan and breadcrumbs in a shallow bowl. This will be your crunchy coating. - Season with garlic powder, onion powder, paprika, salt, and pepper. Stir well to combine all flavors. - Beat the eggs in another bowl until smooth. This will help the coating stick. - Dip each zucchini slice first into the eggs. Let any extra egg drip off. - Coat the slice in the Parmesan-breadcrumb mixture. Press gently to make sure it sticks well. - Arrange the coated zucchini chips in a single layer in the air fryer basket. Don’t overcrowd them. - Lightly spray the tops with olive oil spray for extra crispiness. - Air fry for 10-12 minutes, flipping the chips halfway through. Look for a golden, crispy finish. To get the best crunch from your zucchini chips, olive oil spray is key. This helps the coating stick and crisp up nicely. Just a light spray on top of the chips adds flavor and texture. It’s a small step that makes a big difference. Avoid overcrowding the air fryer basket. If you pack too many chips in, they won’t cook evenly. This leads to soggy chips instead of crispy ones. Cook in batches if needed. This ensures that every chip gets enough hot air to become perfectly golden. These zucchini chips taste great with dips. Try ranch, guacamole, or salsa for a fun twist. They also work well as a side to burgers or sandwiches. Serve them warm for the best taste and texture. The best times to serve these chips are during parties or game days. They make a tasty snack that everyone loves. You can also enjoy them as a healthy treat any time! One common mistake is not preheating the air fryer. This step ensures your chips cook evenly and get crispy. Preheating takes just a few minutes but is worth it. Another mistake is skipping the coating steps. Each chip should first dip in beaten eggs and then in the Parmesan-breadcrumb mix. This process helps the coating stick and adds flavor. Don’t rush through it; take your time for the best results. Pro Tips Choose the Right Zucchini: Select firm, medium-sized zucchinis for the best texture and flavor. Avoid larger ones as they may contain more seeds and be less tender. Optimize the Coating: For an even crispier texture, consider adding a tablespoon of cornstarch to the breadcrumb mixture to enhance the crunch. Batch Cooking: If you're making a large batch, keep cooked chips warm in the oven at a low temperature while you finish air frying the rest. Experiment with Seasonings: Feel free to customize the seasoning mix with your favorite spices like Italian herbs or chili powder for a unique flavor twist. {{image_2}} You can make these zucchini chips even better with flavors. Adding herbs like basil or oregano gives a fresh taste. Just mix them into the breadcrumb mix. You can also make it spicy! Try adding a pinch of cayenne pepper. This will give your chips a nice kick. Adjust the amount based on your spice level. Switching up ingredients can lead to fun results. You can use other cheese types, like cheddar or mozzarella. Each cheese adds its own twist to the flavor. If you need a gluten-free option, try gluten-free breadcrumbs. They work just as well and keep the chips crunchy. These zucchini chips shine as a side or snack. Serve them alongside sandwiches or salads for a tasty treat. You can also add them to salads for extra crunch. They bring a lovely texture to any dish. Try pairing them with dips like ranch or marinara for an extra layer of flavor. To keep your zucchini chips fresh, store them in the fridge. Place the chips in an airtight container. This helps maintain their crunch. If you have many leftover chips, layer them with paper towels. This will absorb moisture. For best results, eat them within two days. To reheat your zucchini chips, use the air fryer. Set it to 350°F (175°C). This method helps keep them crispy. Heat for about 5 minutes. Flip them halfway for even warmth. Avoid the microwave, as it makes them soggy. You can freeze zucchini chips for later. Lay them on a baking sheet in a single layer. Freeze until solid, then transfer to a freezer bag. This way, they won't stick together. When ready to eat, thaw chips in the fridge. Reheat them in the air fryer to regain crispiness. To make your zucchini chips extra crispy, you need to remove moisture. Start by slicing the zucchinis thinly. Use a paper towel to pat them dry. This step is key to getting rid of extra water. You can also sprinkle salt on the slices and let them sit for 15 minutes. The salt will draw out more moisture. After that, rinse and dry the slices again before coating them. Yes, you can use other cheeses! Parmesan gives a nice flavor, but you can try Pecorino Romano or cheddar. If you want a milder taste, mozzarella works too. Just remember, each cheese will change the taste a bit. Experiment with what you like! If you don’t have an air fryer, don’t worry! You can bake the zucchini chips in the oven. Preheat your oven to 425°F (220°C). Line a baking sheet with parchment paper. Place the coated zucchini slices in a single layer on the sheet. Bake for 20-25 minutes. Flip them halfway through to get both sides crispy. Leftovers will last about 2-3 days in the fridge. Store them in an airtight container. To keep them fresh, try to eat them soon after cooking. If they get soggy, you can reheat them in the air fryer or oven. Just a few minutes will bring back some crispiness! Zucchini chips are a tasty snack you can easily make at home. We covered the ingredients, step-by-step instructions, and helpful tips. You learned how to achieve crispiness and avoid common mistakes. You also discovered flavor variations and storage methods. Try using different cheeses or serving options to mix things up. Making zucchini chips is fun and simple. Enjoy your crunchy snack while exploring new ways to enhance it. Your kitchen adventures with zucchini chips can start now!

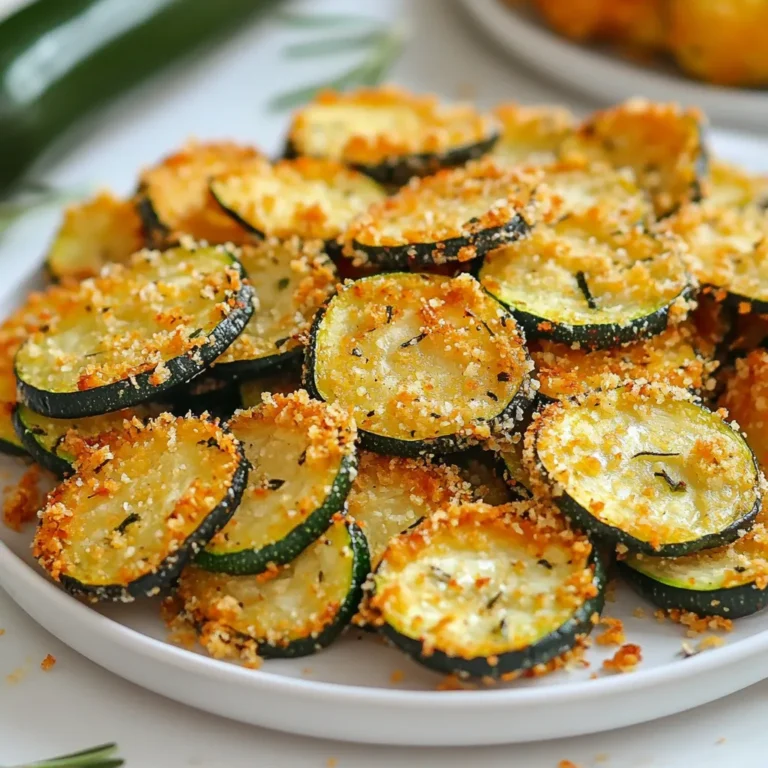
Air Fryer Parmesan Zucchini Chips Crunchy Delight

- 2 boneless, skinless chicken breasts - 1 cup cooked jasmine rice - 1/2 cup honey BBQ sauce The main focus of this dish is the chicken. The chicken breasts should be fresh and tender. Using boneless and skinless pieces makes it easy to cook and serve. The jasmine rice adds a light and fluffy base. It complements the rich flavors of the honey BBQ sauce. - 1 tablespoon olive oil - 1 teaspoon garlic powder - 1 teaspoon smoked paprika - Salt and pepper to taste - 2 green onions, chopped (for garnish) - Sesame seeds (for garnish) Seasoning is key to making this dish shine. Garlic powder brings depth, while smoked paprika adds warmth. Olive oil helps to blend the flavors. Salt and pepper balance it all out. Green onions and sesame seeds add a fresh crunch and visual flair. - 1 cup mixed bell peppers, sliced (red, yellow, green) - 1/2 cup red onion, thinly sliced The veggies add color and nutrition. Mixed bell peppers bring sweetness and crunch. Red onion adds a nice bite. Sautéing them brings out their natural sugars. This step enhances the flavors and makes your dish vibrant. {{ingredient_image_1}} Preparation of the Marinade To start, mix the honey BBQ sauce, olive oil, garlic powder, smoked paprika, salt, and pepper. This mix gives the chicken a sweet and smoky taste. Recommended Marinating Time Let the chicken breasts soak in this marinade for at least 30 minutes. If you can, marinate it longer for more flavor. Grill Preparation Preheat your grill or grill pan to medium heat. This helps the chicken cook evenly. Cooking Times for Chicken Cook the chicken breasts for about 6-7 minutes on each side. Make sure they reach an internal temperature of 165°F. This ensures they are safe to eat. Olive Oil Heating Process While the chicken cooks, heat a tablespoon of olive oil in a pan over medium heat. This helps the veggies get nice and soft. Cooking Time for Bell Peppers and Onions Add the sliced bell peppers and red onion to the pan. Sauté them for about 5-7 minutes. You want them tender and slightly caramelized. Layering Ingredients In serving bowls, start with a base of cooked jasmine rice. Then, add the sautéed bell peppers and red onion. Finally, top it with the sliced grilled chicken. Garnishing Tips Drizzle some extra honey BBQ sauce over the top. Finish with chopped green onions and sesame seeds. This gives your bowl a lovely crunch and extra flavor. Recommended Grill Temperature Grilling chicken requires the right heat. Aim for medium heat, around 350°F to 400°F. This helps cook the chicken evenly and keeps it juicy. Avoiding Dry Chicken To keep chicken moist, do not overcook it. Grill each side for 6-7 minutes. Use a meat thermometer to check for doneness. The internal temperature should reach 165°F. Ideas for Additional Seasonings While honey BBQ sauce adds great taste, you can mix things up. Try adding a pinch of cumin or cayenne for warmth. Fresh herbs like cilantro or parsley can also brighten the dish. Choosing the Right BBQ Sauce Different BBQ sauces can change the flavor. A sweeter sauce works well. Look for one with natural ingredients. If you prefer heat, choose a spicy sauce or add hot sauce. Arranging Ingredients Visually When serving, layer the rice first, then the veggies, and finally the chicken. This way, each layer looks appealing. Use a large bowl or plate for a beautiful presentation. Colorful Garnishing Ideas Garnish with chopped green onions and sesame seeds. You can also add avocado slices or cherry tomatoes for extra color. A splash of lime juice brightens the look and taste. Pro Tips Marinate for Best Flavor: Allow the chicken to marinate for at least 30 minutes, or even overnight, to enhance the flavor and tenderness. Grill at the Right Temperature: Ensure your grill is preheated to medium heat to achieve a perfect sear and prevent the chicken from sticking. Rest the Chicken: Let the grilled chicken rest for a few minutes before slicing; this helps retain the juices for a more succulent bite. Customize Your Veggies: Feel free to add your favorite vegetables such as zucchini or mushrooms for extra flavor and nutrition in your rice bowl. {{image_2}} You can switch up the protein in your Honey BBQ Chicken Rice Bowl. - Using Tofu or Vegetables: Tofu works great as a meat substitute. Just press and cube firm tofu. Marinate it like chicken. Grill it until golden. You can also use hearty veggies like zucchini or mushrooms. Grill them for the same smoky flavor. - Other Types of Chicken Cuts: If you prefer, use chicken thighs instead of breasts. They stay juicy and flavorful. Cut them into strips and follow the same cooking steps. Rice is a key part of this dish, but you can change it up. - Substituting Jasmine Rice: While jasmine rice is soft and fragrant, you can use brown rice for more fiber. It takes longer to cook, so plan ahead. - Quinoa or Cauliflower Rice Variants: Quinoa is a protein-rich option. Cook it in water or broth for added taste. Cauliflower rice is a low-carb choice. Just pulse cauliflower in a food processor and sauté until tender. Spice up your bowl with unique flavors. - Adding Spices or Different BBQ Sauces: Try adding cayenne pepper for heat. You can also swap your honey BBQ sauce with a spicy or mustard-based sauce for a new twist. - Incorporating Fruits or Nuts: Toss in pineapple chunks or mango slices for a sweet touch. You can also add chopped nuts like cashews for crunch. These additions will brighten up your dish and add texture. To keep your Honey BBQ Chicken Rice Bowl fresh, store it in the fridge. Place the chicken, rice, and veggies in an airtight container. This helps prevent moisture loss. The dish stays tasty in the refrigerator for up to three days. Always cool it down before sealing the container. If you want to save it for later, freezing is a great option. Transfer the bowl to a freezer-safe container. Make sure to label it with the date. It can last up to three months in the freezer. When you’re ready to eat, thaw it in the fridge overnight. For reheating, warm it gently in the microwave or on the stove. To keep your leftovers fresh, store each ingredient separately if possible. This way, the rice won’t get soggy. You can also reinvent the dish. Try using leftover chicken in a salad or a wrap. The BBQ flavors work well in many new meals! Yes, you can use frozen chicken. Just make sure to thaw it first. The best way to thaw chicken is in the fridge overnight. If you're short on time, you can also use cold water. Place the chicken in a sealed bag and submerge it in cold water. Change the water every 30 minutes until the chicken is thawed. This method takes about 1-3 hours, depending on the size of the chicken. You can pair this rice bowl with several tasty sides. Here are some ideas: - Steamed broccoli for a healthy crunch. - Corn on the cob for sweetness. - A simple green salad for freshness. - Garlic bread for a fun twist. To add heat to your Honey BBQ Chicken Rice Bowl, try these options: - Mix in some cayenne pepper with your marinade. - Add sliced jalapeños to the sautéed bell peppers. - Use a spicy BBQ sauce instead of the regular one. - Top the finished bowl with hot sauce or chili flakes for extra kick. Yes, you can prepare this dish ahead of time. Here are some meal prep tips: - Cook the chicken and veggies in advance. Store them in airtight containers in the fridge. - You can also cook the rice ahead of time and keep it warm. - When ready to serve, just reheat the chicken and veggies. Layer them over fresh rice, and your meal is ready in no time! In this blog post, we explored how to create a delicious Honey BBQ Chicken Rice Bowl. We discussed key ingredients like chicken, rice, and veggies, plus tips for marinating and cooking. I shared ways to enhance flavors and presented creative variations to suit your taste. Remember, storing leftovers properly can help you enjoy this dish longer. Embrace these steps to create a tasty meal that will impress everyone. Enjoy your cooking journey and have fun with your new recipes!

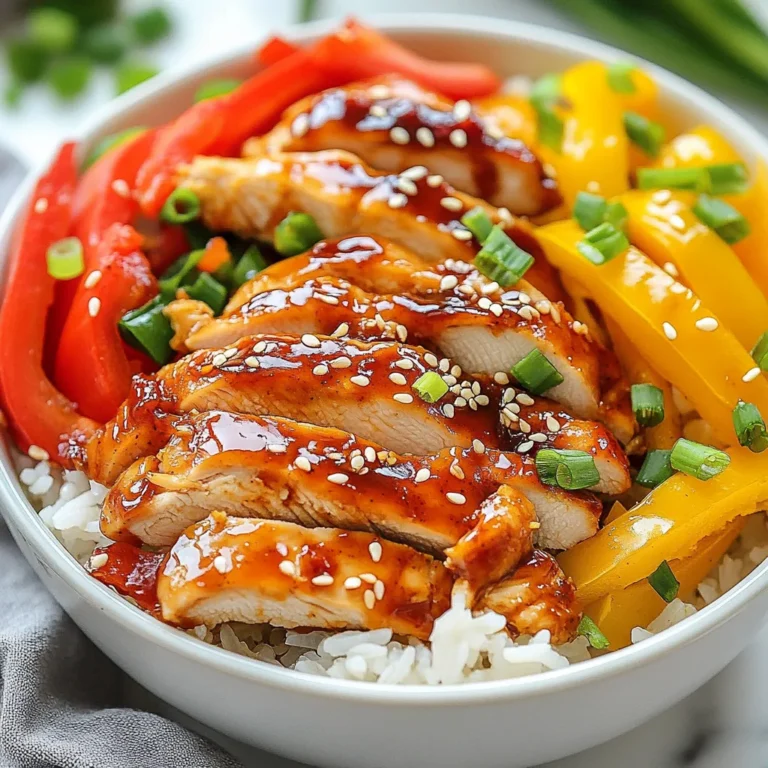
Honey BBQ Chicken Rice Bowl Flavorful and Filling Delight

Chicken and Marinade Ingredients - 1 pound boneless chicken thighs, diced - 1 cup plain yogurt - 2 tablespoons lemon juice - 3 cloves garlic, minced - 1 inch ginger, grated - 2 teaspoons ground cumin - 2 teaspoons ground coriander - 1 teaspoon garam masala - 1 teaspoon turmeric - 1 teaspoon chili powder Sauce Ingredients - 2 tablespoons vegetable oil - 1 medium onion, finely chopped - 1 can (14 oz) crushed tomatoes - 1 cup heavy cream (or coconut cream for a dairy-free version) - Salt and pepper to taste Garnish Ingredients - Fresh cilantro for garnish When I make Chicken Tikka Masala, I love using juicy chicken thighs. They stay tender and flavorful. The marinade makes all the difference. Yogurt, lemon juice, garlic, and spices come together to create a rich taste. Letting the chicken sit in the marinade for a while is key. It draws in all the flavors. For the sauce, I use a mix of sautéed onions, crushed tomatoes, and cream. The heavy cream gives a nice richness. If you want a dairy-free option, coconut cream works well too. Both add a wonderful creaminess to the dish. Don’t forget the fresh cilantro! It adds a bright touch. The combination of all these ingredients makes for a dish that is truly special. Enjoy crafting this flavorful meal in your kitchen! {{ingredient_image_1}} Preparing the Marinade To make the marinade, take a large bowl. Add 1 cup of plain yogurt, 2 tablespoons of lemon juice, 3 minced garlic cloves, and 1 inch of grated ginger. Then, mix in 2 teaspoons each of ground cumin and ground coriander. Next, add 1 teaspoon of garam masala, 1 teaspoon of turmeric, and 1 teaspoon of chili powder. Stir these together until well combined. Finally, toss the diced chicken thighs into the marinade, making sure each piece is coated. Recommended Marination Time For the best flavor, marinate the chicken for at least 1 hour. If you have more time, let it sit overnight in the fridge. This longer marination helps the spices soak in better. Preheating the Oven Before you start cooking, preheat your oven to 400°F (200°C). This temperature helps the chicken cook evenly and get that nice char. Baking Techniques for Optimal Texture Spread the marinated chicken evenly on a baking sheet lined with parchment paper. Make sure the pieces are not too crowded. Bake for 20 minutes or until the chicken is cooked through and slightly charred. This gives it a great texture. Sautéing the Onions While the chicken bakes, grab a large skillet. Heat 2 tablespoons of vegetable oil over medium heat. Add the finely chopped onion and sauté it until it turns golden brown. This usually takes about 5 to 7 minutes. The onions will add depth to your sauce. Adding and Cooking the Tomatoes Next, pour in a can of crushed tomatoes. Stir well to combine. Cook this mixture for about 10 minutes, letting it thicken. Season it with salt and pepper to taste. This step builds the sauce's flavor base. Stirring in Cream Once the sauce thickens, stir in 1 cup of heavy cream. If you want a dairy-free option, use coconut cream instead. This makes the sauce rich and creamy. Simmering for Flavor Development Now, add the baked chicken to the sauce. Mix it well and let it simmer for another 10 minutes. This allows all the flavors to blend together, creating a delicious dish. Fresh spices make a big difference. They add depth and brightness. Always choose whole spices when you can. Grind them just before you use them. This keeps their oils and flavors intact. I love using ground cumin and coriander for their warm flavors. Marinating your chicken is key. It helps the chicken absorb all those tasty spices. I suggest letting it sit overnight if possible. This gives the flavors time to blend. Don’t skip this step; it makes your dish shine. You can cook your chicken in the oven or on the grill. Baking gives a tender texture. Grilling adds a nice char and smoky flavor. I prefer grilling when I can because it enhances the taste. Make the dish your own by adjusting the spice levels. If you like it mild, use less chili powder. For a kick, add more! Taste as you go. This way, you can find your perfect balance. Serve Chicken Tikka Masala with warm naan or rice. These sides soak up the sauce well. You can also add a fresh salad for crunch. It adds a nice contrast to the creamy dish. Top your dish with fresh cilantro for a pop of color. You can also add a squeeze of lemon. It brightens the flavors and makes each bite exciting. Don’t forget a side of yogurt or raita to cool down the heat. Pro Tips Marination Magic: Allowing the chicken to marinate overnight enhances the flavors significantly. The longer, the better! Perfectly Baked Chicken: Ensure that the chicken is spread evenly on the baking sheet for even cooking and a nice char. Adjusting Spice Level: Feel free to adjust the amount of chili powder based on your spice preference. You can also add fresh green chilies for extra heat. Serving Suggestions: Serve your Chicken Tikka Masala with basmati rice or naan for a complete meal. Don't forget to add a side of cucumber raita to balance the spice! {{image_2}} Using coconut cream is a great way to make this dish dairy-free. Coconut cream adds a rich, creamy texture without dairy. For a smooth sauce, just replace heavy cream with one cup of coconut cream. This swap keeps the flavor bold and enhances the dish's tropical notes. If you prefer a vegetarian option, you can use chickpeas or lentils. They absorb the spices well and add protein. You can also try tofu or paneer. Tofu gives a nice texture, while paneer adds a slight sweetness. Both options work well when marinated and baked like the chicken. You can easily change the spice level to fit your taste. For a mild version, reduce the chili powder to half a teaspoon. You can also add a little sugar to balance the heat. For those who love spice, add extra chili powder or fresh chili peppers. This will give your dish a nice kick! - Best Practices for Storage: Store your chicken tikka masala in an airtight container. This keeps it fresh and safe. Let it cool down for about 30 minutes before sealing it. Avoid putting hot food directly in the fridge. - How Long it Lasts in the Fridge: When stored properly, chicken tikka masala lasts up to 3 days in the fridge. Make sure to check for any off smells or changes in color before eating. - Proper Freezing Techniques: To freeze your chicken tikka masala, use a freezer-safe container. Leave some space at the top to allow for expansion as it freezes. You can also use freezer bags for easy storage. Remove as much air as possible before sealing. - Thawing and Reheating Tips: Thaw your dish in the fridge overnight for best results. If you need it faster, you can use the microwave. Reheat it on the stove over low heat until it’s hot. Stir it well to ensure even heating. Chicken Tikka Masala is a rich and creamy dish. It features marinated chicken in a spiced tomato sauce. This dish has roots in Indian cuisine but gained popularity in the UK. It mixes flavors from both cultures. The chicken is usually grilled or baked, then added to the sauce. This cooking method gives it a smoky flavor that many love. It's a great way to enjoy warm spices and comfort food in one meal. Yes, you can use chicken breast instead of thighs. Chicken breast is leaner and cooks faster. This can be good for a quicker meal. However, thighs are juicier and more flavorful. They stay tender even when cooked longer. If you choose breast, watch the cooking time. You want to avoid dry chicken. Both cuts work well in this recipe, so choose what you prefer. Chicken Tikka Masala can be mild or spicy, depending on your taste. The dish uses spices like chili powder and garam masala. You can control the heat by adjusting the chili powder. If you like it mild, use less. If you enjoy spice, add more. Remember, the cream in the sauce helps tone down the heat. So, you can enjoy a flavorful dish without overwhelming spice. Yes, you can easily make Chicken Tikka Masala nut-free. The original recipe does not include nuts. However, if you use certain store-bought sauces, check the labels. Some may contain nut ingredients. For a creamy texture, you can use heavy cream or coconut cream. Both options are delicious and safe for nut allergies. Enjoy this dish worry-free! This blog post covered all the key elements for making Chicken Tikka Masala. You learned about the ingredients, marinade, cooking methods, and serving tips. I also shared variations for different diets and preferences. Remember, using fresh spices and proper marination brings out the best flavors. Feel free to experiment with protein options and spice levels to suit your taste. With these guidelines, you can create this dish with confidence. Enjoy your cooking and make a delicious meal for yourself or your loved ones!

Chicken Tikka Masala Copycat Flavorful Home Dish

- 4 bell peppers (any color), diced - 1 lb ground turkey or beef - 1 cup cooked quinoa or rice - 1 can (15 oz) diced tomatoes, with juices - 1 cup black beans, drained and rinsed - 1 cup corn kernels (fresh or frozen) - 1 onion, finely chopped - 2 cloves garlic, minced - 1 tablespoon chili powder - 1 teaspoon cumin - Salt and pepper to taste - 1 cup shredded cheese (cheddar or Mexican blend) - Fresh cilantro for garnish (optional) Using fresh ingredients makes this dish pop with flavor. I love using colorful bell peppers. They add great taste and look beautiful. You can choose any color you like—red, green, yellow, or orange. Ground turkey or beef gives the casserole its heartiness. Choose what you prefer or have on hand. Cooked quinoa or rice works as a nice base. Either option makes it filling. I often use cooked quinoa for a healthy twist. Diced tomatoes bring moisture and a tangy flavor. Don't forget to include the juices for the best texture. Black beans and corn add fiber and sweetness. They also help make the dish colorful and fun. Onions and garlic bring a savory depth to the mix. I like to sauté them first to enhance their flavors. Chili powder and cumin add warmth to the dish. Adjust these spices to fit your taste. Salt and pepper are key for balancing flavors. Lastly, shredded cheese on top makes everything gooey and delicious. I recommend cheddar or a Mexican blend for a nice kick. For a fresh touch, sprinkle cilantro on top before serving. It adds a bright finish that I always enjoy. With these ingredients, you’ll create a stuffed pepper casserole that is both easy and hearty. {{ingredient_image_1}} 1. Start by washing the bell peppers. Cut off the tops and remove the seeds. Dice them into small pieces. 2. Next, chop the onion into tiny pieces. Mince the garlic cloves. 3. If you haven't cooked your quinoa or rice yet, do so now. Follow the package directions for perfect results. 1. Heat a large skillet over medium heat. Add the chopped onion and minced garlic. Cook for about 3-4 minutes or until the onion turns soft and clear. 2. Now, add your ground turkey or beef to the skillet. Cook it for 5-7 minutes. Break it up with a spatula as it cooks. You want it nicely browned. 3. Stir in the diced bell peppers, cooked quinoa or rice, diced tomatoes (including their juices), black beans, corn, chili powder, cumin, salt, and pepper. Mix everything well. Let it cook for another 5 minutes. This step helps the flavors blend together. 1. Take the skillet mixture and transfer it to a greased 9x13-inch casserole dish. Spread it evenly. 2. Sprinkle the shredded cheese generously over the top. This will add a tasty, melty layer. 3. Cover the dish with aluminum foil and place it in the preheated oven. Bake for 25 minutes. 4. After 25 minutes, remove the foil. Bake for another 10-15 minutes. You want the cheese to melt and bubble. 5. Once it's done, let the casserole sit for a few minutes. This helps it set before you serve. To make your stuffed pepper casserole shine, focus on balancing spices. I recommend using chili powder and cumin. These spices add depth to your dish. Start with one tablespoon of chili powder and one teaspoon of cumin. Adjust to taste as you mix the filling. If you like more texture, try adding more vegetables. You can include zucchini, carrots, or even spinach. These veggies boost flavor and nutrition. Chop them small so they blend well. A watery casserole can ruin your meal. To avoid this, drain the canned tomatoes well. The liquid can make your dish soggy. Also, do not skip the step of letting the casserole sit before serving. This helps it set up nicely. For cheese that melts evenly, sprinkle it on top of the hot mixture. This way, the heat from the filling melts the cheese perfectly. You can use cheddar or a Mexican blend. Both add great flavors. You can make this casserole ahead of time. Prepare it up to the baking step. Cover it well and store it in the fridge. When you are ready, just bake it as directed. If you have leftovers, freezing is a smart choice. Cool the casserole completely, then cut it into portions. Wrap them in plastic wrap and put them in a freezer bag. This way, you can enjoy it later. Pro Tips Use Fresh Ingredients: For the best flavor, use fresh bell peppers and high-quality ground meat. Fresh ingredients enhance the overall taste of the dish. Customize Your Spices: Feel free to adjust the chili powder and cumin to suit your taste. Add more spices for a spicier kick or reduce them for a milder flavor. Layer Your Cheese: For an extra cheesy casserole, consider layering some cheese within the mixture and on top. This will add richness and gooeyness to every bite. Let It Rest: Allowing the casserole to sit for a few minutes after baking helps it set and makes serving easier. This also allows flavors to deepen. {{image_2}} You can switch up the protein in this dish easily. If you want a vegetarian option, consider using lentils or black beans instead of meat. These options add great texture and flavor while keeping it hearty. For meat lovers, you might try ground chicken or pork. Both will work well in this casserole. Each protein brings a unique taste, so feel free to experiment. Want to spice up your casserole? Add some diced jalapeños or a dash of hot sauce to the mix. This will give it a nice kick. You can also change the cheese. If you like it creamy, use mozzarella or pepper jack cheese. For a sharper flavor, go with aged cheddar or feta. Mixing different cheeses can create a rich flavor profile that everyone will love. You can choose different base ingredients for this casserole. Quinoa is a great option as it adds protein and a nutty taste. If you prefer rice, brown rice works well too. It brings a chewy texture that complements the dish. Other grains like farro or barley can also be used. These grains add fiber and a unique flavor to your casserole, making it a fun twist on the classic recipe. To keep your stuffed pepper casserole fresh, store it in an airtight container. This method helps keep moisture in and prevents it from drying out. You can refrigerate it for up to four days. Make sure to let it cool before placing it in the fridge. This helps keep the texture nice and avoids steam buildup. If you want to save some for later, freezing is a great option. First, let the casserole cool completely. Then, cover it tightly with plastic wrap or aluminum foil. Place it in a freezer-safe container. You can freeze it for up to three months. When you're ready to eat, thaw it in the fridge overnight. To reheat, bake it at 350°F (175°C) until it’s hot all the way through. This usually takes about 30-40 minutes. You can also microwave it, but the oven keeps the texture better. You have two main options for reheating: the oven and the microwave. The oven works best for keeping the flavors and texture. Set it to 350°F (175°C) and cover the casserole with foil. Heat for about 20 minutes, then check if it's warm inside. Using the microwave is quicker, but it may not taste as good. Heat in short bursts, stirring in between. This helps heat it evenly. No one wants a cold center! Always make sure it reaches a safe temperature of 165°F (74°C) before serving. Yes, you can prepare this dish ahead of time. Make the filling and store it in the fridge for up to 24 hours. You can also assemble the casserole in advance. Just cover it tightly with foil and store it in the fridge. When you are ready to bake, simply add extra time to the cooking process, as it will be cold. - Preparing in advance: Cook the filling and let it cool before storing. - Storage options: Keep it in an airtight container for best results. Yes, you can use brown rice instead of quinoa. Keep in mind that brown rice takes longer to cook. If you use brown rice, cook it before adding it to the mix. - Cooking times and adjustments: Cook brown rice for about 45 minutes before mixing it in. Reheating this casserole can be easy and quick. Use the oven for the best flavor and texture. Preheat the oven to 350°F (175°C). Place the casserole in a baking dish and cover it with foil. Bake for about 20 minutes. - Tips for retaining flavor and texture: Make sure to cover the dish to keep it moist. This casserole is packed with good nutrients. It has protein from turkey or beef, fiber from beans, and vitamins from peppers. - Nutritional breakdown: Each serving has a good balance of carbs, protein, and fats. - Caloric content and serving size: One serving is about 300-400 calories, depending on the meat and cheese you choose. This blog post outlined how to make a tasty stuffed pepper casserole. We covered the key ingredients and the steps to prepare, cook, and assemble your dish. I shared tips for great flavor, texture, and quick meal prep. You can even explore different protein and grain options. In the end, this casserole is not just delightful, but also flexible. You can tweak it to suit your taste. Whether you cook it today or freeze it for later, you have a meal that pleases every time. Enjoy your cooking adventure!

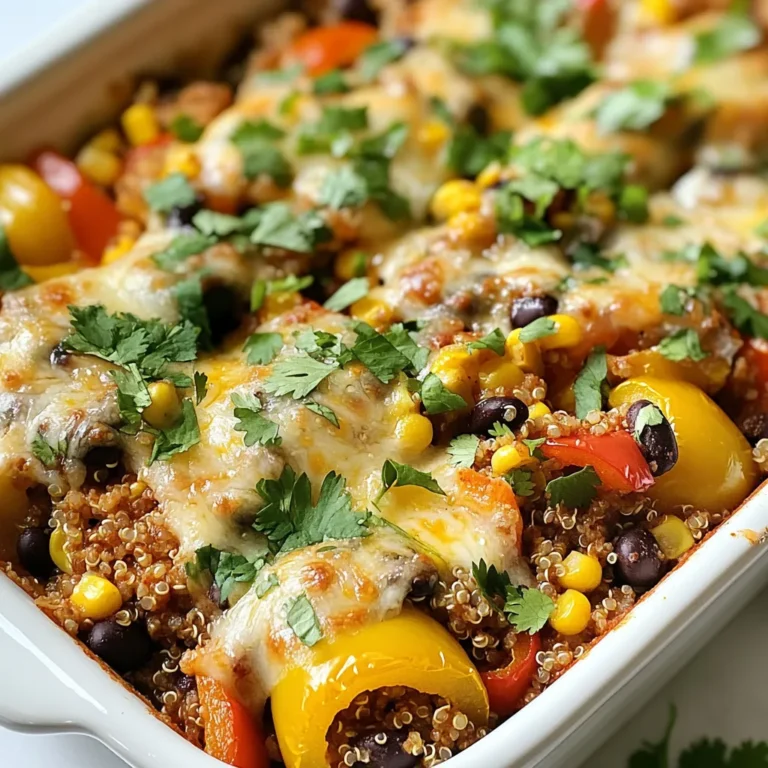
Stuffed Pepper Casserole Easy and Hearty Meal

- 2 cups cottage cheese (low-fat or regular) - 1 cup cooked quinoa - 1 bell pepper, diced - 1 zucchini, grated - 1 cup spinach, chopped - 1/2 onion, finely chopped - 2 cloves garlic, minced - 1 cup shredded mozzarella cheese - 2 large eggs - Olive oil for greasing Cottage cheese is the star of this dish. You can choose low-fat or regular based on your needs. Low-fat cottage cheese gives you fewer calories, while regular offers a richer taste. For vegetables, I love using a mix of bell pepper, zucchini, spinach, and onion. They bring great color and nutrition. You can switch them out for what you have on hand. For the topping, I suggest shredded mozzarella cheese. It melts beautifully and adds a creamy layer on top. - 1 teaspoon dried oregano - 1 teaspoon dried basil - Salt and pepper to taste To enhance flavor, I use dried oregano and basil. These herbs add a wonderful aroma and taste. If you want to change things up, try using fresh herbs instead. For oil, I recommend olive oil. It’s healthy and adds a nice richness to the bake. You can also use avocado oil if you prefer a different flavor. This dish packs a protein punch with about 20 grams of protein per serving! That makes it a great choice for a filling meal. The calorie count is around 300-350 per serving, depending on the cottage cheese type used. It’s a balanced dish, full of protein, fiber, and vitamins. The veggies contribute antioxidants, while quinoa offers complete protein. This bake is not just tasty; it’s good for you too! It supports muscle growth and helps keep you full longer. {{ingredient_image_1}} 1. Preheat the oven and grease the baking dish: Start by setting your oven to 375°F (190°C). This temperature helps cook the bake evenly. Next, take a 9x9-inch baking dish and coat it with olive oil. This step prevents sticking and makes cleanup easier. 2. Preparing the vegetable mix: While the oven heats, gather your vegetables. Dice the bell pepper, grate the zucchini, and chop the spinach. Finely chop the onion and mince the garlic. These veggies add flavor and nutrition to the dish. 1. Mixing cottage cheese with other ingredients: In a large bowl, combine 2 cups of cottage cheese with the cooked quinoa and all the prepared veggies. This mix is the heart of your bake. Make sure to mix everything well to evenly distribute the flavors. 2. Whisking and folding in eggs: In a separate bowl, crack 2 large eggs. Whisk them until they are frothy. Then, gently fold the eggs into the cottage cheese mixture. This helps bind the ingredients together and gives the bake a nice texture. 1. Transferring to the baking dish: Pour the combined mixture into the greased baking dish. Spread it out evenly. This ensures that every part of the bake cooks uniformly. 2. Duration and temperature for baking: Place the dish in your preheated oven. Bake for 30-35 minutes. You want the top to be golden brown and the mixture to be set. This step makes everything come together beautifully. Enjoy your tasty and healthy High Protein Veggie Cottage Cheese Bake! To get the right texture, you can adjust the cottage cheese. For a creamier bake, use low-fat cottage cheese. If you want it firmer, regular cottage cheese works well. The eggs play a key role too. They bind the mix and help it set during baking. Whisk the eggs well before folding them in. This adds air, making your bake light and fluffy. Want to take your bake up a notch? Consider adding toppings like sliced olives or cherry tomatoes. Fresh herbs, such as basil or parsley, can make a big difference. You can also drizzle a bit of balsamic glaze on top for added flavor. Serve with a side of simple salad or roasted vegetables. These pair nicely and add color to your plate. Presentation matters! Cut the bake into wedges and place them on a plate. A side of fresh salad adds crunch and freshness. You can also sprinkle some extra cheese on top for a cheesy finish. For a complete meal, serve with whole-grain bread or quinoa. This gives you more texture and flavor in every bite. Pro Tips Choose Your Cheese: Experiment with different types of cheese, such as feta or goat cheese, for a unique flavor twist. Boost the Veggies: Feel free to add other vegetables like mushrooms, broccoli, or carrots to increase the nutritional value. Make It Ahead: Prepare the mixture a day in advance and store it in the fridge for an easy meal prep option. Customize the Spices: Adjust the herbs and spices to your liking; adding red pepper flakes can give it a nice kick! {{image_2}} You can easily boost the protein in your veggie cottage cheese bake. Here are a couple of great ideas: - Beans: Adding black beans or chickpeas gives a nice texture and protein. - Tofu: Silken tofu blends well. It makes the dish creamier and adds protein. You can also explore different dairy or non-dairy options. Greek yogurt can replace some cottage cheese for a thicker texture. If you prefer plant-based, try using almond or soy yogurt. Seasonal veggies can change the bake's flavor. Here are some swaps to try: - Butternut squash: Adds sweetness and pairs well with spices. - Broccoli: Adds crunch and a bright color. Frozen vegetables are a great option too. They save time and are often just as good as fresh. Just make sure to thaw and drain any excess water. If you need gluten-free options, use certified gluten-free quinoa. This keeps your bake safe for gluten-sensitive friends. For vegan alternatives, replace the eggs with flax eggs. Just mix one tablespoon of ground flaxseed with three tablespoons of water. Let it sit until it thickens. For cheese, try a vegan mozzarella. It melts well and tastes great in this dish. After you enjoy this bake, store any leftovers in an airtight container. Glass or plastic containers work well. Make sure to cool the dish before sealing it. This prevents moisture build-up, which can make it soggy. Store the container in the fridge. It should stay fresh if you keep it at a steady temperature. To freeze the veggie cottage cheese bake, let it cool first. Cut it into squares for easy portions. Wrap each square in plastic wrap, then place them in a freezer bag. This helps keep them separate and prevents sogginess. When you're ready to eat, thaw it in the fridge overnight. Reheat in the oven or microwave until warm. In the fridge, this bake lasts about 3 to 5 days. Always check for signs of spoilage. Look for an off smell or mold. If it smells funny or looks strange, it's best to toss it. Enjoy your leftovers while they are fresh for the best taste and texture! Can I use different types of cheese? Yes, you can! Feel free to use any cheese you love. Cheddar or feta can add great flavor. Just remember that different cheeses may change the taste and texture. How do I make it spicier? To spice things up, add jalapeños or red pepper flakes. You can also mix in a spicy cheese. Adjust the amount to suit your taste. Why is my cottage cheese bake watery? A watery bake often means there was too much moisture. Make sure to drain your veggies well. You can also use less cottage cheese if needed. Can I bake it in a different size dish? Yes, you can use a larger or smaller dish. Just keep an eye on the bake time. A bigger dish may cook faster, while a smaller one can take longer. How can I increase the protein content further? To boost protein, add beans or cooked chicken. You can also use higher protein cheese, like cottage cheese, or add a scoop of protein powder to the mix. Is this recipe suitable for meal prep? Absolutely! This dish stores well and can last a few days in the fridge. It’s a great meal prep option for busy weeks. This blog post detailed how to create a delicious cottage cheese bake. We covered key ingredients like cottage cheese, veggies, and seasonings. I shared step-by-step preparation and baking instructions to ensure success. You learned tips for texture and flavor, plus variations to suit dietary needs. Lastly, I provided storage tips to keep your dish fresh. Enjoy experimenting with your cottage cheese bake, and make it your own!

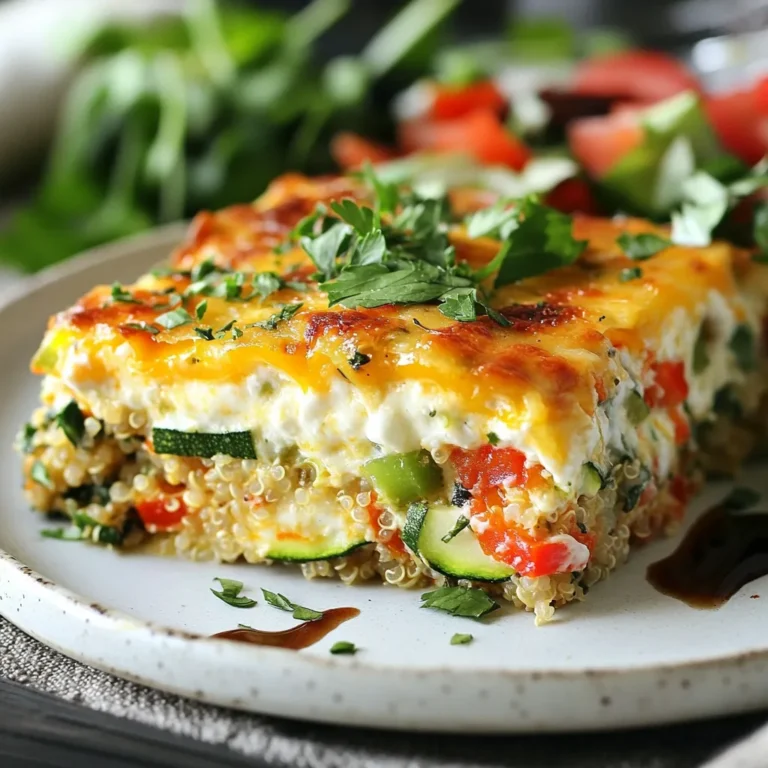
High Protein Veggie Cottage Cheese Bake Recipe

- 8 oz linguine or spaghetti - 1 lb medium shrimp, peeled and deveined - 3 tablespoons unsalted butter - 4 cloves garlic, minced - 1 teaspoon red pepper flakes - Zest and juice of 1 lemon - 4 cups vegetable or chicken broth - 1 cup cherry tomatoes - 1/2 cup fresh parsley, chopped - Salt and pepper to taste - Grated Parmesan cheese for serving (optional) The main ingredients are the stars of this dish. You will need 8 ounces of linguine or spaghetti. I love linguine for its flat shape, which holds sauce well. Next, grab a pound of medium shrimp. Make sure they are peeled and deveined for easy cooking. Lastly, you need three tablespoons of unsalted butter. Butter adds a rich taste that makes this dish special. For flavor, we have garlic, red pepper flakes, and lemon. You will use four cloves of minced garlic. Garlic gives the dish a warm, savory flavor. Adjust the red pepper flakes to your liking. Just a teaspoon is enough to add a nice kick. Don’t forget the zest and juice of one lemon. Lemon brightens the dish and balances the richness of the butter. Now, let’s talk about broth and vegetables. You need four cups of vegetable or chicken broth. The broth adds depth and helps cook the pasta. Also, include one cup of halved cherry tomatoes. They add sweetness and color. Finally, use half a cup of fresh parsley. It brings freshness and a pop of green to the plate. You can season with salt and pepper to taste. If you like cheese, some grated Parmesan makes a great topping. {{ingredient_image_1}} - Step 1: Melt the butter in a large pot over medium heat. Add minced garlic and red pepper flakes. Sauté for about one minute until the garlic smells good. - Step 2: Add the shrimp to the pot. Cook for 2 to 3 minutes. They should turn pink and opaque. Once done, take them out and set aside. - Step 3: In the same pot, pour in the vegetable or chicken broth. Add lemon zest and lemon juice. Bring this mixture to a boil. - Step 4: Stir in the linguine or spaghetti. Cook according to the package instructions, usually about 9 to 11 minutes. Stir often to keep the pasta from sticking. - Step 5: Three minutes before the pasta is fully cooked, add the halved cherry tomatoes to the pot. - Step 6: When the pasta is ready, lower the heat and return the shrimp to the pot. Toss everything together well. Season with salt and pepper. Garnish with fresh parsley before serving hot. You can add grated Parmesan cheese if you like. - Use fresh shrimp for the best flavor. Fresh shrimp tastes sweet and tender. - Adjust red pepper flakes for your spice level. If you like heat, add more! - Stir pasta often to prevent sticking. This helps keep everything smooth and tasty. - Taste and adjust seasonings before serving. A little more salt or pepper can make a big difference. - Pair with garlic bread or salad. These sides complement the dish well and add texture. - Consider wine pairings for a complete meal. A crisp white wine works nicely with the shrimp and lemon. Pro Tips Perfect Pasta Texture: To achieve the ideal al dente texture, make sure to cook the pasta just until it’s firm to the bite. Remember that it will continue to cook slightly after you drain it. Fresh Ingredients Matter: Using fresh shrimp and herbs enhances the flavor greatly. Whenever possible, opt for fresh ingredients instead of frozen or dried. Balance the Flavors: If you find the dish too tangy, a pinch of sugar can help balance the acidity from the lemon juice. Adjust to your taste preferences! Customize the Heat: The red pepper flakes can be adjusted based on your spice tolerance. Start with a little, and add more as desired for extra heat! {{image_2}} You can change the pasta shape to fit your taste. Try penne or fusilli instead of linguine. You can also swap the shrimp for chicken or scallops. Both options work well and give a new twist. Add more greens to your dish for extra flavor and nutrition. Spinach or arugula can brighten the meal. For a briny touch, include capers or olives. Both add a nice contrast to the lemon and butter. Those needing gluten-free options can choose gluten-free pasta. Many brands offer great taste and texture. If you want a vegan dish, replace the shrimp with mushrooms or tofu. Use vegetable broth instead of chicken broth for a full vegan meal. To keep your One-Pot Lemon Butter Shrimp Pasta fresh, store it in the fridge. Place the leftovers in an airtight container. This will help maintain the taste and texture. It’s best to store the pasta within two hours of cooking. If you wait too long, bacteria can grow. I recommend using glass containers. They are safe and do not absorb odors. Plastic containers work too, but make sure they are BPA-free. When it's time to eat your pasta again, you have a few good options. The best way to reheat is on the stove. Just add a splash of broth or water in a pan and heat it over low. Stir often to keep it from sticking. If you are in a hurry, the microwave works as well. Place the pasta in a microwave-safe bowl. Cover it with a damp paper towel to keep it moist. Heat it in short bursts, stirring in between until warm. To keep the flavors bright, always check the seasoning. You may want to add a little more lemon juice or salt. Yes, you can freeze One-Pot Lemon Butter Shrimp Pasta! Just make sure it cools completely before you freeze it. Place it in a freezer-safe container. Leave some space at the top for the pasta to expand. When you want to eat it, take it out of the freezer. Thaw it overnight in the fridge. For quick thawing, you can use the microwave on defrost mode. To reheat frozen pasta, follow the same steps as for refrigerated pasta. Add a little broth or water to help it heat evenly. Enjoy your meal! How long does One-Pot Lemon Butter Shrimp Pasta last in the fridge? This dish stays fresh in the fridge for about 3 to 4 days. Just store it in an airtight container. Make sure to let it cool down before sealing it. Can I use frozen shrimp for this recipe? Yes, you can use frozen shrimp. Just thaw them first. You can place them in cold water for about 15 minutes. This keeps the shrimp tender and tasty. What can I substitute for butter in this recipe? You can use olive oil or vegan butter. Both options give good flavor. Olive oil adds a healthy touch, while vegan butter keeps it dairy-free. How do I prevent the pasta from becoming mushy? Stir the pasta often while it cooks. This helps it cook evenly and prevents sticking. Also, watch the cooking time closely and taste it a minute or two before it’s done. Can I make this dish spicier? Absolutely! Add more red pepper flakes to kick up the heat. Start with a little more, then taste before adding more. You can also include fresh jalapeños for extra spice. What other herbs can I add for flavor? You can add basil, thyme, or oregano. Fresh herbs give a nice boost to the dish. Just chop them finely and toss them in at the end for the best taste. This blog post covered the simple steps to make One-Pot Lemon Butter Shrimp Pasta. You learned about key ingredients, cooking methods, and variations to try. Fresh shrimp and bright lemon add great flavor. For the best results, remember to taste often and be creative with swaps. Whether you choose gluten-free options or add veggies, you can make this dish your own. Enjoy your cooking adventure!

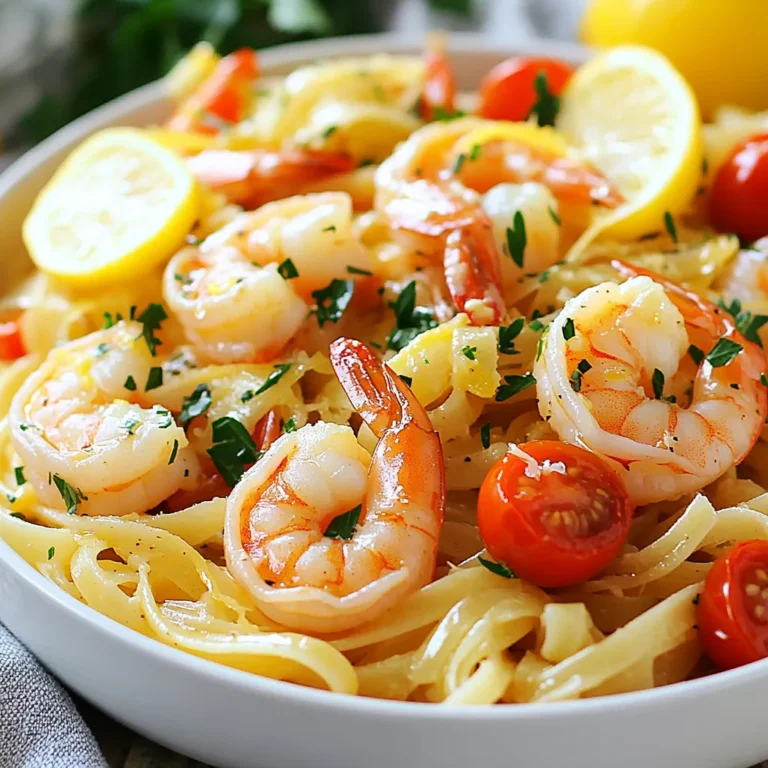
One-Pot Lemon Butter Shrimp Pasta Simple Meal Idea

To make a tasty Lemon Garlic Chicken and Rice, gather these simple ingredients: - 4 bone-in, skin-on chicken thighs - 1 cup long-grain white rice - 2 cups chicken broth - 3 tablespoons olive oil - 4 cloves garlic, minced - Zest of 1 lemon - 1/4 cup freshly squeezed lemon juice - 1 teaspoon dried oregano - 1 teaspoon paprika - Salt and pepper to taste - Fresh parsley, chopped, for garnish These ingredients come together to create a dish full of flavor. The chicken thighs give a nice, juicy bite. The rice soaks up all the tasty broth and lemon juice, making it fluffy and zesty. Garlic adds a warm, savory note that ties everything together. Don't forget the parsley; it adds a fresh, colorful touch. Each ingredient plays a key role in making this dish special. {{ingredient_image_1}} - In a bowl, combine minced garlic, lemon zest, lemon juice, olive oil, oregano, paprika, salt, and pepper. - Add the chicken thighs, ensuring they are fully coated in the marinade. - Let marinate in the refrigerator for at least 30 minutes or up to 2 hours for best flavor. Marinating the chicken helps the flavors sink in. The lemon and garlic work together to give the chicken a bright taste. This step is key to making your dish pop with flavor! - Heat a tablespoon of olive oil in a large skillet or Dutch oven over medium-high heat. - Remove the chicken from the marinade (save the marinade) and sear the chicken thighs skin-side down for about 5-7 minutes. - Flip and cook for an additional 4-5 minutes until golden brown. - Remove the chicken from the pan and set it aside. Searing adds a nice crust to the chicken. The crispy skin makes each bite satisfying. It also helps lock in the juices for a moist finish. - In the same skillet, add the rice and toast it for 2 minutes, stirring often. - Pour in the chicken broth and add the reserved marinade. - Bring to a boil, then reduce heat to low and cover the skillet. - Simmer for about 15 minutes, or until the rice is cooked and has absorbed most of the liquid. Toasting the rice brings out its natural nutty flavor. The broth and marinade add depth and richness to each grain. - Nestle the seared chicken thighs on top of the rice. - Cover the skillet again and cook for an additional 10-15 minutes on low heat. This step allows the chicken to finish cooking while the flavors meld together. The rice absorbs the juices from the chicken, creating a delicious blend. - Once everything is cooked, remove the skillet from heat. - Let it sit for a few minutes. - Garnish with freshly chopped parsley before serving. Resting the dish allows the flavors to settle. The parsley adds a nice touch and brightens the plate. Enjoy your savory lemon garlic chicken and rice! To boost the taste of your Lemon Garlic Chicken and Rice, marinate the chicken longer. A good rule is to let it sit for at least two hours. This gives the flavors time to soak in. Also, always use fresh herbs for garnish. They add color and a burst of flavor that makes the dish pop. For perfect searing, make sure your skillet is hot before adding the chicken. This helps create a nice, crispy skin. Sear the chicken thighs skin-side down first. After a few minutes, flip them to cook the other side. To ensure fluffy rice, toast it briefly in the skillet before adding broth. This step brings out the nutty flavor and prevents it from getting mushy. Use a large skillet or a Dutch oven for this recipe. These are great for even heat. They also allow enough space for the chicken and rice. For preparation, you will need a good chef's knife, a cutting board, and measuring cups. These tools help make your cooking smooth and easy. Pro Tips Marinate for Maximum Flavor: The longer you marinate the chicken, the more flavorful it will be. Aim for at least 2 hours or overnight if possible. Perfectly Crispy Skin: Ensure your skillet is hot enough before adding the chicken. This helps achieve that beautiful crispy skin. Rice Texture Matters: Toasting the rice before adding the liquid enhances its nutty flavor and helps achieve a fluffier texture. Garnish for Freshness: Always add fresh herbs like parsley just before serving. They add a pop of color and a burst of freshness to the dish. {{image_2}} You can switch chicken thighs for chicken breasts. Breasts cook faster and are leaner. This change makes the dish lighter but may dry out quicker. Use a meat thermometer to check doneness and avoid overcooking. Using brown rice instead of white rice adds more fiber. Brown rice takes longer to cook, so adjust the cooking time. Replace the 1 cup of white rice with 1 cup of brown rice. You'll need 2 ½ cups of chicken broth instead of 2 cups. Add vegetables for extra taste and nutrition. Bell peppers and spinach work well. Chop them and add them to the rice when simmering. This makes the dish colorful and healthy. Incorporate spices for different flavor profiles. Try adding cumin for a warm, earthy taste. You can also use curry powder for a unique twist. This gives your dish a whole new character without much effort. You can adapt this recipe for an Instant Pot or slow cooker. For the Instant Pot, sauté the chicken first, then cook on high for 10 minutes. If using a slow cooker, sear the chicken first. Then place it in the slow cooker with the rice and broth. Cook on low for about 6 hours. Grilling chicken instead of searing adds a smoky flavor. Marinate the chicken as usual, then grill it for 6-8 minutes on each side. This method gives a nice char and pairs beautifully with the rice. To keep your Lemon Garlic Chicken and Rice fresh, follow these tips: - Refrigerating leftovers: Place the cooled dish in an airtight container. It can last in the fridge for about 3 to 4 days. Make sure to let it cool down before sealing. This helps prevent condensation and soggy rice. - Freezing guidelines: If you want to store it longer, freezing is a great option. Use a freezer-safe container or heavy-duty freezer bags. Remove as much air as possible to avoid freezer burn. You can keep it in the freezer for up to 3 months. To enjoy your dish again, reheating it properly is key. Here are the best methods: - Methods for best results: The oven is great for reheating. Preheat it to 350°F (175°C). Place your chicken and rice in an oven-safe dish, cover it with foil, and heat for about 20 minutes. You can also use the microwave. Just heat it in short bursts, stirring in between, until warm. - How to avoid dry rice: To keep the rice fluffy, add a splash of water or broth before reheating. This helps create steam and keeps the rice moist. Cover the dish while reheating to trap the steam. You can store Lemon Garlic Chicken and Rice in the fridge for up to four days. Make sure to place it in an airtight container. This helps keep it fresh and tasty. If you want to keep it longer, freeze it. It can last for up to three months in the freezer. Yes, you can make this dish ahead of time. Cook it fully and let it cool. Once cool, store it in the fridge. This dish reheats well, so enjoy it later without losing flavor. Lemon Garlic Chicken and Rice pairs well with many sides. Try a simple green salad or steamed veggies. You can also serve it with garlic bread or roasted potatoes for a heartier meal. Yes, you can use other types of rice. Brown rice is a great option, but it will need more cooking time. Quinoa is another choice, which adds a nice texture. Just adjust the liquid and cooking time as needed. Yes, marinating chicken overnight is safe. It can deepen the flavors and make the chicken more tender. Just make sure to keep it in the fridge while it marinates. This article shared a simple, tasty recipe for Lemon Garlic Chicken and Rice. I covered all the steps, from marinating to serving. You can enhance the dish with tips and variations. Remember, cooking is fun and allows for creativity. With a few changes, you can make this dish your own. Enjoy the flavors and share it with others! You'll impress your family with this easy meal. Now, gather your ingredients and start cooking!

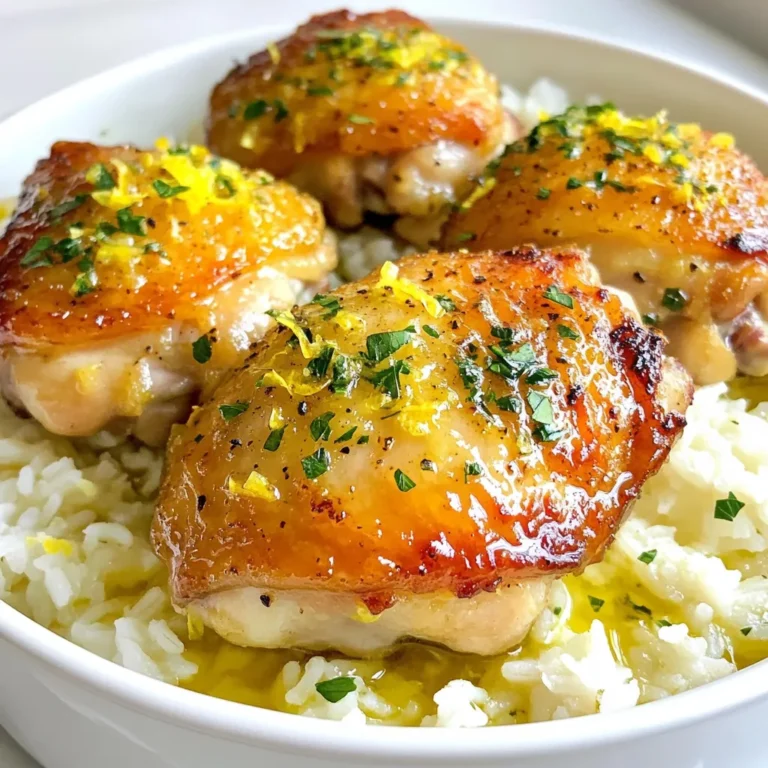
Savory Lemon Garlic Chicken and Rice Delight

To make Marry Me Chickpeas, you will need the following: - 2 cans (15 oz each) chickpeas, drained and rinsed - 1 medium onion, finely chopped - 3 cloves garlic, minced - 1 teaspoon cumin powder - 1 teaspoon smoked paprika - ½ teaspoon turmeric - 1 teaspoon coriander - 1 cup diced tomatoes (canned or fresh) - 1 cup coconut milk - 2 tablespoons olive oil - Salt and pepper to taste - 1 cup fresh spinach, roughly chopped - 2 tablespoons fresh lemon juice - Fresh cilantro or parsley for garnish You can swap out some ingredients if you like. - If you don’t have canned chickpeas, use dried ones. Just soak them overnight. - For a different taste, try using vegetable broth instead of coconut milk. - You can switch fresh spinach for kale or Swiss chard. Both work well. - If you want more heat, add red pepper flakes or diced jalapeños. - Use lime juice instead of lemon juice for a unique twist. When selecting ingredients, freshness matters. Here are some tips: - Choose firm chickpeas without any dents or cracks. - Pick onions that are heavy for their size. They should feel solid. - Look for garlic bulbs that are tight and firm. Avoid any that are sprouting. - For spices, check the expiration date. Fresh spices bring better flavor. - If using fresh tomatoes, pick ones that are ripe and fragrant. These tips ensure your Marry Me Chickpeas dish will taste amazing. Enjoy the cooking process! {{ingredient_image_1}} To make Marry Me Chickpeas, start by gathering all your ingredients. You will need two cans of chickpeas, an onion, garlic, spices, tomatoes, and coconut milk. Prepare your workspace to keep it neat. Chop the onion and mince the garlic. Rinse the chickpeas. This will save time when cooking. 1. Heat Olive Oil: In a large skillet, heat two tablespoons of olive oil over medium heat. 2. Sauté Onion: Add the finely chopped onion. Cook for about five minutes until it turns soft and clear. 3. Add Garlic: Stir in the minced garlic. Cook for one to two minutes until you smell its aroma. 4. Spice It Up: Add cumin, smoked paprika, turmeric, and coriander. Stir to mix these spices with the onions and garlic. Cook for one more minute. 5. Tomatoes Next: Add the diced tomatoes to the skillet. Cook for five minutes, allowing the mix to thicken a bit. 6. Coconut Milk and Chickpeas: Pour in one cup of coconut milk. Add the drained chickpeas and stir well. 7. Season and Simmer: Add salt and pepper to taste. Let the mix simmer for ten minutes. This helps the flavors blend nicely. 8. Add Spinach: Finally, stir in the chopped spinach. Cook until it wilts. Mix in the fresh lemon juice for a zesty touch. 9. Serve: Dish out the chickpeas warm. Top with fresh cilantro or parsley for color and flavor. - Use fresh spices for the best taste. - Adjust salt and pepper as needed. - Let the dish simmer longer for deeper flavors. - Stir well to combine all ingredients. - Serve with rice or bread to make a meal. To make Marry Me Chickpeas even tastier, consider these tips: - Fresh Herbs: Use fresh cilantro or parsley for a bright touch. - Spicy Kick: Add a pinch of red pepper flakes for heat. - Citrus Zest: Grate lemon zest for added brightness. - Nuts or Seeds: Toasted pine nuts or pumpkin seeds add crunch. Each of these elements can take your dish to the next level. Avoid these common pitfalls for the best results: - Overcooking Spinach: Add spinach at the end to keep it vibrant. - Skipping Seasoning: Don't forget salt and pepper; they boost flavor. - Not Rinsing Chickpeas: Rinse well to remove excess sodium and improve taste. By steering clear of these mistakes, you ensure a flavorful dish. Marry Me Chickpeas pair wonderfully with many dishes: - Grains: Serve over rice, quinoa, or couscous for a hearty meal. - Bread: Pair with warm naan or crusty bread to soak up sauce. - Salads: Serve alongside a fresh salad for a balanced plate. Feel free to mix and match these ideas to create a delightful dining experience! Pro Tips Use Fresh Spices: Freshly ground spices can significantly enhance the flavor of your dish. Consider grinding cumin and coriander seeds right before use for a more intense taste. Add Heat: If you enjoy a bit of spice, consider adding a pinch of cayenne pepper or red pepper flakes when sautéing the onions for an extra kick. Customize Your Greens: Feel free to substitute spinach with other greens like kale or Swiss chard, which can add different textures and flavors to the dish. Perfect Pairing: This dish pairs wonderfully with rice or quinoa. Cooking the grains in coconut milk can complement the flavors and add creaminess. {{image_2}} You can easily make Marry Me Chickpeas vegan. The original recipe is already dairy-free. The coconut milk gives it a creamy texture. This dish is also gluten-free. Just ensure your spices are labeled gluten-free. You can swap some ingredients for your taste. Try different beans if you want. Black beans or kidney beans work well too. Instead of coconut milk, you can use almond milk. For a spicy kick, add jalapeños or red pepper flakes. Make this dish unique with your twists. Add roasted red peppers for a smoky flavor. Or mix in some artichoke hearts for extra texture. You can also top it with avocado for creaminess. Serve it over rice or quinoa for a hearty meal. The possibilities are endless! To keep your Marry Me Chickpeas fresh, store them in an airtight container. They will last about three to four days in the fridge. Make sure to let the dish cool down before sealing it. This keeps moisture from building up inside the container. When you're ready to enjoy leftovers, reheat the chickpeas on the stove over medium heat. Add a splash of water or coconut milk to keep them moist. Stir often until heated through, which should take about five to seven minutes. You can also microwave them in a bowl, covered, for about two minutes. Stir halfway through for even heating. If you want to save Marry Me Chickpeas for later, freezing works well. Pour the cooled dish into a freezer-safe container or bag. Make sure to remove as much air as possible before sealing. They can stay frozen for up to three months. When you're ready to eat, thaw them in the fridge overnight. Reheat as mentioned above. Marry Me Chickpeas is a warm, creamy dish made with chickpeas. It combines spices, tomatoes, and coconut milk for rich flavor. The name comes from its delicious taste that makes you want to share it. People often serve it as a main dish or a side. It’s perfect for any meal. Yes, you can make Marry Me Chickpeas ahead of time. Just cook the dish and let it cool. Store it in an airtight container in the fridge. It stays good for three to four days. Reheat it on the stove or in the microwave before serving. Marry Me Chickpeas pairs well with many dishes. You can serve it over rice or quinoa for a filling meal. It also goes great with warm naan or pita bread. For a light meal, serve it with a fresh salad. You can even add it to wraps for lunch. To add spice, include red pepper flakes or chopped fresh chili peppers. You can also use spicy smoked paprika instead of regular. Another option is to add a dash of hot sauce while cooking. Adjust the heat level to match your taste. Yes, you can use dried chickpeas instead of canned. First, soak the chickpeas overnight in water. Then, cook them until they are soft. This process may take longer, so plan ahead. Once cooked, drain and rinse them before adding to the recipe. Marry Me Chickpeas are tasty and easy to make. We covered the best ingredients, how to prepare them, and tips to boost flavor. You can tailor this dish to fit your needs. Remember to store leftovers properly for later use. With simple swaps and variations, you can adjust the recipe to match your taste. Trust me, this dish will impress everyone around your table. Enjoy cooking and savor your Marry Me Chickpeas!

Marry Me Chickpeas Flavorful and Easy Recipe Guide

PREV 1 … 51 52 53 … 56 NEXT
go kitchen now

explore

DessertsDinnerAppetizersDrinks

Our Policies

  • Cookie Policy
  • Copyright Policy
  • Disclaimer
  • GDPR Policy
  • Terms Of Use
Back to Top
  • About
  • Contact Us
  • Privacy Policy
© 2025 go kitchen now