FREE DINNER EBOOK! Get your copy!
  • Cookie Policy
  • GDPR Policy
  • Disclaimer
  • Terms Of Use
  • Visit my other site: Fun Cookie Recipes
go kitchen now
  • Home
  • Dinner
  • Desserts
  • Drinks
  • Appetizers
  • Contact
  • About
  • Privacy Policy
  • Home
  • Dinner
  • Desserts
  • Drinks
  • Appetizers
  • Contact
  • About
  • Privacy Policy
  • Cookie Policy
  • GDPR Policy
  • Disclaimer
  • Terms Of Use
Visit my other site: Fun Cookie Recipes

HOME / CATEGORIES /

Latest

- 4 boneless, skinless chicken thighs - 2 cups pineapple chunks (fresh or canned) - 1 red bell pepper, sliced - 1 green bell pepper, sliced - 1 red onion, sliced - 3 cloves garlic, minced - 2 tablespoons soy sauce - 1 tablespoon honey - 1 tablespoon fresh ginger, grated - 1 teaspoon sesame oil - Salt and pepper to taste - Cooked jasmine rice for serving - Chopped green onions and sesame seeds for garnish This dish bursts with flavor. You need juicy chicken thighs and sweet pineapple. The bell peppers add crunch, while the onion brings a nice zing. Garlic, soy sauce, honey, and ginger create a tasty marinade. Sesame oil adds depth. With salt and pepper, this meal shines. Don't forget the jasmine rice! It soaks up all the tasty juices. Chopped green onions and sesame seeds make a bright finish. Enjoy this colorful mix of ingredients for a fun and easy dinner. {{ingredient_image_1}} - Preheat the oven. Set your oven to 400°F (200°C). This will help cook the chicken and veggies evenly. - Prepare the marinade. In a small bowl, whisk together: - 2 tablespoons soy sauce - 1 tablespoon honey - 3 cloves garlic, minced - 1 tablespoon fresh ginger, grated - 1 teaspoon sesame oil - Salt and pepper to taste This mix adds great flavor to the chicken. - Marinate the chicken. In a large bowl, place 4 boneless, skinless chicken thighs. Pour half of the marinade over them. Let it sit for at least 15 minutes. This step makes the chicken tasty and juicy. - Prepare the sheet pan with vegetables. Spread 2 cups of pineapple chunks, sliced red and green bell peppers, and sliced red onion on a large sheet pan. Drizzle the remaining marinade over the veggies and pineapple. Toss to coat them well. - Nestle the chicken on the pan. Take the marinated chicken and place it among the vegetables on the sheet pan. This allows the flavors to mix as it cooks. - Roast in the oven. Place the sheet pan in the oven. Roast for 25-30 minutes. The chicken should reach an internal temperature of 165°F (75°C). The veggies will become tender and caramelized. - Resting the dish. When done, take the sheet pan out of the oven and let it rest for a couple of minutes. This helps keep the juices in the chicken. - Serving suggestions. Serve the chicken and veggies over cooked jasmine rice. For a special touch, garnish with chopped green onions and sesame seeds. Enjoy the bright flavors of your Hawaiian Chicken Sheet Pan Dinner! To get the best flavor, marinate the chicken for at least 15 minutes. This gives the chicken time to soak up the marinade. If you want to mix it up, try using teriyaki sauce or a spicy chili sauce. Both add a unique taste. To ensure even cooking, spread the chicken and veggies in a single layer on the pan. This helps everything cook at the same rate. To check doneness, use a meat thermometer. The chicken should reach 165°F (75°C) for safety. For a beautiful finish, garnish your dish with chopped green onions and sesame seeds. It adds color and crunch. Serve the Hawaiian chicken over fluffy jasmine rice for a nice touch. The rice soaks up all the tasty juices. Pro Tips Marinate Longer for Extra Flavor: If time allows, marinate the chicken for up to 2 hours. This will enhance the flavor and tenderness of the chicken. Use Fresh Pineapple: Opt for fresh pineapple chunks for a brighter flavor and better texture compared to canned pineapple. Customize Your Veggies: Feel free to add other vegetables like zucchini or snap peas for extra color and nutrients. Check Chicken Temperature: Always use a meat thermometer to ensure the chicken reaches an internal temperature of 165°F (75°C) for safe consumption. {{image_2}} You can switch up the veggies in this dish. Try using zucchini, snap peas, or carrots. Each option adds a new taste. You can also mix in broccoli for crunch. If you want a different protein, use chicken breasts instead of thighs. Tofu is a great choice too. It soaks up the marinade well and makes the dish plant-based. Want to amp up the flavor? Add spices like chili flakes or black pepper. Fresh herbs like cilantro or basil can brighten the dish. You might also drizzle some teriyaki sauce for extra sweetness. A splash of lime juice can add a nice zing. You can make it your own by using what you like. If you want to make this meal ahead, marinate the chicken the night before. It will soak in all the tasty flavors. You can also chop the veggies in advance. Just keep them in the fridge. For leftovers, store them in an airtight container. This dish freezes well too. Just make sure to let it cool before freezing it. When you’re ready, reheat in the oven for the best taste. To store leftover Hawaiian Chicken Sheet Pan Dinner, place it in an airtight container. This helps keep the meal fresh. You can also separate the chicken from the veggies for better storage. It lasts in the fridge for about three to four days. Be sure to check for any signs of spoilage before eating. If you want to keep the dish longer, freezing is a great option. First, let the meal cool completely. Then, transfer it to a freezer-safe container. Make sure to remove as much air as possible to avoid freezer burn. You can freeze it for up to three months. When you're ready to eat, thaw it overnight in the fridge. Reheat it in the oven at 350°F (175°C) until warmed through. When reheating, it’s a good idea to refresh the flavors. You can add a splash of soy sauce or fresh ginger. This gives the dish a boost. Pair your leftovers with jasmine rice or a fresh salad for a tasty meal. These sides complement the flavors well and make the meal feel fresh again. Enjoy your delicious leftovers! You can serve this dish with fluffy jasmine rice. The rice soaks up the tasty sauce. You might also add a simple salad. A cucumber salad or a mixed green salad works well. For a Hawaiian touch, try adding mac salad. It balances the flavors and adds freshness. Yes, you can use chicken breasts. They will cook faster than thighs. Just make sure to check the time. Cook until they reach 165°F (75°C). Breasts may be less juicy but still taste great. Marinate them the same way for good flavor. Use a meat thermometer to check for doneness. Insert it into the thickest part of the chicken. It should read 165°F (75°C). If you don’t have a thermometer, cut into the chicken. The meat should be white and juices clear. Yes, you can prep this dish before cooking. Marinate the chicken and store it in the fridge. You can cut the veggies too. Just keep everything in separate containers. When ready, toss them together and bake. This saves time on busy nights. Along with rice, you can serve grilled vegetables. Roasted broccoli or snap peas add color. You might also enjoy a tropical fruit salad. Pineapple, mango, and kiwi work well together. These sides enhance the Hawaiian feel of the meal. This dish combines tasty chicken, sweet pineapple, and colorful veggies. You learned how to marinate, cook, and serve it perfectly. Remember to try variations with different proteins or spices for fun flavors. When stored correctly, leftovers can keep well and make meal prep easy. Enjoy sharing this meal with friends and family, and get creative with your own twists. Your kitchen adventures with this Hawaiian Chicken Sheet Pan Dinner can be both simple and delicious!

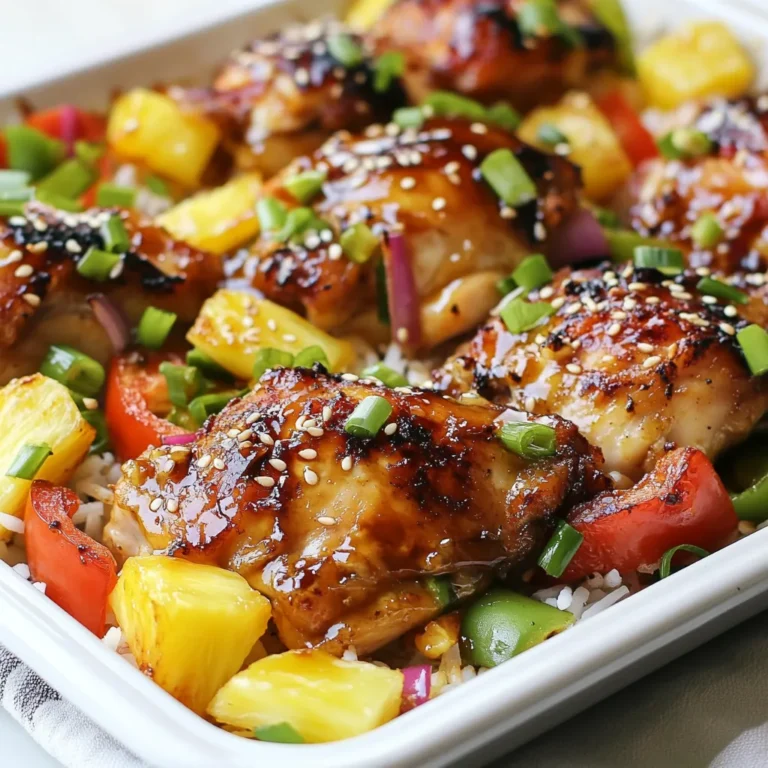
Hawaiian Chicken Sheet Pan Dinner Flavorful and Easy

- 2 pounds ripe tomatoes, halved - 1 large onion, quartered - 4 cloves garlic, unpeeled - 2 tablespoons olive oil - 1 teaspoon salt - ½ teaspoon black pepper - 1 teaspoon dried basil - 2 cups vegetable broth - 1 teaspoon sugar (optional, to balance acidity) - Fresh basil leaves for garnish - A splash of heavy cream for serving You can swap fresh tomatoes for canned ones. Use one 28-ounce can of whole tomatoes. If you don’t have fresh basil, try dried basil instead. You can also use chicken broth if you aren't making it vegan. For a creamier soup, coconut milk works well as a non-dairy option. {{ingredient_image_1}} Start by gathering all your ingredients. You will need: - 2 pounds ripe tomatoes, halved - 1 large onion, quartered - 4 cloves garlic, unpeeled - 2 tablespoons olive oil - 1 teaspoon salt - ½ teaspoon black pepper - 1 teaspoon dried basil - 1 teaspoon sugar (optional) - 2 cups vegetable broth - Fresh basil leaves for garnish - Optional: a splash of heavy cream for serving Next, preheat your oven to 400°F (200°C). This step is key for roasting. Place the halved tomatoes, quartered onion, and unpeeled garlic on a large baking sheet. Arrange the tomatoes cut-side up. Drizzle the olive oil over the veggies. Sprinkle the salt, black pepper, dried basil, and sugar if you want. Toss gently to coat everything. Roast in the oven for about 30-35 minutes. Look for caramelized tomatoes and soft onions. This is when the magic happens! When done, take the sheet out and let it cool slightly. Squeeze the roasted garlic out of its skin into a blender. Add the roasted tomatoes and onions. Pour in any juices from the baking sheet too. Add the vegetable broth and blend until smooth. If it seems too thick, add more broth until you like the texture. Taste your soup and adjust the seasoning if you need to. For a richer flavor, mix in a splash of heavy cream. Heat the soup in a pot over medium heat until warm. Serve hot. Garnish each bowl with fresh basil leaves. Enjoy your tasty roasted tomato soup! To make your soup even tastier, try these tips: - Add fresh herbs: Fresh basil adds brightness. Chop some and stir in before serving. - Experiment with spices: A dash of chili powder gives a nice kick. Try a pinch of smoked paprika for a smoky taste. - Use good quality broth: A rich vegetable broth can boost the flavor. Homemade broth is the best choice. Sometimes, things don't go as planned. Here’s how to fix common problems: - Soup too thick: If your soup is thick, add more broth. Blend again until smooth. - Too acidic: If your soup tastes too sharp, stir in a bit of sugar. This balances the flavors well. - Unbalanced flavor: Taste your soup before serving. If it needs more salt or pepper, add a little at a time. Make your soup look as good as it tastes with these ideas: - Use rustic bowls: Serve in large, colorful bowls for a homey feel. - Drizzle with olive oil: A light drizzle on top adds shine and flavor. - Garnish with fresh basil: Place a few fresh basil leaves on top. This adds color and freshness. These tips will help you create a beautiful and delicious roasted tomato soup. Enjoy the process! Pro Tips Use Ripe Tomatoes: The quality of your tomatoes will greatly affect the flavor of your soup. Choose ripe, in-season tomatoes for the best taste. Roast for Maximum Flavor: Roasting the vegetables enhances their sweetness and depth of flavor. Don’t skip this step! Adjust Consistency: If you prefer a thinner soup, gradually add more vegetable broth until you reach your desired consistency. Garnish for Presentation: A drizzle of olive oil or a splash of heavy cream adds a beautiful finish and extra richness to your dish. {{image_2}} To make a creamy roasted tomato soup, simply add a splash of heavy cream. This small step makes the soup rich and smooth. After blending the roasted veggies, pour in the cream and mix well. You can also adjust the cream amount based on your taste. If you want extra creaminess, use more cream. It blends well with the roasted flavors. If you like some heat, try the spicy roasted tomato soup. Add red pepper flakes or a chopped jalapeño before roasting. This gives your soup a nice kick. You can also add hot sauce when blending. Taste it first and add more if needed. This spicy twist pairs well with the sweet tomatoes. Tomato basil soup is a classic. To make this version, add fresh basil leaves while blending. The fresh basil adds a bright flavor. Serve the soup with a grilled cheese sandwich for a cozy meal. The gooey cheese and warm soup create a perfect match. You can use any bread and cheese you like for the sandwich. Enjoy your meal with this simple yet delightful pairing. You can store leftover soup in the fridge. Place it in an airtight container. It stays fresh for up to five days. Make sure to cool the soup first before sealing it. This step helps keep the soup tasty and safe. Want to save some for later? You can freeze the soup. Pour it into freezer-safe bags or containers. Leave some space at the top since the soup expands when frozen. It can last up to three months in the freezer. When ready to eat, thaw it in the fridge overnight. To enjoy your soup again, reheat it on the stove. Pour the soup into a pot and warm it over medium heat. Stir it often to avoid sticking. If it's too thick, add more broth to reach your preferred consistency. You can also use the microwave. Heat it in short bursts, stirring in between. Always check the temperature before serving. Yes, you can use canned tomatoes. Select high-quality canned whole or diced tomatoes. Drain them if you want a thicker soup. Canned tomatoes save time and still give great taste. Add them with the same seasonings as fresh tomatoes. To make this soup vegan, use vegetable broth. The other ingredients are already vegan-friendly. Skip the heavy cream if you want. You can add cashew cream or coconut milk for creaminess. This way, you keep the flavor and texture. Roasted tomato soup pairs well with many sides. Here are a few tasty options: - Grilled cheese sandwiches - Crusty bread or baguette - A fresh garden salad - Garlic bread These sides add texture and flavor to your meal. Try different pairings to find your favorite! This blog post covered key steps to make delicious roasted tomato soup. We explored main ingredients and optional ones to boost flavor. I've shared easy preparation steps, roasting techniques, and blending tips. You learned about flavor-enhancing tricks and common issues to avoid. Variations like creamy or spicy options add fun. Finally, I shared storage tips for freshness. Keep experimenting with flavors and enjoy your soup!

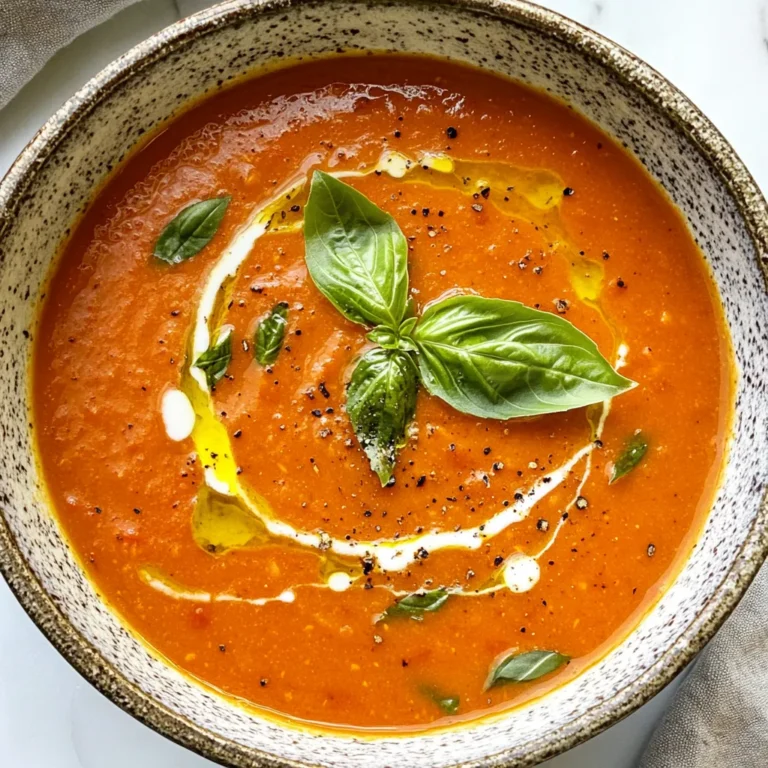
Easy Roasted Tomato Soup Simple and Flavorful Recipe

- 2 medium zucchinis - 1 teaspoon salt - 1 cup all-purpose flour - 1/2 cup grated Parmesan cheese - 2 large eggs - 1/4 cup fresh parsley - 1/2 teaspoon garlic powder - 1/2 teaspoon onion powder - 1/4 teaspoon black pepper - 1/4 cup green onions - Vegetable oil for frying To make these crispy zucchini fritters, you need fresh and simple ingredients. The zucchinis bring a light taste and moisture. The salt helps to pull out that moisture. Flour and eggs bind the mix together. Parmesan adds a savory touch. Fresh parsley brightens the flavor. Garlic and onion powders give a nice kick. Green onions add crunch and color. - Additional herbs (e.g., dill, basil) - Spices (e.g., cayenne pepper for heat) - Cheese substitutions (e.g., feta, mozzarella) You can also enhance the flavor with herbs. Dill and basil add a fresh twist. If you like spice, cayenne pepper brings heat. Cheese can change the taste too. Feta offers a tangy bite, while mozzarella makes it creamy. You can mix and match to find your favorite combo. {{ingredient_image_1}} First, grab your grater and shred the zucchini. I find a box grater works best. Once you have the grated zucchini, put it in a clean kitchen towel. Squeeze out as much moisture as you can. This step is key to getting crispy fritters. After that, move the dried zucchini to a mixing bowl. Next, sprinkle the zucchini with salt. Mix it well and let it sit for about 5 minutes. The salt helps draw out even more moisture. You want to get the zucchini as dry as possible. Now, it’s time to create the batter. Add all the other ingredients to the mixing bowl. This includes the flour, Parmesan cheese, eggs, parsley, garlic powder, onion powder, black pepper, and chopped green onions. Mix everything well until you see a smooth batter form. Make sure the zucchini is evenly mixed in. If it feels too wet, add a bit more flour. The batter should be thick but still scoopable. Heat up some vegetable oil in a large frying pan over medium-high heat. You want about 1/4 inch of oil in the pan. To check if the oil is ready, drop in a tiny bit of batter. If it sizzles, you’re good to go. Scoop out about 2 tablespoons of the fritter mixture. Gently place it into the hot oil. Use the back of a spatula to flatten it slightly. Repeat this process, making sure not to crowd the pan. Fry each fritter for about 3-4 minutes on each side. You want them to turn golden brown and crispy. Once they are done, take them out and place them on a paper towel-lined plate. This helps soak up any extra oil. Keep frying in batches until all the batter is used. If you need more oil, feel free to add it. Enjoy those crispy zucchini fritters! To make crispy zucchini fritters, you must remove moisture from the zucchini. Moisture makes them soggy. Grate the zucchini, then wrap it in a clean kitchen towel. Squeeze hard to get out as much water as you can. After that, sprinkle salt on the zucchini and let it sit for 5 minutes. This pulls out even more moisture. Next, heat vegetable oil in your pan. The oil should be about 1/4 inch deep. Make sure it is hot before adding the fritters. If the oil is too cool, the fritters will absorb too much oil and become greasy. Crispy zucchini fritters are great with dips. I love serving them with sour cream or tzatziki sauce. These dips add a creamy touch and balance the flavors. For garnishing, sprinkle chopped parsley on top. This adds color and a fresh taste. You can also add a squeeze of lemon juice for a zesty kick. One big mistake is overcrowding the frying pan. If you add too many fritters, they won't cook evenly. Fry them in small batches to get that perfect crisp. Also, pay attention to cooking time. Undercooking makes them soggy, while overcooking can burn them. Cook each side for about 3-4 minutes. Keep an eye out for a golden brown color. This way, you'll enjoy tasty, crispy fritters every time! Pro Tips Drain Well: Make sure to squeeze out as much moisture from the grated zucchini as possible to ensure crispy fritters. Oil Temperature: Test the oil temperature by dropping a small amount of batter into the pan; it should sizzle immediately. Adjust the heat as necessary. Batch Cooking: Fry the fritters in small batches to avoid overcrowding, which can lower the oil temperature and result in soggy fritters. Flavor Variations: Experiment with additional herbs or spices, such as dill or cayenne pepper, to customize the flavor of your fritters. {{image_2}} For a fun twist on crispy zucchini fritters, try adding spinach and feta. Just mix in about one cup of cooked and drained spinach and half a cup of crumbled feta cheese with your zucchini. This variation adds a nice creaminess and rich flavor. If you want some heat, go for spicy zucchini fritters with jalapeños. Chop one or two fresh jalapeños and mix them into the batter. This will give your fritters a zesty kick that pairs well with a cool dip. You can easily make these fritters gluten-free. Swap the all-purpose flour for almond flour. It will still hold together well and give a nice texture. For those following a vegan diet, you can use flax eggs instead of regular eggs. To make one flax egg, mix one tablespoon of ground flaxseed with two and a half tablespoons of water. Let it sit for a few minutes until it thickens. This will help bind your fritters without using eggs. Experiment with these variations to find your favorite! To keep your crispy zucchini fritters fresh, place them in an airtight container. Store them in the fridge for up to three days. Before you store, let them cool completely. This helps avoid sogginess. When you are ready to eat them, reheating is key. To maintain their crispiness, heat a skillet over medium heat. Add a small amount of oil. Place the fritters in the pan and cook for 2-3 minutes on each side. This will help them regain their crunch. If you want to save some fritters for later, freezing is a great option. First, let the fritters cool completely. Next, place them in a single layer on a baking sheet. Freeze them for about an hour. Once frozen, transfer them to a freezer bag. This prevents them from sticking together. To defrost, take them out and let them sit in the fridge overnight. For reheating from frozen, preheat your oven to 375°F. Place the fritters on a baking sheet and heat for about 15-20 minutes. This keeps them crispy and delicious. You can serve crispy zucchini fritters with many tasty sides. Here are some great options: - Sour cream: A classic dip that adds creaminess. - Tzatziki sauce: This yogurt-based sauce adds a fresh flavor. - Salad: A simple green salad can balance the fritters well. - Roasted vegetables: They add color and nutrition to your meal. - Marinara sauce: Perfect for dipping if you love a bit of tang. If you want to skip frying, you can bake the fritters. Here’s how: 1. Preheat your oven to 400°F (200°C). 2. Line a baking sheet with parchment paper for easy cleanup. 3. Shape the fritters and place them on the sheet. 4. Brush or spray them lightly with oil for crispiness. 5. Bake for about 20-25 minutes, flipping halfway through, until golden brown. Yes, you can prepare crispy zucchini fritters in advance! Here are some tips: - Batter storage: You can mix the batter a few hours ahead. Keep it in the fridge until you’re ready to cook. - Cooked fritters: If you have leftovers, store them in an airtight container. They stay good for about 3 days. - Reheating: For the best texture, reheat them in a hot skillet or oven to regain their crispiness. Zucchini fritters are fun and easy. I shared the ingredients and steps to make them perfect. You learned how to mix, fry, and serve these tasty bites. Remember, removing moisture is key for crispiness. You can add your own twist with spices or cheese. Store leftovers right for later enjoyment. Enjoy making and sharing these delicious fritters. They will delight everyone!

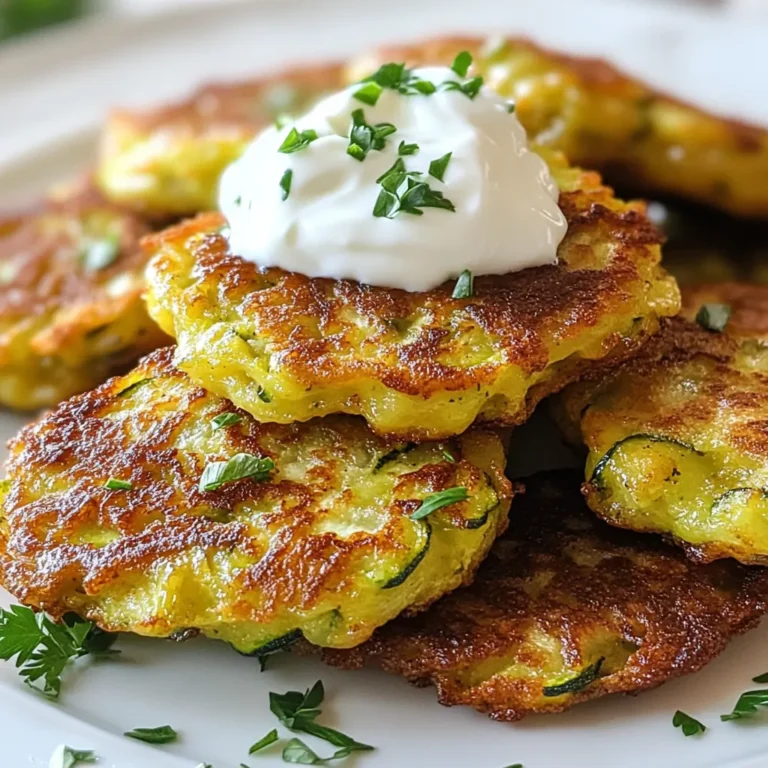
Crispy Zucchini Fritters Simple and Flavorful Recipe

- 4 boneless, skinless chicken breasts - 1 cup ranch dressing - 1 cup cream cheese, softened - 1 cup shredded cheddar cheese - 1 teaspoon garlic powder - 1 teaspoon onion powder - 1 teaspoon dried parsley - Salt and pepper to taste - 1 tablespoon olive oil - Fresh chives for garnish - Suggested side dishes: steamed broccoli or a mixed green salad The main ingredients in this dish are simple yet flavorful. The chicken breasts form a tender base that pairs perfectly with the creamy ranch dressing and cheese. I love using cream cheese because it adds richness without being too heavy. For seasoning, garlic powder and onion powder bring a warm touch. Dried parsley adds a hint of freshness. Don't forget to season with salt and pepper. The olive oil helps sear the chicken and lock in moisture. For garnish, fresh chives not only look pretty but also add a subtle onion flavor. Pair this dish with sides like steamed broccoli or a mixed green salad. These sides keep the meal balanced and bright! {{ingredient_image_1}} 1. Preheat your oven to 375°F (190°C). This step is key for even cooking. 2. Season the chicken breasts. Use salt, pepper, garlic powder, and onion powder. This adds great flavor. 1. Heat olive oil in a large skillet over medium-high heat. This helps to sear the chicken. 2. Sear the chicken breasts for 4-5 minutes on each side. Look for a nice golden color. They do not need to be cooked all the way. Take them out and set aside. 3. In a medium bowl, mix ranch dressing, cream cheese, and chicken broth. Stir until it is smooth and well combined. This creamy ranch mixture will coat the chicken perfectly. 1. In an oven-safe baking dish, place the seared chicken in a single layer. Pour the ranch mixture over the chicken. Make sure it is well coated. 2. Sprinkle shredded cheddar cheese on top. This adds a wonderful cheesy touch. 3. Cover the dish with aluminum foil. Bake in the preheated oven for 25-30 minutes. Make sure the chicken reaches an internal temperature of 165°F (75°C). 4. Remove the foil and bake for another 5-10 minutes. This allows the cheese to bubble and turn slightly golden. 5. Once baked, take it out and garnish with fresh chives. This adds a pop of color and flavor. To make your creamy ranch chicken even tastier, consider these tips: - Seasoning Adjustments: Try adding smoked paprika or cayenne for a bit of heat. You can also mix in fresh herbs like thyme or rosemary for added depth. - Creamier Sauce: To achieve a richer sauce, mix in a splash of heavy cream. This will give your dish an extra smooth texture. You can also let the ranch mixture simmer longer to enhance its flavor. To keep your chicken juicy and tender, follow these steps: - Tender Chicken: Sear your chicken on medium-high heat. This locks in moisture and flavors. Avoid cooking it fully in the skillet; it will finish cooking in the oven. - Best Baking Practices: When baking, cover the dish with foil for the first part. This traps steam and keeps the chicken moist. Remove the foil near the end to let the cheese brown nicely. Garnishing and plating can make your dish stand out: - Garnishing Ideas: Use fresh chives to add a pop of color. You can also sprinkle some extra cheddar cheese on top for a cheesy finish. - Plating Suggestions: Serve the chicken on a large plate with a side of steamed broccoli or a fresh salad. This adds color and makes your meal look more inviting. Consider a drizzle of the creamy sauce around the plate for flair. Pro Tips Perfectly Sear the Chicken: Make sure your skillet is hot enough before adding the chicken to achieve that golden brown crust, which seals in juices and flavor. Customize Your Ranch: Feel free to add additional herbs or spices to the ranch mixture, like dill or paprika, to enhance the flavor profile. Check Chicken Temperature: Always use a meat thermometer to ensure your chicken reaches an internal temperature of 165°F (75°C) for safe consumption. Let it Rest: Allow the chicken to rest for a few minutes after baking before serving. This helps the juices redistribute, making each bite more flavorful. {{image_2}} You can switch up the protein in this dish. If you want variety, try turkey instead of chicken. Turkey breasts cook well and taste great with the ranch sauce. You could also use pork chops. Just make sure to adjust the cooking time. For a vegetarian version, use mushrooms or tofu. Both options soak up the flavors nicely. You can change the flavor by using different dressings. Try Italian dressing for a zesty twist. Blue cheese dressing adds a rich and tangy taste. You can also mix in add-ins like spinach or bell peppers. These vegetables add color and nutrition. For more spice, add crushed red pepper or paprika. Experimenting with flavors keeps the meal exciting. You can make this dish in different ways. Use a slow cooker for a hands-off approach. Just add the seared chicken and sauce, then cook on low for 6 hours. It makes the chicken tender and full of flavor. You can also use an Instant Pot. Cook the chicken with the sauce for about 10 minutes. It’s quick and easy, perfect for busy days. To keep your creamy ranch chicken fresh, store it in an airtight container. Let it cool first, then cover it well. This dish lasts up to three days in the fridge. Always check for signs of spoilage before eating. Reheat creamy ranch chicken in the oven for the best results. Set your oven to 350°F (175°C) and place the dish inside. Cover it with foil to keep the moisture in. This helps maintain the creamy texture. You can also use a microwave; just heat in short bursts to avoid drying it out. Yes, you can freeze creamy ranch chicken. To freeze, let it cool completely. Then, place it in a freezer-safe container. It can last up to three months. When you're ready to eat, thaw it in the fridge overnight. Reheat it in the oven or microwave as mentioned above. Enjoy the creamy goodness later! How do I know when the chicken is cooked through? The chicken is done when it reaches an internal temperature of 165°F (75°C). Use a meat thermometer for best results. The juices should run clear, not pink. Always check the thickest part of the chicken. Can I use low-fat cream cheese? Yes, you can use low-fat cream cheese. It will still provide a creamy texture. The taste may be a bit different, but it will work well in this dish. What's the best way to serve creamy ranch chicken? Serve creamy ranch chicken with sides like steamed broccoli or a fresh salad. Crusty bread is great for soaking up the sauce. A sprinkle of fresh chives adds color and flavor. What to do if the sauce is too thick? If the sauce is too thick, add a bit more chicken broth. Stir it in slowly until you reach your desired consistency. This keeps the sauce creamy and smooth. How can I make this recipe spicier? Add a pinch of cayenne pepper or red pepper flakes to the ranch mixture. You can also mix in some hot sauce for extra heat. Adjust to your taste. Caloric content and serving size details Each serving of creamy ranch chicken has about 450 calories. This is based on a serving size of one chicken breast with sauce. Any potential allergens to be aware of This dish contains dairy from cream cheese and cheddar cheese. It also includes ranch dressing, which may have other allergens. Always check labels for specific ingredients. This blog post offers a detailed guide on making creamy ranch chicken. We started with the main ingredients, including chicken and cheese, then discussed how to prepare, cook, and bake the dish. I shared tips to enhance flavor and presented delicious variations. You learned how to store leftovers and answered common questions. With this easy recipe, you can impress your family or friends. Enjoy creating this dish while adding your own flair. Happy cooking!

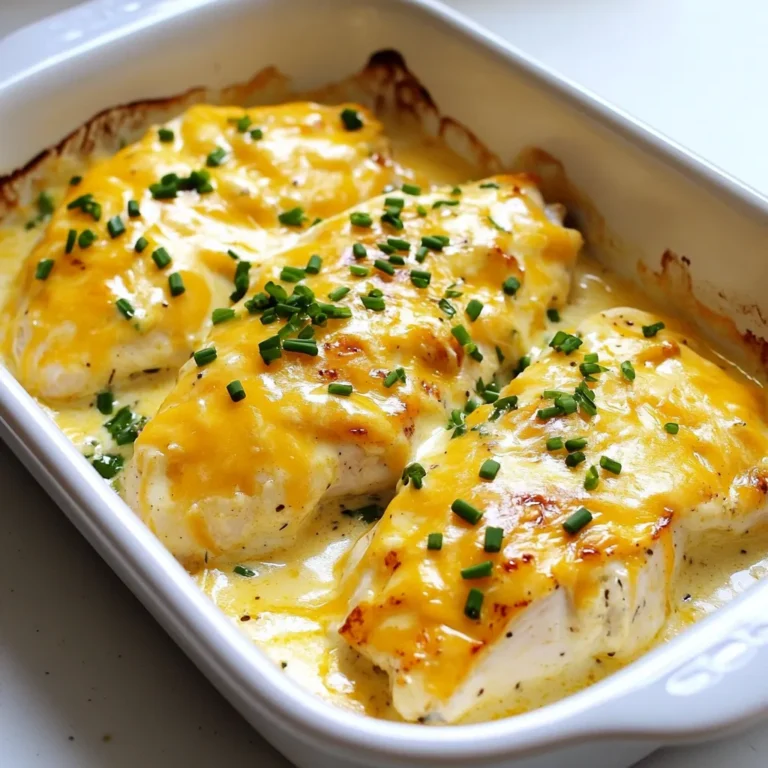
Creamy Ranch Chicken Simple and Flavorful Recipe

- 2 cups cooked chicken breast, shredded - 1 cup Greek yogurt - 1 cucumber, grated and squeezed - 2 garlic cloves, minced - 1 tablespoon fresh dill, chopped - 1 tablespoon fresh lemon juice - Salt and pepper to taste - 1 cup cherry tomatoes, halved - 1/2 red onion, finely chopped - 1/4 cup feta cheese (optional) - Fresh greens for serving To make Tzatziki Chicken Salad, you need a few simple ingredients. Start with cooked chicken breast. I like to shred it for easy mixing. Then grab some Greek yogurt. This will make your salad creamy and tasty. Don't forget the cucumber! Grate it and squeeze out the excess water. This keeps the salad from getting too watery. Next, use garlic for a little kick. Mince two cloves. Fresh dill adds a bright flavor. One tablespoon is enough. Fresh lemon juice gives a zesty touch. Season with salt and pepper to enhance the taste. For a burst of color, add cherry tomatoes. Halve one cup and toss them in. Finely chop half a red onion for a bit of crunch. You can also add feta cheese if you like. It’s optional but adds a nice creaminess. Finally, prepare some fresh greens like lettuce or arugula for serving. These ingredients come together to create a refreshing meal. Don't be afraid to adjust them to suit your taste! {{ingredient_image_1}} To make the tzatziki dressing, grab a large mixing bowl. Add 1 cup of Greek yogurt. Next, grate 1 cucumber and squeeze out excess water. This step keeps our dressing thick and fresh. Toss the grated cucumber into the bowl. Then, mince 2 garlic cloves and add them in. For flavor, add 1 tablespoon of fresh dill and 1 tablespoon of fresh lemon juice. Season with salt and pepper to taste. Mix everything well until it is smooth and creamy. This tzatziki sauce gives our chicken salad a cool, tangy flavor. Now it’s time to mix in the chicken. Take 2 cups of shredded cooked chicken breast and add it to the tzatziki dressing. Stir until the chicken is fully coated. This makes sure each bite is packed with flavor. Next, gently fold in 1 cup of halved cherry tomatoes and 1/2 finely chopped red onion. These ingredients add color and crunch. If you like, sprinkle in 1/4 cup of crumbled feta cheese for extra taste. Gently mix it all together until well combined. For serving, place a handful of fresh greens on each plate. Lettuce or arugula works great here. Top the greens with a generous scoop of tzatziki chicken salad. This makes a lovely, colorful dish. If you want, drizzle some extra tzatziki over the salad. Finally, garnish with a little extra dill for a fresh touch. Enjoy this refreshing meal that is perfect for lunch or dinner. To get the best texture in your tzatziki chicken salad, start with the yogurt. Use thick Greek yogurt for a creamy base. Grate the cucumber finely and make sure to squeeze out excess water. This step keeps your salad from getting soggy. When you mix in the chicken, be gentle. You want to keep the chicken pieces nice and whole. Adding fresh herbs makes a big difference. Dill adds a bright taste that works well with tzatziki. If you want a kick, try adding a pinch of cayenne or smoked paprika. A squeeze of lemon juice brightens up the flavor too. You can also mix in other veggies like bell peppers or olives for extra color and taste. One common mistake is not draining the cucumber well. If you skip this, your salad can turn watery. Another issue is over-mixing. Gently fold in the tomatoes and onion to keep their texture. Lastly, don’t skip the salt and pepper. These simple seasonings bring out all the flavors. Pro Tips Use Fresh Ingredients: Fresh herbs and high-quality Greek yogurt will greatly enhance the flavor of your tzatziki chicken salad. Chill Before Serving: Letting the salad chill in the fridge for at least 30 minutes allows the flavors to meld beautifully. Customize Your Veggies: Feel free to add other vegetables like bell peppers or avocado for extra color and nutrition. Make It Ahead: This salad can be made ahead of time and stored in the refrigerator for up to 2 days, making it perfect for meal prep. {{image_2}} You can make Tzatziki Chicken Salad even healthier. Use grilled chicken instead of cooked. This adds less fat and more flavor. You can also swap Greek yogurt for a low-fat version. This keeps the taste but cuts calories. For a lighter option, add more veggies. Try bell peppers or celery for crunch. They add color and nutrients to your meal. If you're vegan, replace chicken with chickpeas. They give protein and a hearty texture. Use coconut yogurt to keep the tzatziki creamy. For gluten-free eaters, this salad is naturally gluten-free. Just ensure any added ingredients are gluten-free. If you like spice, add jalapeños or a dash of hot sauce. This gives the salad a nice kick. Feel free to mix and match ingredients for fun. Swap cherry tomatoes for diced bell peppers. They add sweetness and extra crunch. Instead of red onion, try green onions for a milder taste. You can also use different herbs like mint or parsley. These give a fresh twist to the classic tzatziki flavor. If you love cheese, try using goat cheese instead of feta. It adds a tangy taste that pairs well with the salad. To keep your tzatziki chicken salad fresh, place it in an airtight container. Always use a clean spoon to serve. This helps avoid germs. Store it in the fridge for up to three days. If you notice any change in smell or color, toss it out. Freezing tzatziki chicken salad is not the best idea. The yogurt and cucumber can change texture when frozen. If you want to save it, freeze the chicken alone. When ready, defrost it in the fridge. Then mix it with fresh tzatziki sauce and veggies. Reheat shredded chicken in the microwave for about one minute. Make sure to cover it to keep moisture. Stir the chicken halfway to heat evenly. Let it cool before mixing with the cold tzatziki salad. This ensures you enjoy that fresh taste! Tzatziki chicken salad is a fresh and creamy dish. It combines shredded chicken with a tzatziki dressing made from Greek yogurt. The dressing includes grated cucumber, garlic, dill, and lemon juice. This salad is perfect for warm days. It is light yet filling, making it a great meal option. Yes, you can make this salad ahead of time. It tastes even better after sitting for a bit. The flavors mix and become more vibrant. Just store it in the fridge in an airtight container. I suggest eating it within two days for the best taste and texture. You can serve this salad in many ways. Here are some ideas: - Place it on a bed of fresh greens like lettuce or arugula. - Use it as a filling for pita bread or wraps. - Serve it with whole grain crackers for a quick snack. - Top it on a grain bowl with quinoa or brown rice. Each of these options adds a fun twist to your meal! This blog post covered a delicious Tzatziki Chicken Salad. We looked at key ingredients, step-by-step instructions, and helpful tips. You learned how to enhance flavor, avoid common mistakes, and store leftovers. The variations let you adapt the salad to fit your taste. In the end, this recipe offers a fresh and healthy option for any meal. Enjoy creating this dish and impress yourself and others with your skills!

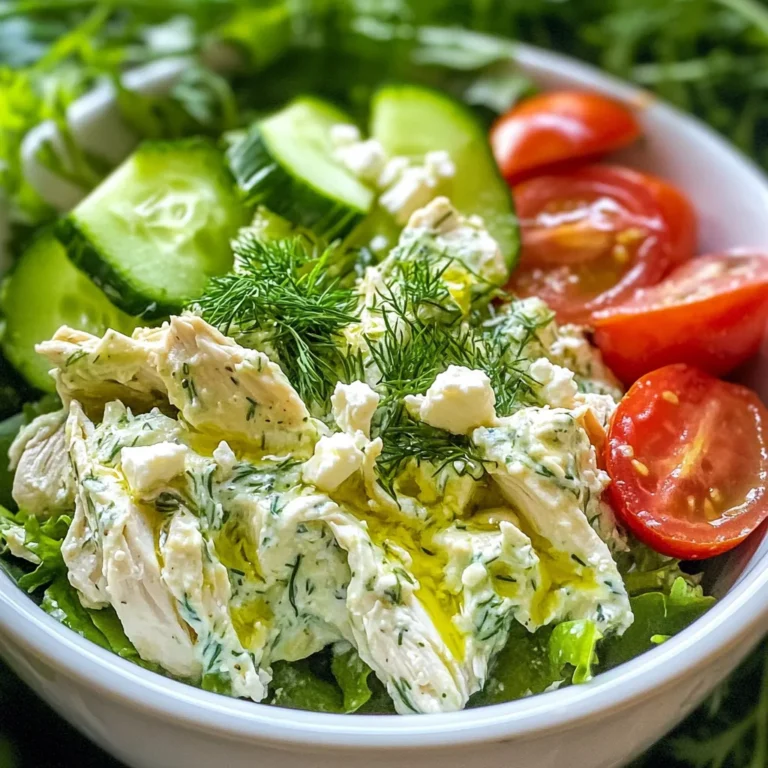
Tzatziki Chicken Salad Refreshing and Simple Meal

- 1 pound boneless, skinless chicken breasts, diced - 1 tablespoon olive oil - 1 medium onion, chopped - 3 cloves garlic, minced - 2 medium carrots, diced - 2 celery stalks, diced - 4 cups chicken broth - 1 can (14 oz) diced tomatoes, undrained - 1 cup kale or Swiss chard, chopped - 1 tablespoon Italian seasoning - ½ teaspoon red pepper flakes (optional) - Salt and pepper to taste - 1 cup cannellini beans, drained and rinsed - Fresh basil leaves, for garnish - Grated Parmesan cheese, for serving To make this Tuscan chicken soup, you need simple, fresh ingredients. The chicken gives it a hearty base. You can use either kale or Swiss chard for greens. I love the bright colors the carrots and celery add. The tomatoes bring in a nice tang. The Italian seasoning gives it that classic Tuscan flair. You can add red pepper flakes if you want some heat. Salt and pepper help to balance all the flavors. Finally, the cannellini beans add protein and creaminess. Do not forget the fresh basil and Parmesan for garnish. This soup is packed with flavor and nutrients. Each bite warms you up and makes you feel good inside. It’s the perfect meal for a chilly day or when you need comfort. {{ingredient_image_1}} To start, heat the olive oil in a large pot over medium heat. Once the oil shimmers, add the diced chicken. Cook it for about 5 to 7 minutes, stirring often. You want the chicken to turn golden brown. After it browns, take it out of the pot and set it aside. In the same pot, add the chopped onion, diced carrots, and diced celery. Sauté these for about 5 minutes. You want the veggies to soften but not brown. Then, add the minced garlic. Cook for another minute until it smells great. This mix will give your soup a rich base. Now, pour in the chicken broth. Bring it to a boil. Once boiling, add the can of diced tomatoes, with all the juice. Stir in the cooked chicken and Italian seasoning. If you like a bit of heat, add the red pepper flakes. Lower the heat and let it simmer. Cover the pot and cook for 15 to 20 minutes. This lets all the flavors blend well. After simmering, stir in the chopped kale or Swiss chard and the rinsed cannellini beans. Cook for another 5 minutes. You want the greens to wilt and become tender. Finally, season your soup with salt and pepper to taste. This is the moment to adjust flavors to your liking. Serve hot, garnished with fresh basil leaves and a sprinkle of grated Parmesan cheese. Enjoy! To keep your Tuscan chicken soup fresh, store it in an airtight container. Place it in the fridge if you plan to eat it within a few days. For longer storage, freeze the soup in freezer-safe bags. Lay the bags flat to save space. This soup can last in the freezer for up to three months. When you’re ready to eat, thaw it in the fridge overnight. If you like a bit of heat, add red pepper flakes. Start with a small amount, about ½ teaspoon. Taste the soup as you add more. If it’s too spicy, balance it with a touch of cream or extra broth. You can also skip the flakes if you prefer a milder flavor. Want to boost the taste? Try adding fresh herbs like thyme or oregano. A splash of lemon juice brightens the soup, too. For depth, consider adding a bay leaf while it simmers. Remove it before serving. You can also mix in a bit of smoked paprika for a unique twist. Pro Tips Use Homemade Broth: For a richer flavor, try using homemade chicken broth instead of store-bought. It enhances the overall taste of the soup. Vegetable Variations: Feel free to add other vegetables like zucchini or bell peppers for extra nutrition and flavor. Just be sure to adjust cooking times accordingly. Storage Tips: This soup can be stored in the refrigerator for up to 3 days. To freeze, let it cool completely, then transfer to airtight containers for up to 3 months. Garnish Creatively: Experiment with different garnishes such as a drizzle of balsamic glaze or a squeeze of lemon juice to add a fresh twist before serving. {{image_2}} You can change the chicken in this soup for turkey. Turkey has a light flavor and is easy to find. If you want a plant-based option, try using chickpeas or lentils. They add protein and texture, making the soup hearty. Simply replace the chicken breast with two cups of cooked chickpeas or lentils. This will keep the dish flavorful and filling. While kale and Swiss chard are great, other greens work well, too. Spinach is a soft, mild option that wilts quickly. You can also use collard greens for a more robust flavor. Just chop them and add them in the last few minutes of cooking. This keeps them bright and fresh. Other veggies like zucchini or bell peppers can add color and taste. Feel free to get creative! If you love a rich soup, you can add cream. Heavy cream or half-and-half gives it a smooth texture. For a dairy-free option, use coconut milk or cashew cream. Start with half a cup and mix it in just before serving. This adds a nice richness that makes every spoonful a treat. To keep Tuscan chicken soup fresh, store it in airtight containers. Let the soup cool to room temperature first. This helps prevent moisture buildup, which can spoil the soup. You can also use freezer bags for space-saving storage. Just remember to label them with the date. In the fridge, Tuscan chicken soup lasts about 3 to 4 days. If you freeze it, the soup can last up to 3 months. Be sure to thaw it in the fridge overnight for safe use. Always check for any off smells or changes in texture before eating. For reheating, you have a few options. The stovetop is best for even heating. Pour the soup into a pot and heat over low to medium heat. Stir often to prevent sticking. You can also use the microwave. Heat in a microwave-safe bowl, covering it loosely. Stir halfway through to ensure it warms evenly. Tuscan Chicken Soup is a warm, hearty dish. It comes from Tuscany, Italy. This soup features chicken, fresh veggies, and beans. The flavors blend well for a cozy meal. You can enjoy it on chilly days or anytime you crave comfort food. The use of kale or Swiss chard gives it a nice green touch. Yes, you can make this soup ahead of time. It stores well in the fridge. Just let it cool before putting it in a container. It tastes even better the next day. When you are ready to eat, heat it gently on the stove. You can also freeze it for later. If you freeze it, use it within three months for the best taste. Yes, this soup can be gluten-free. All the main ingredients are free from gluten. Just make sure to use gluten-free chicken broth. Check the label on canned tomatoes, beans, and any seasonings. This way, you can enjoy the soup without worry. To make this soup vegetarian, you can skip the chicken. Instead, use extra beans for protein. You can add more veggies like zucchini or bell peppers. Use vegetable broth in place of chicken broth. This keeps the flavors rich and tasty while making it plant-based. This blog post covered everything you need to know about Tuscan Chicken Soup. You learned the ingredients and steps for making it. I shared tips on storage and variations for your taste. You can adjust spices or try different proteins, too. In conclusion, this soup is simple, tasty, and adaptable. It can fit many diets and preferences. Now, you can enjoy a warm bowl any time!

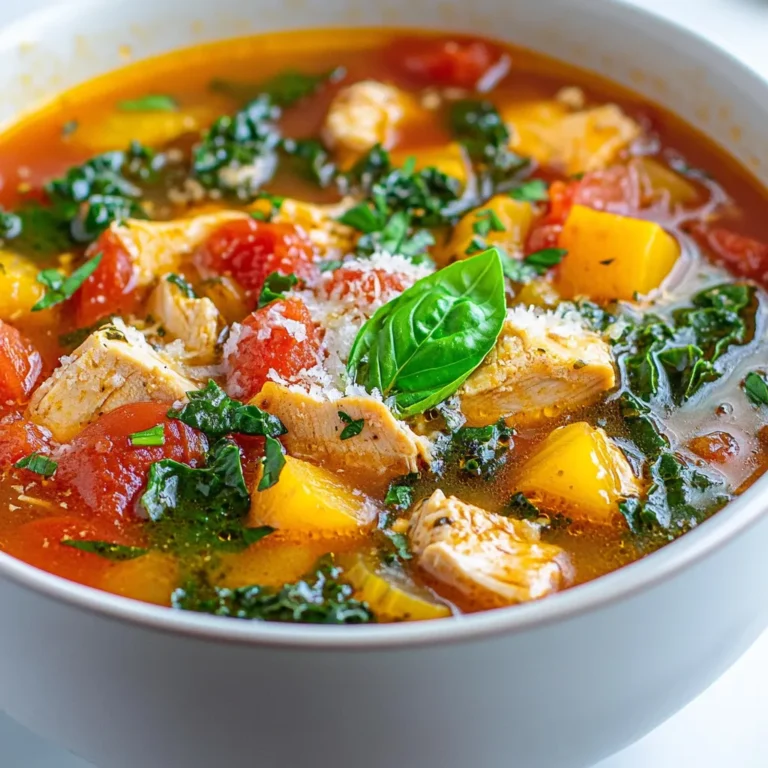
Tuscan Chicken Soup Flavorful and Comforting Recipe

To make these crispy churro bites, you need: - 1 cup all-purpose flour - 1/2 cup water - 1/4 cup unsalted butter - 2 tablespoons granulated sugar - 1/4 teaspoon salt - 1 teaspoon baking powder - 1 teaspoon cinnamon - 1 egg - 1/2 cup granulated sugar (for coating) - 1 teaspoon cinnamon (for coating) - Cooking spray These ingredients create a soft dough that puffs up in the air fryer. The butter and sugar give it a rich flavor. The cinnamon adds a warm spice, making each bite delightful. You can add a few ingredients for more flair. Consider: - Vanilla extract for sweetness - Nutmeg for a warm spice - A pinch of cayenne for heat These extras enhance the flavor, making your churro bites even more special. Feel free to experiment with what you like best. If you have allergies, don’t worry! Here are some easy swaps: - Use gluten-free flour instead of all-purpose flour. - Swap unsalted butter for coconut oil or a dairy-free butter. - Replace the egg with a flaxseed meal (1 tablespoon mixed with 2.5 tablespoons water). These substitutions keep the taste and texture close to the original recipe while ensuring everyone can enjoy them. {{ingredient_image_1}} To make the best churro bites, start by mixing your ingredients. In a medium saucepan, combine 1/2 cup water, 1/4 cup unsalted butter, 2 tablespoons granulated sugar, and 1/4 teaspoon salt. Heat this mixture over medium heat. Stir until the butter melts completely. Bring it to a boil. Once boiling, remove it from heat. Quickly stir in 1 cup all-purpose flour and 1 teaspoon baking powder. Mix until a dough forms. Let the dough cool for about 5 minutes. After it cools, add 1 egg. Mix it in well until your dough is smooth and ready. Preheat your air fryer to 375°F (190°C). While it's heating, transfer your dough to a piping bag fitted with a large star tip. Pipe small pieces of dough, about 1 inch long, onto parchment paper. Be sure to leave space between them. Spray the air fryer basket with cooking spray. Carefully place the churro bites in a single layer. Make sure they do not touch each other. You may need to cook them in batches. Lightly spray the tops of the churro bites with cooking spray. Cook for 8 to 10 minutes. Keep an eye on them until they turn golden and crispy. While your churro bites are cooking, mix 1/2 cup granulated sugar and 1 teaspoon cinnamon in a shallow bowl. Once the churro bites finish cooking, toss them in the cinnamon-sugar mixture right away. Coat them well for that perfect sweet crunch. Serve them warm and enjoy every bite of your crispy churro bites! To get your churro bites crispy, follow these tips: - Use the right temperature: Preheat your air fryer to 375°F (190°C). This heat helps cook the churro bites evenly. - Don’t overcrowd: Place churro bites in a single layer. Space them out for better airflow. - Spray them lightly: A quick spray of cooking spray on the tops adds extra crunch. - Cook until golden: Watch for a lovely golden color. This indicates they are crispy. To ensure success, avoid these common mistakes: - Skipping the preheat: Not preheating can lead to soggy bites. - Using too much dough: Pipe only 1-inch pieces. Larger bites may not cook through. - Not mixing the cinnamon-sugar: Combine sugar and cinnamon well for an even coating. - Cooking too long: Keep an eye on the time. Overcooking can lead to dryness. Make your churro bites even better with these ideas: - Add zest: Mix in orange or lemon zest for a fresh twist. - Try flavored sugar: Use vanilla sugar or chocolate sugar for a unique taste. - Experiment with spices: Add nutmeg or cardamom for extra warmth. - Serve with dips: Pair with chocolate sauce or caramel for a sweet treat. Pro Tips Chill the Dough: For an even crispier texture, refrigerate the dough for about 30 minutes before piping it. This helps maintain its shape while cooking. Experiment with Flavors: Feel free to add different spices to the dough, such as nutmeg or cardamom, to create unique flavor variations. Use Parchment Paper: Lining the air fryer basket with parchment paper helps prevent sticking and makes for easy cleanup. Serving Suggestions: Serve with chocolate sauce or caramel for dipping to elevate your churro bites experience! {{image_2}} You can make your churro bites even sweeter with chocolate. After frying, melt some chocolate chips in a bowl. Dip each churro bite into the chocolate or drizzle it over the top. Dark, milk, or white chocolate works well. This adds a rich flavor and a fun look. Kids love it, and it makes a great treat for parties. Want to shake things up? Try stuffing your churro bites! Use a piping bag to fill the churro dough with a tasty filling before frying. Cream cheese, Nutella, or dulce de leche are great choices. Just make sure to seal the dough well. This will give you a warm, gooey center that surprises everyone! If you need a gluten-free option, swap the all-purpose flour for a gluten-free flour blend. Make sure it has xanthan gum for the right texture. Follow the same steps in the recipe. Your churro bites will still taste amazing, and everyone can enjoy them! Just remember to check all your ingredients for any hidden gluten. After you enjoy your churro bites, store them in an airtight container. This keeps them fresh and helps prevent them from getting soggy. Let them cool completely before sealing. If you leave them warm, moisture builds up inside the container. You can keep them at room temperature for up to two days. If you want them for longer, place them in the fridge. They will last about a week in the fridge. To bring back the crunch, reheat churro bites in the air fryer. Set the air fryer to 350°F (175°C) and heat for 3 to 5 minutes. This will make them crispy again. You can also use a toaster oven if you don't have an air fryer. Just keep an eye on them so they don't burn. Avoid using a microwave, as it makes them soft and chewy. If you have extra churro bites or want to make a big batch, freezing is a great option. Place them in a single layer on a baking sheet first. Once frozen, transfer them to a freezer bag or container. Be sure to remove as much air as possible to prevent freezer burn. They can stay frozen for up to three months. When you're ready to enjoy them, reheat directly from the freezer in the air fryer for a quick treat. Yes, you can air fry frozen churro bites. Just increase the cooking time by a few minutes. Check them often to avoid burning. Cooking from frozen gives you crispy bites quickly. To make more churro bites, simply double or triple the ingredients. Keep the same cooking time, but air fry in batches. This method ensures each batch gets that perfect crunch. Churro bites pair well with chocolate sauce or caramel for dipping. Ice cream also makes a tasty side. Fresh fruit adds a nice touch too. Enjoy mixing and matching flavors! Churro bites are easy and fun to make. We covered essential and optional ingredients, plus how to adapt for allergens. I walked through steps for preparing the dough, air frying, and coating. You now have tips for perfect texture, common mistakes, and flavor variations. Make sure to store leftovers correctly and reheat them for crispiness. Enjoy your churro bites with a chocolate drizzle or stuffed options. Try the recipe and impress your friends with these tasty treats!

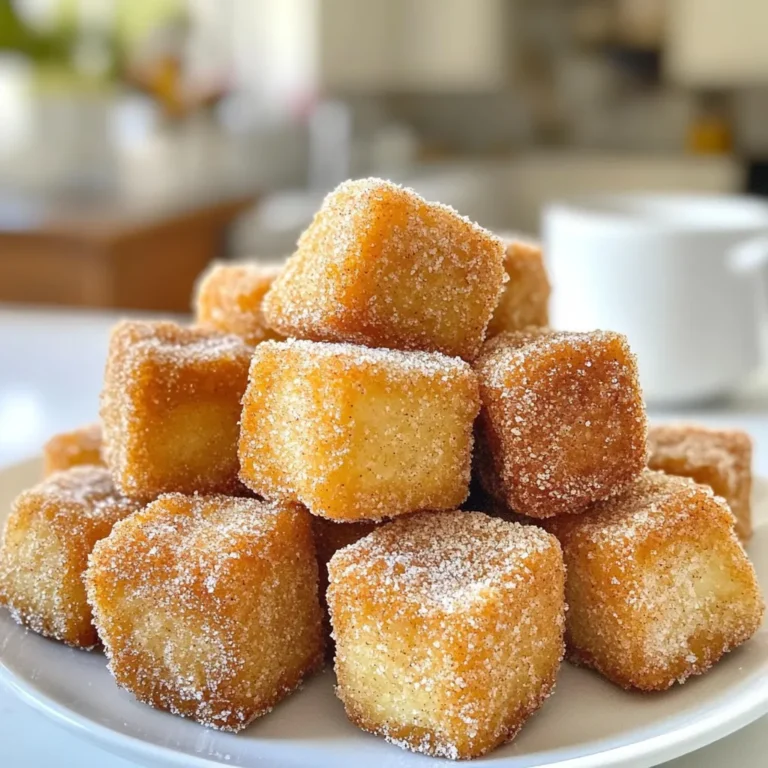
Crispy Air Fryer Churro Bites Easy Sweet Treat

- 1 lb boneless, skinless chicken breasts, diced - 2 tablespoons olive oil - 1 small onion, diced - 2 carrots, diced - 2 celery stalks, diced - 3 cloves garlic, minced - 4 cups chicken broth - 1 cup heavy cream - 2 cups frozen mixed vegetables (peas, corn, green beans) The chicken is the star of this dish. I love using boneless, skinless breasts. They cook quickly and stay tender. Dicing the chicken helps it blend well with the soup. Next, we need fresh vegetables. I use onion, carrots, and celery. They add flavor and texture. Garlic brings in a nice aroma and taste. The broth is crucial. I prefer chicken broth for its rich flavor. Heavy cream gives the soup a creamy, comforting base. Frozen mixed vegetables add color and nutrients to every bite. - 1 teaspoon dried thyme - 1 teaspoon dried rosemary - 1 tablespoon Dijon mustard - Salt and pepper to taste Seasonings make this soup shine. Thyme and rosemary are my go-to herbs. They add a lovely earthiness. Dijon mustard gives a hint of tang. Don’t forget salt and pepper. They enhance all the flavors. - 2 cups biscuit dough (store-bought or homemade) Toppings make this soup fun. You can use store-bought biscuit dough for ease. Homemade biscuit dough adds a personal touch. Both options work well. For homemade dough, you can roll it out or cut it into small rounds. This creates fluffy tops that soak up the soup. It’s a perfect pairing! {{ingredient_image_1}} 1. Heat 2 tablespoons of olive oil in a large pot over medium heat. 2. Add 1 pound of diced chicken breasts. 3. Cook the chicken for about 5 to 7 minutes. 4. Look for a golden brown color. 5. Once cooked, remove the chicken from the pot and set it aside. 1. In the same pot, add the diced onion, carrots, and celery. 2. Use 1 small onion, 2 carrots, and 2 celery stalks. 3. Sauté these veggies for about 5 minutes until they soften. 4. Stir in 3 cloves of minced garlic. 5. Cook for an extra minute until you smell the garlic. 1. Sprinkle ½ cup of all-purpose flour over the sautéed vegetables. 2. Stir to mix everything well for about a minute. 3. This step helps to cook out the raw flour taste. 4. Gradually pour in 4 cups of chicken broth. 5. Stir constantly to avoid lumps and bring it to a gentle boil. 6. Next, add 1 cup of heavy cream and 2 cups of frozen mixed vegetables. 7. Mix in 1 teaspoon of dried thyme, 1 teaspoon of dried rosemary, and 1 tablespoon of Dijon mustard. 8. Reduce the heat and let it simmer for 15 to 20 minutes. 1. Season the soup with salt and pepper to taste. 2. Return the cooked chicken to the pot and stir well. 3. If using homemade biscuit dough, prepare it now. 4. Roll out the dough and cut it into small rounds or squares. 5. Top the soup with the biscuit pieces and cover the pot. 6. Cook for an additional 10 to 15 minutes until the biscuits are fluffy. To make your soup richer, you can add more cream. Use a full cup of heavy cream instead of half. You can also mix in some cream cheese for extra creaminess. Another trick is to blend part of the soup. Just scoop some into a blender, then mix it back in. This will thicken the soup without changing the flavor. For a thicker soup, add more flour. Start with a tablespoon more than the recipe calls for. Stir it well to avoid lumps. You can also let the soup simmer longer. This helps it thicken naturally as water evaporates. To boost flavor, add fresh herbs like parsley or chives when serving. You can also sprinkle some paprika for a hint of spice. A touch of lemon juice adds a fresh kick. Experiment with spices like thyme and rosemary for warmth. For garnishes, consider crispy bacon bits or a dollop of sour cream. Fresh herbs add color and flavor. You can also top with additional biscuit pieces for a fun twist. For quick prep, chop your vegetables ahead of time. You can store them in the fridge for easy access. Another tip is to use rotisserie chicken. This cuts down on cooking time. Just shred the chicken and add it to the soup. If you have leftover soup, use it in other meals. You can mix it with pasta or rice for a quick lunch. This makes great use of leftovers while keeping meals exciting. Pro Tips Use Leftover Chicken: This soup is a great way to use up leftover rotisserie chicken for a quicker meal. Thicken with Cornstarch: If you prefer a thicker soup, you can mix cornstarch with water and stir it in during the simmering process. Add Fresh Herbs: Garnishing with fresh thyme or parsley enhances the flavor and presentation of your soup. Customize Veggies: Feel free to swap in your favorite vegetables or whatever you have on hand for added variety. {{image_2}} If you want a meatless soup, try using mushrooms or tofu instead of chicken. They add great texture and flavor. For broth, use vegetable broth instead of chicken broth. This keeps it rich and tasty. You can swap heavy cream for coconut milk or cashew cream for a creamy touch without dairy. To make this soup gluten-free, use almond flour or a gluten-free flour mix instead of all-purpose flour. This keeps your soup thick and smooth. For the biscuit topping, look for gluten-free biscuit mixes or make your own with gluten-free flour. These will still give you that fluffy, comforting finish. For a spicy twist, add diced jalapeños or a pinch of cayenne pepper. This adds a nice kick to the soup. If you want a Mediterranean vibe, try adding sun-dried tomatoes, olives, and fresh basil. These ingredients give your soup a bright and fresh taste that is different from the classic version. To store leftover Chicken Pot Pie Soup, follow these simple steps: - Refrigeration guidelines: Let the soup cool to room temperature. Pour it into an airtight container. It will stay fresh for up to 3 days in the fridge. - Freezing instructions: For longer storage, freeze the soup. Use freezer-safe containers or bags. Leave space at the top for expansion. The soup will last up to 3 months in the freezer. When you're ready to enjoy your soup again, reheating is key: - Best methods for reheating: The best way to reheat is on the stove. Pour the soup into a pot over medium heat. Stir often until it’s hot. - Avoiding changes in texture: If using a microwave, heat in short bursts. Stir in between to avoid hot spots. This keeps the texture smooth and creamy. Knowing how long your soup lasts helps with planning: - How long it lasts in the fridge and freezer: In the fridge, Chicken Pot Pie Soup lasts 3 days. In the freezer, it remains good for 3 months. Always check for off smells or changes in color before eating. Yes, you can make Chicken Pot Pie Soup ahead of time. To prep, start by cooking the chicken and vegetables as per the recipe. Once you finish cooking, let the soup cool. Store it in an airtight container in the fridge. This soup stays fresh for 3 to 4 days. When you are ready to eat, heat it up on the stove. Add a bit of broth if it seems thick. This soup tastes great after it sits for a day. The flavors have more time to blend together. If you want a lighter soup, try using half-and-half. It gives a creamy taste with less fat. You can also use coconut milk for a dairy-free option. It adds a nice flavor twist. For a very light choice, consider using yogurt. Just stir it in at the end so it doesn't curdle. Freezing this soup is simple. First, let it cool completely. Then, pour it into freezer-safe bags or containers. Make sure to leave some space at the top, as the soup will expand when frozen. Seal the bags tightly to prevent freezer burn. Label the bags with the date. You can freeze the soup for up to 3 months. To thaw, place it in the fridge overnight. Reheat it on the stove, stirring well. If it’s too thick, add a little broth to reach your desired consistency. Absolutely! Adding more vegetables makes the soup even better. You can try adding potatoes for extra heartiness. Sweet potatoes add a hint of sweetness. Spinach or kale can boost the nutrients. Bell peppers give a nice crunch. Just chop them small and add them when you sauté the other veggies. This soup is flexible, so feel free to get creative! We explored how to make a delicious Chicken Pot Pie Soup. You learned about the main ingredients and key seasonings that give it flavor. I shared easy steps for cooking the chicken, sautéing veggies, and creating a creamy base. Tips for variations, storage, and reheating were also covered. With these insights, you can make this comforting dish any time. Enjoy experimenting to find your favorite version!

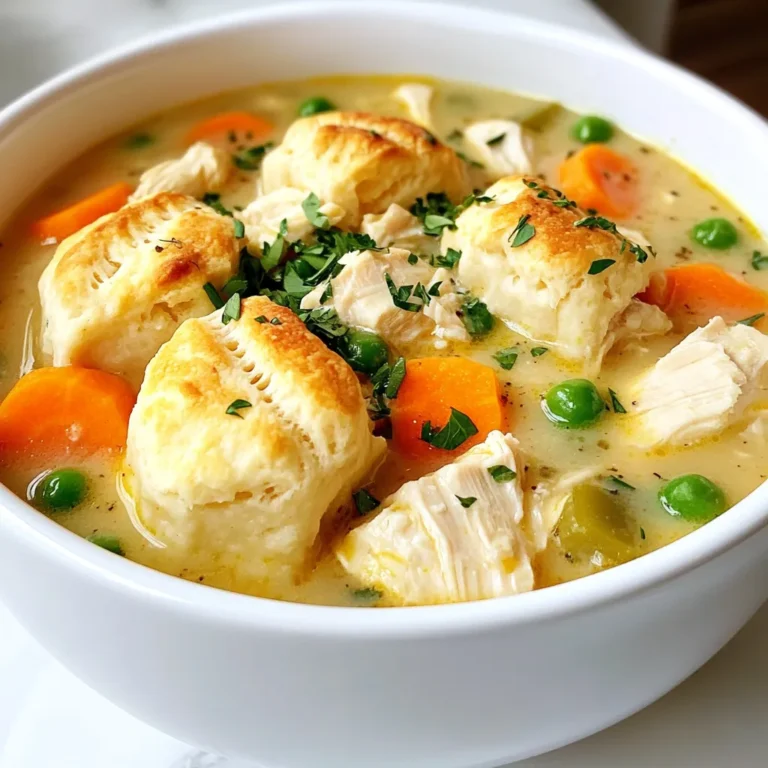
Savory Chicken Pot Pie Soup Comforting Kitchen Favorite

- 4 boneless, skinless chicken thighs - 2 cups broccoli florets - 1 cup cherry tomatoes, halved - 1 bell pepper (any color), sliced - 1 medium red onion, sliced - 4 cloves garlic, minced - 1/2 cup unsalted butter, melted - 1 tablespoon fresh rosemary, minced - 1 tablespoon fresh parsley, chopped - Salt and pepper to taste - 1 teaspoon paprika - 1 teaspoon lemon zest - Prep time: 10 minutes - Total time: 40 minutes - Servings: 4 Using fresh and simple ingredients makes this dish shine. The chicken thighs give great taste and stay juicy. Broccoli, cherry tomatoes, bell peppers, and onions add color and nutrition. You have a mix of flavors and textures that create a tasty meal. The garlic butter adds a rich touch. It combines garlic, creamy butter, and fresh herbs. The lemon zest gives a bright kick that enhances the dish. You will love how this mix brings out the best in the chicken and veggies. This recipe is quick to prepare. In just 10 minutes, you can get everything ready. With a total time of 40 minutes, you will have a warm meal for four. You can enjoy it fresh out of the oven or save it for later. {{ingredient_image_1}} - Preheat your oven to 400°F (200°C). - Line a large sheet pan with parchment paper. - In a bowl, combine melted butter, minced garlic, rosemary, parsley, paprika, lemon zest, salt, and pepper. - Mix well until smooth and creamy. - Place chicken in the center of the sheet pan. - Toss the broccoli florets, cherry tomatoes, bell pepper slices, and red onion in half of the garlic butter mixture. - Arrange the seasoned vegetables around the chicken evenly. - Drizzle the remaining garlic butter over the chicken and veggies. - Bake for 25-30 minutes until chicken reaches 165°F (75°C) and veggies are tender. Using fresh herbs makes a big difference. Fresh rosemary and parsley add great taste. You can also adjust the salt and pepper to fit your taste. If you like it spicy, add more paprika. Make sure you do not overcrowd the sheet pan. This way, the vegetables cook evenly. If you want a crispier texture, you can broil the dish for a few minutes after baking. This step gives a nice crunch to the veggies and chicken. Serving the dish on a large platter is a great idea. It looks nice and makes it feel special. You can garnish the meal with extra parsley and a sprinkle of lemon zest. This adds color and makes it more inviting. Pro Tips Use Fresh Ingredients: Fresh vegetables and herbs will enhance the flavor of your dish significantly. Always choose the freshest produce for the best results. Don’t Overcrowd the Pan: Make sure to space the chicken and vegetables out on the sheet pan. This allows for even cooking and helps to achieve a nice caramelization. Rest the Chicken: Let the chicken rest for a few minutes after baking. This helps the juices redistribute, resulting in a more tender and flavorful bite. Customize Your Veggies: Feel free to swap out the vegetables based on your preference or what you have on hand. Zucchini, asparagus, or green beans all work well! {{image_2}} You can easily change the protein in this dish. Swap chicken thighs for chicken breasts or drumsticks. Both options work well and keep the meal tasty. If you want a lighter choice, use shrimp or tofu. Shrimp cooks fast and adds a nice touch. Tofu works great for a vegetarian option. Just make sure to press it first to remove excess water. Feel free to switch up the veggies based on what you like. Incorporate seasonal vegetables like zucchini or asparagus for fresh flavors. These add color and nutrients. You can also consider frozen vegetable mixes. They save time and still taste good. Just toss them in with the chicken and garlic butter. Want to spice things up? Add red pepper flakes for heat. This small change can make a big difference in flavor. You can also substitute lemon zest with lime zest. The lime will give the dish a fun twist. Experimenting with these flavors can lead to new favorites! You can store leftovers in an airtight container. Keep them in the fridge for up to 3 days. When you want to eat them, reheat in the oven or microwave. This keeps the chicken and veggies tasty. Let the dish cool down before freezing. You can freeze it for up to 2 months. When ready to eat, thaw it in the fridge overnight. This makes reheating easier and ensures good flavor. Serve this meal with rice or quinoa for a filling option. Crusty bread also pairs well and soaks up the garlic butter. For a fresh touch, add a salad. This makes your meal balanced and colorful. Bake for 25-30 minutes or until the internal temperature reaches 165°F (75°C). This ensures the chicken is safe to eat and juicy. Use a meat thermometer for best results. Check the thickest part of the thigh to confirm it's done. It’s recommended to use thawed chicken for even cooking. Frozen chicken can cook unevenly. This may lead to parts being undercooked while others overcook. Thaw your chicken in the fridge overnight or use the defrost setting on your microwave. Pair with sides like mashed potatoes, rice, or steamed vegetables for a full meal. These sides balance the rich flavors. You can also try a fresh salad or crusty bread. They add freshness and texture, making the meal more enjoyable. In this post, we covered how to make a tasty sheet pan garlic butter chicken. We looked at simple ingredients like chicken, vegetables, and a rich garlic butter mix. I shared step-by-step cooking tips, variations, and storage info to make it easy for you. Remember, fresh herbs can boost flavors, and serving options can enhance your meal. This dish is not just easy; it’s also fun to customize. Enjoy making this recipe your own!

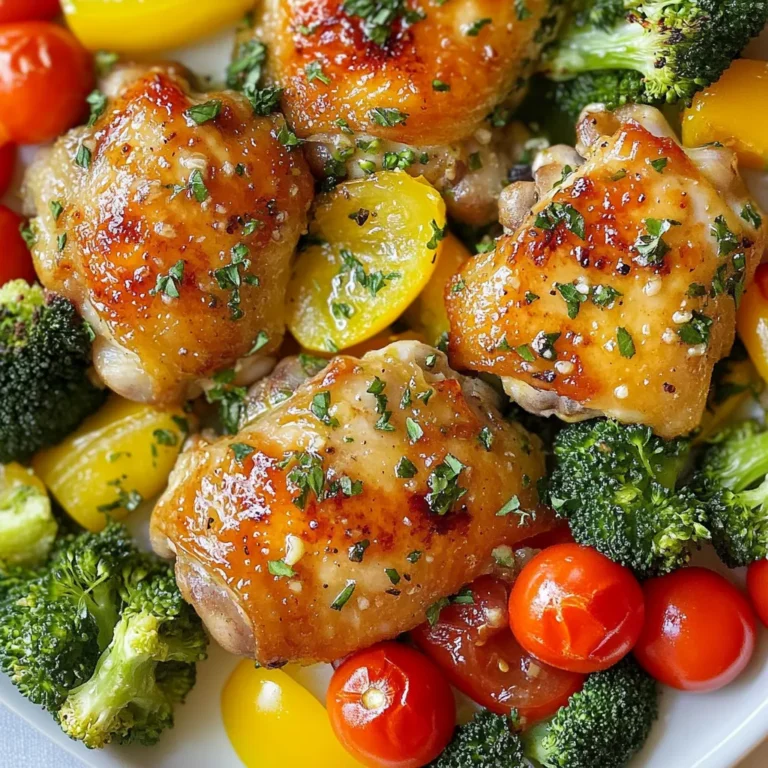
Sheet Pan Garlic Butter Chicken and Veggies Delight

- 2 cups cooked rice (white or brown) - 2 chicken breasts, diced - 1 cup corn kernels (fresh, frozen, or canned) - 1 red bell pepper, diced - 1/2 red onion, finely chopped - 1 avocado, sliced - 1/4 cup cilantro, chopped - 1 teaspoon smoked paprika - 1 teaspoon chili powder - 1 lime, juiced - 1/2 cup crumbled cotija cheese (or feta) - 2 tablespoons olive oil I love starting with fresh, simple ingredients. Here’s what you need to make this tasty street corn chicken bowl. You can use white or brown rice, depending on your preference. Diced chicken breasts bring protein and flavor. I often choose fresh corn kernels, but frozen or canned work well too. Add some color with a diced red bell pepper and finely chopped red onion. These ingredients add crunch and taste. Don’t forget the creamy avocado slices; they add a nice touch. Fresh cilantro brings brightness to the dish. The spices are key: smoked paprika and chili powder give it warmth. A squeeze of lime juice brightens up all the flavors. Finally, crumbled cotija cheese, or feta if you prefer, adds richness. Drizzle with olive oil to tie everything together and enhance the taste. You can easily find all these ingredients at your local store. By using fresh and vibrant ingredients, your street corn chicken bowl will shine. Enjoy cooking with these simple, easy-to-find items! {{ingredient_image_1}} 1. First, heat a large skillet over medium heat. Add 2 tablespoons of olive oil to the pan. 2. Next, take 2 diced chicken breasts and place them in the skillet. 3. Sprinkle 1 teaspoon of smoked paprika, 1 teaspoon of chili powder, salt, and pepper on the chicken. Mix well. 4. Cook the chicken for about 5-7 minutes. Ensure it is browned and fully cooked. 5. Once done, remove the chicken from heat and set it aside. 1. In the same skillet, add 1 cup of corn kernels and 1 diced red bell pepper. 2. Sauté the corn and pepper for 3-4 minutes. Look for slight charring on the corn. 3. Once cooked, remove the skillet from heat. 1. In a large bowl, combine the cooked rice (2 cups), sautéed chicken, corn, and bell pepper. 2. Add 1/2 finely chopped red onion and 1/4 cup of chopped cilantro to the bowl. 3. Drizzle with juice from 1 lime. Toss everything together gently until mixed well. 1. Use a spoon to scoop the chicken and corn mixture into serving bowls. 2. Top each bowl with sliced avocado and 1/2 cup of crumbled cotija cheese. 3. For extra flavor, consider adding more cilantro or lime wedges on the side. - Best methods for cooking chicken: I like to use a large skillet for cooking chicken. Heat olive oil over medium heat. Add diced chicken and season it well with spices. Cook until it is browned and cooked through. This usually takes about 5-7 minutes. Make sure to stir it to cook evenly. - Ensuring corn is perfectly sautéed: To get great corn, add it to the same skillet after the chicken. Sauté it for just 3-4 minutes. You want it to be slightly charred. This brings out its sweet flavor and adds texture to your dish. - Suggestions for additional spices: If you want to spice things up, try adding cumin or garlic powder. They add depth to the flavor. You can also use smoked paprika for a hint of smokiness. Adjust spices to your taste. - Importance of lime juice: Don’t skip the lime juice! It brightens the whole dish. The acidity cuts through the richness of the cheese and avocado. It adds a fresh, zesty kick that makes every bite better. - Presentation ideas: For a lovely look, use colorful bowls. Layer the chicken and corn mix at the bottom. Top it with sliced avocado and a sprinkle of cotija cheese. You can add extra cilantro for a pop of color. - Pairing side dishes or drinks: This bowl pairs well with a simple salad or tortilla chips. You can also serve it with a cold drink, like limeade or a light beer. They enhance the meal and make it even more enjoyable. Pro Tips Use Fresh Ingredients: Whenever possible, opt for fresh corn and vegetables to enhance the flavor and texture of your dish. Perfectly Cooked Chicken: Ensure the chicken is cooked to an internal temperature of 165°F for safety and tenderness. Customize Your Spice Level: Adjust the amount of chili powder to suit your taste; add more for extra heat or reduce for a milder flavor. Make It a Meal Prep: This bowl is perfect for meal prep! Store the components separately in airtight containers for quick and easy lunches throughout the week. {{image_2}} You can easily swap out chicken for other proteins. Tofu works great for a plant-based option. Simply cube it and sauté until golden. Shrimp is another fantastic swap. Cook it for a few minutes until pink and tender. When it comes to cheese, cotija cheese adds a nice touch. However, you can use feta instead for a tangy twist. Goat cheese can also work well, giving your bowl a creamy texture. For those who need gluten-free options, make sure your rice is certified gluten-free. This dish is naturally gluten-free if you skip any sauces with gluten. If you want to make it vegan, replace chicken with tofu and omit cheese. You can add nutritional yeast for a cheesy flavor. Use a vegan-friendly lime dressing to keep it light and zesty. Want to pack in more flavor? Consider adding black beans or pinto beans. They not only boost protein but also add a creamy texture. You can also toss in other veggies like zucchini or jalapeños for extra crunch and heat. For spice lovers, hot sauce is a perfect addition. Drizzle some over the top before serving. You can also mix in diced jalapeños or a pinch of cayenne pepper for some kick. These ingredients will take your savory street corn chicken bowl to the next level. To keep your street corn chicken bowl fresh, store it in the fridge. Use an airtight container. This will help keep it safe and tasty. Always let the bowl cool down before sealing it. You can store it for up to three days. If you want to save it longer, freeze it. Divide it into portions for easy use later. Make sure to use freezer-safe containers. You can freeze it for up to three months. When it’s time to enjoy your leftovers, reheating is key. The best way to reheat is using the oven. Preheat it to 350°F (175°C). Place the bowl in an oven-safe dish. Cover it with foil to keep it moist. Heat for about 15-20 minutes. If you prefer the microwave, use that too. Just place your bowl in and heat it in short bursts. Stir in between to keep the flavors. Your street corn chicken bowl lasts about three days in the fridge. After that, it may lose flavor and texture. Look for signs of spoilage, such as a sour smell or any change in color. If you see mold, throw it away. Safety comes first when enjoying your delicious meal! To make street corn, start with fresh corn on the cob. - Boil or grill the corn until tender. - Once cooked, let it cool. - Cut the kernels off the cob into a bowl. - Mix the kernels with mayo, lime juice, and spices like chili powder. - Add crumbled cotija cheese and cilantro for more flavor. This mix brings a fresh taste to your bowl. Yes, you can prep parts of this dish in advance. - Cook the rice a day before and store it in the fridge. - Dice the chicken and store it in a sealed container. - You can also prep the veggies, like the bell pepper and onion, ahead of time. Just remember to keep everything separate until you’re ready to serve. This keeps your dish fresh and tasty. If you don’t have cotija cheese, feta cheese works well. - Use crumbled feta for a similar flavor. - You can also use goat cheese for a tangy twist. - For a non-dairy option, try nutritional yeast mixed with a bit of salt. These options will still give your bowl a delicious finish. This dish combines simple ingredients for a tasty chicken bowl. You learned how to cook chicken, sauté veggies, and mix everything up. Remember to add lime juice for a fresh kick. You can easily change ingredients to fit your taste or diet. Store leftovers properly to keep them fresh and delicious. Enjoy a fun cooking experience with these tips and tricks. Get creative and make it your own!

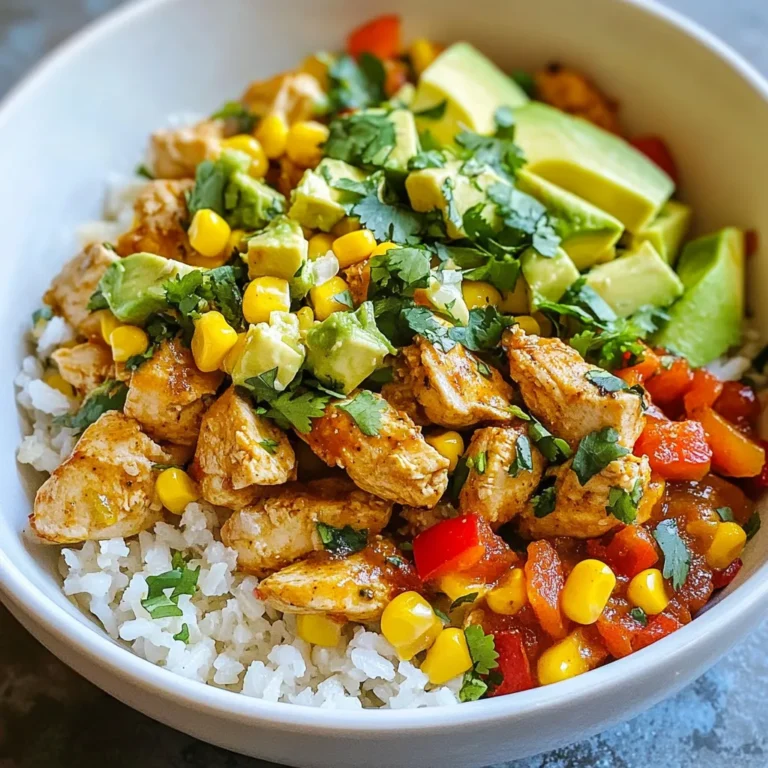
Savory Street Corn Chicken Bowl Easy and Tasty Recipe

PREV 1 … 54 55 56 NEXT
go kitchen now

explore

DessertsDinnerAppetizersDrinks

Our Policies

  • Cookie Policy
  • Copyright Policy
  • Disclaimer
  • GDPR Policy
  • Terms Of Use
Back to Top
  • About
  • Contact Us
  • Privacy Policy
© 2025 go kitchen now