FREE DINNER EBOOK! Get your copy!
  • Cookie Policy
  • GDPR Policy
  • Disclaimer
  • Terms Of Use
  • Visit my other site: Fun Cookie Recipes
go kitchen now
  • Home
  • Dinner
  • Desserts
  • Drinks
  • Appetizers
  • Contact
  • About
  • Privacy Policy
  • Home
  • Dinner
  • Desserts
  • Drinks
  • Appetizers
  • Contact
  • About
  • Privacy Policy
  • Cookie Policy
  • GDPR Policy
  • Disclaimer
  • Terms Of Use
Visit my other site: Fun Cookie Recipes

HOME / CATEGORIES /

Latest

To make a tasty Slow Cooker Buffalo Chicken Dip, you need these simple ingredients: - 2 cups shredded cooked chicken (rotisserie chicken works well) - 1 package (8 oz) cream cheese, softened - 1 cup buffalo sauce (adjust for desired heat level) - 1 cup shredded sharp cheddar cheese - 1/2 cup ranch dressing or blue cheese dressing - 1/4 cup green onions, chopped (for garnish) - Tortilla chips or celery sticks for serving These ingredients blend together for a creamy and spicy dip. The chicken adds protein, while the cream cheese gives it a rich base. Buffalo sauce brings the heat, and cheddar cheese makes it ooey-gooey. The ranch or blue cheese dressing adds a tangy touch. Green onions on top give a fresh crunch. You can serve this dip with tortilla chips or crunchy celery sticks. Both options complement the flavors well. Enjoy this dip at parties or game days; it will surely please your guests! {{ingredient_image_1}} First, gather your ingredients. In a slow cooker, add the softened cream cheese. Then, mix in the shredded chicken. Next, pour in the buffalo sauce and ranch or blue cheese dressing. Stir well until everything combines smoothly. The cream cheese should blend nicely with the other ingredients. Now, cover your slow cooker. Set it to low and cook for 2 to 3 hours. You want the dip to be hot and bubbly. After the cooking time is up, stir the mixture again. This helps keep the dip creamy. Next, add the shredded cheddar cheese on top. Allow it to melt for about 15 to 20 minutes. This gives the dip a rich, cheesy flavor. Once the cheese is melted, take the dip out of the slow cooker. Stir it to ensure a smooth texture. Before serving, garnish with chopped green onions. This adds a nice color and fresh taste. Serve the dip warm in a decorative bowl. Surround it with tortilla chips and celery sticks for dipping. Enjoy the tasty Buffalo chicken dip at your next party! For a smooth dip, mix the cream cheese well. I find it helps to soften it first. Use a whisk or a spatula to break it down. This way, it blends better with the chicken and sauces. When melting the cheese, add it last. I recommend waiting until the dip is hot. Let the cheddar sit on top for about 15 to 20 minutes. This ensures it melts nicely and blends into the dip. To change the spice level, adjust the buffalo sauce. If you want more heat, add more sauce. For less heat, use less sauce or a milder brand. You can also mix in some honey for sweetness. If you want a different taste, try alternative dressings. You can swap ranch for blue cheese dressing or even Caesar dressing. Each option gives a unique flavor. Pro Tips Use Quality Chicken: For the best flavor, use rotisserie chicken or leftover grilled chicken. The seasoning from the chicken adds depth to the dip. Adjust the Heat: If you're sensitive to spice, start with a milder buffalo sauce and gradually increase the amount to suit your taste. Serve Immediately: This dip is best enjoyed fresh and warm. If you need to make it ahead of time, reheat gently on low in the slow cooker before serving. Add Extra Flavor: Consider mixing in some crumbled blue cheese or additional spices like garlic powder and smoked paprika for an extra kick. {{image_2}} If you want a vegetarian dip, you can swap chicken for chopped cauliflower or mushrooms. Both options add great texture. You can also use canned chickpeas for extra protein and fiber. For cheese, swap the sharp cheddar for pepper jack for a spicy twist. You can also try mozzarella for a milder flavor. Cream cheese is key for creaminess, but Neufchâtel works well too. Adding ranch seasoning boosts the dip's flavor. Just a teaspoon or two will make it extra tasty. You can also try garlic powder or onion powder for more depth. For herbs, add fresh cilantro or parsley. They brighten the dish and give it a fresh taste. A dash of smoked paprika adds a nice smoky flavor too. These changes can make your buffalo chicken dip unique and fun for any party! To keep your buffalo chicken dip fresh, first let it cool down. Then, transfer it to an airtight container. Use a container that seals well to keep out air. This helps the dip stay tasty. Store it in the fridge for up to three days. If you need to store it longer, consider freezing it. For freezing, use a freezer-safe container. Make sure to leave some space for expansion as it freezes. When you're ready to enjoy leftovers, reheating is key. You can use a microwave or stovetop. For the microwave, place the dip in a safe bowl. Heat it in short bursts of 30 seconds. Stir after each burst until heated through. For the stovetop, use a small pot over low heat. Stir often to prevent sticking. For serving, consider adding fresh toppings. A sprinkle of green onions or extra cheese can revive the dip. Serve it warm with fresh tortilla chips or celery sticks for dipping. This makes it feel fresh and fun again! Yes, you can make this dip ahead of time. Prepare it and store it in the fridge. Just reheat it in the slow cooker before serving. This saves time on party day. You can serve buffalo chicken dip with tortilla chips or celery sticks. Both options add great crunch. You might also try crackers or sliced veggies for more variety. Leftovers can last for about 3 to 4 days in the fridge. Store them in an airtight container to keep them fresh. To enjoy them later, just reheat in the microwave or slow cooker. Yes, you can freeze buffalo chicken dip. Place it in a freezer-safe container. It will last for about 2 to 3 months. To eat, thaw it in the fridge overnight, then reheat it. This blog post covered how to make delicious buffalo chicken dip. We discussed the essential ingredients and detailed steps to prepare it. You learned tips for a creamy texture and ways to adjust the heat level. Variations, substitutions, and storage information were also shared to enhance your experience. In conclusion, making this dip is simple and fun. You can experiment with flavors and serve it with your favorite snacks. Enjoy sharing this tasty treat at your next gathering!

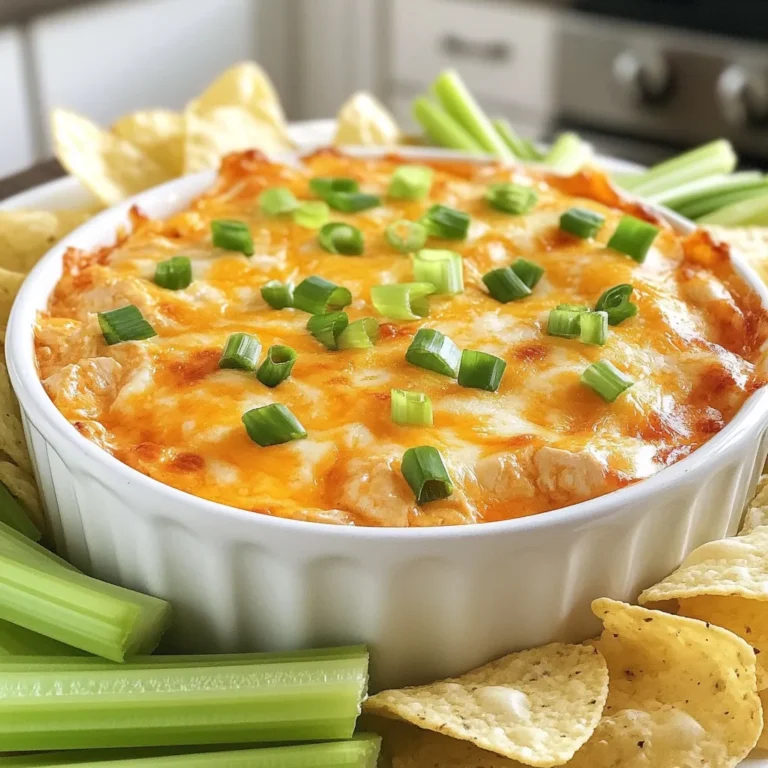
Slow Cooker Buffalo Chicken Dip Tasty Party Snack

- 4 boneless, skinless chicken thighs - 1 cup teriyaki sauce (store-bought or homemade) - 1 tablespoon fresh ginger, minced - 2 garlic cloves, minced - 1 cup bell peppers, sliced (mixed colors) - 1 cup broccoli florets - 1 cup onions, sliced - 1 tablespoon sesame oil - 2 green onions, chopped (for garnish) - Sesame seeds (optional, for garnish) - Cooked rice (for serving) The key to this dish is fresh ingredients. Start with four boneless, skinless chicken thighs. They cook well and stay juicy. You can use store-bought teriyaki sauce, but homemade is even better. It gives a richer flavor. Minced fresh ginger adds a nice kick. Garlic also boosts the taste and aroma. For veggies, I love using bell peppers, broccoli, and onions. These add color and crunch! Don't forget the sesame oil. It gives a nice nutty flavor. You can garnish with green onions and sesame seeds if you like. Lastly, serve this over warm cooked rice. It soaks up all the tasty sauce. This recipe is simple but full of flavor! {{ingredient_image_1}} To start, you need to prepare your crockpot. Lightly spray the inside with non-stick cooking spray. This helps to keep the chicken from sticking and makes clean-up easier later. Next, it’s time to layer the ingredients. First, place the four boneless, skinless chicken thighs at the bottom of the crockpot. This gives them a nice base. Then, in a small bowl, mix together one cup of teriyaki sauce, one tablespoon of minced ginger, and two minced garlic cloves. Pour this sauce over the chicken. Now, add your vegetables. Start with one cup of sliced bell peppers, followed by one cup of broccoli florets, and one cup of sliced onions. They can be colorful and fresh. Drizzle one tablespoon of sesame oil over the top to add flavor. Now, you need to choose your cooking time. If you set the crockpot on low, let it cook for 6 to 8 hours. If you’re in a hurry, you can set it to high for 3 to 4 hours. It is important to cook until the chicken is tender and fully cooked. You can check by using a meat thermometer or by shredding the chicken with two forks. It should fall apart easily. After cooking, serve the teriyaki chicken over cooked rice. You can garnish with green onions and sesame seeds for extra flavor and flair. Enjoy your meal! To make your chicken teriyaki even better, try adding some extras. You can mix in a little red pepper flake for heat or add pineapple chunks for sweetness. A splash of rice vinegar adds a tangy kick. If you love herbs, add cilantro or basil for fresh notes. Each of these options will bring your dish to life. Shredding chicken is easy when you follow some tips. Use two forks to pull the chicken apart. Start at the thickest part and work your way out. You can also let the chicken cool for a few minutes. This makes it easier to handle. Shred the chicken right in the crockpot. This keeps all the tasty sauce in the mix. Serve your teriyaki chicken over warm rice. This adds a nice base to the dish. You can also add steamed vegetables on the side. Broccoli or snap peas work well. For a fun touch, sprinkle chopped green onions and sesame seeds on top. This gives your meal a vibrant look and extra flavor. Enjoy your delicious creation! Pro Tips Use Frozen Vegetables: If you're short on time, using frozen bell peppers and broccoli can save you prep time and still provide a deliciously fresh taste. Customize Your Sauce: Feel free to tweak the teriyaki sauce by adding a splash of rice vinegar or a pinch of red pepper flakes for extra flavor. Shred for Flavor: Shredding the chicken directly in the crockpot allows it to soak up all the sauce and spices, enhancing the overall taste of the dish. Serve with Extras: For a complete meal, serve the chicken teriyaki with a side of steamed edamame or a simple cucumber salad. {{image_2}} You can switch up the chicken thighs in this dish. Chicken breast works well too. It has less fat, so it cooks faster. You can also use tofu for a plant-based option. Just press it to remove extra water. Then cut it into cubes. Add it to the crockpot like you do with chicken. Both options taste great with the teriyaki sauce. Feel free to mix in more veggies. Carrots, snap peas, and zucchini are good choices. You can also use frozen vegetables if you’re short on time. Just toss them in without thawing. This dish is all about your taste. The more colors you add, the more fun it looks! Making your own teriyaki sauce is simple. You’ll need: - ½ cup soy sauce - ¼ cup brown sugar - 2 tablespoons rice vinegar - 1 tablespoon sesame oil - 1 tablespoon cornstarch mixed with 2 tablespoons water (for thickness) Mix these in a bowl. Heat gently until the sugar melts. This sauce will give your dish a fresh taste. Plus, you can control the sweetness and saltiness. After you enjoy your meal, store any leftovers right away. Place the chicken teriyaki in an airtight container. This helps keep the dish fresh and safe. If you want to freeze it, use freezer-safe bags or containers. Remove as much air as possible to avoid freezer burn. To reheat chicken teriyaki, use the microwave for quick warmth. Heat on medium power for about 2-3 minutes. Stir halfway through to ensure even heating. You can also reheat it on the stovetop. Just place it in a pan over low heat. Stir gently until warmed through. In the fridge, chicken teriyaki lasts about 3-4 days. If you freeze it, it can stay good for about 2-3 months. Always check for signs of spoilage before eating. If it smells off or looks strange, toss it out for safety. Yes, you can use frozen chicken thighs. Just place them directly in the crockpot. If using frozen chicken, cook on high for 4-5 hours or on low for 8-10 hours. The chicken will still be juicy and tender. Crockpot Chicken Teriyaki pairs well with several sides. Here are some ideas: - Steamed white rice or brown rice - Quinoa for a healthy twist - Stir-fried vegetables - A fresh salad with sesame dressing - Noodles tossed in soy sauce These sides will balance the flavors and make your meal more complete. To check if the chicken is done, look for these signs: - The chicken should shred easily with a fork. - The meat should be white or light brown, not pink. - The internal temperature should reach 165°F (75°C). If you see these signs, your chicken is ready to enjoy! This article shared an easy chicken teriyaki recipe using your crockpot. We covered the ingredients, cooking steps, and tips to enhance flavor. I also shared variations and storage advice. You can make it your own by switching proteins or adding veggies. Remember, cooking should be fun and adaptable. Enjoy creating your dish and make it suit your taste! Cook with confidence, and don’t hesitate to experiment. Happy cooking!

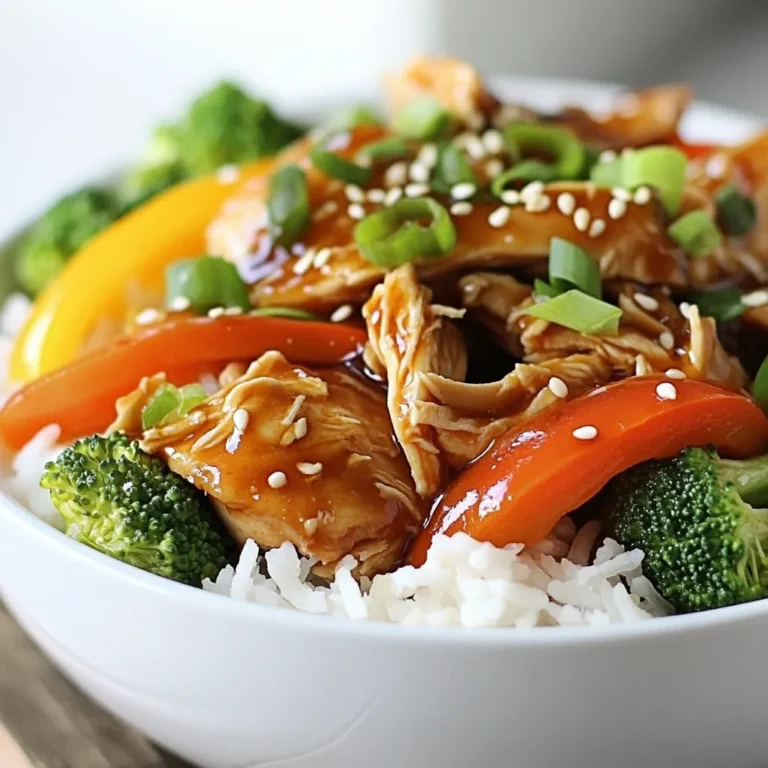
Dump-and-Go Crockpot Chicken Teriyaki Delight

To make Mediterranean baked salmon with feta, you need fresh and tasty ingredients. Here’s what you will need: - 4 salmon fillets - 1 cup cherry tomatoes, halved - 1 cup Kalamata olives, pitted and halved - 1 cup fresh spinach - 1/2 cup feta cheese, crumbled - 2 tablespoons olive oil - 2 tablespoons lemon juice - 2 cloves garlic, minced - 1 teaspoon dried oregano - Salt and pepper to taste - Fresh parsley, chopped (for garnish) Each ingredient brings its own special touch to the dish. Salmon fillets are rich in flavor and healthy fats. Cherry tomatoes add a sweet burst. Kalamata olives bring a salty kick. Fresh spinach gives a bright green color. Feta cheese adds a creamy and tangy note. Using olive oil and lemon juice enhances all the flavors. Garlic and oregano add depth and warmth. Don’t forget the salt and pepper! They help to bring out the best in every bite. Garnishing with fresh parsley adds a nice pop of color. Plus, it gives a fresh taste that ties everything together. Enjoy the process of gathering these fresh ingredients. They will transform your meal into a Mediterranean delight! {{ingredient_image_1}} Preheating the oven is key for great salmon. Start by setting your oven to 400°F (200°C). This temperature cooks the salmon evenly. It also helps to keep the fish moist and tender. A hot oven seals the flavors in. Next, grab a large baking dish. Place the salmon fillets skin-side down. This keeps the fish from sticking. In a bowl, mix cherry tomatoes, Kalamata olives, spinach, and minced garlic. Drizzle olive oil and lemon juice over the mix. Add dried oregano and stir well. Spread this mix around the salmon in the dish. Cover the baking dish with aluminum foil. Bake for 15 minutes. This traps steam and helps the salmon cook. After 15 minutes, remove the foil. Bake for another 10 minutes. The salmon is done when it flakes easily with a fork. Always check it early to avoid overcooking. Remove from the oven and let it cool a bit. Enjoy your beautiful dish! To make your Mediterranean baked salmon burst with flavor, think about spices and herbs. Here are some great options: - Dried oregano: This is a must for that classic Mediterranean taste. - Thyme or rosemary: Both add a lovely depth. - Paprika: For a gentle kick and color. You can also marinate the salmon before cooking. A simple mix of olive oil, lemon juice, and minced garlic works wonders. Let the salmon sit in this mix for about 30 minutes. This step boosts flavor and keeps the fish moist. When it comes to serving, the look matters. Here are some ideas to make your dish pop: - Rustic Serving: Serve directly from the baking dish for a homey feel. - Plated Presentation: Place each salmon fillet on a plate. Add a scoop of the tomato and olive mix beside it. This makes it look fancy. Don't forget the garnishing! Fresh parsley adds color and freshness. You can also sprinkle some lemon zest for a bright touch. The right tools make cooking easier. Here’s what I recommend: - Baking Dish: Use a large, shallow baking dish. It helps the salmon cook evenly. - Utensils: A sharp knife for cutting the fish and a sturdy spatula for serving are key. These tools will help you achieve the best results and make cooking more enjoyable. Pro Tips Fresh Ingredients: Use the freshest salmon and seasonal vegetables for the best flavor and texture. Marinating Time: If you have time, marinate the salmon in olive oil, lemon juice, and garlic for 30 minutes before baking to enhance the flavors. Feta Variations: Experiment with different types of cheese, such as goat cheese or ricotta, for a unique twist on this dish. Serving Suggestions: Pair with a side of quinoa or a fresh Mediterranean salad to complete the meal. {{image_2}} If you want a gluten-free option, this recipe works well as is. All the ingredients are naturally gluten-free. You can enjoy it without worry. For a dairy-free version, skip the feta cheese. You can try using a nut-based cheese or a creamy avocado spread instead. Seasonal vegetables add a fun twist. In spring, try asparagus or peas. In summer, add zucchini or bell peppers. For fall, roasted squash shines in this dish. You can also use different cheeses. Goat cheese or a sharp cheddar can bring new flavors. For a spicy kick, add red pepper flakes or a drizzle of hot sauce. If you like zesty flavors, mix in some lemon zest or capers. To add crunch, sprinkle sliced almonds or pumpkin seeds on top before baking. These small changes can make your dish unique and exciting. To store leftover salmon, let it cool first. Place it in an airtight container. This helps keep it fresh. Use a container that seals well to avoid any odors. I like glass containers as they do not stain. Store it in the fridge for up to three days. When you reheat salmon, you want to keep it moist. The best way is to use the oven. Preheat your oven to 275°F (135°C). Place the salmon on a baking sheet. Cover it with foil to trap moisture. Heat for about 15 minutes. Check that it’s warm throughout. Yes, you can freeze baked salmon! First, let it cool completely. Wrap each piece in plastic wrap tightly. Then, place the wrapped salmon in a freezer bag. Remember to label it with the date. To thaw, move it to the fridge overnight. This keeps the texture nice and firm. Baking salmon usually takes about 25 to 30 minutes. Start by preheating your oven to 400°F (200°C). Place the salmon fillets in a baking dish. Cover it with foil for the first 15 minutes. This helps keep the fish moist. After that, remove the foil and bake for an extra 10 minutes. Check for doneness; the fish should flake easily with a fork. The safe internal temperature for baked salmon is 145°F (63°C). This ensures that harmful bacteria are killed. To check, use a food thermometer. Insert it into the thickest part of the fillet. Once it reaches 145°F, your salmon is ready to eat. It will also look opaque and flake easily. Yes, you can use frozen salmon! However, you need to adjust the cooking time. Thaw the salmon first for even cooking. If you can’t thaw it, increase the baking time by about 5 to 10 minutes. Keep an eye on the internal temperature. Frozen salmon may take longer to reach 145°F. This blog post covered a tasty baked salmon recipe, highlighting key ingredients and step-by-step instructions. I shared helpful tips to enhance flavor, presentation ideas, and cooking equipment recommendations. We explored dietary variations and proper storage techniques to keep leftovers fresh. Finally, I answered common questions about baking salmon. Now you can make this dish with confidence and creativity. Enjoy your cooking journey!

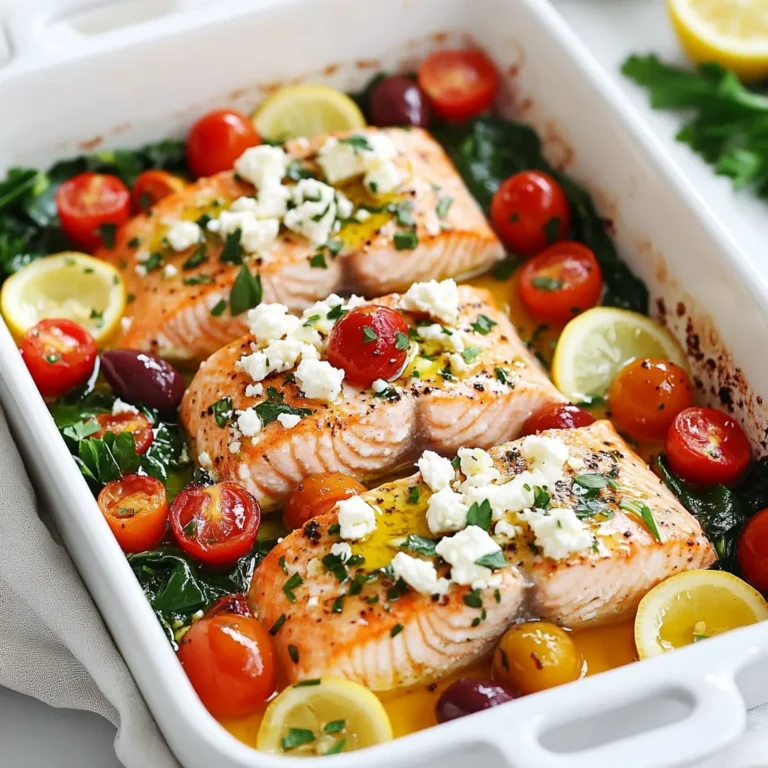
Mediterranean Baked Salmon with Feta Flavor Boost

- 1 lb boneless, skinless chicken thighs - 2 tablespoons hot honey - 1 tablespoon olive oil - 1 teaspoon garlic powder - 1 teaspoon onion powder - 1 teaspoon smoked paprika - Salt and pepper to taste These ingredients form the heart of the dish. The chicken thighs provide rich flavor and tenderness. Hot honey adds a sweet and spicy kick. Olive oil keeps the chicken moist during cooking. Garlic and onion powder offer a savory depth. Smoked paprika gives a subtle smokiness. Seasoning with salt and pepper enhances all the flavors. - 2 cups cooked brown rice or quinoa - 1 cup broccoli florets - 1 cup bell peppers, sliced - 1 avocado, sliced These ingredients add nutrition and balance. Brown rice or quinoa serves as a hearty base. Broccoli adds vitamins and a nice crunch. Sliced bell peppers bring color and sweetness. Avocado adds creaminess and healthy fats. - Fresh cilantro for garnish - Lime wedges for serving Garnishing with cilantro adds freshness. Lime wedges give a zesty finish. Squeeze lime over the bowl just before eating. This brightens the dish and enhances the flavors. Enjoy the blend of sweet, spicy, and savory in every bite! {{ingredient_image_1}} To start, preheat your oven to 400°F (200°C). Grab a bowl and mix together olive oil, hot honey, garlic powder, onion powder, smoked paprika, salt, and pepper. This mix will bring a sweet and spicy flavor to your chicken. Next, take your boneless, skinless chicken thighs and place them in the bowl. Make sure to coat them well with this tasty marinade. Let the chicken sit for at least 15 minutes. If you have time, marinate it in the fridge for up to 2 hours for even more flavor. Now, line a baking sheet with parchment paper. Place the marinated chicken thighs in a single layer on the sheet. Bake them in your preheated oven for about 20 to 25 minutes. You want the chicken to be cooked through and look caramelized. To check if it’s done, the inside should reach 165°F (75°C). Once done, take the chicken out and let it rest for about 5 minutes before slicing. This helps keep it juicy. While the chicken bakes, it’s time to focus on the veggies. Steam 1 cup of broccoli florets for about 5 to 7 minutes. You want them bright green and tender-crisp. In a skillet over medium heat, add a little olive oil and sauté 1 cup of sliced bell peppers for about 5 minutes. Season them with a pinch of salt and pepper. This quick cooking keeps the peppers colorful and crunchy. Now, let’s put everything together! Start with a base of cooked brown rice or quinoa in your meal prep container. Then add a portion of the sliced chicken on top. Next, arrange the steamed broccoli and sautéed bell peppers in the bowl. For a fresh touch, add a few slices of avocado. Finally, sprinkle some fresh cilantro on top and place lime wedges on the side. This adds brightness when you squeeze them over the meal just before eating. Enjoy your vibrant and tasty hot honey chicken meal prep bowl! Marinating is key for great taste. I recommend using hot honey for a spicy kick. If you prefer, mix regular honey with chili flakes. Coat the chicken well with the marinade. Allow it to sit for at least 15 minutes. For even more flavor, marinate it for up to 2 hours in the fridge. This step makes the chicken tender and full of flavor. Cooking chicken can be tricky. Always bake at 400°F (200°C) for best results. Use a baking sheet lined with parchment paper. This helps the chicken brown nicely. Bake for 20-25 minutes. The chicken should reach an internal temperature of 165°F (74°C). Letting it rest for 5 minutes before slicing keeps it juicy. A great meal should look good too! Use glass meal prep containers for a colorful display. Layer the ingredients in separate sections. Start with brown rice or quinoa as the base. Add sliced chicken, broccoli, and bell peppers. Top with avocado slices and fresh cilantro. A lime wedge on the side adds a nice touch. Presentation makes the meal even more appetizing! Pro Tips Marinate for Maximum Flavor: Allow the chicken to marinate for at least 2 hours in the fridge for a deeper flavor infusion. Perfectly Cooked Chicken: Use a meat thermometer to ensure the chicken reaches an internal temperature of 165°F (75°C) for safety and juiciness. Customize Your Veggies: Feel free to swap in your favorite vegetables or whatever you have on hand for a personalized touch. Meal Prep Storage: Store the bowls in airtight containers in the fridge for up to 4 days for easy grab-and-go meals. {{image_2}} You can swap chicken thighs for chicken breasts. Breasts cook faster and are leaner. You can also use turkey for a different flavor. For a meatless option, try tofu or tempeh. These options soak up the marinade well. Instead of brown rice, use quinoa or farro. Quinoa adds protein and cooks quickly. Farro has a nutty taste and chewy texture. You can also use cauliflower rice for a low-carb choice. Each grain offers unique flavors and textures. Broccoli and bell peppers are great, but feel free to mix it up. Try zucchini, snap peas, or carrots for variety. Spinach or kale can be added for extra greens. Just steam or sauté them until tender. This keeps your meal bowls fresh and exciting. To store your Hot Honey Chicken Meal Prep Bowls, you need airtight containers. Divide the chicken, rice, and veggies into these containers. Make sure to leave space for toppings like avocado and cilantro. This helps keep everything fresh. You can use glass or plastic containers. Glass looks nice and is easy to clean. When it's time to eat, heat your meal prep bowl. Use the microwave for quick warming. Start with one minute on high. Check if it's hot. If not, heat in 30-second bursts until warm. You can also use a skillet. Heat the bowl over medium heat, stirring gently. This keeps the chicken juicy and the veggies crisp. Your Hot Honey Chicken Meal Prep Bowls last in the fridge for up to four days. After that, the chicken may dry out. If you want to freeze them, do so before adding avocado and cilantro. They freeze well for up to three months. Just remember to thaw them overnight in the fridge before reheating. Hot honey is a sweet and spicy sauce. It blends honey with chili flakes or peppers. This mix gives it a kick that makes dishes pop. You can buy hot honey or make your own with regular honey and chili flakes. It adds flavor and depth to many meals. Yes, you can use chicken breasts. They are leaner than thighs. However, they may dry out faster. If you choose breasts, cook them until they reach 165°F (74°C). You might need to adjust the cooking time to keep them juicy. To make it spicier, add more hot honey or chili flakes. You can also use spicy peppers in the mix. For a milder dish, reduce the hot honey or use regular honey. You can also skip the chili flakes entirely for a sweeter flavor. You can add many toppings to your bowls. Try sliced radishes, cherry tomatoes, or corn. You can also add black beans or cheese for extra flavor. Fresh herbs like basil or parsley can add a nice touch. Enjoy mixing and matching to find your favorite combos! This blog post shared the key ingredients and steps to make hot honey chicken meal prep bowls. We covered tips for marinating, cooking, and assembling your bowls. I included variations and storage info to help keep your meals fresh. Remember, adjusting spices and vegetables can keep things fun. Enjoy creating delicious meals that are easy to make and perfect for the week!

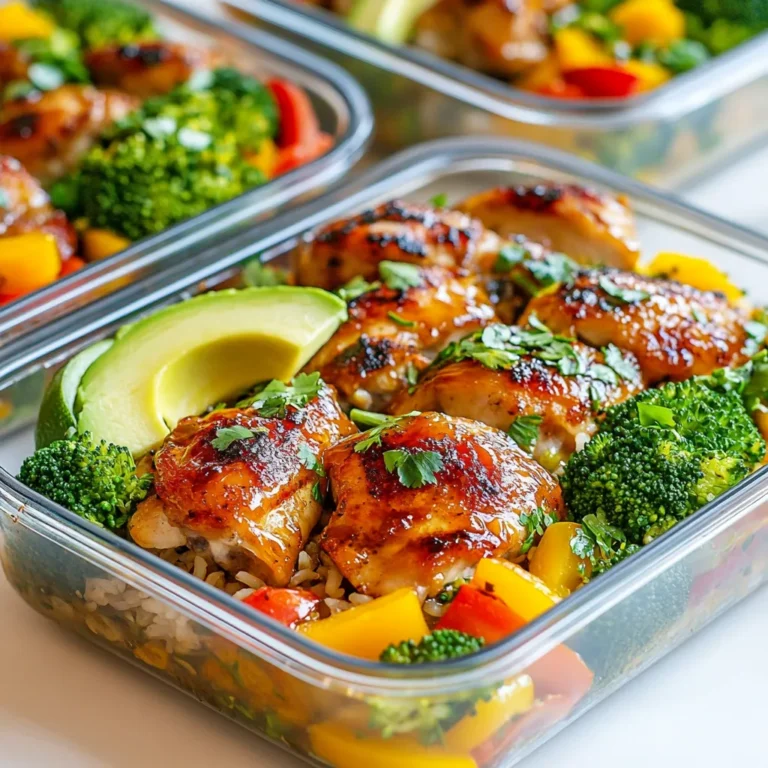
Savory Hot Honey Chicken Meal Prep Bowls Recipe

- 1.5 lbs chicken thighs, boneless and skinless - 3 tablespoons olive oil - 1 teaspoon salt - 1/2 teaspoon black pepper - 1 tablespoon Italian seasoning - 1 red bell pepper, sliced - 1 green bell pepper, sliced - 1 medium onion, sliced - 3 cloves garlic, minced - 1 teaspoon crushed red pepper flakes (adjust to taste) - 1 cup chicken broth - 1 tablespoon apple cider vinegar - 1 tablespoon honey - 1/2 cup Kalamata olives, pitted and halved - Fresh parsley, chopped (for garnish) Choose fresh, high-quality ingredients for the best flavor. Use organic chicken for tenderness. Look for colorful, firm bell peppers. They add sweetness and crunch. Select good-quality olive oil for depth. A robust chicken broth enhances the dish's taste. Always prefer raw, whole garlic over pre-minced for a punchier flavor. Fresh parsley adds a bright touch, so pick it last. You can swap chicken thighs for boneless chicken breasts if you prefer. For a lighter dish, use vegetable broth instead of chicken broth. If you don’t have Kalamata olives, green olives work well too. For a sweeter note, honey can be replaced with maple syrup. If you want more heat, add fresh jalapeños or switch to a spicier pepper. {{ingredient_image_1}} 1. Heat the Oil: Begin by heating 3 tablespoons of olive oil in a large skillet over medium-high heat. This oil will give your chicken a nice, crispy texture. 2. Season the Chicken: While the oil heats, season 1.5 lbs of boneless, skinless chicken thighs. Use 1 teaspoon of salt, 1/2 teaspoon of black pepper, and 1 tablespoon of Italian seasoning. This adds great flavor. 3. Sear the Chicken: Once the oil is hot, add the chicken. Sear the chicken for about 5-6 minutes on each side. You want it golden brown. When done, remove it from the skillet and set it aside. 4. Cook the Veggies: In the same skillet, add sliced red and green bell peppers, and 1 medium sliced onion. Sauté these for 4-5 minutes until they soften. The colors will make your dish vibrant. 5. Add Garlic and Spice: Next, add 3 minced cloves of garlic and 1 teaspoon of crushed red pepper flakes. Sauté for 1-2 minutes. This will bring out a lovely aroma. 6. Combine Everything: Return the chicken to the skillet. Pour in 1 cup of chicken broth, 1 tablespoon of apple cider vinegar, and 1 tablespoon of honey. Stir well to mix everything. 7. Simmer: Bring the skillet mixture to a simmer. Cover it and cook for about 15 minutes. Make sure the chicken reaches an internal temperature of 165°F. 8. Finish with Olives: After the chicken is done, add 1/2 cup of halved Kalamata olives. Stir gently and let it cook for 2-3 more minutes to warm the olives. - For Searing: Make sure the oil is hot enough before adding the chicken. If it’s not hot, the chicken will steam instead of sear. - For Veggies: Cut the bell peppers and onion into similar sizes. This helps them cook evenly. - For Garlic: Stir it in quickly. Garlic cooks fast and can burn easily, which turns it bitter. - For Simmering: Keep the lid on during simmering. This traps steam and helps cook the chicken evenly. - Skipping the Sear: Don’t skip searing the chicken. This adds flavor and texture. - Overcrowding the Pan: If your skillet is too crowded, the chicken will not brown well. Cook in batches if needed. - Not Adjusting Seasoning: Always taste before serving. You might need more salt or spices. - Rushing the Simmer: Make sure to simmer long enough. This allows flavors to meld and the chicken to cook through. To boost flavor, use fresh herbs. Fresh parsley adds brightness. Crushed red pepper gives heat. You can adjust the amount based on your taste. Adding honey balances the spice with sweetness. A splash of apple cider vinegar adds tang. This mix creates a depth of flavor that makes Chicken Scarpariello shine. For juicy chicken, choose thighs. They stay moist and tender. Sear them well for a golden crust. This step locks in flavor. Always check the internal temperature. It should reach 165°F for safety. Let the chicken rest after cooking. This helps keep it juicy inside. Serve Chicken Scarpariello with crusty bread. It’s perfect for dipping in the sauce. You can also pair it with fluffy couscous or rice. These sides soak up the flavors well. For a veggie boost, add a fresh salad. A light green salad complements the dish nicely. Enjoy with a glass of white wine for a special touch. Pro Tips Use Bone-In Chicken: For even more flavor, consider using bone-in chicken thighs. They tend to be juicier and can add depth to the dish. Customize the Heat: Adjust the amount of crushed red pepper flakes to your preference. If you enjoy a bit of heat, don't hesitate to add more! Fresh Herbs: Enhance the freshness of the dish by adding a handful of fresh basil or oregano just before serving for an aromatic finish. Chill for Flavor: This dish tastes even better the next day! If you can, make it ahead of time and let it sit in the fridge overnight to let the flavors meld. {{image_2}} To spice things up, add more heat! Use extra crushed red pepper flakes. You can also add sliced jalapeños for a fresh kick. This version brings warmth and flavor together, perfect for those who love heat. For a veggie boost, add more bell peppers or zucchini. You can even toss in some spinach at the end. This makes the dish colorful and healthy. Plus, it’s a great way to sneak in more nutrients without losing the hearty feel of Chicken Scarpariello. To keep this dish gluten-free, use a gluten-free chicken broth. You can also serve the chicken over cauliflower rice instead of regular rice. This change keeps the meal low-carb while still satisfying. Enjoy all the flavor without the extra carbs! To store your Chicken Scarpariello Skillet leftovers, let them cool. Place the chicken and veggies in an airtight container. Make sure to seal it tight. You can store it in the fridge for up to three days. This keeps the dish fresh and tasty for later meals. Always label your container with the date to track freshness. Reheating your Chicken Scarpariello is easy. You can use a skillet or microwave. For the skillet, add a splash of chicken broth. Heat on low until warm. Stir occasionally to avoid burning. If using a microwave, place the dish in a microwave-safe bowl. Cover it with a damp paper towel. Heat it in short bursts, stirring in between, until heated through. If you want to freeze your Chicken Scarpariello, do it before reheating. Cool it completely and place it in a freezer-safe container. Make sure to remove as much air as possible. This helps prevent freezer burn. You can freeze it for up to three months. When ready to eat, thaw it in the fridge overnight. Reheat it gently using the methods above. Enjoy a quick and easy meal anytime! Chicken Scarpariello is a tasty Italian dish. It features chicken, peppers, and olives. The dish has a sweet and tangy flavor. The chicken cooks in a rich broth with spices. You get a mix of savory and slightly sweet notes. This meal is perfect for family dinners. It’s easy to make and full of flavor. Yes, you can use chicken breasts. They will cook faster than thighs. Make sure to check for doneness early. Chicken breasts can dry out, so watch them closely. If you prefer, you can cut them into smaller pieces. This helps them cook evenly and stay juicy. To spice it up, add more red pepper flakes. You can also include jalapeños for extra heat. Fresh herbs like basil or oregano add great flavor too. For a twist, try a splash of lemon juice. This will add brightness to the dish. Experiment with your favorite spices for a personal touch. This blog post detailed how to make Chicken Scarpariello. We covered the key ingredients, cooking steps, and common pitfalls. I shared tips for flavor and many variations you can try. You learned how to store leftovers and answers to frequent questions. Embrace your creativity in the kitchen. With these insights, you can cook with confidence. Enjoy your flavorful journey with Chicken Scarpariello!

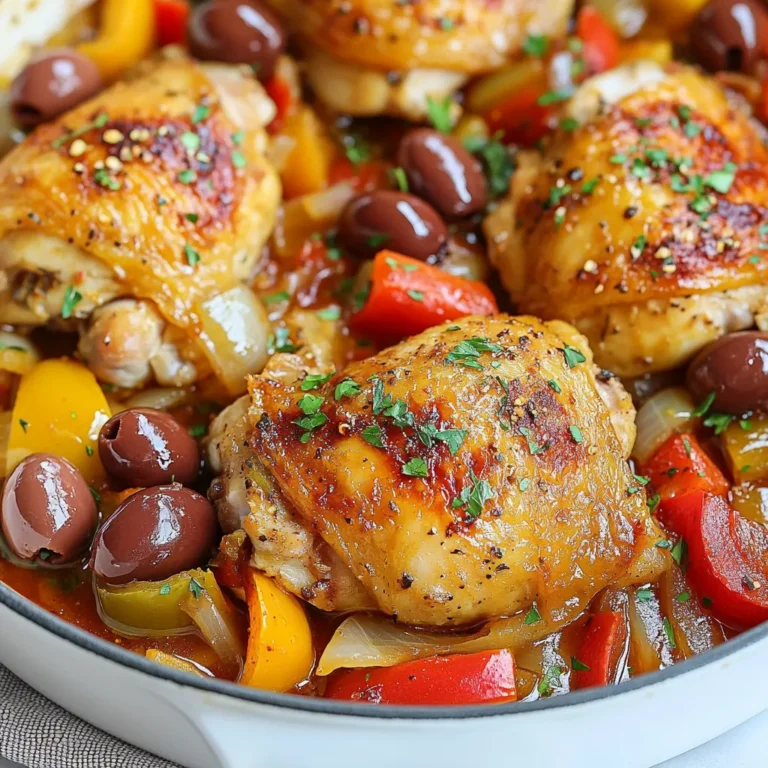
Chicken Scarpariello Skillet Flavorful Family Meal

To make your Keto Mediterranean Chicken Skillet, gather these items: - 4 boneless, skinless chicken thighs - 2 tablespoons olive oil - 1 teaspoon smoked paprika - 1 teaspoon garlic powder - 1 teaspoon dried oregano - Salt and pepper to taste - 1 medium zucchini, sliced - 1 bell pepper, chopped (any color) - 1 cup cherry tomatoes, halved - 1/2 cup black olives, pitted and sliced - 1/4 cup feta cheese, crumbled - Fresh parsley, for garnish Each serving of this dish is packed with nutrients. Here’s what you can expect: - Calories: 350 - Protein: 28g - Fat: 24g - Carbohydrates: 10g - Fiber: 3g This meal is low in carbs, making it perfect for a keto diet. You can swap some ingredients for variety or to meet dietary needs. Here are some ideas: - Use chicken breast instead of thighs for a leaner option. - Try avocado oil if you want a different flavor than olive oil. - Replace zucchini with yellow squash for a slight twist. - Use sun-dried tomatoes instead of fresh for a richer taste. - Swap feta cheese for goat cheese if you prefer a creamier texture. Feel free to mix and match these suggestions to suit your taste! {{ingredient_image_1}} Start by taking four boneless, skinless chicken thighs. Place them in a bowl. Drizzle two tablespoons of olive oil over the chicken. This helps keep the chicken moist and adds flavor. Sprinkle one teaspoon of smoked paprika, garlic powder, and dried oregano over the chicken. Add salt and pepper to taste. Mix well to coat each piece. Let the chicken marinate for about 15 minutes. This step is key for great flavor. Now, heat your large skillet over medium-high heat. Add one tablespoon of olive oil to the pan. Once hot, place the marinated chicken thighs in the skillet. Cook them for about 6-7 minutes on each side. Look for that golden brown color to know they are done. Once cooked, remove the chicken from the skillet and set it aside. This keeps the chicken warm while you cook the veggies. In the same skillet, add the remaining tablespoon of olive oil. Toss in one medium zucchini, sliced into half-moons, and one chopped bell pepper. Sauté these for about 3-4 minutes until they soften a bit. Then, stir in one cup of halved cherry tomatoes and half a cup of sliced black olives. Cook for another 3-4 minutes. This allows the tomatoes to soften and release their juices. Finally, return the chicken to the skillet, nestling it among the veggies. Cook for 2 more minutes to heat everything through. Top with a quarter cup of crumbled feta cheese and give it a gentle stir. Garnish with fresh parsley before serving. Enjoy your tasty Keto Mediterranean Chicken Skillet! To get the best flavor, marinate the chicken. Use olive oil, smoked paprika, garlic powder, oregano, salt, and pepper. Mix these in a bowl and coat the chicken thighs well. Let them sit for about 15 minutes. This short time helps the spices soak in. You can also marinate longer, up to 2 hours, for even more depth. Keep it in the fridge if you marinate longer. When you cook the chicken, heat your skillet first. Use medium-high heat for a nice sear. Add a tablespoon of olive oil and let it get hot. Cook the chicken for 6-7 minutes on each side. You want it golden brown and cooked through. Use a meat thermometer to check. The chicken should reach 165°F. Remove the chicken from the pan and let it rest. This keeps it juicy. Garnish with crumbled feta and fresh parsley. It adds color and flavor. Serve the chicken with a side salad for crunch. You can also pair it with cauliflower rice for a low-carb option. For extra zing, drizzle some lemon juice over the top. This brightens the dish and enhances the Mediterranean flavors. Enjoy your meal! Pro Tips Marinate for Flavor: Allowing the chicken thighs to marinate for at least 15 minutes helps infuse the meat with the spices, making every bite flavorful. Use Fresh Ingredients: Whenever possible, opt for fresh vegetables and herbs to enhance the overall taste and nutritional value of the dish. Cook on Medium-High Heat: Cooking the chicken on medium-high heat ensures a nice sear, locking in the juices and keeping the chicken moist. Customize Your Veggies: Feel free to swap or add other low-carb vegetables like spinach or eggplant according to your preference. {{image_2}} If you want a vegetarian meal, you can swap chicken for hearty mushrooms or chickpeas. Both options add great texture and flavor. Use 2 cups of sliced mushrooms or 1 can of chickpeas, rinsed and drained. Cook them the same way you would the chicken. Mushrooms give a rich taste, while chickpeas add a nice protein boost. Feel free to mix and match vegetables. You can use spinach, eggplant, or asparagus instead of zucchini and bell peppers. Each veggie brings its own flavor. For a colorful dish, try adding red and yellow bell peppers. You can also toss in some fresh spinach at the end for extra greens. The key is to use fresh and seasonal produce for the best taste. To change the spice level, add ingredients based on your taste. For a mild dish, stick to the original spices. If you like heat, try adding red pepper flakes or cayenne pepper. Start with a pinch and add more if needed. You can also include a dash of hot sauce when serving. This way, you can enjoy a dish that suits your spice preference perfectly. To store leftovers, let the Keto Mediterranean Chicken Skillet cool first. Place it in an airtight container. This keeps the dish fresh and tasty. Store it in the fridge for up to 3 days. If you want to keep it longer, consider freezing it. When reheating, use a skillet for the best flavor. Heat a small amount of olive oil over medium heat. Add the chicken and veggies back to the skillet. Stir until everything is warm. You can also use a microwave. Place the dish in a microwave-safe bowl, cover it, and heat in short bursts. Stir often to avoid hot spots. To freeze, portion the dish into freezer-safe containers. Let it cool completely before sealing. Label each container with the date. This way, you know how long it has been stored. You can freeze it for up to 3 months. To reheat, thaw it in the fridge overnight. Then use the skillet method to warm it up. This keeps the flavors bright and delicious. Yes, this dish works great for meal prep. You can cook it ahead of time and store it. Just keep the skillet in airtight containers in the fridge. It lasts up to four days. Reheat in the microwave or on the stove. The flavors blend even more after a day, making it tasty for lunch or dinner. Absolutely! While feta cheese adds a nice tang, you can swap it for other cheeses. Try goat cheese for a creamier texture. Mozzarella offers a mild taste that melts well. Parmesan adds a sharper flavor and pairs nicely. Feel free to experiment with your favorite cheeses to find the best match for your palate. This dish pairs well with many sides. Consider a fresh salad with leafy greens and a light vinaigrette. Cauliflower rice is a low-carb option that soaks up the sauce. You can also serve it with roasted veggies for added flavor and nutrients. These sides will complement the rich taste of the chicken skillet. This article covered ingredients, instructions, and tips for a delicious chicken skillet. I shared alternatives and variations to fit your tastes. Storing leftovers and meal prep ideas make this dish easy for busy days. Remember, you can adjust flavors and ingredients as needed. Cooking should be fun and flexible! Enjoy creating your own tasty version of this dish for friends and family.

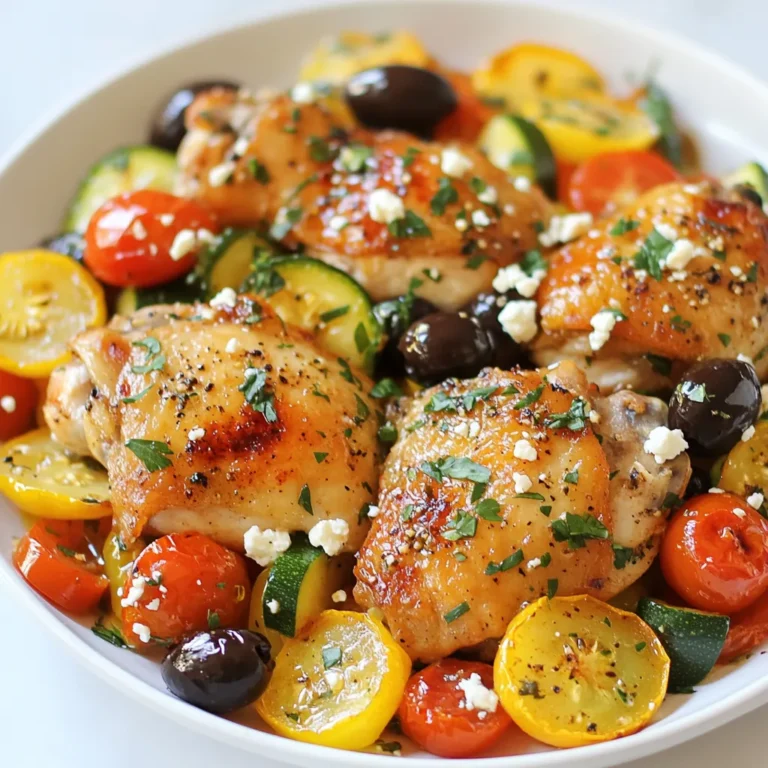
Keto Mediterranean Chicken Skillet Flavorful Goodness

- 2 boneless, skinless chicken breasts, thinly sliced - 8 oz fettuccine or spaghetti - 4 tablespoons unsalted butter - 4 cloves garlic, minced - 1 cup heavy cream - 1 cup freshly grated Parmesan cheese - 1 cup baby spinach (optional) - Salt and pepper to taste - ½ teaspoon red pepper flakes (optional) - Fresh parsley, chopped, for garnish When I cook this dish, I love using fresh, high-quality ingredients. The chicken adds a nice protein boost. The pasta makes it hearty and filling. Garlic and Parmesan create a rich and creamy sauce that is hard to resist. - Sun-dried tomatoes for a tangy twist - Grilled shrimp for a seafood option - Broccoli or asparagus for extra veggies - Lemon zest for a fresh kick You can switch up the base recipe to suit your taste. Adding sun-dried tomatoes or shrimp can change the dish's flavor profile. Broccoli or asparagus not only adds color but also nutrition. - Large pot for boiling pasta - Large skillet for cooking chicken and sauce - Colander for draining pasta - Whisk for mixing the sauce - Serving plates for presentation Using the right tools makes cooking easier. A large pot helps cook the pasta evenly. A good skillet is key for making the sauce. Having a whisk on hand ensures a smooth, creamy result. Each ingredient plays a role in making Garlic Parmesan Chicken Pasta a favorite. With these tips, you are ready to create a delicious meal that everyone will enjoy. {{ingredient_image_1}} Start by boiling water in a large pot. Add a good amount of salt to the water. This adds flavor to the pasta. Once the water is boiling, add 8 ounces of fettuccine or spaghetti. Cook the pasta according to the package instructions until it is al dente. This usually takes about 8 to 10 minutes. Reserve 1 cup of the pasta water before draining. Drain the pasta and set it aside. Grab a large skillet and heat it over medium heat. Add 2 tablespoons of unsalted butter and let it melt. Once the butter is hot, add 2 thinly sliced chicken breasts. Season the chicken with salt and pepper. Cook the chicken for about 5 to 7 minutes until it turns golden brown and is no longer pink inside. Remove the chicken from the skillet and set it aside. In the same skillet, add the remaining 2 tablespoons of butter. Let it melt and then add 4 minced garlic cloves. Sauté the garlic for about 1 minute until it smells amazing. Next, pour in 1 cup of heavy cream while stirring. Bring the mixture to a gentle simmer. Gradually whisk in 1 cup of freshly grated Parmesan cheese until the sauce is smooth and creamy. If the sauce is too thick, add some reserved pasta water a little at a time until it reaches your favorite consistency. Now, it's time to bring everything together. Add the cooked chicken back into the skillet. Then, add the drained pasta and baby spinach if you like. Toss everything together until the pasta and chicken are well coated with the creamy sauce. Taste and adjust the seasoning with more salt, pepper, or even red pepper flakes for some heat. Plate your delicious Garlic Parmesan Chicken Pasta. For a nice touch, sprinkle some chopped parsley on top. You can also serve extra Parmesan on the side for those who want more cheese. This dish is best enjoyed right away while it's warm and creamy. Enjoy your meal! To cook chicken breasts well, start with thin slices. This helps them cook evenly. Heat two tablespoons of butter in a skillet over medium heat. Season the chicken with salt and pepper. Cook each side for about 3-4 minutes. Look for a nice golden brown color. This means the chicken is done. Always check that the meat is no longer pink inside. Use a meat thermometer if you have one. It should read 165°F. Cooking pasta al dente means it should be firm to the bite. Use a large pot with plenty of salted water. Bring the water to a rolling boil before adding the pasta. Follow the package instructions for cooking time. Start tasting the pasta a minute or two before the time is up. You want it to be tender but still have a slight bite. Once cooked, don’t forget to save a cup of pasta water before draining! If your sauce is too thick, don’t worry! You can easily fix this. Start by adding some of the reserved pasta water. Add a little at a time until you reach the right thickness. Stir well after each addition. If the sauce is too thin, let it simmer for a few minutes. This will help it thicken up. Remember, the sauce should coat the pasta nicely without being runny. Garnishing makes your dish look beautiful and appetizing. Fresh parsley adds a nice pop of color. Chop it finely and sprinkle it over the top just before serving. If you want a cheesy touch, add extra Parmesan cheese. You can also use red pepper flakes for a bit of heat. Keep garnishing simple to let the flavors shine through. A little goes a long way! Pro Tips Use Fresh Ingredients: Fresh garlic and Parmesan cheese will elevate the flavor of your dish significantly. Avoid pre-grated cheese if possible for a creamier sauce. Don't Overcook the Chicken: Ensure the chicken is cooked just until golden brown and no longer pink in the center to keep it juicy and tender. Adjust Sauce Consistency: If your sauce is too thick, gradually add reserved pasta water until you reach your desired creaminess. Garnish for Flavor: Fresh parsley not only adds color but also a fresh flavor boost. Consider adding a squeeze of lemon juice for brightness. {{image_2}} You can make Garlic Parmesan Chicken Pasta even better by adding vegetables. Baby spinach is a great choice. It wilts nicely in the warm sauce. You can also add cherry tomatoes for a pop of color. They add sweetness and a juicy bite. Peas or broccoli work well too. If you want to skip chicken, try shrimp or tofu. Shrimp cooks quickly and adds a nice seafood flavor. Tofu provides a good source of protein for a plant-based dish. For a gluten-free option, use gluten-free pasta. There are many kinds available, like rice or quinoa pasta. They taste great and hold up well in the dish. If you need a dairy-free version, swap heavy cream for coconut milk. It adds a unique flavor. Nutritional yeast can replace Parmesan cheese for a cheesy taste without dairy. If you like heat, try adding more red pepper flakes. Start with a teaspoon and adjust to your taste. You can also add some diced jalapeños for an extra kick. Another idea is to mix in a splash of hot sauce. This adds flavor and spice, perfect for those who love bold dishes. Enjoy experimenting with these spicy additions! To store leftover Garlic Parmesan Chicken Pasta, let it cool first. Place it in an airtight container. Make sure to use a container that seals tightly. This helps keep the pasta fresh. Store it in the fridge for up to three days. If you want to enjoy it later, keep it in the freezer. When you're ready to reheat, start by taking the pasta out of the fridge. You can microwave it or use a skillet. If using a microwave, put it in a bowl with a splash of water. Heat in short bursts, stirring in between. If using a skillet, add a little cream or water. Heat it on low and stir often. This keeps it from drying out. To freeze, divide the pasta into single servings. Use freezer-safe bags or containers. Remove as much air as possible before sealing. Label with the date. You can freeze it for up to three months. To enjoy, thaw it in the fridge overnight before reheating. This will keep the flavors fresh. Yes, you can make Garlic Parmesan Chicken Pasta ahead of time. Cook the pasta and chicken as directed. Then, store them separately in airtight containers. This keeps them fresh. When you're ready to serve, just reheat them in a skillet. Add the garlic sauce and mix well. This will save you time on busy nights. Fettuccine or spaghetti works best for this dish. Both types hold the sauce well. You can also use penne or rotini if you prefer. Just make sure to cook them until al dente for the best texture. This way, they won't get mushy when mixed with the sauce. To add more flavor, try these tips: - Use fresh herbs like basil or thyme. - Add more garlic for a stronger taste. - Sprinkle in some lemon juice for brightness. - Use red pepper flakes for spice. - Consider adding sun-dried tomatoes for a tangy touch. These small changes can make your dish even more delicious. Yes, you can make this dish without cream. Substitute the cream with chicken broth or vegetable broth. You can also use a mix of milk and cornstarch to thicken the sauce. This will still give you a nice texture. Just remember to adjust the seasoning for taste. This blog post covered how to make Garlic Parmesan Chicken Pasta. We explored the key ingredients and the tools you need. Then, I walked through cooking steps and offered tips for perfecting your dish. I also shared tasty variations and storage tips. Cooking this dish is simple and fun. You can adjust it to fit your taste. Try different veggies or proteins to make it your own. Enjoy your delicious meal!

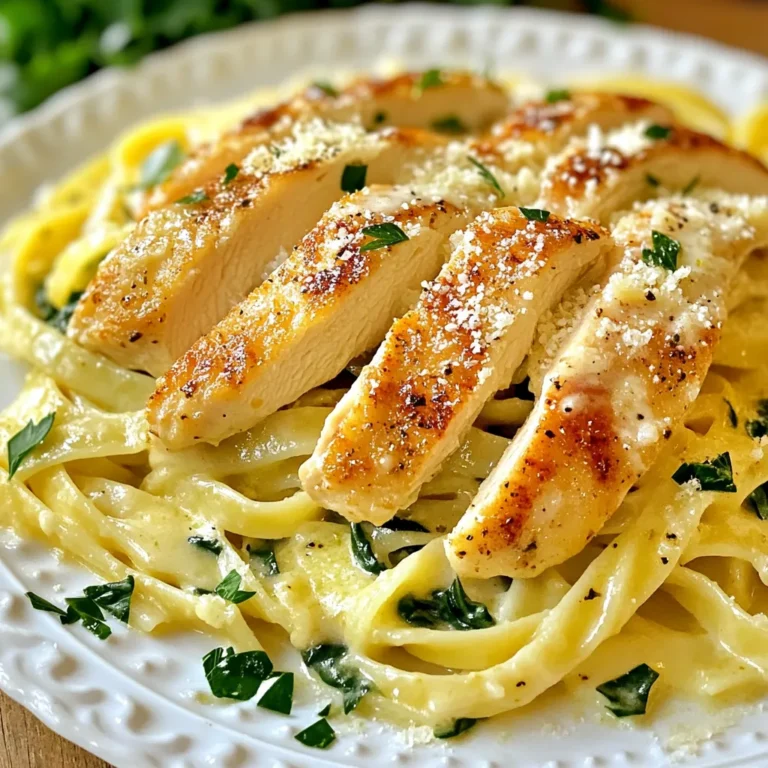
Garlic Parmesan Chicken Pasta Simple and Tasty Dish

- 300g spaghetti or your favorite pasta - 1 cup sun-dried tomatoes packed in oil, chopped - 3 cloves garlic, minced - 1 medium onion, chopped - 4 cups vegetable broth - 1 teaspoon dried oregano - 1 teaspoon dried basil - 1/2 teaspoon red pepper flakes (optional, for heat) - 1 cup baby spinach - 1/2 cup grated Parmesan cheese - 2 tablespoons olive oil - Salt and pepper to taste - Fresh basil leaves for garnish In this recipe, I use simple yet tasty ingredients. Start with your choice of pasta. I love spaghetti, but any pasta works well. The sun-dried tomatoes packed in oil add a rich flavor. I always chop them to mix easily. Minced garlic and chopped onion create a great base. They bring depth and aroma to the dish. Next, let’s look at pantry staples. Vegetable broth is key. It adds moisture and flavor. Dried herbs like oregano and basil give it an Italian vibe. If you like a kick, add red pepper flakes. For the final touch, baby spinach brightens the dish. It wilts perfectly into the pasta. Grated Parmesan cheese is a must for creaminess. Olive oil adds richness, while salt and pepper balance the flavors. Fresh basil leaves make for a beautiful garnish. With these ingredients, you will create a quick and tasty meal. This dish is easy to prepare and full of flavor. {{ingredient_image_1}} 1. Start by heating 2 tablespoons of olive oil in a large skillet over medium heat. 2. Add 1 medium chopped onion. Sauté it for about 3 minutes. The onion should become soft and translucent. 3. Next, add 3 minced garlic cloves and 1 cup of chopped sun-dried tomatoes. Cook this mixture for 2 minutes. The aroma will fill your kitchen. 1. Pour in 4 cups of vegetable broth. Then, add 300 grams of spaghetti, 1 teaspoon of dried oregano, 1 teaspoon of dried basil, and 1/2 teaspoon of red pepper flakes for a little heat. 2. Stir everything well to combine. Bring the mixture to a boil. 3. Once it boils, reduce the heat to medium-low. Cover the skillet and let it simmer for about 10-12 minutes. Stir occasionally. The pasta should reach al dente, and most of the liquid should be absorbed. 1. When the pasta is cooked, stir in 1 cup of baby spinach. Let it wilt for about 2 minutes. 2. If your pasta looks too dry, add a little more vegetable broth or water. 3. Remove the skillet from heat. Sprinkle 1/2 cup of grated Parmesan cheese over the top. Gently toss everything together. 4. Taste and add extra salt and pepper if needed. Now, you have a tasty meal just waiting to be enjoyed! To ensure your pasta is al dente, check it a couple of minutes before the time is up. You want it firm but not hard. It should have a slight bite. If you find that your pasta is too dry, just add more vegetable broth or water. This will help you reach your desired consistency. Keep stirring occasionally to prevent sticking. If you want to boost the flavor, try adding extra herbs like thyme or rosemary. A pinch of smoked paprika can also give it a nice twist. For garnishes, fresh basil leaves add a pop of color. You can also sprinkle more Parmesan cheese on top. A drizzle of olive oil adds richness and flavor. I recommend using a large skillet for this dish. A wide pan helps with even cooking. A wooden spoon is great for stirring without scratching the pan. Don’t forget a good set of measuring cups and spoons! They help keep your ingredients balanced for the best taste. Pro Tips Use High-Quality Sun-Dried Tomatoes: Opt for sun-dried tomatoes packed in oil for added flavor and richness to the dish. Don’t Skip the Spinach: Adding baby spinach not only enhances the nutrition but also adds a lovely color contrast to the dish. Adjust the Liquid: If the pasta seems dry after cooking, feel free to add a splash more vegetable broth or water to reach your preferred consistency. Garnish for Presentation: Top your pasta with fresh basil and extra Parmesan cheese for a beautiful and appetizing finish. {{image_2}} You can easily switch pasta types. Try penne, fusilli, or even whole wheat pasta. Each type gives a unique feel. You can also use gluten-free pasta if needed. Adding different veggies can bring new life to this dish. Try bell peppers, zucchini, or even mushrooms. They add crunch and flavor. Just chop them small and sauté them with the onion. If you want a vegetarian meal, this recipe is already perfect. Just skip the cheese for a vegan twist. You can use nutritional yeast as a cheese alternative. For gluten-free options, choose gluten-free pasta. It cooks well in the broth, just like regular pasta. The flavor remains rich and tasty. Experimenting with cheeses can change the dish. Try feta for a tangy kick or mozzarella for creaminess. Each cheese brings its own unique taste. Adding proteins can turn this pasta into a full meal. Chicken or shrimp works well. Just cook them in the skillet before adding the broth. This adds depth and makes it heartier. Store any leftover Sun-Dried Tomato One-Pan Pasta in the fridge. Use airtight containers to keep it fresh. Glass or plastic containers work well. Make sure to cool the pasta before sealing. This step helps prevent moisture build-up. To reheat, use a skillet over low heat. Add a splash of vegetable broth to keep it moist. Stir gently until warmed through. You can also use a microwave. Heat in short bursts, stirring in between. Adjust portions by reheating only what you need. You can freeze Sun-Dried Tomato One-Pan Pasta. Place it in freezer-safe containers. Leave some space at the top for expansion. It will keep well for up to three months. Thaw it overnight in the fridge before reheating. This way, the texture stays nice. This dish takes about 25 minutes to make. You will spend 10 minutes on prep and 15 minutes cooking. This quick meal is great for busy days or when you want something tasty fast. You can use fresh sun-dried tomatoes, but they will change the dish. Fresh tomatoes are firmer and less oily. The flavor will be less rich and a bit more tart. If you want that deep taste, I recommend using sun-dried tomatoes packed in oil. Yes, you can make this dish ahead of time. Cook it fully and let it cool down. Store it in an airtight container in the fridge for up to three days. When you reheat it, add a splash of broth or water. This helps keep the pasta moist and tasty. This article covers a tasty one-pan pasta dish featuring sun-dried tomatoes. We explored key ingredients like pasta, garlic, and spinach, along with cooking tips to achieve perfect flavors. You can easily adjust this meal to fit your diet or personal taste. Remember to store leftovers correctly, so they stay fresh. With these strategies, you can create a delightful pasta dish that impresses everyone. Enjoy cooking, and don’t be afraid to try new flavors!

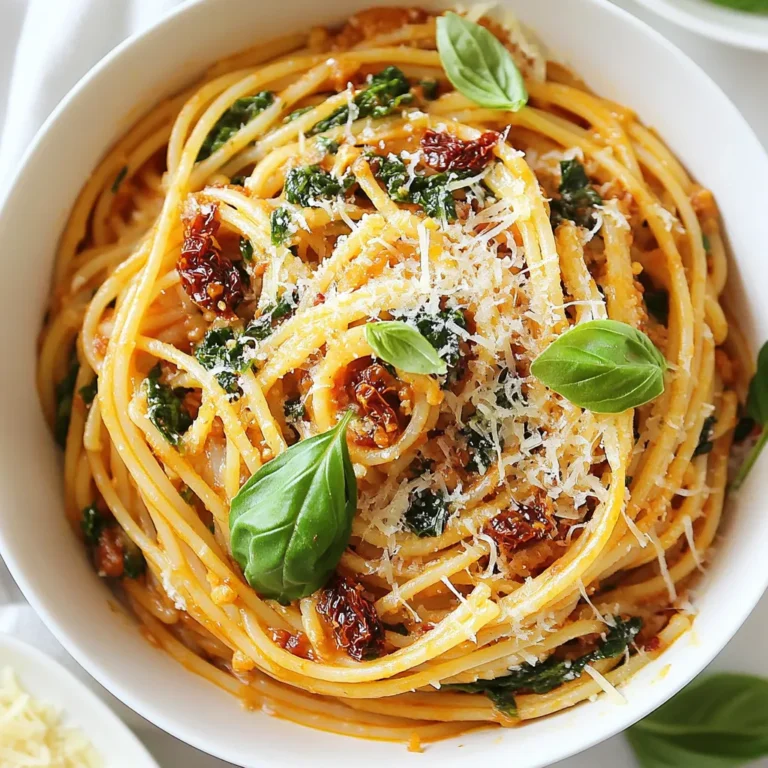
Sun-Dried Tomato One-Pan Pasta Quick and Tasty Meal

For a delicious batch of breakfast cups, gather these main ingredients: - 6 large eggs - 1 cup spinach, chopped - 1/2 cup bell peppers, diced (any color) - 1/4 cup red onion, finely chopped - 1/2 cup shredded cheese (cheddar or mozzarella) - Salt and pepper to taste - 1/4 teaspoon garlic powder - Cooking spray or olive oil for grease These ingredients form a tasty base. Eggs provide protein. Spinach adds vitamins. Bell peppers give color and crunch. Red onion offers a sweet flavor. Cheese binds it all together. You can customize your breakfast cups. Consider these optional add-ins: - Fresh herbs for flavor - Other vegetables like zucchini or mushrooms - Meat options like cooked bacon or sausage Adding fresh herbs boosts taste. Extra veggies increase nutrition. Meat options make it heartier. Feel free to mix and match! Each serving has: - Approximately 150 calories - About 10 grams of protein - 2 grams of fiber These cups are great for many diets. They are gluten-free and vegetarian. They fit well into a balanced meal plan. Enjoy them without worry! {{ingredient_image_1}} Prepping the Oven and Muffin Tin Start by preheating your oven to 375°F (190°C). This step is key for even cooking. Next, grab a muffin tin and grease it with cooking spray or a bit of olive oil. This helps the breakfast cups pop out easily after baking. Mixing the Ingredients In a mixing bowl, crack 6 large eggs. Whisk them until they are well beaten. Add a pinch of salt, pepper, and 1/4 teaspoon of garlic powder for flavor. Then, toss in 1 cup of chopped spinach, 1/2 cup of diced bell peppers, and 1/4 cup of finely chopped red onion. Stir it all together so every bite is tasty. Pouring Mixture into Muffin Tin Now, pour the egg and veggie mix into the muffin tin. Fill each cup about 3/4 full. This gives them space to rise. Lastly, sprinkle 1/2 cup of shredded cheese on top of each cup for a cheesy finish. Baking Time and Temperature Place the muffin tin in the preheated oven. Bake for 18 to 20 minutes. You’ll know they are done when the eggs are set and the tops are slightly golden. Tips for Safely Removing from Muffin Tin After baking, let the cups cool for a few minutes. Take a small knife and gently run it along the edges. This helps loosen them. Then, carefully remove the breakfast cups from the muffin tin. Presentation Ideas To serve, place the breakfast cups on a platter. You can garnish them with fresh herbs like parsley or chives. This adds color and extra flavor. Enjoy your tasty breakfast cups warm! - Ensuring Even Cooking To get even cooking, fill each muffin cup the same. This helps them cook at the same rate. Use a measuring cup for accuracy. Rotate the muffin tin halfway through baking. This ensures all cups get equal heat. - Achieving Ideal Texture For the best texture, do not overbeat the eggs. A little fluff is good. Make sure to mix the veggies evenly into the egg mixture. This gives each bite a nice balance of flavor. - How to Store Leftovers After cooling, place the breakfast cups in an airtight container. They last up to four days in the fridge. For longer storage, freeze them in a single layer. Once frozen, transfer to a freezer bag. - Best Reheating Methods Reheat in the oven at 350°F (175°C) for about 10 minutes. This keeps them crispy. If using a microwave, heat in 30-second bursts. Check often to avoid overcooking. - Overfilling Cups Fill each cup only three-quarters full. If you overfill, the mixture may overflow while baking. This can make a mess and affect cooking time. - Skipping the Greasing Step Always grease the muffin tin. Use cooking spray or olive oil. This prevents the cups from sticking. No one likes a breakfast cup that won’t come out easily! Pro Tips Use Fresh Ingredients: Fresh spinach and vegetables enhance the flavor and texture of the breakfast cups, making them more enjoyable. Customize Your Fillings: Feel free to add other vegetables like zucchini or mushrooms, or even cooked bacon or sausage for extra flavor. Check for Doneness: The breakfast cups should be set in the center and slightly golden on top; if they wobble, they need more time. Storage Tips: Store leftovers in an airtight container in the fridge for up to 4 days; reheat in the microwave for a quick breakfast. {{image_2}} Using Seasonal Vegetables You can change the veggies based on what’s fresh. Try zucchini, kale, or broccoli. They add great taste and color. Using seasonal produce helps keep your meals fresh and exciting. Combining Different Cheeses Mixing cheeses adds depth. Cheddar gives a sharp taste, while mozzarella makes it creamy. You can also try feta or goat cheese for a tangy twist. Each cheese brings a unique flavor to your breakfast cups. Low-carb and Keto Options For a low-carb version, skip the bell peppers and use more leafy greens. You can add avocado for healthy fats. This keeps the dish filling without the carbs. Dairy-free Alternatives If you need a dairy-free option, use plant-based cheese. You can also skip cheese altogether. Nut milk can replace regular milk if your recipe calls for it. This way, you still enjoy tasty breakfast cups. Adding Spices Spices can transform your breakfast cups. Try paprika for a smoky touch or cumin for warmth. A pinch of chili powder adds a nice kick. Experiment to find your favorite spice blend. Using Different Cheese Types Different cheese types change the flavor profile. Swiss cheese adds nuttiness, while pepper jack gives heat. Mixing cheese types can also create new textures. Don’t be afraid to get creative! To keep your ingredient breakfast cups fresh, follow these easy steps: - Refrigeration Guidelines: After cooking, let the cups cool down. Place them in an airtight container. Store them in the fridge for up to 5 days. This keeps them tasty and safe to eat. - Freezing Breakfast Cups: If you want to store them longer, freezing is a great option. Wrap each cup in plastic wrap, then place them in a freezer bag. They can last for up to 3 months. When you're ready to eat, thaw them in the fridge overnight. Knowing how long your breakfast cups last is key. - How Long They Last in the Fridge: In the fridge, these cups stay good for 5 days. Always check the date and use your senses. - Signs of Spoilage: If you notice any mold or off smells, toss them out. It's better to be safe than sorry. Reheating your breakfast cups is simple and quick. - Oven Method: Preheat your oven to 350°F (175°C). Place the cups on a baking sheet. Heat for about 10-15 minutes. This method keeps them nice and fluffy. - Microwave Method: For a faster option, use the microwave. Place one cup on a microwave-safe plate. Heat for 30-60 seconds. Check to make sure it’s warm all the way through. Enjoy your delicious breakfast cups anytime with these easy storage and reheating tips! Yes, you can make these breakfast cups in advance. To prepare in advance, bake the cups as directed. Once cooled, place them in an airtight container. Store them in the fridge for up to three days. For longer storage, freeze them in a single layer. After freezing, transfer them to a freezer bag. They can last for about two months in the freezer. If you need an egg substitute, you have options. For a simple swap, use 1/4 cup of unsweetened applesauce per egg. You can also use a flaxseed meal mix. Just combine 1 tablespoon of flaxseed meal with 2.5 tablespoons of water. Let it sit for a few minutes until it thickens. For plant-based options, try silken tofu blended until smooth. This gives a similar texture to eggs. To enhance the flavor, consider adding seasonings and herbs. Fresh herbs like parsley and chives work well. You can also use dried herbs like oregano or thyme. Adding spices like paprika or chili powder can give it a kick. If you want to get creative, try mixing in different ingredients. Consider adding cooked bacon, sausage, or even sun-dried tomatoes for added taste. Breakfast cups are easy to make and fun to customize. Start with eggs, veggies, and cheese. You can add herbs or meat for extra flavor. They pack nutrients and fit many diets, too. I shared tips on making them, storing, and reheating. Remember to avoid overfilling and grease the cups well. With so many variations, these breakfast cups will please anyone. Experiment with different ingredients and enjoy this simple, tasty meal anytime.

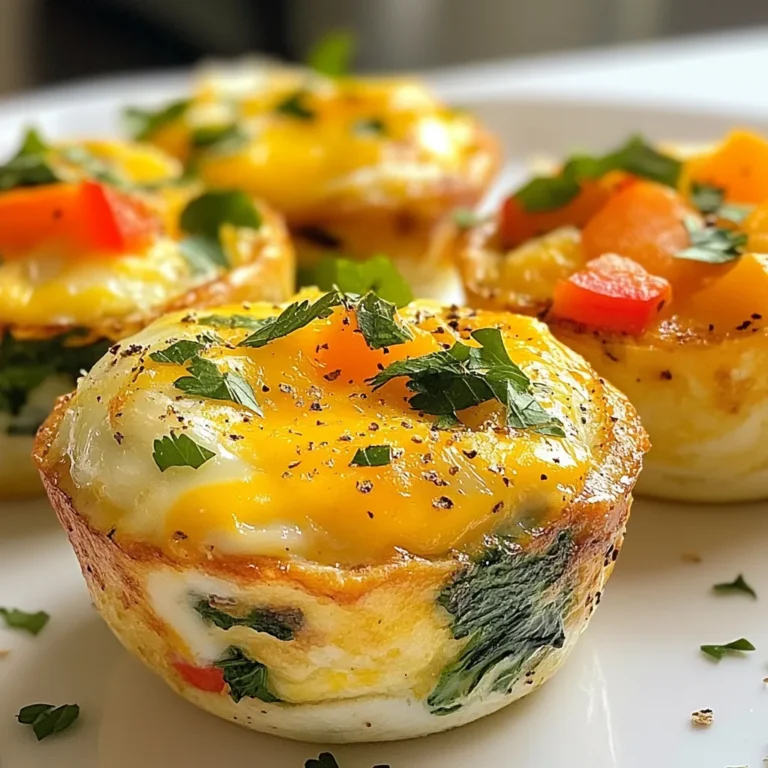
Ingredient Breakfast Cups Simple and Tasty Meal

PREV 1 … 55 56
go kitchen now

explore

DessertsDinnerAppetizersDrinks

Our Policies

  • Cookie Policy
  • Copyright Policy
  • Disclaimer
  • GDPR Policy
  • Terms Of Use
Back to Top
  • About
  • Contact Us
  • Privacy Policy
© 2025 go kitchen now