FREE DINNER EBOOK! Get your copy!
  • Cookie Policy
  • GDPR Policy
  • Disclaimer
  • Terms Of Use
  • Visit my other site: Fun Cookie Recipes
go kitchen now
  • Home
  • Dinner
  • Desserts
  • Drinks
  • Appetizers
  • Contact
  • About
  • Privacy Policy
  • Home
  • Dinner
  • Desserts
  • Drinks
  • Appetizers
  • Contact
  • About
  • Privacy Policy
  • Cookie Policy
  • GDPR Policy
  • Disclaimer
  • Terms Of Use
Visit my other site: Fun Cookie Recipes

HOME / CATEGORIES /

Latest

- 2 lbs chicken wings - 1 tablespoon olive oil - 1 cup BBQ sauce (thick is best) - 1 tablespoon honey (optional) - 1 teaspoon garlic powder - 1 teaspoon onion powder - 1 teaspoon smoked paprika - 1 teaspoon black pepper - 1 teaspoon salt - Fresh parsley - Optional dipping sauces (like ranch or blue cheese) When making Air Fryer BBQ chicken wings, you start with the right ingredients. I always choose fresh chicken wings. They cook best and taste great. Olive oil helps the wings crisp up nicely. A thick BBQ sauce gives that sweet and tangy flavor. If you want a little extra sweetness, honey works well too. Next, I add some flavor with seasonings. Garlic powder and onion powder give a nice base. Smoked paprika adds a hint of smokiness. Black pepper and salt elevate the taste. Mix these well to coat the wings evenly. For garnishing, I love to sprinkle fresh parsley on top. It adds color and a fresh taste. Serve with your favorite dipping sauces for extra flavor. These ingredients make the wings not just tasty but also fun to eat. First, you need to pat the chicken wings dry. Use paper towels to remove excess moisture. This step is key. It helps the wings get crispy in the air fryer. Next, gather a large bowl. Toss the wings with one tablespoon of olive oil. Then, add one teaspoon each of garlic powder, onion powder, smoked paprika, black pepper, and salt. Mix well. Ensure every wing is coated evenly with the seasoning. This will boost the flavor and give them a tasty crust. Now, it’s time to preheat your air fryer. Set it to 380°F (190°C) and let it warm up for about 5 minutes. This helps cook the wings evenly. Once preheated, place the seasoned wings in the air fryer basket. Make sure to keep them in a single layer. Avoid overcrowding. This allows hot air to circulate properly. Cook the wings for 25 to 30 minutes. Halfway through, give the basket a shake. This helps them cook evenly. Look for a crispy and golden brown finish. In the last 5 minutes of cooking, brush the wings with your favorite BBQ sauce. If you like a little sweetness, add one tablespoon of honey. This will create a nice glaze. After glazing, return the wings to the air fryer for 5 more minutes. This allows the sauce to caramelize. When the timer goes off, take the wings out and let them rest for a couple of minutes. This helps the juices settle. Finally, garnish with fresh parsley. Serve them hot and enjoy! To make your air fryer wings crispy, start by drying them. Use paper towels to pat the wings dry. This step is key because moisture can prevent crispiness. Next, set your air fryer to 380°F (190°C). Preheating for about 5 minutes helps the wings cook evenly. To boost the taste of your wings, try adding different seasonings. You can mix in cayenne pepper for heat or add some dried herbs for freshness. A marinade with soy sauce or even a splash of lime juice can give your wings a unique twist. Experiment with flavors to find your favorite blend. When serving your BBQ chicken wings, think about sides. Celery sticks and carrot sticks are classic choices. They add crunch and balance the meal. Pair your wings with dipping sauces like ranch or blue cheese for extra flavor. Don't forget to drizzle more BBQ sauce on top for that delicious finish! {{image_2}} You can change the flavor of your wings with different BBQ sauces. Try a sweet sauce like honey BBQ or a tangy option like vinegar-based sauce. If you want heat, use a spicy sauce with cayenne pepper or chipotle. Making your own sauce can be fun too! Mix ketchup, apple cider vinegar, and brown sugar for a tasty homemade BBQ sauce. While the air fryer is quick and easy, you can also bake or fry the wings. Oven-baked wings can be crispy but take longer to cook. You can place them on a rack for even cooking. Traditional frying gives a rich flavor and crispy texture but adds more fat. Air frying keeps them light and is less messy. You can serve wings in various styles. Try Buffalo wings with a hot sauce and a side of ranch. For an Asian twist, coat them in soy sauce, sesame oil, and ginger. Dry rubs are great too! Use a mix of spices to season the wings without sauce. Each style offers a new taste adventure! To store leftover wings, let them cool down first. Place them in an airtight container. Glass or plastic containers work well. You can keep them in the fridge for up to three days. Make sure to avoid stacking the wings too tightly. This helps keep them fresh. To reheat wings, the air fryer is your best friend. Preheat it to 350°F (175°C). Place the wings in the basket, and heat for about 8-10 minutes. This method keeps them crispy. You can also use an oven, but the air fryer is faster and better for crispiness. To freeze wings, first, let them cool completely. Place them in a freezer-safe bag or container. Remove as much air as possible to prevent freezer burn. They can last up to three months in the freezer. When ready to eat, thaw them in the fridge overnight. Reheat in the air fryer for the best results. Cook chicken wings at 380°F (190°C) for 25-30 minutes. This time gives you crispy wings. Halfway through, shake the basket to help them cook evenly. If you like them extra crispy, add a few more minutes. Yes, you can cook frozen wings in an air fryer. Set the temperature to 400°F (200°C) and cook for about 30-35 minutes. Check for doneness after 30 minutes. You may need to increase the time if they are still not crispy. A thick BBQ sauce works best for air fryer wings. Thick sauces cling better and create a nice glaze. You can try sweet, smoky, or spicy flavors. If you prefer a thinner sauce, brush it on towards the end of cooking to avoid burning. In this post, we covered how to make delicious air fryer BBQ chicken wings. We explored the best ingredients, from chicken wings to flavorful seasonings. You learned how to prepare, cook, and glaze your wings for maximum taste. We shared tips for crispy texture, flavor boosts, and serving ideas. You also discovered variations and how to store leftovers properly. Now, you can enjoy perfect BBQ wings anytime. Mastering this simple recipe will make you the star of any gathering. Enjoy your cooking adventure!

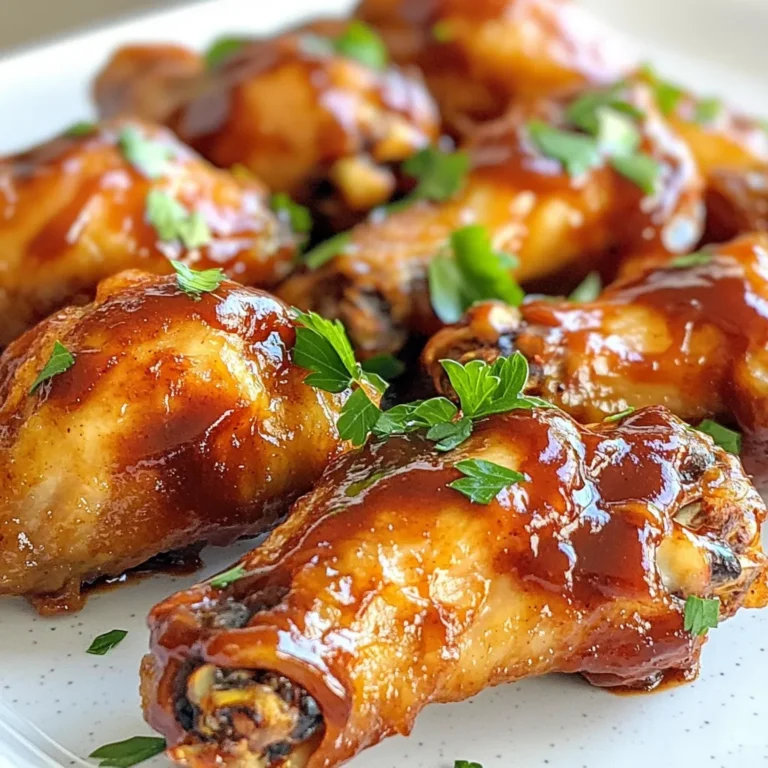
Air Fryer BBQ Chicken Wings Crispy and Flavorful Dish

- 12 ounces fettuccine or linguine pasta - 1 pound peeled and deveined shrimp - 4 cups chicken broth - 1 cup heavy cream - 1 cup spinach leaves - 1 tablespoon Cajun seasoning - 2 tablespoons olive oil - 1 red bell pepper, sliced - 1 green bell pepper, sliced - 1 small onion, diced - 3 cloves garlic, minced - 1 cup cherry tomatoes, halved - Salt and pepper to taste - Fresh parsley, for garnish One Pot Cajun Shrimp Pasta is quick and full of flavor. You start with the pasta; choose either fettuccine or linguine. Both work well. You need one pound of shrimp, already peeled and deveined. This saves time and makes cooking easy. Next, chicken broth adds depth. Use four cups to make the dish rich. Heavy cream gives the sauce a creamy texture. One cup is all you need. Add a cup of fresh spinach leaves for color and nutrients. Seasoning is key! You need one tablespoon of Cajun seasoning. This spice mix gives the dish its signature kick. Two tablespoons of olive oil help cook the veggies. You also need some colorful veggies. Slice one red and one green bell pepper. Dice a small onion for sweetness. Mince three cloves of garlic for flavor. Lastly, add one cup of halved cherry tomatoes for freshness. Don't forget salt and pepper to taste. Fresh parsley adds a nice touch as a garnish. These ingredients come together to create a savory and quick meal that everyone will love. 1. Start by heating 2 tablespoons of olive oil in a large pot over medium-high heat. 2. Add 1 sliced red bell pepper, 1 sliced green bell pepper, and 1 diced small onion. 3. Sauté these vegetables for about 5 minutes. You want them soft and fragrant. 4. Next, add 3 minced garlic cloves. Cook for 1 more minute until you smell the garlic. 5. Now, sprinkle 1 tablespoon of Cajun seasoning over the veggies. Mix it well to coat them. 6. Add 1 pound of peeled and deveined shrimp. Stir occasionally until they turn pink, which takes about 2-3 minutes. 1. Pour in 4 cups of chicken broth and bring it to a simmer. 2. Once simmering, add 12 ounces of fettuccine or linguine pasta into the pot. Make sure the pasta is fully submerged. 3. Cover the pot and cook the pasta according to the package instructions. This usually takes around 10-12 minutes. 4. Stir the pasta occasionally to keep it from sticking together. 1. When the pasta is cooked and most of the liquid is absorbed, reduce the heat to medium-low. 2. Stir in 1 cup of heavy cream, 1 cup of halved cherry tomatoes, and 1 cup of spinach leaves. 3. Cook for another 2-3 minutes until the spinach wilts and all is heated through. 4. Season with salt and pepper to taste. Adjust more Cajun seasoning if you like it spicier. 5. Remove the pot from heat and let it sit for a few minutes to thicken. 6. Before serving, garnish with chopped fresh parsley. - Use good Cajun seasoning. I like to pick one with real spices and no fillers. This makes a big difference in taste. You can find great blends online or in stores. - Choose fresh shrimp. Look for shrimp that smell like the ocean, not fishy. If you can, buy them from a trusted fish market. Fresh shrimp cooks better and tastes great. - One-pot cooking is easy. Start with high heat for sautéing, then lower it for simmering. This helps all flavors blend well. - To prevent pasta from sticking, stir it often while it cooks. Adding a bit of oil to the water can help too. This keeps it from clumping together. - For garnishes, use fresh parsley. It adds a nice pop of color and flavor. You can also try green onions or grated Parmesan. - Pair this dish with a simple salad or crusty bread. These sides complement the pasta and make your meal feel complete. {{image_2}} You can swap shrimp for other proteins if you like. Chicken or scallops work well. Tofu is a great choice for a plant-based option. Different pasta types can change the dish, too. Try penne or rotini for a fun twist. Whole wheat or gluten-free pasta also fit nicely in this meal. If you need gluten-free options, choose gluten-free pasta. You can find many choices at stores now. Just make sure to check the labels. For a vegetarian alternative, skip the shrimp. You can add more veggies like zucchini or mushrooms. This keeps the flavors bold and tasty. To really pack in the flavor, add extra spices. A dash of cayenne or paprika can enhance the heat. You might want to try adding lemon zest for a fresh twist. Incorporating additional veggies is another great choice. Spinach is nice, but you could also add asparagus or broccoli. This makes your dish colorful and healthy. To keep your One Pot Cajun Shrimp Pasta fresh, store it in an airtight container. This helps prevent moisture loss. Make sure the dish is cool before sealing it. In the fridge, it lasts for 3 to 4 days. When you want to enjoy leftovers, you can reheat it easily. Use a skillet over low heat. Add a splash of chicken broth or cream to keep it moist. Stir often to avoid burning. You can also use the microwave. Cover it loosely and heat in short bursts. This way, you keep the flavor intact. Yes, you can freeze One Pot Cajun Shrimp Pasta! Portion it into freezer-safe containers. Leave some space at the top for expansion. It stays good for up to 3 months. When ready to eat, thaw it in the fridge overnight. Reheat it on the stove or microwave, adding a bit of liquid to revive the taste. This dish is quick to make. It takes about 10 minutes to prep. Cooking it adds another 20 minutes. In total, you will spend about 30 minutes to make this meal. Yes, you can make this dish ahead of time. I suggest cooking the pasta and shrimp first. You can then store it in an airtight container. Just reheat it when you are ready to eat. Add cream and spinach right before serving for the best taste. You can pair this dish with many sides. A simple green salad works well. Garlic bread is another great choice. You can also serve it with steamed veggies or a light coleslaw to balance the flavors. Yes, this dish has a bit of heat from the Cajun seasoning. If you prefer less spice, you can adjust the amount. Start with half a tablespoon and taste as you cook. You can also add extra cream to tone it down if needed. This blog post covered how to make a tasty One Pot Cajun Shrimp Pasta. We looked at ingredients, preparation steps, and cooking tips to help you succeed. Remember to adjust the spices to suit your taste. You can swap ingredients and make this dish fit your diet. Whether you’re cooking for a crowd or just for yourself, this dish delivers flavor and ease. Enjoy experimenting and making it your own!

One Pot Cajun Shrimp Pasta Savory and Quick Meal

To make Pumpkin Spice Oatmeal Energy Bites, gather the following ingredients: - 1 cup rolled oats - 1/2 cup pumpkin puree - 1/4 cup almond butter (or peanut butter) - 1/4 cup honey or maple syrup - 1/4 cup ground flaxseed - 1 teaspoon pumpkin spice blend (cinnamon, nutmeg, ginger, allspice) - 1/2 teaspoon vanilla extract - 1/4 cup mini chocolate chips (optional) - Pinch of salt These simple ingredients create a tasty, healthy treat. The rolled oats provide a base, while the pumpkin puree adds moisture and flavor. Almond butter or peanut butter gives richness, and honey or maple syrup adds sweetness. Ground flaxseed offers fiber and healthy fats, which help keep you full. The pumpkin spice blend brings that warm, cozy flavor we all love in fall. Vanilla extract adds depth to the taste, and mini chocolate chips give a fun surprise in every bite. The salt enhances all these flavors, making the bites truly delicious. With these ingredients, you can whip up a batch of energy bites that are perfect for snacks or on-the-go fuel. Plus, they are easy to store and share! Start by taking a large mixing bowl. Add 1 cup of rolled oats. Next, scoop in 1/2 cup of pumpkin puree. Then, add 1/4 cup of almond butter or peanut butter. Pour in 1/4 cup of honey or maple syrup too. Don’t forget to add 1/4 cup of ground flaxseed. Mix all these ingredients well until they are fully combined. You want a thick, sticky mixture that holds together. Now it’s time to add flavor. Sprinkle in 1 teaspoon of pumpkin spice blend. This mix brings warm notes of cinnamon, nutmeg, ginger, and allspice. Next, pour in 1/2 teaspoon of vanilla extract. This adds a nice depth to the bites. If you want a sweet treat, fold in 1/4 cup of mini chocolate chips. This is optional, but it makes the bites extra special. Once your mixture is ready, chill it in the fridge for about 30 minutes. This makes it easier to handle. After chilling, scoop out a tablespoon of the mixture. Use your hands to roll it into a ball. Repeat this until you have rolled all the mixture into bite-sized balls. Each bite should be about the size of a golf ball. Next, take a baking sheet and line it with parchment paper. Place all the rolled energy bites on this sheet. Make sure they have a little space between them. Now, refrigerate the bites for 1-2 hours. This helps them set and hold their shape nicely. Enjoy these tasty bites as a snack or a quick energy boost! For the best results, chill the mixture for about 30 minutes. This helps the flavors blend and makes it easier to form the bites. If you skip this step, the mixture may be too sticky to handle. To ensure the right consistency, mix the ingredients well. You want a dough-like texture that holds together. If it feels too dry, add a splash of water or a bit more pumpkin puree. If it’s too wet, add a bit more oats or flaxseed. For a fun presentation, arrange the energy bites in a small mason jar. You can also place them on a decorative plate for snacks at parties. These bites make great gifts too! Wrap them in cellophane and tie with a festive ribbon. They’re a healthy and thoughtful treat for friends and family. {{image_2}} You can change the taste of your pumpkin spice oatmeal energy bites by switching nut butters. Almond butter gives a creamy texture, while peanut butter adds a rich flavor. If you're feeling adventurous, try cashew butter for a milder taste. Each nut butter brings its own special twist. You can also swap out sweeteners. Honey is a classic choice, but maple syrup offers a nice, earthy flavor. If you want a lower-calorie option, use agave syrup. Just keep in mind that the sweetness level may vary with each sweetener. If you need gluten-free options, use certified gluten-free rolled oats. This way, everyone can enjoy these tasty bites without worry. You can also look for gluten-free nut butters to match. For vegan substitutions, simply replace honey with maple syrup or agave. This keeps it plant-based and just as delicious. You can also use sunflower seed butter if you want a nut-free option. Each change keeps the bites yummy while catering to different diets. To keep your pumpkin spice oatmeal energy bites fresh, use airtight containers. Glass or plastic containers work well. These containers shield the bites from air and moisture. You can also use resealable bags for easy storage. When it comes to storing, the refrigerator is a great choice. It keeps the bites cool and fresh for daily snacking. If you want to save them for longer, use the freezer. Just wrap each bite in plastic wrap before placing them in a container. This adds extra protection from freezer burn. In the fridge, your energy bites last about one week. They stay tasty and safe to eat during this time. If you store them in the freezer, they can last up to three months. Watch for signs of spoilage. If you see mold or any weird smells, it’s best to toss them out. Also, if the texture changes and feels off, do not eat them. Always trust your senses when checking for freshness. Pumpkin Spice Oatmeal Energy Bites are packed with nutrients. Each bite is rich in fiber, healthy fats, and protein. They contain rolled oats, which provide whole grains. Pumpkin puree adds vitamins A and C, while ground flaxseed gives omega-3 fatty acids. A typical serving has about 100 calories. Yes, you can freeze these energy bites. Just place them in an airtight container or a freezer bag. They can last up to three months in the freezer. To enjoy, thaw them in the fridge overnight or at room temperature for a few hours. To make these bites vegan, simply replace honey with maple syrup. Use your favorite nut butter or seed butter for binding. Ensure all ingredients are plant-based, and you’re good to go! If you don’t have almond butter, try peanut butter or sunflower seed butter. Both options work well and add great flavor. You can also use cashew butter for a creamy texture. To change the sweetness, adjust the amount of honey or maple syrup. Start by adding less and taste as you mix. You can also add a small amount of stevia or other sweeteners if you prefer. In this post, I covered how to make Pumpkin Spice Oatmeal Energy Bites. We explored the simple ingredients needed, from rolled oats to optional chocolate chips. I shared step-by-step instructions to mix, form, and set the bites. Plus, I gave tips for perfecting the recipe and ways to store them properly. These energy bites are easy to make and fun to enjoy. You can modify them to fit your taste. Try different nut butters or sweeteners for a unique twist. Grab your ingredients and start preparing your tasty snacks!

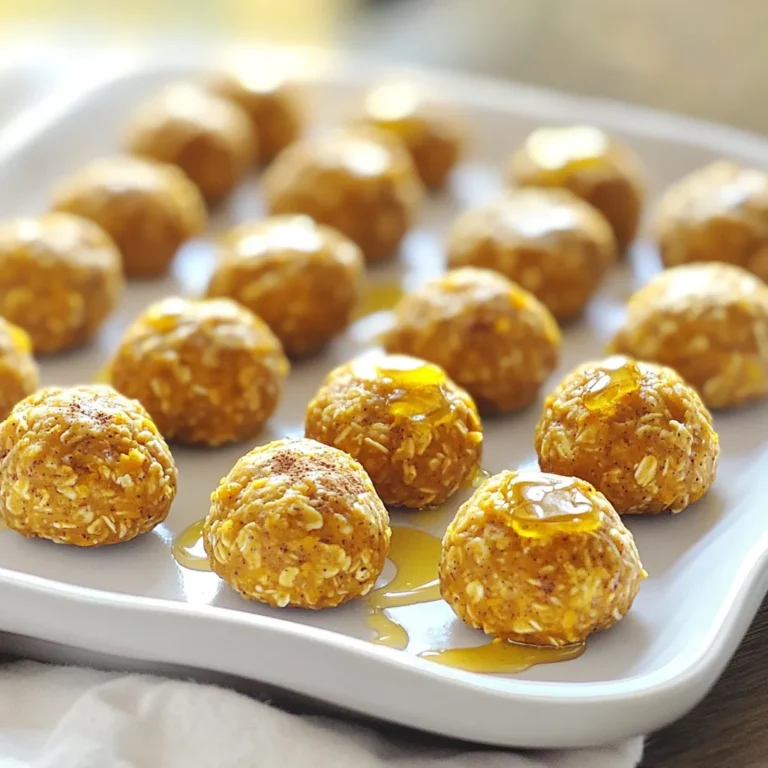
Pumpkin Spice Oatmeal Energy Bites Simple and Tasty

- 2 large sweet potatoes, peeled and cut into sticks - 2 tablespoons olive oil - 1 teaspoon garlic powder - 1 teaspoon paprika - 1/2 teaspoon cumin - Salt and pepper to taste - 1 tablespoon cornstarch - Ketchup - Garlic aioli - Spicy mayo - Honey mustard Gather these ingredients before you start. The sweet potatoes give a great flavor. Olive oil helps the spices stick. Garlic powder adds a nice kick. Paprika brings color and a hint of smoke. Cumin gives an earthy taste. Salt and pepper balance everything. If you want extra crispiness, add cornstarch. For dipping, you have fun choices. Ketchup is classic. Garlic aioli is creamy and rich. Spicy mayo adds heat. Honey mustard offers sweetness. These sauces make your fries even better. Start by peeling the sweet potatoes. This removes the skin, which can be tough. Next, cut the sweet potatoes into sticks. Aim for 1/4 inch thickness. This size helps them cook evenly. Make sure your cuts are consistent. Uniform pieces will ensure every fry cooks the same. Place the cut sweet potato sticks in a bowl of cold water. Let them soak for 30 minutes. Soaking helps remove excess starch. This step is key for crispy fries. After soaking, drain the fries and pat them dry. Use a paper towel to remove all moisture carefully. Dry fries will crisp up better in the air fryer. In a large bowl, combine olive oil, garlic powder, paprika, cumin, salt, and pepper. If you want extra crispiness, add cornstarch. Toss the dry sweet potato sticks in this mixture. Ensure every fry is well coated to maximize flavor. Next, preheat your air fryer to 400°F (200°C) for about 3-5 minutes. Once it’s ready, place the fries in the air fryer basket. Arrange them in a single layer. Avoid overcrowding the basket to allow proper air circulation. Air fry the fries for 15-20 minutes. Shake the basket halfway through to promote even cooking. After 15 minutes, check for crispiness. If they aren’t golden and crunchy, continue cooking in 2-minute increments. When done, remove the fries and serve them hot. Enjoy your crispy sweet potato fries! To get the best crispiness, start with even-sized sweet potato sticks. Aim for about 1/4 inch thick. This size helps them cook well. Soak the fries in cold water for 30 minutes. This step removes extra starch and leads to crispier fries. After soaking, dry them well with a paper towel. If you want extra crunch, add 1 tablespoon of cornstarch to your seasoning mix. This simple trick gives a great texture. If your fries are soggy, they might be too thick or not soaked enough. Make sure to cut them evenly. If they stick together, you may need to shake the basket more often. Overcrowding can also cause this issue. Always air fry in a single layer. If they aren’t crispy, try cooking them longer in 2-minute increments. This way, you can find the perfect crunch without burning them. Preheating your air fryer is key. Set it to 400°F (200°C) for 3-5 minutes before adding the fries. This helps them cook evenly and get crispy all over. When you place the sweet potato sticks in the basket, leave space between them. This allows hot air to circulate. Shake the basket halfway through cooking. This will help all sides crisp up nicely. {{image_2}} Want to add heat? You can make spicy sweet potato fries. Just mix in cayenne pepper or chili powder with your spices. Start with 1/2 teaspoon and adjust to your taste. This adds a nice kick to your fries. A little heat balances the sweetness of the potatoes. For a fresh twist, try herb-seasoned fries. Use dried herbs like rosemary, thyme, or oregano. Mix 1 teaspoon of your chosen herb into the seasoning. This gives your fries a fragrant touch. Fresh herbs can also work well if you have them on hand. They add depth and flavor. You can also blend sweet and savory flavors. Add a sprinkle of brown sugar or maple syrup to your seasoning mix. This enhances the natural sweetness of the sweet potatoes. Pair it with a pinch of sea salt for balance. The result is a unique flavor that surprises your taste buds. Feel free to experiment with different spices and herbs. Each variation opens up new tastes and experiences. Enjoy creating your perfect sweet potato fry recipe! To store leftover sweet potato fries, let them cool first. Then, place them in an airtight container. You can keep them in the fridge for up to 3 days. If you want to keep them longer, consider freezing them. Just make sure to seal the container tightly to prevent freezer burn. When reheating sweet potato fries, the goal is to keep them crispy. The best way to do this is by using the air fryer. Set the air fryer to 375°F (190°C). Place the fries in a single layer and heat for about 5-7 minutes. This will help restore their crunch. You can also use a regular oven for reheating, but the air fryer works best. Freezing sweet potato fries is a great option for meal prep. First, lay the fries on a baking sheet in a single layer. Freeze them for about 2 hours. Once frozen, transfer them to a freezer bag or container. This way, they won’t stick together. Frozen fries can last for 2-3 months. When ready to cook, you can air fry them straight from the freezer. Just add a few extra minutes to the cooking time. Yes, you can use other potatoes like russet or Yukon gold. They have a different taste and texture. Russets give a classic fry feel, while Yukon golds are creamy. Just remember to slice them into even sticks, about 1/4 inch thick. This helps them cook evenly like sweet potatoes. Sweet potato fries can last up to 3 days in the fridge. Store them in an airtight container to keep them fresh. When you want to eat them, reheat in the air fryer for crispiness. They won’t be as crunchy as when fresh but will still taste good. The best air fryer temperature for sweet potato fries is 400°F (200°C). This high heat helps the fries cook fast and get crispy. Preheat your air fryer for 3-5 minutes before adding the fries. This step ensures even cooking and great texture. This guide covered how to make delicious sweet potato fries. We discussed key ingredients, step-by-step instructions, and helpful tips for the best results. I shared tasty variations and storage tips to keep your fries fresh. Remember, practicing these steps will give you crispy fries every time. Enjoy experimenting with flavors and sauces that suit your taste. With these methods, you can make perfect sweet potato fries that impress everyone. Happy cooking!

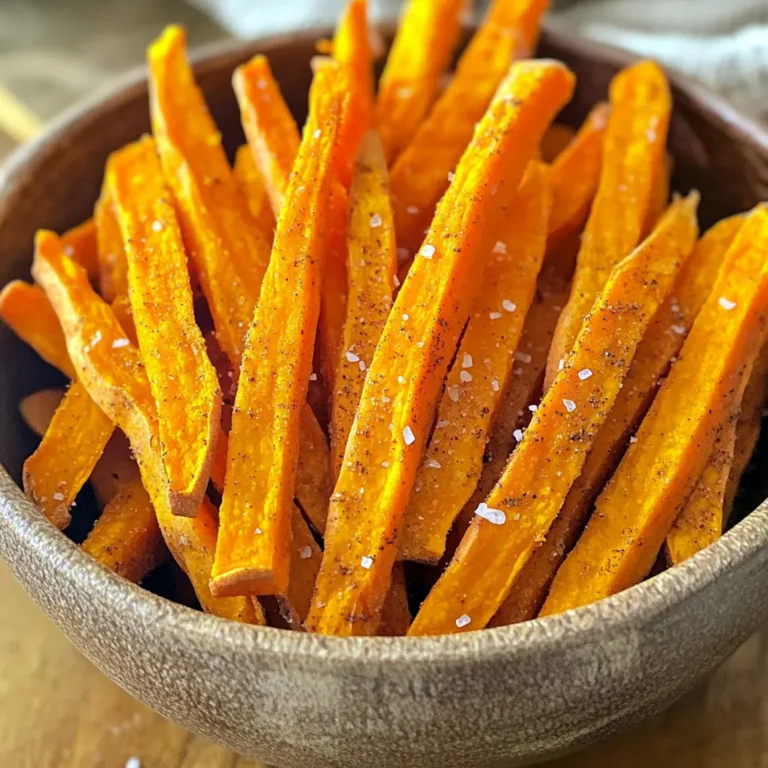
Air Fryer Sweet Potato Fries Simple and Crispy Recipe

- 1 lb large shrimp, peeled and deveined - 1 bunch asparagus, trimmed and cut into 2-inch pieces Large shrimp make this dish shine. They are tasty and cook quickly. Asparagus adds a crisp texture and bright color. Both ingredients pair well together. - 4 cloves garlic, minced - 2 tablespoons olive oil - Juice and zest of 1 lemon Garlic brings a rich aroma and depth to the dish. Olive oil adds smoothness and helps the flavors mix. The lemon juice and zest give a fresh, zesty kick that brightens the shrimp and asparagus. - 1 teaspoon paprika - 1 teaspoon dried oregano - Salt and pepper to taste Paprika adds a warm, smoky taste. Dried oregano brings an earthy note that balances the dish. Salt and pepper enhance all the flavors, making each bite delicious. Using these ingredients, you create a flavorful meal that is quick and easy. Each component works together to make this dish a crowd-pleaser. Enjoy the blend of flavors as they come together in your oven! Preheating the oven Start by preheating your oven to 400°F (200°C). This step warms the oven and helps cook the shrimp and asparagus evenly. Preparing shrimp and asparagus Next, take 1 pound of large shrimp, peeled and deveined. Add them to a large bowl. Grab 1 bunch of asparagus, trimmed and cut into 2-inch pieces. Toss the asparagus into the bowl. This mix will be the base of our dish. Combining shrimp and seasoning Now, add 4 cloves of minced garlic, 2 tablespoons of olive oil, and the juice and zest of 1 lemon to the shrimp and asparagus. Sprinkle in 1 teaspoon of paprika, 1 teaspoon of dried oregano, and salt and pepper to taste. Mix everything well until each piece is coated. This step adds flavor and makes the dish shine. Spreading on the sheet pan Take a large sheet pan and spread the shrimp and asparagus mixture evenly in a single layer. This helps them cook nicely without steaming. Baking time and doneness Place the sheet pan in the oven. Bake for about 10 to 12 minutes. The shrimp should turn pink and opaque, while the asparagus becomes tender-crisp. Keep an eye on them to avoid overcooking. After baking, let the dish rest for a few minutes. Adjust the seasoning if needed before serving. Adjusting seasoning levels can make a big difference. Taste the mix before baking. If it needs more flavor, add salt, pepper, or lemon juice. You want the shrimp to pop with flavor. To ensure shrimp cook properly, keep an eye on the time. Bake for 10-12 minutes. Look for shrimp to turn pink and opaque. If they are overcooked, they will be tough and rubbery. Garnishing your dish adds a nice touch. Use freshly chopped parsley for color and flavor. Lemon slices also brighten your plate. Place them around the shrimp and asparagus. This makes your dish look fresh and inviting. Pair this dish with light sides. A simple green salad works well. You can also serve it with rice or quinoa for extra texture. For drinks, try white wine or sparkling water with lemon. These choices balance the meal and keep it light. {{image_2}} You can change up the veggies in this dish. Try broccoli or bell peppers instead of asparagus. Both add nice colors and flavors. You can also use green beans for a crunchy bite. If you want more heat, add red pepper flakes or cayenne pepper. If you need gluten-free options, this recipe is already safe. Just check your spices to ensure they’re gluten-free. For a keto-friendly meal, use fewer vegetables and add more shrimp. You can also add avocado for healthy fats and creaminess. You can make this dish on the stove if you prefer. Just heat a large skillet over medium heat and cook the shrimp and veggies until done. Stir often to cook evenly. If you like grilling, try skewering shrimp and asparagus. Grill them for a smoky flavor and char. To store leftovers, first cool the dish to room temperature. Then, place the shrimp and asparagus in an airtight container. You can keep them in the fridge for up to three days. If you want to freeze them, make sure to use a freezer-safe bag. Squeeze out as much air as possible before sealing. This way, they can last for up to two months in the freezer. When it’s time to eat your leftovers, reheating is easy. The best method is to use the oven. Preheat it to 350°F (175°C). Spread the shrimp and asparagus on a baking sheet. Bake for about 8-10 minutes until they are hot. You can also use a microwave. Just place the food on a microwave-safe plate and heat in short bursts. Stir in between until warmed through. In the fridge, your shrimp and asparagus should last about three days. If you freeze them, they will stay good for up to two months. It’s best to label the container with the date. This helps keep track of how long it has been stored. Always check for any off smells or changes in color before eating. Can I use frozen shrimp? Yes, you can use frozen shrimp. Just make sure to thaw them first. Thawing helps them cook evenly. To thaw, place shrimp in cold water for about 15-20 minutes. Pat them dry before cooking. How do I know when shrimp are cooked? Shrimp cook fast. They turn pink and opaque when done. Check them after about 10 minutes of baking. If they curl into a C shape, they’re ready to eat! What should I look for when buying shrimp? When buying shrimp, look for clear shells and a fresh smell. Avoid shrimp that smell fishy or have dark spots. If possible, buy shrimp that is wild-caught. Always check the size; larger shrimp offer more meat. Can I make this dish with other seafood? Yes! You can use other seafood like scallops or fish. Just adjust the cooking time. For example, fish fillets may cook faster than shrimp. Keep an eye on them to avoid overcooking. This dish features large shrimp and fresh asparagus, enhanced by garlic, olive oil, and lemon. I shared simple steps for preparation, mixing, and baking to get perfect results. Tips on seasoning adjustments and presentation help you elevate your meal. You can swap ingredients or try different cooking methods for variety. Proper storage and reheating ensure leftovers stay fresh. Now, you have all the tools to impress at your next dinner. Enjoy cooking and tasting this delightful dish!

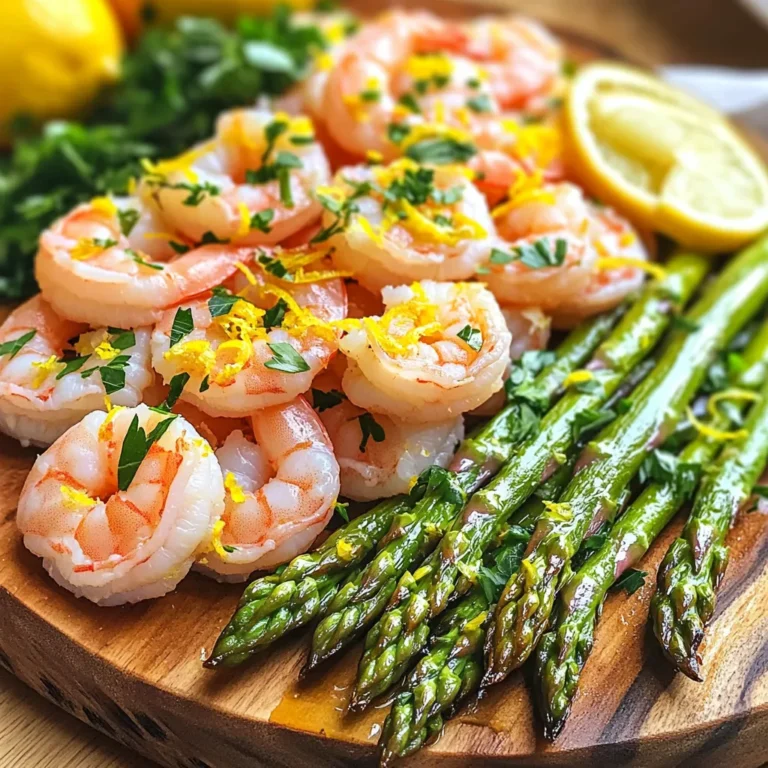
Sheet-Pan Lemon Garlic Shrimp & Asparagus Delight

To make this tasty dish, gather the following ingredients: - 2 cups rolled oats - 1 ½ cups almond milk (or any milk of choice) - ½ cup maple syrup - ½ cup brown sugar, packed - 2 ripe bananas, mashed - ½ cup unsweetened applesauce - 1 teaspoon vanilla extract - 1 teaspoon baking powder - ½ teaspoon cinnamon - ¼ teaspoon salt - ½ cup chopped walnuts (optional) - ½ cup dried cranberries or raisins (optional) If you don't have some ingredients, don't worry! Here are some easy swaps: - Use oat milk or soy milk instead of almond milk. - Honey or agave can replace maple syrup. - Applesauce can be swapped with yogurt for creaminess. - Any nut or seed can replace walnuts. - You can use any dried fruit, like apricots or dates, instead of cranberries or raisins. Choosing the best ingredients matters! Here are my tips: - Oats: Look for rolled oats, not instant. They cook better. - Milk: Pick unsweetened milk to control the sugar level. - Maple Syrup: Choose pure maple syrup for the best flavor. - Bananas: Use ripe bananas for added sweetness. - Nuts and Fruit: Make sure they are fresh and not stale for the best taste. Using quality ingredients makes this dish even better! Start by preheating your oven to 350°F (175°C). While it heats up, grab a 9x9-inch baking dish. Lightly grease it with cooking spray or a bit of butter. This step helps the oatmeal bake come out easily and not stick to the pan. In a large mixing bowl, add 2 cups of rolled oats. Pour in 1 ½ cups of almond milk. Next, add ½ cup of maple syrup and ½ cup of packed brown sugar. Then, mash 2 ripe bananas and mix them in. Add ½ cup of unsweetened applesauce and 1 teaspoon of vanilla extract. Now, sprinkle in 1 teaspoon of baking powder, ½ teaspoon of cinnamon, and ¼ teaspoon of salt. Stir everything until well combined. If you like, fold in ½ cup of chopped walnuts and ½ cup of dried cranberries or raisins for extra flavor. Pour your oatmeal mixture into the greased baking dish. Spread it out evenly with a spatula. Bake in the preheated oven for 30-35 minutes. You want the top to turn golden brown. To check if it’s done, insert a toothpick in the center. If it comes out clean, your oatmeal bake is ready. Once baked, let it cool for about 10 minutes. This helps it set before you serve. Enjoy it warm with a drizzle of maple syrup on top! To get the best texture for your oatmeal bake, use rolled oats. They soak up liquid well. You can also mash the bananas fully for a creamier base. The applesauce adds moisture, which helps too. Bake it just until golden brown. If you overbake, the dish gets dry. Store any leftovers in an airtight container. Keep the oatmeal bake in the fridge for up to five days. When you want to reheat, just pop it in the microwave for a quick warm-up. You can also warm it in the oven at 350°F. Cover it with foil to prevent drying out. This oatmeal bake shines at breakfast but can also be a sweet treat. Serve it warm in bowls. Add a dollop of yogurt on top for creaminess. You can slice up fresh bananas and sprinkle a bit of cinnamon for extra flavor. Drizzle more maple syrup for a special touch. {{image_2}} You can easily make this oatmeal bake gluten-free. Just swap the rolled oats for certified gluten-free oats. This small change keeps the dish safe for those who avoid gluten. Many brands offer gluten-free oats that taste great. You can boost the flavor of your oatmeal bake with spices and fruits. Here are some ideas: - Spices: Add nutmeg or ginger for a warm taste. A pinch of cardamom can give it a unique twist. - Fruits: Toss in berries, diced apples, or chopped peaches for added sweetness. You can also use dried fruits like apricots or figs. They add a nice chewy texture. If you need a nut-free version, just skip the walnuts. You can replace them with seeds like pumpkin or sunflower seeds. These seeds add a nice crunch without the nuts. You can also try adding more dried fruit for extra flavor and texture. To keep your Maple Brown Sugar Oatmeal Bake fresh, store it properly. First, let it cool completely. Then, cut it into squares for easy serving. Place the squares in an airtight container. You can layer them with parchment paper to avoid sticking. Store the container in the fridge for up to five days. This way, you can enjoy a quick breakfast or snack! If you want to save some for later, freezing works great! Wrap each square tightly in plastic wrap. Then, place them in a freezer bag. Make sure to remove as much air as possible. This helps prevent freezer burn. When you’re ready to eat, take out a square and let it thaw in the fridge overnight. You can also warm it in the microwave for about 30 seconds. Your baked oatmeal will stay good in the fridge for about five days. If frozen, it can last up to three months. Just be sure to check for any signs of spoilage, like odd smells or colors. This dish is best enjoyed fresh, but you can still enjoy it after storing! Yes, you can easily make this recipe vegan. Just use plant-based milk, like almond or oat milk. Also, ensure you pick a maple syrup that is pure and not mixed with any animal products. The bananas and applesauce already make this dish vegan-friendly. If you do not have almond milk, you can use any milk you prefer. Soy milk, oat milk, or coconut milk work well too. You can even use regular cow's milk if you want. Just keep in mind that each type of milk will change the flavor a bit. This oatmeal bake lasts for about 4 to 5 days in the fridge. Be sure to store it in an airtight container. You can also freeze it for up to 3 months. Just thaw it in the fridge before reheating. This blog covers how to make Maple Brown Sugar Oatmeal Bake. We looked at ingredients, replacements, and tips for choosing the best items. The steps for mixing and baking ensure a perfect outcome. You’ll also find tips for texture, storing leftovers, and serving ideas. Plus, we discussed fun variations, storage methods, and answered common questions. Remember, making this dish is easy and fun. Enjoy your tasty oatmeal bake, and feel free to get creative with flavors! Your breakfast or dessert will always impress!

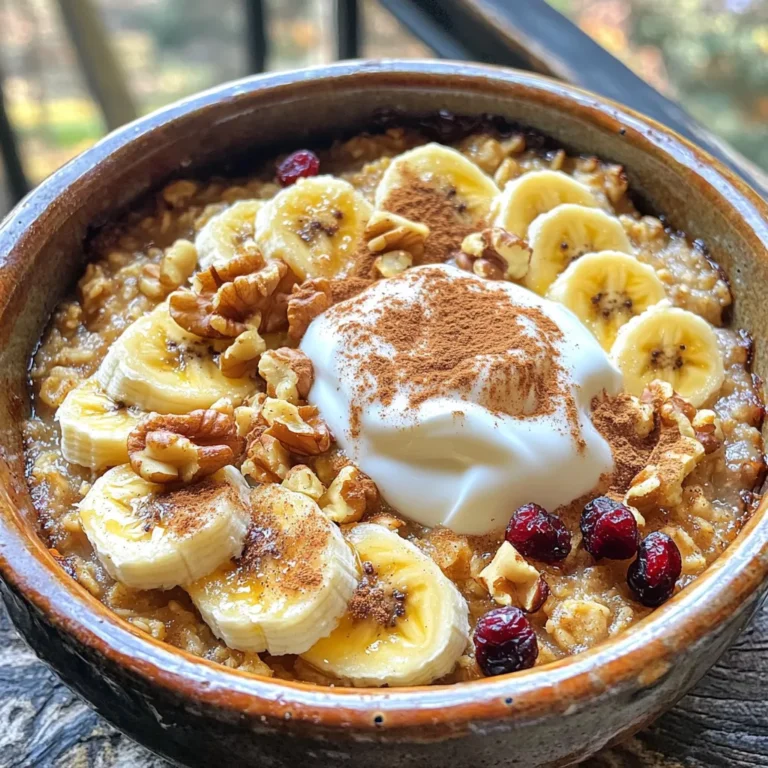
Maple Brown Sugar Oatmeal Bake Simple and Tasty Dish

To make No-Bake Strawberry Cheesecake Energy Bites, gather these ingredients: - 1 cup rolled oats - ½ cup cream cheese, softened - ½ cup almond butter or peanut butter - ¼ cup honey or maple syrup - ½ cup freeze-dried strawberries, crushed - 1 teaspoon vanilla extract - ¼ teaspoon salt - 2 tablespoons chia seeds (optional) - ¼ cup graham cracker crumbs (for rolling) These ingredients come together to create a tasty and healthy snack. You might not have all the ingredients at home. Here are some swaps: - Use Greek yogurt instead of cream cheese for a lighter option. - Swap almond butter for peanut butter based on your taste. - Maple syrup can replace honey for a vegan choice. - Try other freeze-dried fruits like raspberries or blueberries for variety. - If you're avoiding gluten, use gluten-free graham crackers. These substitutions keep the recipe flexible while still being delicious. Each energy bite is packed with nutrition. Here’s a breakdown of what you get per bite: - Calories: Approximately 80 - Protein: 2g - Carbs: 9g - Fats: 4g - Fiber: 1g These bites are a smart snack choice. They offer a good mix of protein and healthy fats to keep you energized. Start by gathering your ingredients. You will need rolled oats, cream cheese, almond butter, honey, freeze-dried strawberries, vanilla extract, salt, chia seeds, and graham cracker crumbs. In a large bowl, mix the rolled oats, cream cheese, almond butter, honey, crushed freeze-dried strawberries, vanilla extract, salt, and chia seeds if you choose to add them. Use a spatula or your hands to combine everything well. The mix should be sticky but hold together easily. If the mixture feels too dry, add a bit more almond butter or honey. If it’s too wet, stir in more oats. This balance is key to making the bites firm. Getting the texture just right is important. To achieve this, ensure your cream cheese is softened. This helps blend it smoothly with the other ingredients. If your mix is crumbly, it won’t hold shape when you roll it. If it’s too wet, your bites will be mushy. Always adjust slowly. Add a tablespoon of almond butter or oats at a time. This way, you can control the texture better. Chilling the mixture makes it easier to handle. After mixing, place the bowl in the fridge for about 30 minutes. This helps firm it up. Once chilled, scoop out small portions, about one tablespoon each. Roll these portions into balls using your hands. The warmth from your hands will help shape the bites. Next, roll each ball in graham cracker crumbs. This adds a nice crunch. Place them on a parchment-lined tray. Finally, chill the bites again for about 15 minutes. This helps them hold their shape before serving. Enjoy your tasty, no-bake treats! You can easily change the flavors of your energy bites. Here are some fun ideas: - Nut Butters: Swap almond butter for peanut butter or cashew butter. Each will add a unique taste. - Fruits: Use dried blueberries or cranberries instead of freeze-dried strawberries. They will add a different sweetness. - Sweeteners: Try agave syrup or brown rice syrup for a new twist on sweetness. - Seeds: Add flaxseeds or pumpkin seeds for extra crunch and nutrition. Mix and match these ideas to create your perfect snack! To keep your energy bites fresh, store them properly. Here’s how: - Refrigerate: Place them in an airtight container. They stay fresh for about one week in the fridge. - Freeze: For longer storage, freeze them. Use a freezer-safe container. They can last up to three months. - Thawing: When ready to eat, thaw them in the fridge overnight. This keeps the texture perfect. Proper storage will help maintain their taste and texture. These energy bites are so versatile! Here are some fun ways to serve them: - Snack Time: Enjoy them as a quick, healthy snack at any time of day. - Breakfast Boost: Pair them with yogurt or fruit for a filling breakfast. - Party Treats: Serve them at gatherings. Place them in a cute muffin tin to impress your guests. - On-the-Go: Pack them in your bag for a tasty energy boost while traveling. These bites are tasty, healthy, and perfect for many occasions! {{image_2}} You can mix up your energy bites with different flavors. Try using chocolate instead of strawberries. Use cocoa powder along with almond butter for a rich taste. You can also swap out strawberries for other freeze-dried fruits. Raspberries, blueberries, or bananas can change the whole vibe. For a tropical twist, add crushed pineapple and coconut flakes. Each flavor gives a new take on these bites. Making these energy bites vegan is simple. Use plant-based cream cheese and maple syrup instead of honey. For gluten-free bites, ensure your oats are certified gluten-free. You can also use gluten-free graham cracker crumbs for rolling. This way, everyone can enjoy these tasty treats. You can cater to many diets while keeping the flavors intact. Want to boost nutrition? Add chia seeds or flaxseeds for extra fiber and omega-3s. You can also mix in protein powder for a more filling snack. Nuts or seeds can give a nice crunch and healthy fats. If you like a bit of spice, a pinch of cinnamon can add warmth. Each add-in enhances both taste and health benefits. Store your No-Bake Strawberry Cheesecake Energy Bites in an airtight container. This keeps them fresh and tasty. You can keep them in the fridge for up to one week. If you want them to last longer, freezing is a great option. Make sure to separate layers with parchment paper to avoid sticking. To freeze your energy bites, place them in a single layer on a tray. Once frozen, put them in a freezer-safe bag. They can last up to three months in the freezer. When you're ready to eat, just take out what you need. Let them thaw in the fridge for a few hours, or enjoy them straight from the freezer for a cold treat! For on-the-go snacks, use small containers or zip-top bags. This makes it easy to grab a few bites when you need energy. Keep them cool by using an insulated lunch bag with an ice pack, especially in warm weather. These energy bites are perfect for a quick snack, whether at school or work! Yes, you can use fresh strawberries, but the texture will change. Fresh strawberries add moisture. This can make the mixture too wet. If you choose fresh, add more oats to balance it out. Freeze-dried strawberries give great flavor without extra moisture. They also add crunch and color. These energy bites stay fresh for about a week in the fridge. Store them in an airtight container. If you want them to last longer, you can freeze them. They can last for up to three months in the freezer. Just let them thaw before you enjoy them. Absolutely! These bites are perfect for meal prep. You can make them a few days in advance. Just store them in the fridge. You can also make a big batch and freeze them. This way, you always have a healthy snack ready to go. In this article, we covered all aspects of making energy bites. We explored ingredients, including substitutions and nutrition per bite. I outlined step-by-step instructions for making them and shared tips for the right texture. You learned how to customize and store your bites effectively. We also discussed different flavor variations, storage ideas, and answered common questions. These energy bites are not just easy to make; they can fit any diet. Enjoy creating your own tasty snacks!

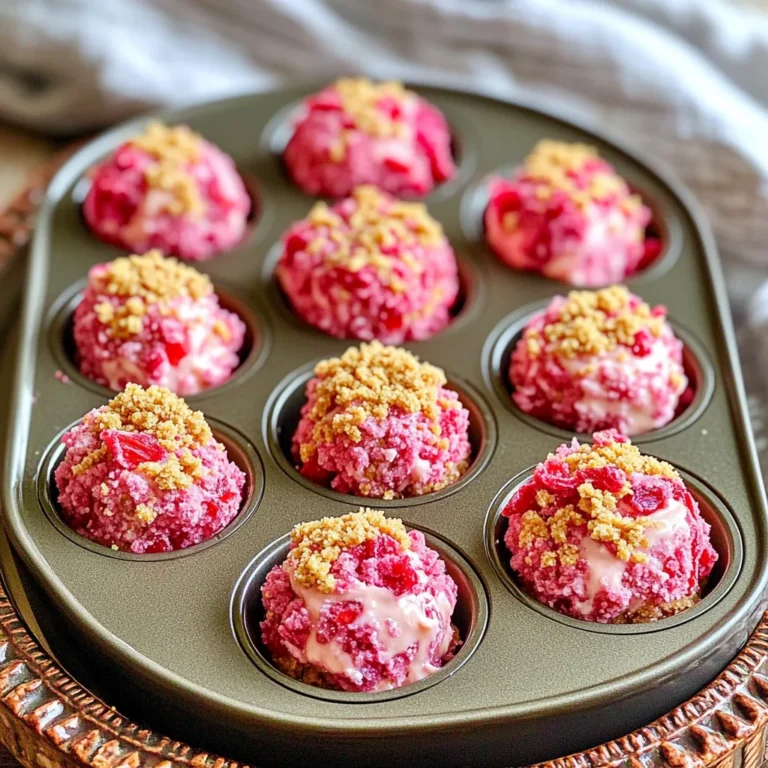
No-Bake Strawberry Cheesecake Energy Bites Delight

- 1 cup cottage cheese (preferably low-fat) - 1/2 cup natural peanut butter or almond butter - 1/4 cup maple syrup or honey Cottage cheese is the star here. It gives a creamy texture and high protein. I prefer low-fat, but any kind works. Next, we have peanut butter or almond butter. This adds a nutty flavor and healthy fats. For sweetness, you can use maple syrup or honey. Adjust the amount to your taste. - 1/2 cup oats - 1/4 cup mini chocolate chips (dark or milk as preferred) - 1/4 teaspoon cinnamon Adding oats gives the dip a nice texture and extra fiber. Mini chocolate chips bring joy to every bite. Choose dark or milk based on your taste. A hint of cinnamon adds warmth and flavor. Feel free to skip or add any extras you like. - Mixing bowls - Hand mixer or food processor - Serving bowl You will need a few tools to make this dip. A mixing bowl helps combine the ingredients easily. A hand mixer or food processor ensures everything blends smoothly. Finally, a serving bowl is a must for presenting your tasty dip. First, grab a medium mixing bowl. Add 1 cup of cottage cheese and 1/2 cup of peanut butter. You can use almond butter if you prefer. Next, pour in 1/4 cup of maple syrup or honey for sweetness. Add 1 teaspoon of vanilla extract for great flavor. Mix these ingredients well until they form a creamy base. Now, it's time to blend! Use a hand mixer or a food processor to mix the ingredients. Blend until the mixture is smooth and fluffy. Make sure to scrape the sides of the bowl. This helps to mix everything evenly. You want a nice, creamy texture for your dip. After blending, it's time to add more fun! Stir in 1/2 cup of oats and 1/4 cup of mini chocolate chips. You can choose dark or milk chocolate chips based on your taste. Add 1/4 teaspoon of cinnamon for warmth, and a pinch of salt to balance the sweetness. Mix these ingredients well so they are spread throughout the dip. Once mixed, transfer the dip into a serving bowl. Refrigerate the dip for at least 30 minutes. Chilling lets the flavors blend nicely and thickens the dip. When you're ready to serve, enjoy it with fresh fruit like apple slices or strawberries. You can also use graham crackers or pretzels for dipping. To make this dip fit your taste, adjust the sweetness. Start with 1/4 cup of maple syrup or honey. Mix, taste, and add more if you like it sweeter. You can also try different nut butters. Almond butter gives a nutty twist, while peanut butter adds a classic flavor. Make your dip look fancy. Garnish it with extra oats or mini chocolate chips on top. You can use colorful fruit like strawberries or apple slices around the bowl. Arrange graham crackers or pretzels nearby for a fun serving style. This makes your dip more inviting and tasty. If you have leftovers, store them right. Cover the dip with plastic wrap or transfer it to an airtight container. This keeps it fresh for up to three days in the fridge. Before serving again, mix it well to restore its creamy texture. Enjoy your dip with fresh dippers for a quick snack! {{image_2}} You can switch up your nut butter. Almond butter gives a nutty taste. It is great for those who want a different flavor. Peanut butter is classic and creamy. It adds a rich and sweet touch. Try both to see which one you like best. Mix and match for fun! If you want a sugar-free dip, try using stevia. It is a natural sweetener that works well. You can also use agave syrup for a milder taste. Honey is a good choice too. Each sweetener changes the flavor a bit. Experiment to find the right balance for you. Want to boost the protein? Add a scoop of protein powder. It helps make the dip even healthier. If you love chocolate, try cocoa powder. Mixing it in creates a rich chocolate version. Both options will give your dip a new twist. Enjoy playing with flavors! To keep your high-protein cottage cheese cookie dough dip fresh, store it in the fridge. Use a clean, airtight container. This helps keep out air and moisture. I recommend glass or plastic containers with tight lids. They work best to keep the dip creamy and tasty. When stored properly, this dip lasts about 3 to 5 days in the fridge. After that, its flavor and texture can change. Always check for any signs of spoilage before you dive in. Can you freeze it? Yes, you can! Freezing is a great option if you want to save some for later. To freeze, place the dip in a freezer-safe container. Leave some space at the top, as it may expand when frozen. When you're ready to enjoy it again, thaw it in the fridge overnight. Stir it well before serving to revive its creamy texture. Yes, you can make this dip vegan with a few simple swaps. For the cottage cheese, use a vegan alternative like tofu or a store-bought vegan cheese. Replace the peanut butter with almond butter, and use maple syrup as your sweetener. This way, you can enjoy a creamy and delicious dip without any animal products. Making this dip is quick. It takes about 10 minutes to prepare. After mixing, let it chill in the fridge for at least 30 minutes. This gives the flavors time to blend and the dip time to thicken. In total, you will spend around 40 minutes from start to finish. This dip pairs well with many fun dippers. Here are some great options: - Fresh fruit like apple slices or strawberries - Graham crackers for a sweet crunch - Pretzels for a salty contrast - Vanilla wafers for a classic taste - Celery sticks for a crisp bite Experiment with different dippers to find your favorite combination! This blog post covered how to make a tasty dip. You learned about the main ingredients, like cottage cheese and nut butter. We also explored optional add-ins that enhance flavor. The step-by-step guide showed how to mix, chill, and serve. Remember to customize the flavor and texture to fit your taste. Lastly, we discussed storage tips, shelf life, and even vegan options. Making this dip is easy and fun. Try it out and enjoy with your favorite snacks!

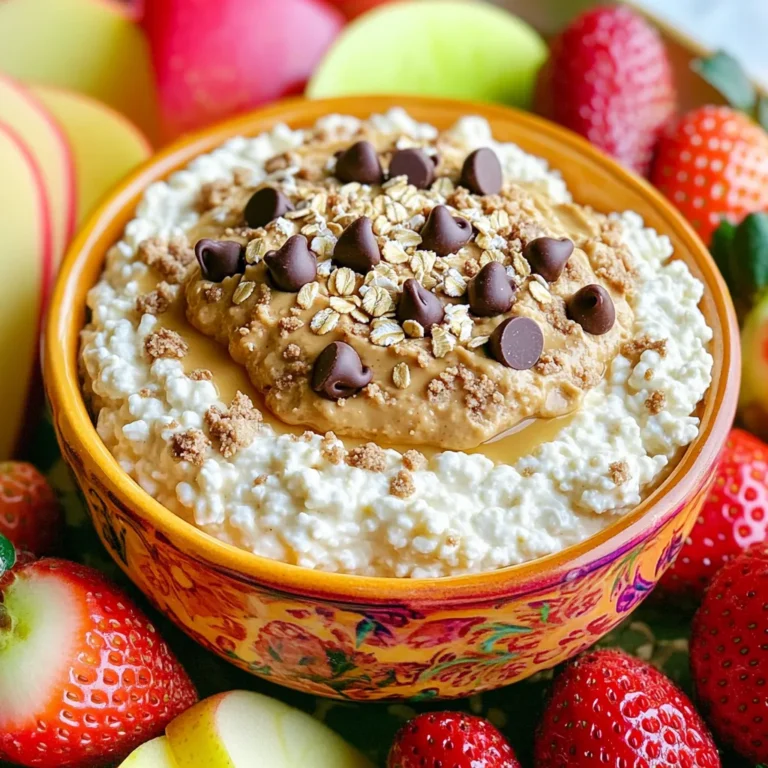
High-Protein Cottage Cheese Cookie Dough Delight

To make the Matcha Vanilla Swirl Chia Pudding, gather these simple ingredients: - 1 cup almond milk (or milk of choice) - 1/4 cup chia seeds - 2 tablespoons maple syrup (or honey) - 1 teaspoon pure vanilla extract - 1 tablespoon matcha powder - A pinch of sea salt - Fresh fruits for topping (like berries or banana slices) - Optional: Toasted coconut flakes for garnish These ingredients blend well to create a tasty and healthy pudding. Almond milk gives it a creamy base. Chia seeds are packed with nutrients and thicken the pudding. Maple syrup adds a touch of sweetness, while vanilla and matcha bring unique flavors. You can choose any milk you like. For a nut-free option, use oat milk or soy milk. The sweetener can also be adjusted. Honey works too if you prefer. The fresh fruits and toasted coconut flakes add color and crunch. Feel free to get creative with your toppings! This dish is not just good for breakfast; it also makes a great snack or dessert. Using fresh ingredients makes this pudding even more delightful. To start, gather your ingredients. In a medium mixing bowl, pour in 1 cup of almond milk. Add 1/4 cup of chia seeds, 2 tablespoons of maple syrup, and a pinch of sea salt. Whisk this mixture until it blends well. Let it sit for 5 minutes. This waiting time helps the chia seeds soak up the milk. After 5 minutes, whisk again to break up any clumps. Cover the bowl and place it in the fridge for at least 1-2 hours. You can also leave it overnight for a thicker pudding. Once your chia pudding has set, it’s time to divide it. Take the mixture and split it into two bowls. In one bowl, add 1 teaspoon of pure vanilla extract. Stir gently until the vanilla mixes in well. In the second bowl, whisk in 1 tablespoon of matcha powder. Make sure it blends fully and turns vibrant green. This step gives each layer its unique flavor. Now comes the fun part! Grab your serving cups or small bowls. Start layering your puddings. Alternate between the matcha and vanilla mixtures to create a beautiful swirl. Top each serving with fresh fruits like berries or banana slices. For an extra crunch, sprinkle some toasted coconut flakes on top. Enjoy this refreshing and nutritious treat! To get a great texture, use the right amount of chia seeds. For every cup of liquid, use 1/4 cup of chia seeds. Mix well and let it sit for five minutes. This helps seeds absorb liquid. Stir again to avoid clumping. Let it chill in the fridge for at least one hour. Overnight works best for a thick pudding. You can swap almond milk for any milk you like. Use oat milk, soy milk, or coconut milk. If you want a vegan option, use maple syrup instead of honey. For a touch of sweetness, consider agave syrup. You can also replace matcha with cocoa powder for a chocolate version. Toppings can make your pudding fun and tasty. Fresh fruits like berries or banana slices add color and flavor. You can also sprinkle toasted coconut flakes on top for crunch. For extra nutrition, add nuts or seeds. Try a drizzle of honey or maple syrup for sweetness. Mix in granola for a delightful texture contrast. {{image_2}} You can add cocoa powder to your matcha chia pudding. This gives it a rich chocolatey flavor. Use 1 tablespoon of unsweetened cocoa powder. Mix it in with the matcha. The blend of chocolate and matcha is tasty and fun. It looks great too, with a dark green and brown swirl! Another tasty option is coconut matcha chia pudding. Use coconut milk instead of almond milk. This adds a creamy texture and sweet coconut flavor. You can also add shredded coconut on top for crunch. This version tastes like a tropical treat, perfect for warm days. Bring in fresh fruits for a fruity twist. You can mix in pureed fruits like strawberries or mangoes. Add this to the vanilla layer for a fruity surprise. You can also layer fresh fruit pieces on top. Berries, bananas, or peaches work great. Each bite will burst with flavor and color. To keep your chia pudding fresh, store it in the fridge. Place it in a clean container. Make sure to seal it tightly. This keeps out air and bacteria. If you made extra, you can enjoy it later. I recommend using glass jars or airtight plastic containers. Glass jars work well for keeping flavors. They are also great for meal prep. If you have smaller servings, use smaller containers. This helps with portion control too. Your Matcha Vanilla Swirl Chia Pudding lasts about 3 to 5 days in the fridge. Remember to check for any changes in smell or texture. If you want to enjoy it warm, gently heat it. Use a microwave or a small pot on low heat. Stir well to keep it smooth. Enjoy it fresh or reheated for a comforting treat! Yes, you can use any non-dairy milk. Almond, coconut, or oat milk all work well. Each type adds its own flavor. Choose what you enjoy most. Just make sure it is unsweetened if you want to control the sugar. Chia pudding lasts about 3 to 5 days in the fridge. Store it in an airtight container. Always check for signs of spoilage before eating. If it smells off or has an unusual texture, it’s best to toss it. You can use honey or agave syrup instead of maple syrup. If you want a sugar-free option, try stevia or monk fruit sweetener. Adjust the amount based on your taste. Remember, each sweetener has a different level of sweetness. This blog post covered all you need to know about making chia pudding. We explored key ingredients like almond milk, chia seeds, and matcha. I shared step-by-step instructions for perfect texture and layers. We also discussed helpful tips, tasty variations, and how to store leftovers. Chia pudding is a fun and healthy treat. It can fit into many diets and preferences. Enjoy experimenting with flavors and toppings to make it your own! Now, you can create your perfect chia pudding with confidence.

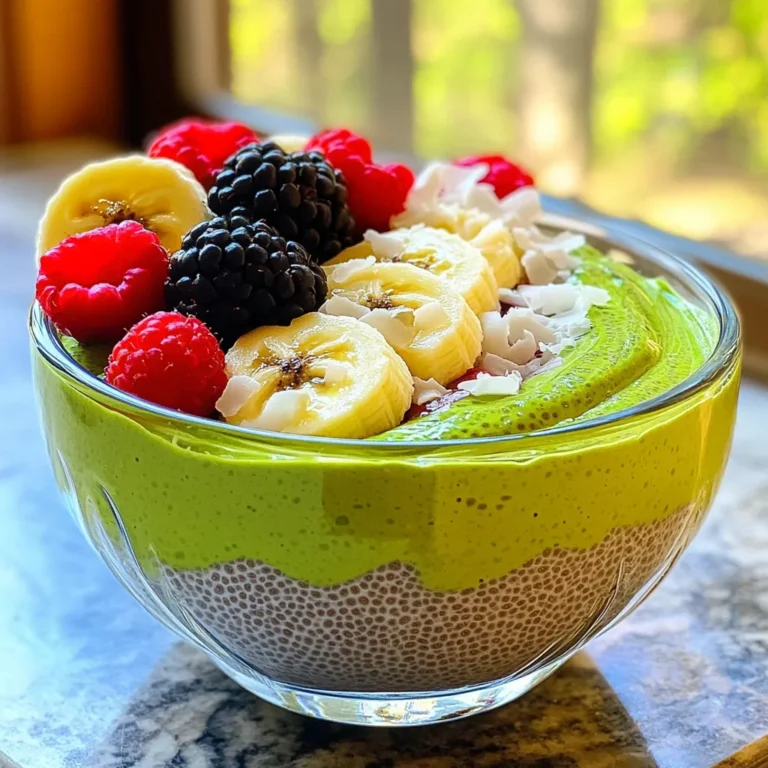
Matcha Vanilla Swirl Chia Pudding Delight Recipe

- 1 lb boneless, skinless chicken breasts - 1 cup wild rice, rinsed - 4 cups chicken broth (low sodium) - 1 medium onion, diced - 2 cloves garlic, minced - 2 carrots, diced - 2 celery stalks, diced - 1 teaspoon dried thyme - 1 teaspoon dried rosemary - 1 bay leaf - 1 cup heavy cream (or coconut milk for a dairy-free option) - Salt and pepper to taste - Fresh parsley, chopped (for garnish) Gathering fresh ingredients makes a big difference. The chicken breasts give the soup its heartiness. Wild rice adds a nutty flavor and a chewy texture. Chicken broth brings it all together with rich taste. For veggies, you need onion, garlic, carrots, and celery. They add layers of flavor and color. Thyme and rosemary bring warmth and depth. The bay leaf ties everything together during cooking. Don't forget the cream! It makes the soup rich and smooth. If you want a dairy-free option, coconut milk works great. Finish with salt, pepper, and fresh parsley for a burst of flavor. Each ingredient plays a role in this dish. Make sure to use high-quality items for the best result. This comforting soup will warm you up on any chilly day. Start by placing the boneless chicken breasts at the bottom of your slow cooker. This helps the chicken cook evenly and keeps it moist. Next, season the chicken with salt, pepper, thyme, and rosemary. These spices add great flavor to the soup. Make sure to coat the chicken well for the best taste. Layer the rinsed wild rice over the chicken. The wild rice will absorb flavors as it cooks. Now, add the diced onion, minced garlic, diced carrots, and diced celery on top of the rice. These vegetables bring freshness and crunch to the soup. Pour the chicken broth over all the ingredients in the slow cooker. This broth is the base of your soup. Toss in the bay leaf for added flavor and stir gently to combine everything. Be careful not to disturb the chicken too much. Cover the slow cooker and set it on low heat. Cooking on low allows all the flavors to meld together. The cooking time is about 6 to 7 hours. You know it’s done when the chicken is fully cooked and shreds easily with a fork. Once the soup is ready, take out the chicken breasts. Shred them using two forks and return the shredded chicken to the slow cooker. This gives the soup a nice texture and hearty feel. Stir in the cream or coconut milk into the soup. This adds richness and makes the soup creamy. Let it warm for an additional 15 minutes on low heat to incorporate the cream fully. Finally, taste the soup and adjust the seasoning with salt and pepper if needed. Before serving, remember to remove the bay leaf. Garnish your soup with chopped fresh parsley for a touch of color and freshness. To make your soup shine, choose fresh herbs. I love using thyme and rosemary. They add great taste. If you have fresh herbs, use them! Dried herbs work well too. When it comes to broth, homemade is best. It has deep flavor and richness. But store-bought broth is fine if you’re short on time. Just pick low sodium versions to keep it healthy. For creaminess, I often use heavy cream. It makes the soup rich and smooth. If you want a dairy-free option, coconut milk is a great choice. It adds a nice sweetness. To get the right thickness, let the soup cook longer. The wild rice will absorb some broth and thicken the soup. If it’s too thick, just add a bit of water or broth. Serve your soup in warm bowls for a cozy touch. I like to sprinkle fresh parsley on top. It adds color and freshness. Pair the soup with crusty bread. A nice slice will soak up all the goodness. For a twist, add a sprinkle of black pepper before serving. It gives a little kick! {{image_2}} You can easily make this soup dairy-free. Instead of heavy cream, use coconut milk. This swap gives a creamy feel without dairy. For gluten-free needs, wild rice is a great choice. It naturally fits this diet. Just ensure all other ingredients are gluten-free too. Want to add more greens? Toss in some spinach or kale. These veggies boost nutrition and flavor. You can also play with herbs and spices. Try adding parsley, dill, or even a pinch of cayenne for warmth. Each choice brings new life to the soup. Chicken is great, but turkey works too. Use it if you have leftovers. For a meatless option, replace chicken with beans or lentils. This gives protein while keeping it hearty. You could also use tofu for an interesting twist. Each choice makes the soup unique while keeping it cozy. To store leftover soup, let it cool to room temperature first. Then, place the soup in airtight containers. I recommend using glass or BPA-free plastic containers for safety. Make sure to leave some space at the top since the soup can expand as it cools. For best results when freezing soup, use freezer-safe containers or heavy-duty freezer bags. Be sure to label them with the date. When you are ready to eat, thaw the soup in the fridge overnight. You can also use the microwave for a quick thaw. When reheating, warm it on the stove until it bubbles. This helps keep the flavors intact. In the fridge, your soup will last about three to four days. Always check for signs of spoilage before eating. If you see any strange smells, mold, or changes in color, it’s best to throw it away. Keeping your soup safe means enjoying every bite! Yes, you can use frozen chicken breasts in your soup. Just keep in mind that it will change the cooking time. If you start with frozen chicken, it may take an extra hour to cook. The texture may be slightly different too. The chicken might not shred as easily, but it will still be tasty. Just ensure it reaches an internal temperature of 165°F for safety. If you can't find wild rice, don't worry! You have some great options. Brown rice works well and cooks faster. Quinoa is another choice; it adds protein and a nice texture. You could also use barley for a heartier soup. Each option changes the flavor a bit, but they all make a warm, filling soup. To add some heat, try adding red pepper flakes or cayenne pepper. Start with a small amount and taste as you go. You can also mix in diced jalapeños for a fresh kick. Another idea is to use a spicy chicken broth. This will enhance the flavor and warmth of your soup without overpowering it. This soup recipe combines simple ingredients and easy steps for a healthy meal. You learned how to layer fresh chicken, wild rice, and vegetables in a slow cooker. We also explored ways to adjust flavors and textures with herbs, spices, and cream options. Consider the storage tips and variations to make it your own. Cooking should be fun and creative. Enjoy your warm bowl of goodness, tailored to your taste. Your family will love it!

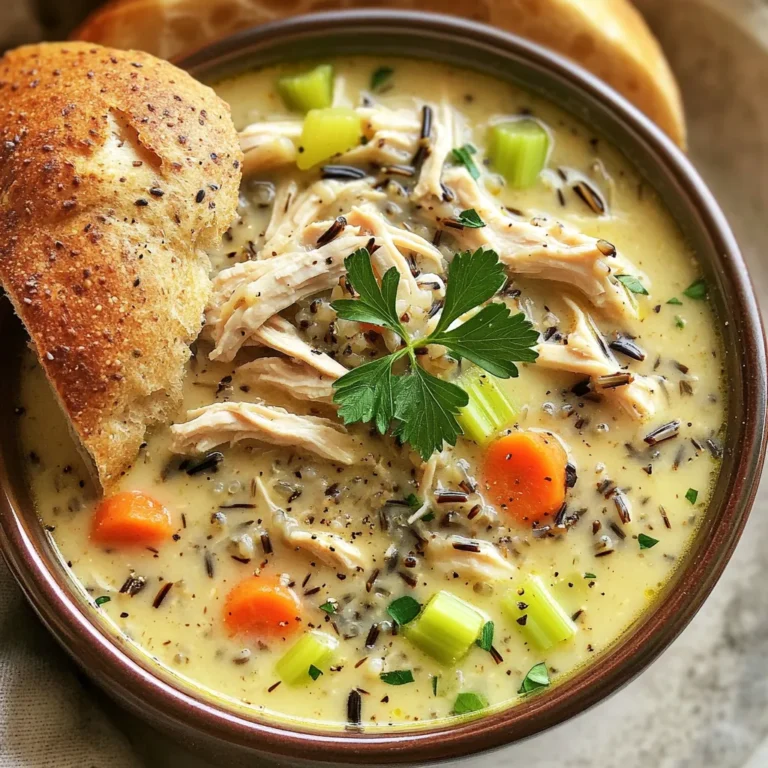
Slow Cooker Chicken Wild Rice Soup Nourishing Comfort

PREV 1 … 7 8 9 … 56 NEXT
go kitchen now

explore

DessertsDinnerAppetizersDrinks

Our Policies

  • Cookie Policy
  • Copyright Policy
  • Disclaimer
  • GDPR Policy
  • Terms Of Use
Back to Top
  • About
  • Contact Us
  • Privacy Policy
© 2025 go kitchen now