If you crave a meal that's simple and tasty, Baked Italian Grinder Sandwiches are for you! These warm, cheesy delights are easy to make and packed with flavor. With just a few fresh ingredients, like hoagie rolls and marinara sauce, you can whip up a satisfying dish that the whole family will love. Dive into this article for step-by-step instructions and tips to make the best Italian grinder sandwiches!
Why I Love This Recipe
- Delicious Layers: This sandwich is packed with layers of flavorful meats and cheese, making each bite a delightful experience.
- Quick and Easy: With a prep time of just 15 minutes, this recipe is perfect for busy weeknights or last-minute gatherings.
- Customizable: You can easily swap out ingredients based on your preferences, making it a versatile dish for everyone.
- Perfect for Sharing: These sandwiches are great for sharing at parties or family dinners, ensuring everyone gets to enjoy this tasty treat.
Ingredients
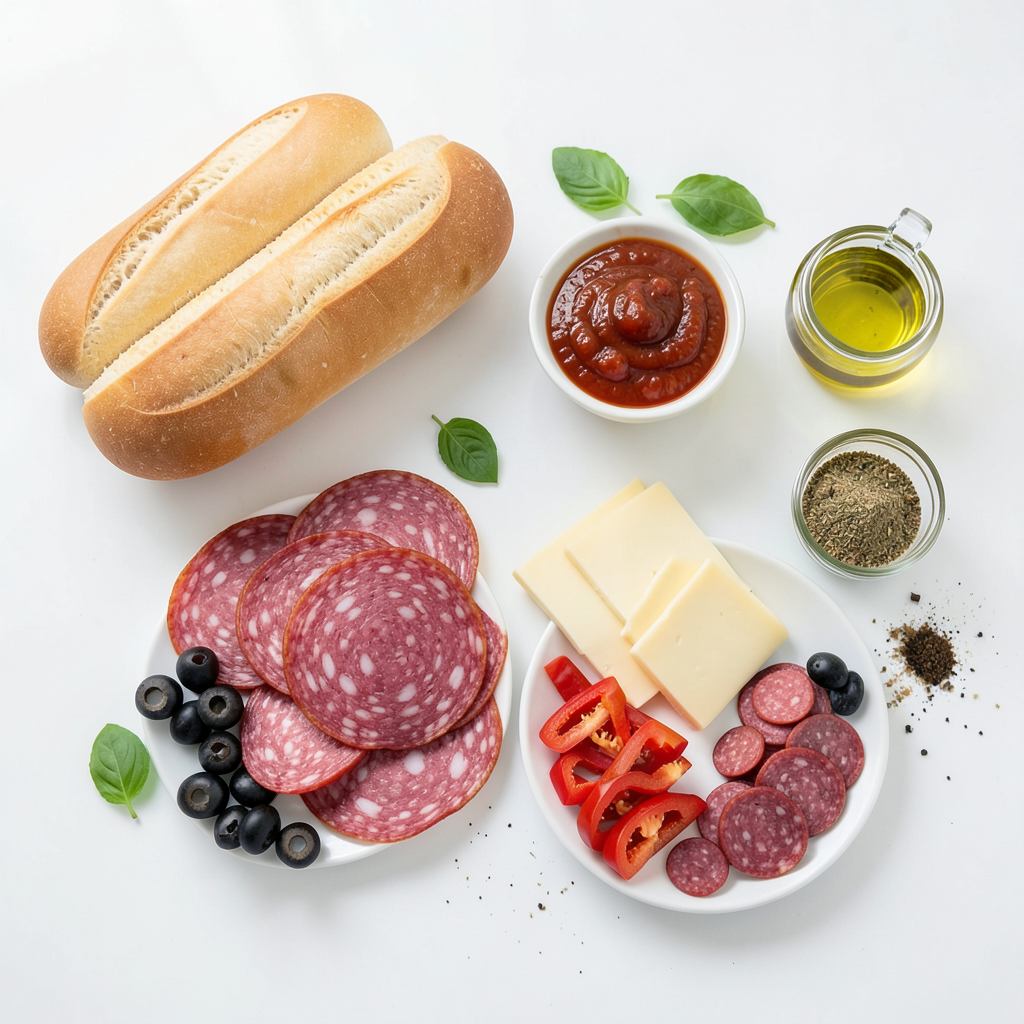
Detailed Ingredients List
- 4 hoagie rolls
- 1 cup marinara sauce
- 1/2 pound sliced salami
- 1/2 pound sliced pepperoni
- 1/2 pound sliced provolone cheese
- 1/2 pound sliced capicola
- 1/4 cup sliced black olives
- 1/4 cup roasted red peppers, sliced
- 1 tablespoon olive oil
- 1 teaspoon Italian seasoning
- Salt and pepper to taste
- Fresh basil leaves for garnish
Each ingredient plays an important role in the taste and feel of your sandwich. The hoagie rolls serve as the perfect base. They hold all the fillings together. Marinara sauce adds a rich, tangy flavor that blends well with the meats.
Sliced meats like salami, pepperoni, and capicola bring a savory punch. Provolone cheese melts beautifully, adding creaminess. Black olives and roasted red peppers give a nice texture and extra taste.
Olive oil and Italian seasoning enhance every bite. You can adjust salt and pepper to match your taste. Finally, fresh basil leaves add a pop of color and fresh flavor.
Remember, using fresh ingredients will make a big difference. Each bite should be a burst of flavors, making your meal truly memorable.
Step-by-Step Instructions
Preparation Method
1. Preheating the oven
Start by preheating your oven to 375°F (190°C). This step is key for cooking the sandwiches evenly.
2. Preparing the hoagie rolls
Take your hoagie rolls and cut them horizontally. Make sure you do not cut all the way through. You want to create a pocket for your tasty fillings.
3. Combining the sauce
In a bowl, mix together the marinara sauce, sliced black olives, roasted red peppers, and Italian seasoning. Stir well until everything is combined. This will add great flavor to your sandwiches.
4. Assembling the sandwiches
Spread the marinara mixture inside each hoagie roll. Next, layer on the salami, pepperoni, provolone cheese, and capicola. The more layers, the better!
5. Baking instructions
Drizzle olive oil over the filled rolls. Season with salt and pepper to taste. Now, close the rolls and place them on a baking sheet lined with parchment paper. Cover the sandwiches with aluminum foil. Bake them for 15 minutes. After that, remove the foil and bake for an extra 5-10 minutes. Look for melted, bubbly cheese before taking them out. Let them cool for a few minutes. Garnish with fresh basil leaves for a nice touch.
Tips & Tricks
Enhancing Flavor
- Using fresh ingredients: Fresh ingredients make your sandwiches taste great. Use fresh basil and ripe peppers to boost flavor. Fresh herbs add a bright taste that dried herbs can't match.
- Suggested seasoning adjustments: Feel free to adjust seasonings to your taste. Add more Italian seasoning for a stronger flavor. A pinch of red pepper flakes gives a nice kick.
- Tips for perfect cheese melt: To get that perfect cheese melt, cover the sandwiches with foil for the first part of baking. Remove the foil near the end to allow the cheese to bubble and brown.
Serving Suggestions
- Ideal sides to pair with sandwiches: Serve your sandwiches with a side salad or crispy fries. A light pasta salad pairs well for a complete meal.
- Creative serving ideas: Cut the sandwiches in half and serve on a wooden board for a rustic touch. Offer a small bowl of extra marinara for dipping to enhance the meal experience.
Pro Tips
- Use Fresh Ingredients: The quality of your meats and cheeses will greatly affect the flavor of your sandwich. Opt for freshly sliced deli meats and good-quality provolone for the best taste.
- Customize Your Fillings: Feel free to add or substitute ingredients based on your preference. Spinach, arugula, or different cheeses can enhance the sandwich to your liking.
- Keep an Eye on the Cheese: Watch the sandwiches closely while baking. You want the cheese to be perfectly melted and slightly browned, so adjust the time if necessary.
- Let Them Rest: Allow the sandwiches to cool for a couple of minutes before serving. This helps the ingredients meld together and makes them easier to handle.
Variations
Ingredient Swaps
You can change the meats in your sandwich. Use turkey or ham instead of salami. For cheese, try mozzarella or cheddar. Both taste great! If you want a meat-free meal, use grilled veggies. You can also add some spinach or arugula. Want some heat? Use hot capicola or add sliced jalapeños.
Creative Twists
Sauces can make your sandwich stand out. Try pesto for a fresh flavor or add a bit of ranch dressing. You can mix marinara with garlic or red pepper flakes for a kick. Adding toppings gives your sandwich a nice crunch. Think about using sliced pickles, fresh lettuce, or crispy onions. These simple swaps and twists can make your sandwich unique and tasty.
Storage Info
Storing Leftovers
To keep your Baked Italian Grinder Sandwiches fresh, store them properly. First, let the sandwiches cool down. Then, wrap each sandwich tightly in plastic wrap. Place them in an airtight container or a resealable plastic bag. This keeps them fresh for up to three days in the fridge. If you want to store them longer, freeze the sandwiches. Wrap them well in foil, then place them in a freezer-safe bag. They can last up to three months in the freezer.
Reheating Methods
To enjoy your leftovers, reheat them for the best taste. Preheat your oven to 350°F (175°C). Unwrap the sandwich and place it on a baking sheet. Cover it with foil to keep it moist. Bake for about 10-15 minutes, or until heated through. If you like a crispy crust, remove the foil for the last few minutes. You can also use a toaster oven for this method. Enjoy the cheesy goodness just like when they were fresh!
FAQs
Common Questions
How to make Baked Italian Grinder Sandwiches from scratch? To make these sandwiches, start by preheating your oven to 375°F (190°C). Cut hoagie rolls without slicing all the way through. In a bowl, mix marinara sauce, black olives, roasted red peppers, and Italian seasoning. Spread this mix inside the rolls. Layer sliced salami, pepperoni, provolone cheese, and capicola in each roll. Drizzle olive oil, add salt and pepper, close the rolls, and bake for 15 minutes covered with foil. Remove the foil and bake for 5-10 more minutes until the cheese melts.
Can I use different types of bread? Yes, you can use various breads. While hoagie rolls are classic, you can try baguettes or sub rolls. Just ensure they can hold the fillings well. For a fun twist, use ciabatta for a crusty texture.
What are some side dishes that pair well with these sandwiches? These sandwiches go well with many sides. Try a fresh salad, crispy fries, or garlic bread. You can also serve a bowl of marinara sauce for dipping.
How long do leftovers last? Leftovers can last up to three days in the fridge. Store them in an airtight container. Make sure to keep them cool to maintain flavor and texture.
Can I make these sandwiches ahead of time? Yes, you can prepare them a few hours ahead. Assemble the sandwiches and wrap them in foil. Bake them just before serving for the best taste. This way, you can enjoy them warm and gooey!
This post covered how to create delicious Baked Italian Grinder Sandwiches. We explored key ingredients like hoagie rolls and marinara sauce. I shared a step-by-step guide for preparing, assembling, and baking these sandwiches. Tips for enhancing flavor and creative serving ideas made it even better. We also discussed ingredient swaps and how to store leftovers.
Enjoy making your own version and feel the joy in every bite.