Are you ready for a dinner that packs a flavor punch? Baked Queso Chicken is a simple dish that turns weeknight meals into a fiesta. In this post, I’ll guide you through easy steps to make juicy chicken, topped with creamy, savory queso. Perfect for busy evenings, this meal is both tasty and satisfying. Let’s dive into the ingredients and get cooking your new favorite dinner delight!
Why I Love This Recipe
- Simple Preparation: This dish is quick and easy to prepare, making it perfect for busy weeknights.
- Flavorful Ingredients: The combination of salsa, cheese, and spices creates a deliciously bold flavor.
- Healthy Option: Using lean chicken breasts and plenty of veggies makes this a nutritious meal choice.
- Perfect for Sharing: This recipe serves four, making it ideal for family dinners or gatherings with friends.
Ingredients
Main Ingredients
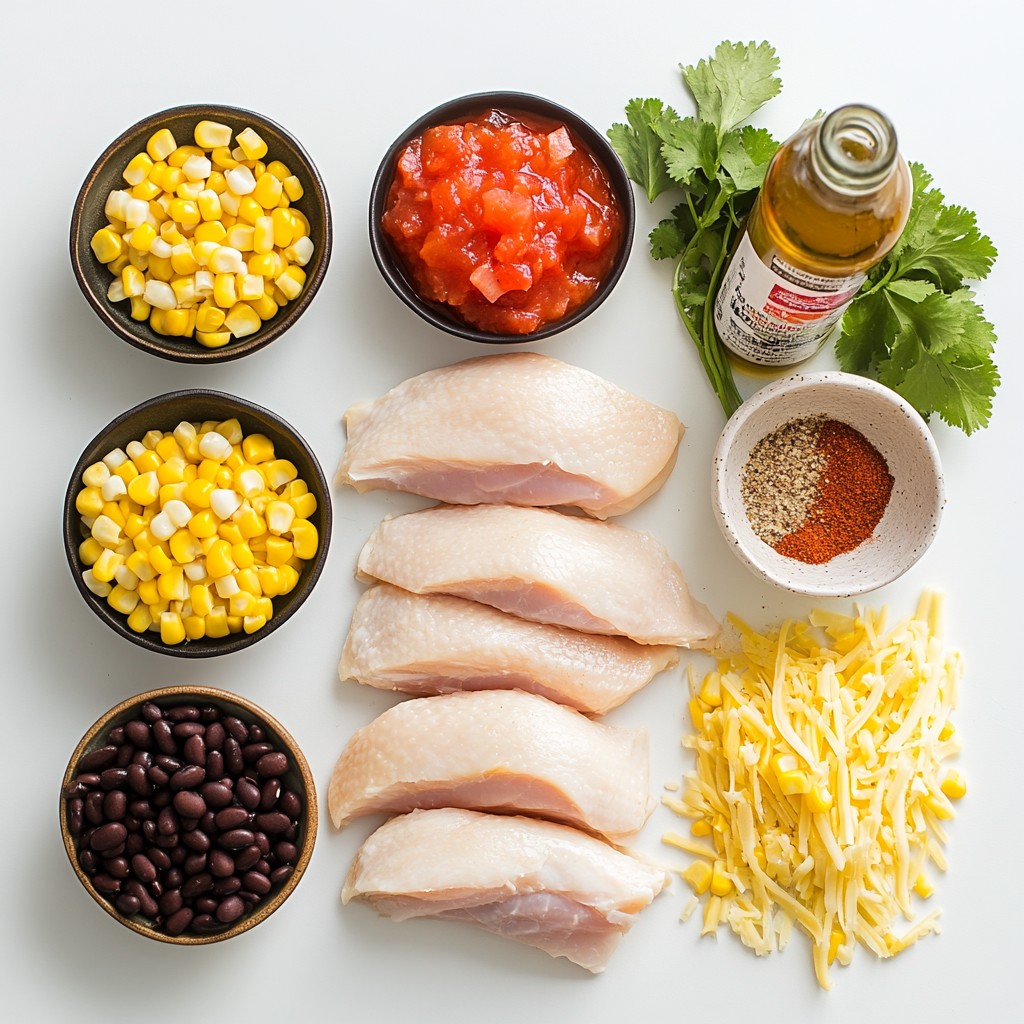
For baked queso chicken, gather these main items:
- 4 boneless, skinless chicken breasts
- 1 cup shredded queso cheese (or Mexican blend cheese)
- 1 cup mild salsa
- 1 can black beans, rinsed and drained
- 1 cup corn (fresh or canned)
These ingredients form the base of this cheesy delight. They blend well and create a tasty meal.
Seasonings
You will need these seasonings to add great flavor:
- 1 teaspoon cumin
- 1 teaspoon chili powder
- Salt and pepper to taste
- 1 tablespoon olive oil
These seasonings bring warmth and depth to your dish. They highlight the chicken and enhance the other flavors.
Optional Garnishes
To make your dish look and taste even better, consider these garnishes:
- Fresh cilantro, for garnish
Adding cilantro gives the dish a fresh touch. It also adds a pop of color, making your meal more appealing.
Step-by-Step Instructions
Preparation of Ingredients
First, gather all your ingredients. You need 4 boneless, skinless chicken breasts. Grab 1 cup of shredded queso cheese or a Mexican blend. You also need 1 cup of mild salsa, 1 can of black beans (rinsed and drained), and 1 cup of corn. Don't forget 1 teaspoon each of cumin and chili powder. You will need 1 tablespoon of olive oil, plus salt and pepper to taste. Finally, fresh cilantro makes a great garnish.
Baking the Chicken
Start by preheating your oven to 375°F (190°C). While the oven heats, mix the salsa, black beans, corn, cumin, chili powder, olive oil, salt, and pepper in a large bowl. Make sure all ingredients blend well.
Next, rub a bit of olive oil on the chicken breasts. Season them with salt, pepper, cumin, and chili powder. Place the chicken in a baking dish. Take the salsa mixture and pour it over the chicken, making sure it covers the meat.
Now, sprinkle the shredded queso cheese on top. Cover your baking dish with aluminum foil. Bake in the preheated oven for 25 minutes.
Final Touches
After 25 minutes, carefully remove the foil. Bake for another 10 to 15 minutes. You want the chicken cooked through, and the cheese should be bubbly and golden.
Once done, take it out and let it sit for a few minutes. This helps the juices settle. Finally, garnish with freshly chopped cilantro before serving. Enjoy your tasty Baked Queso Chicken!
Tips & Tricks
How to Achieve Perfectly Cooked Chicken
To cook chicken just right, start with even-sized pieces. Use boneless, skinless chicken breasts for quick cooking. Rub them with olive oil and season well with salt, pepper, cumin, and chili powder. This adds flavor and keeps the chicken juicy. Bake at 375°F for 25 minutes, covered with foil. Then, remove the foil and bake for another 10-15 minutes. Check if the chicken reaches 165°F. This ensures it is safe to eat and perfectly cooked.
Cheese Melting Tips
For the best cheese melt, use shredded queso cheese or a Mexican blend. Spread it evenly on top for a nice, gooey layer. Bake the chicken uncovered to let the cheese bubble and turn golden. This gives a tasty crust. If you want a crispier top, broil it for a minute or two after baking. Just watch it closely so it doesn't burn.
Flavors to Enhance the Dish
You can boost the flavor of baked queso chicken in many ways. Add spices like paprika or garlic powder to the seasoning mix. Fresh herbs like cilantro or green onions make a bright touch. You can also mix in diced jalapeños for some heat. If you like more texture, toss in chopped bell peppers or zucchini into the salsa mixture. These additions make the dish even more delicious.
Pro Tips
- Marinate for Extra Flavor: For a more flavorful chicken, consider marinating the chicken breasts in the spices and a bit of salsa for at least 30 minutes before cooking.
- Cheese Variations: Experiment with different types of cheese such as pepper jack for a spicy kick, or a sharp cheddar for a bolder flavor.
- Serving Suggestions: Serve your baked queso chicken over rice or with warm tortillas to soak up the delicious sauce.
- Leftover Storage: Store any leftovers in an airtight container in the refrigerator for up to 3 days. Reheat in the oven for best results.
Variations
Vegetarian Options
You can easily make this dish vegetarian. Replace the chicken with hearty vegetables. Use thick slices of portobello mushrooms or eggplant. These will soak up the flavors well. You can also add more beans and veggies to the salsa mix. Zucchini, bell peppers, or sweet potatoes work great here.
Different Cheese Choices
While queso cheese is a star, you can switch it up! Try cheddar, Monterey Jack, or pepper jack. Each cheese brings its own taste. Mixing cheeses can create a richer flavor too. If you want a vegan option, look for plant-based cheese products. Many melt nicely and taste great.
Spicy Additions
If you love heat, add spicy elements! Mix in diced jalapeños or serrano peppers. You can also use spicy salsa instead of mild. For a smoky flavor, add chipotle peppers in adobo sauce. Just a little will go a long way. Adjust the heat to your liking for a fun kick!
Storage Info
How to Store Leftovers
To store leftovers, let the baked queso chicken cool completely. Place the chicken in an airtight container. You can keep it in the fridge for up to three days. If you want to enjoy it later, consider freezing it.
Reheating Instructions
Reheat the chicken in the oven for the best taste. Preheat your oven to 350°F (175°C). Cover the chicken with foil to keep it moist. Bake for about 15-20 minutes or until it is warmed through. You can also use the microwave. Heat it in short bursts of one minute, checking often.
Freezing Tips
If you want to freeze the chicken, wrap each piece tightly in plastic wrap. Then place them in a freezer bag. This helps prevent freezer burn. Label the bag with the date. The chicken can stay in the freezer for up to three months. When you are ready to eat, thaw it in the fridge overnight before reheating.
FAQs
Can I use bone-in chicken?
Yes, you can use bone-in chicken for baked queso chicken. Bone-in chicken can add more flavor. Just adjust the cooking time. Cook it longer than boneless chicken. Aim for an internal temperature of 165°F (74°C). This ensures it is safe to eat.
What can I serve with baked queso chicken?
Baked queso chicken pairs well with many sides. Here are some tasty options:
- Rice or quinoa for a hearty base.
- Tortilla chips for a crunchy bite.
- A fresh salad for a light touch.
- Grilled veggies for added color and taste.
- Guacamole or sour cream for extra creaminess.
These sides can balance the flavors of the dish.
How to make a lower-calorie version?
To lower the calories in baked queso chicken, make a few swaps:
- Use skinless chicken thighs instead of breasts.
- Swap regular cheese for reduced-fat cheese.
- Use a light salsa or homemade salsa without added sugar.
- Replace corn with more veggies like zucchini or bell peppers.
- Serve with a side salad instead of rice or chips.
These changes can help you enjoy the dish while cutting calories.
This blog post covered how to make delicious baked queso chicken. We explored the key ingredients, including main components and seasonings. I shared step-by-step instructions to guide the cooking process and helpful tips to get perfect chicken every time. You learned about fun variations and how to store leftovers properly.
Remember, you can always try new flavors to make the dish your own. Enjoy your cooking adventure!