Are you looking for a delicious dinner that’s quick and easy to make? Chicken Scallopini is the perfect dish! With tender chicken, a crispy coating, and a rich sauce, this recipe packs big flavor with minimal effort. In this article, I'll walk you through the simple ingredients, step-by-step instructions, and helpful tips to make your dinner a hit. Let’s get cooking and transform your weeknight meals!
Why I Love This Recipe
- Crispy Texture: The combination of panko breadcrumbs and Parmesan cheese creates an irresistible crunchy exterior that contrasts beautifully with the juicy chicken inside.
- Bright Flavor: The addition of fresh lemon juice and garlic infuses the dish with a bright, zesty flavor that elevates the chicken and adds a refreshing touch.
- Quick and Easy: This recipe is perfect for a weeknight dinner, taking only 30 minutes from start to finish without compromising on taste.
- Versatile Dish: Serve it with a variety of sides, from pasta to salads, making it a versatile option for any meal or occasion.
Ingredients
Main Ingredients
- 2 boneless, skinless chicken breasts
- 1/2 cup all-purpose flour
- 1/2 cup breadcrumbs (panko preferred for extra crunch)
- 1/4 cup grated Parmesan cheese
- 2 large eggs
- 1/4 cup milk
- 3 tablespoons lemon juice
- 2 tablespoons olive oil
- 2 tablespoons unsalted butter
- 1 clove garlic, minced
- Salt and pepper to taste
Each ingredient plays a key role in this recipe. The chicken breasts give the dish its base. Flour helps the coating stick. Breadcrumbs add the crunch you love. Parmesan cheese gives a savory touch. Eggs and milk create the perfect binding mix. Olive oil and butter add flavor and richness when cooking. Garlic brings aroma and taste. Lastly, salt and pepper enhance all the flavors.
Optional Garnishes
- Fresh parsley, chopped (for garnish)
- Lemon wedges (for serving)
Garnishes can elevate your dish. Fresh parsley adds color and a touch of freshness. Lemon wedges serve as a bright, zesty addition when squeezed over the chicken.
Common Substitutes
- Chicken breasts can be swapped for thighs for more flavor.
- Panko breadcrumbs can be replaced with regular breadcrumbs if needed.
- For gluten-free options, use almond flour or a gluten-free flour blend.
- You can use grated Romano cheese instead of Parmesan for a different taste.
Substitutes allow you to adapt the recipe to your pantry. Each swap can add a unique twist while keeping the dish delicious.
Step-by-Step Instructions
Preparing the Chicken
Start with the chicken breasts. Place one breast between two sheets of plastic wrap. Use a meat mallet or rolling pin to pound it to about 1/2 inch thick. This step helps the chicken cook evenly. Repeat this with the second breast. You want both pieces to be thin and flat for the best results.
Bread Naming Station Setup
Now, set up your breading station. Use three shallow dishes. In the first dish, add the flour. Season it with salt and pepper. In the second dish, whisk together the eggs and milk until combined. In the third dish, mix the breadcrumbs and grated Parmesan cheese. This setup makes breading easy and fun!
Cooking the Chicken
Heat a large skillet over medium heat. Add the olive oil and butter. Wait until the butter melts and bubbles. Then, add the chicken breasts to the pan. Cook each side for about 4-5 minutes. You want them to turn golden brown. If your skillet is small, cook in batches to avoid overcrowding. Once cooked, remove the chicken and place it on a paper towel-lined plate. This helps drain any excess oil.
In the same skillet, add minced garlic. Sauté it for about 30 seconds until fragrant. Then, pour in the lemon juice. Make sure to scrape up any browned bits from the pan. These bits add great flavor! Return the chicken to the skillet, drizzling the lemon sauce on top. Let it warm for an extra minute. Your Chicken Scallopini is now ready to serve!
Tips & Tricks
Achieving Perfectly Crispy Coating
To make your chicken scallopini crispy, start with dry chicken. Pat the chicken breasts with paper towels. This helps the coating stick better. Use panko breadcrumbs for extra crunch. They provide a lighter, crispier finish. Make sure to coat the chicken evenly. Shake off excess flour and egg before breading. This helps to avoid sogginess. Fry in hot oil; too cool oil can lead to a soft crust.
Flavor Enhancements
Lemon juice brightens up the flavors. Add it to the breadcrumb mix for more zest. You can also use garlic powder in the flour for extra taste. Fresh herbs, like thyme or oregano, can add depth. A sprinkle of red pepper flakes gives a nice kick. If you like, add capers to the lemon sauce for a briny touch. This adds layers of flavor to your dish.
Cooking Techniques for Tender Chicken
Pound the chicken evenly to a 1/2 inch thickness. This ensures it cooks uniformly. Cook on medium heat, so the chicken cooks through without burning. If you notice browning too quickly, lower the heat. Let the chicken rest on a paper towel after cooking. This absorbs extra oil and keeps it tender. Finally, drizzle the lemon sauce right before serving. This keeps the chicken juicy and flavorful.
Pro Tips
- Pound Evenly: Ensure chicken breasts are pounded to an even thickness for consistent cooking and tenderness.
- Season Each Layer: Don’t just season the flour; add salt and pepper to the breadcrumb mixture for enhanced flavor.
- Use Panko Breadcrumbs: For an extra crispy texture, opt for panko breadcrumbs instead of regular ones.
- Rest After Cooking: Let the cooked chicken rest briefly on a paper towel to absorb excess oil, ensuring it stays crispy.
Variations
Ingredient Swaps
You can swap chicken for turkey or pork. Both work well in this dish. If you want a lighter option, try using thinly sliced eggplant. For the flour, whole wheat flour is a great choice for a nutty flavor. You can also use almond flour for gluten-free cooking. Instead of panko, use crushed cornflakes for a different crunch.
Sauce Alternatives
If you want to change the sauce, try adding capers for a briny touch. A splash of white wine can add nice depth. You can also use a creamy sauce with heavy cream or Greek yogurt. For a fun twist, mix in some fresh herbs like basil or thyme. This will brighten up the dish and add great flavor.
Serving Suggestions
Serve chicken scallopini over pasta or rice for a filling meal. You can also pair it with a fresh salad for a lighter option. Roasted vegetables or steamed greens make great sides too. For a touch of elegance, serve with lemon wedges for extra zing. Don't forget to sprinkle fresh parsley on top for color!
Storage Info
Refrigeration Tips
After cooking, let the chicken cool down. Place it in an airtight container. Store it in the fridge for up to three days. When you’re ready to eat, check for any signs of spoilage. Always trust your nose!
Freezing Instructions
To freeze, wrap each chicken piece tightly in plastic wrap. Then, place them in a freezer bag. Chicken scallopini can last up to three months in the freezer. When you want to enjoy it, take it out and let it thaw in the fridge overnight.
Reheating Recommendations
To reheat, use a skillet over medium heat. Add a splash of olive oil or butter. Heat each piece for about 3-4 minutes on each side. This helps keep the chicken crispy. You can also use the microwave, but it may lose some crunch. Enjoy your tasty chicken scallopini!
FAQs
What is Chicken Scallopini?
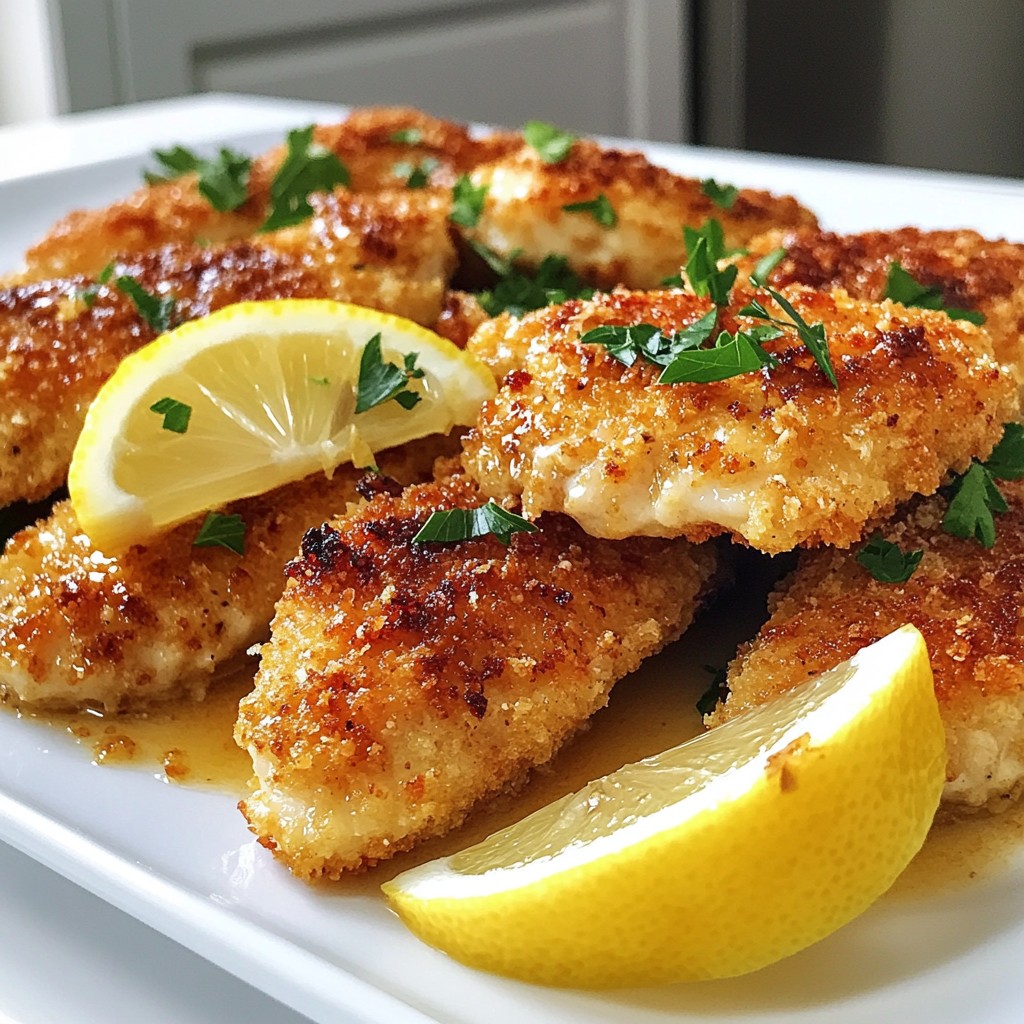
Chicken scallopini is a simple yet tasty dish. It features thin slices of chicken breast that are pounded, breaded, and cooked until golden. The dish often includes a bright lemon sauce that adds flavor. You can serve it with fresh parsley and lemon wedges for a pop of color and taste.
Can I use other proteins?
Yes, you can use other proteins for this dish. Try thinly sliced pork or veal for a different flavor. You could even use turkey or tofu for a twist. Just remember to adjust cooking times to ensure everything cooks through evenly.
How can I make this dish gluten-free?
To make chicken scallopini gluten-free, swap out regular flour and breadcrumbs. Use gluten-free flour and gluten-free breadcrumbs instead. This will keep the crispy texture while making it safe for those with gluten sensitivities. Always check labels to ensure all ingredients are gluten-free.
In this blog post, we explored chicken scallopini, from ingredients to cooking tips. We covered main ingredients, optional garnishes, and common substitutes. Next, we shared step-by-step instructions for preparing and cooking the chicken. I also gave tips for a crispy coating and suggested flavor boosts. Finally, we discussed variations and storage info to keep your dish fresh. Chicken scallopini is tasty and flexible, allowing you to get creative. Enjoy cooking and savor each bite of your delicious meal!