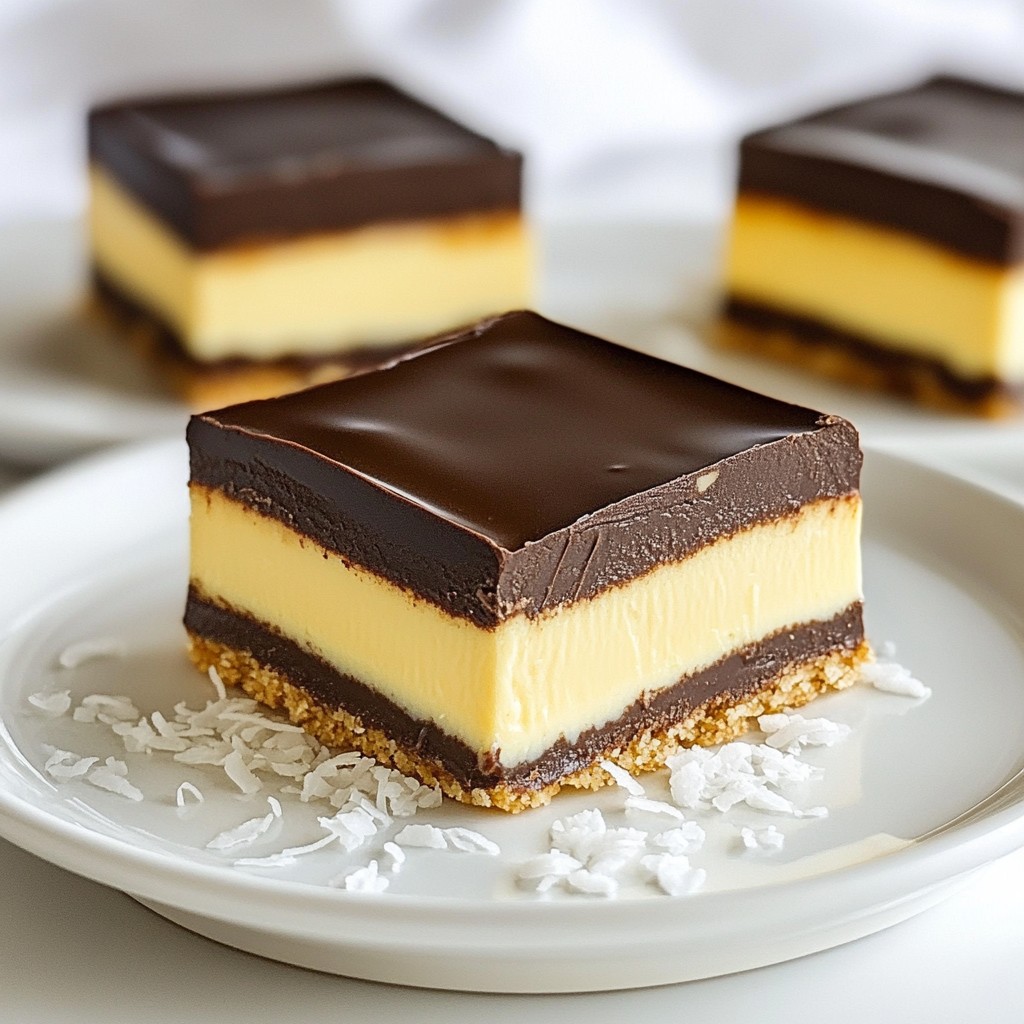
Are you ready to indulge in a sweet, no-bake treat that's easy as pie? Classic No-Bake Nanaimo Bars bring layers of rich flavors with simple ingredients. In this post, I'll show you how to make these delicious bars with just a few steps and minimal effort. Let’s dive into the world of creamy chocolate, crunchy nuts, and delightful coconut, perfect for any dessert lover! Your taste buds will thank you!
Error: Connection error.
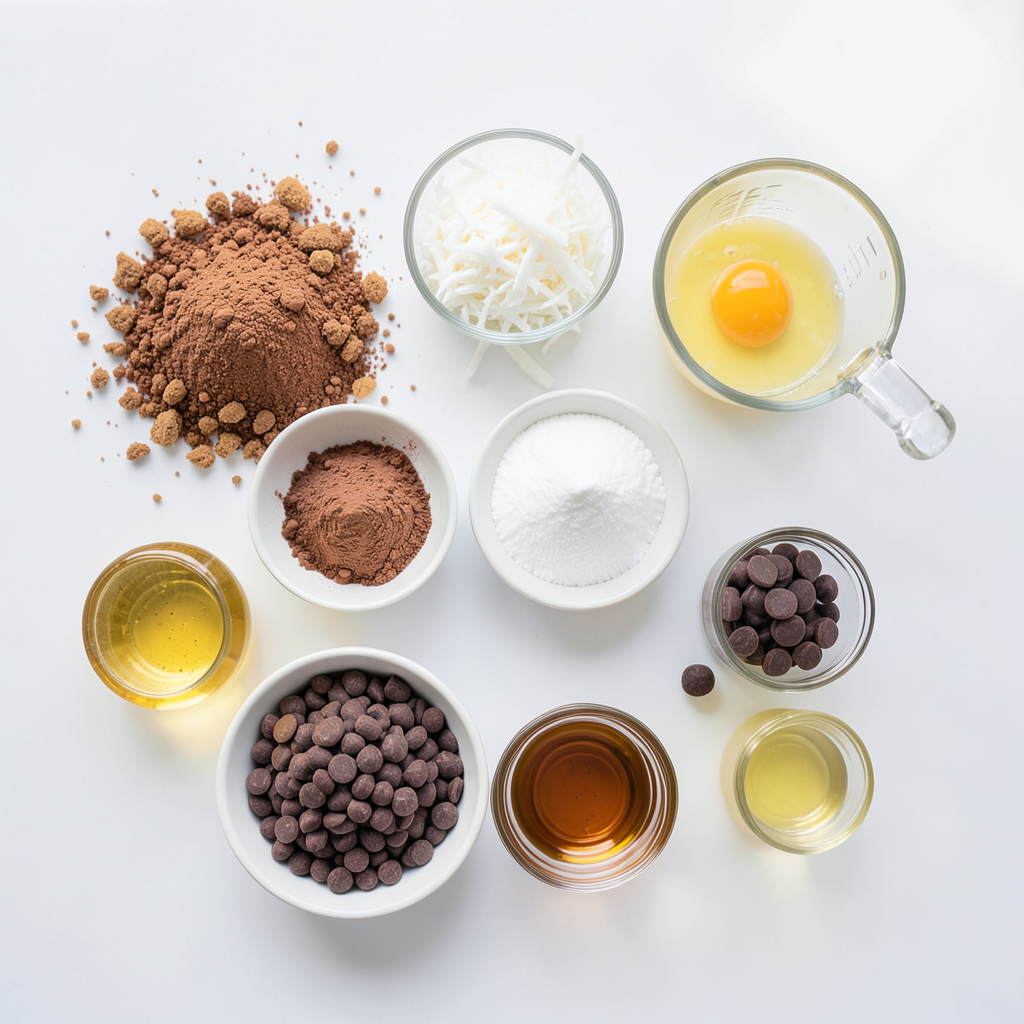
Ingredients
Main Ingredients
- 1 cup graham cracker crumbs
- 1/2 cup unsweetened cocoa powder
- 1/2 cup shredded coconut
- 1/2 cup unsalted butter, softened
- 1 cup powdered sugar
- 1 large egg, beaten
- 2 tablespoons vanilla extract
- 1/2 cup unsweetened cocoa powder (for topping)
- 1 cup semi-sweet chocolate chips
- 1 tablespoon coconut oil
Optional Ingredients
- Add nuts like walnuts or pecans for crunch.
- Use different extracts like almond for a twist.
- Top with crushed candies for a fun texture.
Tools Needed
- Medium mixing bowls for combining ingredients.
- A small saucepan for melting chocolate.
- An 8x8 inch baking dish lined with parchment paper.
- A spatula for smoothing layers.
- A sharp knife for cutting the bars.
Step-by-Step Instructions
Preparation of the Base
To start, gather your dry ingredients. In a medium bowl, mix 1 cup of graham cracker crumbs, 1/2 cup of cocoa powder, and 1/2 cup of shredded coconut. Stir until everything is well combined.
Next, use another bowl to cream together 1/2 cup of softened unsalted butter and 1 cup of powdered sugar. Beat it until it looks light and fluffy. This step makes the bars soft and sweet.
Then, add 1 large beaten egg and 2 tablespoons of vanilla extract to the butter mixture. Mix until it all comes together. Gradually blend your dry mix into the wet mix. Keep stirring until it forms a thick batter.
Assembling the Layers
Now, grab an 8x8 inch baking dish. Line it with parchment paper, leaving some overhang. This overhang helps with easy removal later.
Press the mixture evenly into the bottom of the dish. Smooth the top with a spatula to make it nice and flat. Take your time here—it sets the stage for the layers to come.
Topping with Chocolate
For the topping, melt 1 cup of semi-sweet chocolate chips and 1 tablespoon of coconut oil together. Use a small saucepan over low heat. Stir continuously until smooth.
Once melted, pour the chocolate over your graham cracker layer. Spread it evenly across the top.
After that, refrigerate the bars for 2 hours. This will let the chocolate set and the flavors meld. When ready, lift the bars out of the pan using the parchment paper overhang. Cut them into squares or bars for serving.
Tips & Tricks
Achieving the Perfect Texture
To make sure your Nanaimo bars hold together, follow these tips:
- Use fresh ingredients: Old butter or stale graham crackers can ruin your texture.
- Cream butter and sugar well: This step adds air, making the bars light and fluffy.
- Press firmly: When layering the base, press the mixture down firmly. This helps the bars stay intact when you cut them.
Flavor Enhancements
Want to boost the taste of your Nanaimo bars? Here are some ideas:
- Try different extracts: Swap vanilla for almond or mint extract for a fun twist.
- Add a pinch of salt: A small amount of sea salt can enhance the chocolate flavor.
- Mix in some nuts: Chopped walnuts or pecans can add crunch and depth.
Serving Suggestions
Presenting your Nanaimo bars well makes them more inviting. Here are some tips:
- Use a decorative plate: Arrange the bars neatly on a colorful plate.
- Garnish with coconut: Sprinkling extra shredded coconut on top adds flair.
- Pair with coffee: Serve with a hot cup of coffee or tea for a delightful treat.
Error: Connection error.
Variations
Different Flavor Profiles
You can change the flavor of Nanaimo bars with some simple tweaks. Try adding different extracts for a unique taste. Instead of vanilla, you might use almond or coconut extract. Both can add a fun twist to the bars. You can also top the chocolate layer with crushed nuts or sprinkles. This adds flavor and texture.
Dietary Modifications
For those who need gluten-free or vegan options, there are easy swaps. Use gluten-free graham crackers or almond flour instead of regular crumbs. For a vegan version, replace the egg with a flaxseed mixture. Mix one tablespoon of flaxseed meal with three tablespoons of water. Let it sit for five minutes to thicken. You can also use vegan butter and dairy-free chocolate chips.
Creative Twists on Classic Recipe
Adding layers can make your Nanaimo bars even more exciting. Consider a layer of peanut butter or a fruit jam for a fruity twist. You could also mix in some chopped nuts or dried fruit into the base layer. This can give a nice surprise and extra taste with each bite. Be creative and make the bars your own!
Storage Info
Best Practices for Storage
To keep your Nanaimo bars fresh, store them in an airtight container. Place parchment paper between layers to avoid sticking. Keep them in the fridge for best results. This helps the chocolate and base stay firm. If you plan to enjoy them later, wrap them tightly in plastic wrap before placing them in the container.
Freezing Instructions
If you want to save some bars for later, freezing is a great option. Cut the bars into squares and wrap each one in plastic wrap. Place the wrapped bars in a freezer-safe bag or container. This keeps them fresh for up to three months. When you're ready to eat them, let them thaw in the fridge overnight.
Shelf Life
When stored properly, Nanaimo bars can last up to a week in the fridge. They stay fresh and tasty this way. If you freeze them, you can enjoy them for months without losing flavor. Just remember, the sooner you eat them, the better they will taste!
FAQs
Can I make Nanaimo bars vegan?
Yes, you can make Nanaimo bars vegan. To do this, swap the egg for a flax egg. Just mix one tablespoon of ground flaxseed with three tablespoons of water. Let it sit for five minutes to thicken. Use vegan butter instead of regular butter. For the chocolate layer, choose dairy-free chocolate chips. These changes keep the bars tasty and plant-based.
How long do these bars take to set?
The bars need about two hours to set in the fridge. This time helps the chocolate harden and the layers firm up. If you want to be sure they are ready, let them sit longer. The longer they chill, the better they hold together when you cut them.
Can I use milk chocolate instead of semi-sweet?
Yes, you can use milk chocolate instead of semi-sweet. It will make the bars sweeter and creamier. If you like a richer flavor, semi-sweet chocolate is still the best choice. You can even mix both types for a fun twist. Just melt the chocolate as usual and pour it over the base layer.
You now have a comprehensive guide to making delicious Nanaimo bars. We covered the key ingredients and tools you need, plus easy step-by-step instructions. I shared tips and tricks for the perfect texture and flavor enhancements. You can explore variations to suit your taste and dietary needs. Lastly, you learned how to store your bars for freshness. With this knowledge, you are ready to create a tasty treat that everyone will love. Enjoy baking and sharing your very own Nanaimo bars!