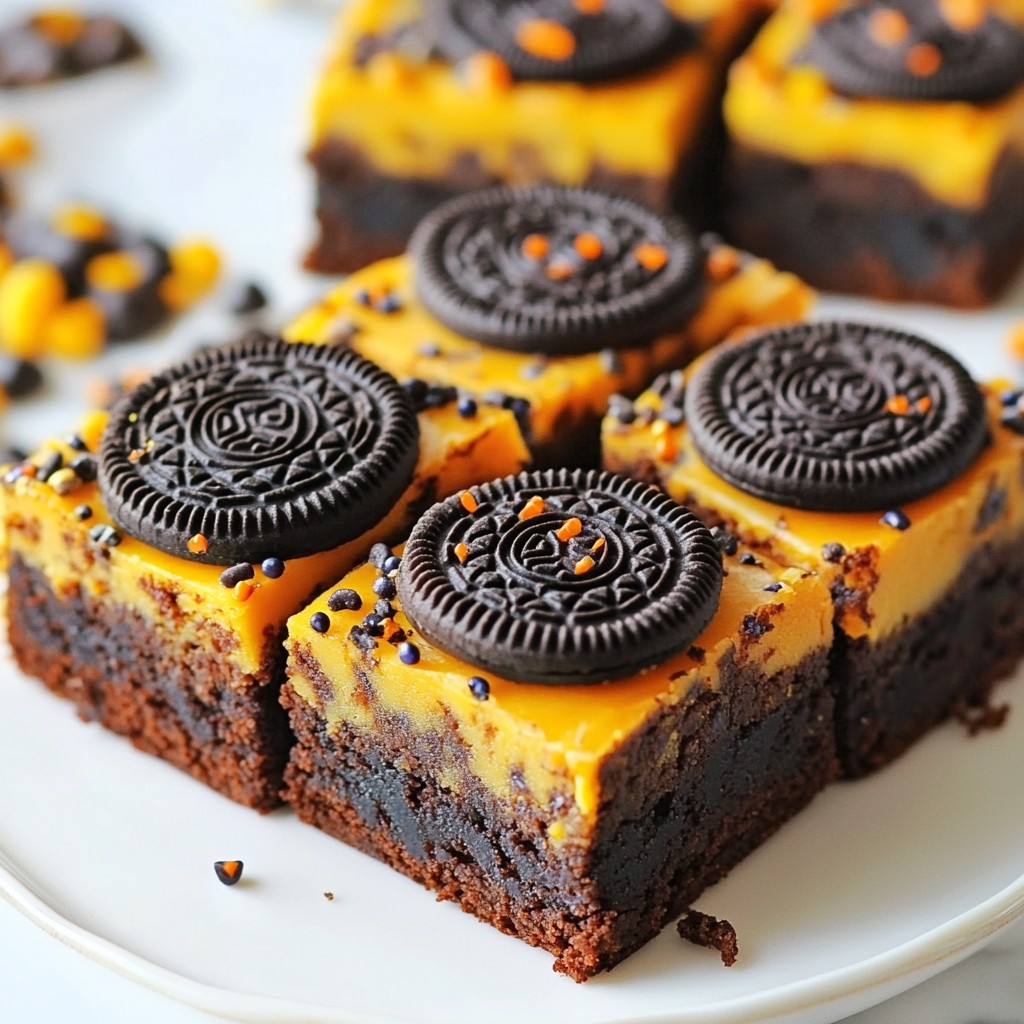
Get ready for a festive treat that’s sure to impress! Halloween Oreo Brownies are a delightful blend of rich chocolate and spooky fun. I’ll guide you through each step, from mixing the ingredients to baking the perfect batch. Plus, I’ll share tips for making them extra special. Whether for a party or a cozy night in, these brownies will be a hit. Let’s dive in and whip up some magic!
Why I Love This Recipe
- Deliciously Chocolatey: These brownies are rich and fudgy, with a deep chocolate flavor that every chocolate lover will adore.
- Fun Halloween Twist: The addition of Halloween-themed Oreos adds a festive touch that makes these brownies perfect for the spooky season.
- Easy to Make: With simple ingredients and straightforward steps, these brownies come together quickly, making them a great last-minute treat.
- Customizable: You can easily adapt this recipe with different mix-ins or toppings, allowing for creativity in every batch.
Ingredients
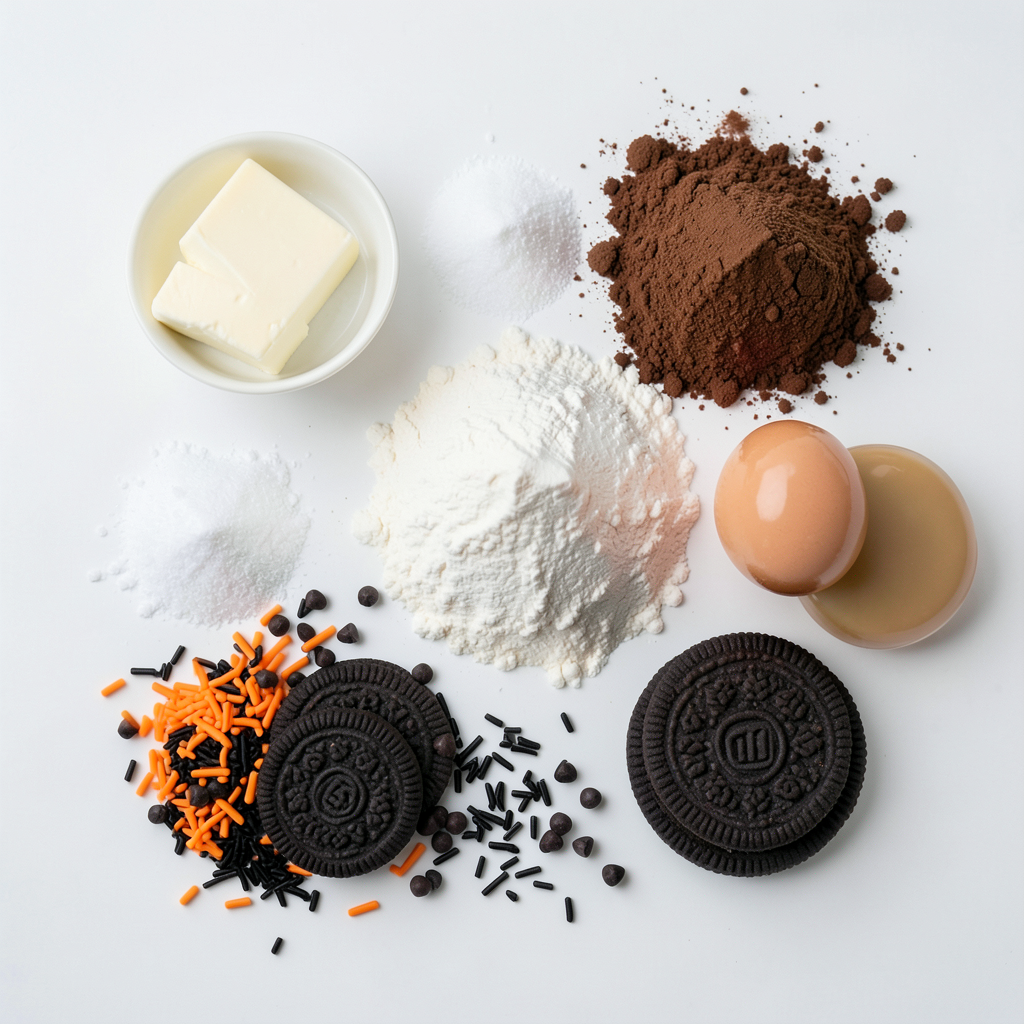
List of Ingredients
- 1 cup unsalted butter (2 sticks)
- 1 cup granulated sugar
- 1 cup packed brown sugar
- 4 large eggs
- 1 teaspoon vanilla extract
- 1 cup all-purpose flour
- 1 cup unsweetened cocoa powder
- 1 teaspoon baking powder
- 1/2 teaspoon salt
- 10 Halloween-themed Oreo cookies (or regular ones, separated into halves)
- 1/2 cup chocolate chips (optional)
- 1/2 cup orange and black sprinkles (for decoration)
Baking these Halloween Oreo brownies starts with the right ingredients. First, I use unsalted butter for a richer taste. You’ll need one cup, or two sticks, which I melt slowly. Then, I mix in one cup of granulated sugar with one cup of brown sugar. This blend gives the brownies a great balance of sweetness.
Next, I add four large eggs to the mix. Eggs give the brownies their structure and help them rise. I also add one teaspoon of vanilla extract for flavor. After mixing the wet ingredients, I sift in one cup of all-purpose flour, one cup of cocoa powder, one teaspoon of baking powder, and half a teaspoon of salt. This step is key to making the brownies light and fluffy.
Now, let’s talk about the fun part! I always include ten Halloween-themed Oreo cookies. You can use regular Oreos if you can't find the Halloween ones. I separate the cookies into halves, which I fold into the brownie batter. For an extra treat, I sometimes add half a cup of chocolate chips. Finally, I sprinkle the top with orange and black sprinkles for a festive finish.
Step-by-Step Instructions
Preparation Steps
1. Preheat your oven to 350°F (175°C). Grease a 9x13 inch baking pan or line it with parchment paper. This makes for easy removal later.
2. In a medium saucepan, melt 1 cup of unsalted butter over low heat. Once it melts, take it off the heat. Let it cool for a few minutes.
3. In a large bowl, whisk together 1 cup of granulated sugar, 1 cup of brown sugar, 4 large eggs, and 1 teaspoon of vanilla extract. Mix until it’s creamy and well combined.
4. Gradually pour in the melted butter. Whisk continuously as you add it. This helps to mix everything together smoothly.
Combining Dry Ingredients
1. In another bowl, sift together 1 cup of all-purpose flour, 1 cup of unsweetened cocoa powder, 1 teaspoon of baking powder, and 1/2 teaspoon of salt. Sifting helps avoid lumps.
2. Slowly add the dry mix to the wet mix. Whisk gently until just combined. Be careful not to overmix; this keeps the brownies tender.
Completing the Batter
1. Gently fold in 1/2 cup of chocolate chips and half of the Halloween Oreo cookie halves. The cookies add fun and flavor.
2. Pour the batter into your prepared baking pan. Spread it evenly across the pan.
3. Press the remaining Oreo halves into the top of the batter. This adds a spooky touch and more flavor.
Baking the Brownies
1. Bake in your preheated oven for 25-30 minutes. Check for doneness by inserting a toothpick in the center. It should come out with a few moist crumbs.
2. After baking, let the brownies cool in the pan for 10-15 minutes. Then, transfer them to a wire rack to cool completely. This helps them set nicely for cutting.
Tips & Tricks
Perfecting Your Brownies
To make great brownies, watch out for common mistakes. Overmixing is one of them. Mix just until the dry and wet ingredients blend. This keeps your brownies fudgy.
You can also control the texture. For fudgy brownies, use less flour. For cake-like brownies, add an extra egg. This change will create a lighter texture.
Decorating Ideas
Halloween is fun for decorations! Use orange and black sprinkles to add color. You can also place small candy pumpkins on top.
For serving, place the brownies on a spooky platter. Add plastic spiders or chocolate skulls around the brownies. This makes a festive display everyone will love.
Pro Tips
- Use Room Temperature Ingredients: Ensuring your eggs and butter are at room temperature will help create a smoother batter and result in fudgier brownies.
- Don’t Overmix: When combining the wet and dry ingredients, mix just until combined. Overmixing can lead to tough brownies.
- Check for Doneness: Instead of relying solely on baking time, check your brownies a few minutes early by inserting a toothpick; it should come out with a few moist crumbs.
- Cool Before Cutting: Allowing the brownies to cool completely before cutting will help them set and make for cleaner edges and easier serving.
Variations
Different Flavor Options
You can make these brownies even more fun by adding different flavors. Here are a few ideas:
- Nuts: Chopped walnuts or pecans add crunch and richness. Simply fold in 1/2 cup of your favorite nuts with the chocolate chips and Oreo cookies.
- Other Cookies: Swap Halloween Oreos for different cookies. Try peppermint or peanut butter cookies for a new twist. Just break them into smaller pieces and mix them in.
- Mint Version: Add 1/2 teaspoon of mint extract to the wet mixture. This gives the brownies a fresh mint flavor, perfect for a holiday party.
- Peanut Butter Version: Mix in 1/2 cup of creamy peanut butter into the batter. This creates a rich, nutty flavor that pairs well with the chocolate.
Theme Adaptations
Feel free to adapt these brownies for any holiday or occasion! Here are some fun ideas:
- Other Holidays: Use red and green sprinkles for Christmas. For Valentine’s Day, swap in pink and red. Each holiday can have its own tasty twist!
- Sprinkle Colors: Change up the sprinkles based on themes. For Easter, try pastel colors. For Fourth of July, use red, white, and blue. This small change adds a festive touch.
- Seasonal Flavors: In the fall, add a pinch of cinnamon or nutmeg for a cozy flavor. In summer, mix in some fresh fruit like raspberries for a bright taste.
These variations can make your Halloween Oreo brownies unique. Enjoy experimenting with different flavors and themes!
Storage Info
Storing Brownies
To keep your Halloween Oreo brownies fresh, store them in an airtight container. This helps prevent them from drying out. You can keep them at room temperature for up to four days. If you need to store them longer, freezing is a great option.
To freeze brownies, first, let them cool completely. Then, cut them into squares. Wrap each square in plastic wrap. Place the wrapped brownies in a freezer bag or container. They can last up to three months in the freezer.
Reheating Tips
Warming up these brownies is easy. You can use a microwave or an oven. If using a microwave, heat them for about 10-15 seconds. Check if they are warm enough.
To reheat in the oven, preheat it to 350°F (175°C). Place the brownies on a baking sheet. Cover them with foil to keep them moist. Heat for about 5-10 minutes, depending on your oven. This keeps your brownies soft and delicious.
FAQs
Common Questions
How can I make my brownies more chocolatey? To boost the chocolate flavor, add more cocoa powder. You can also use dark chocolate chips instead of regular ones. For extra richness, try adding melted chocolate to the batter.
Can I substitute ingredients for dietary restrictions? Yes, you can use vegan butter and flax eggs for a dairy-free option. Gluten-free flour can replace all-purpose flour. Check labels on cookies to find ones that fit your diet.
How long do Halloween Oreo brownies last? These brownies stay fresh for up to five days at room temperature. If you refrigerate them, they can last up to a week. To keep them fresh, store them in an airtight container.
Troubleshooting
What to do if my brownies come out dry? If your brownies are dry, try reducing the baking time next time. Also, make sure to measure your ingredients accurately. Adding a bit more butter can help keep them moist.
Reasons why brownies may not rise or set properly Brownies may not rise if you overmix the batter. Using old baking powder can also affect rise. Always check the expiration date before using it. Make sure your oven is at the right temperature, too.
This blog post covered everything you need to make delicious Halloween Oreo brownies. We explored the key ingredients, simple steps, and helpful tips to perfect your treat. I highlighted fun variations and how to store them for freshness. If you follow these steps, your brownies will impress everyone. Enjoy experimenting with different flavors and decorations. Baking should be fun, so don’t worry if things don’t go as planned. With practice, you will create the brownies of your dreams. Happy baking!