Mini Lemon Cheesecakes Delightful and Simple Treat

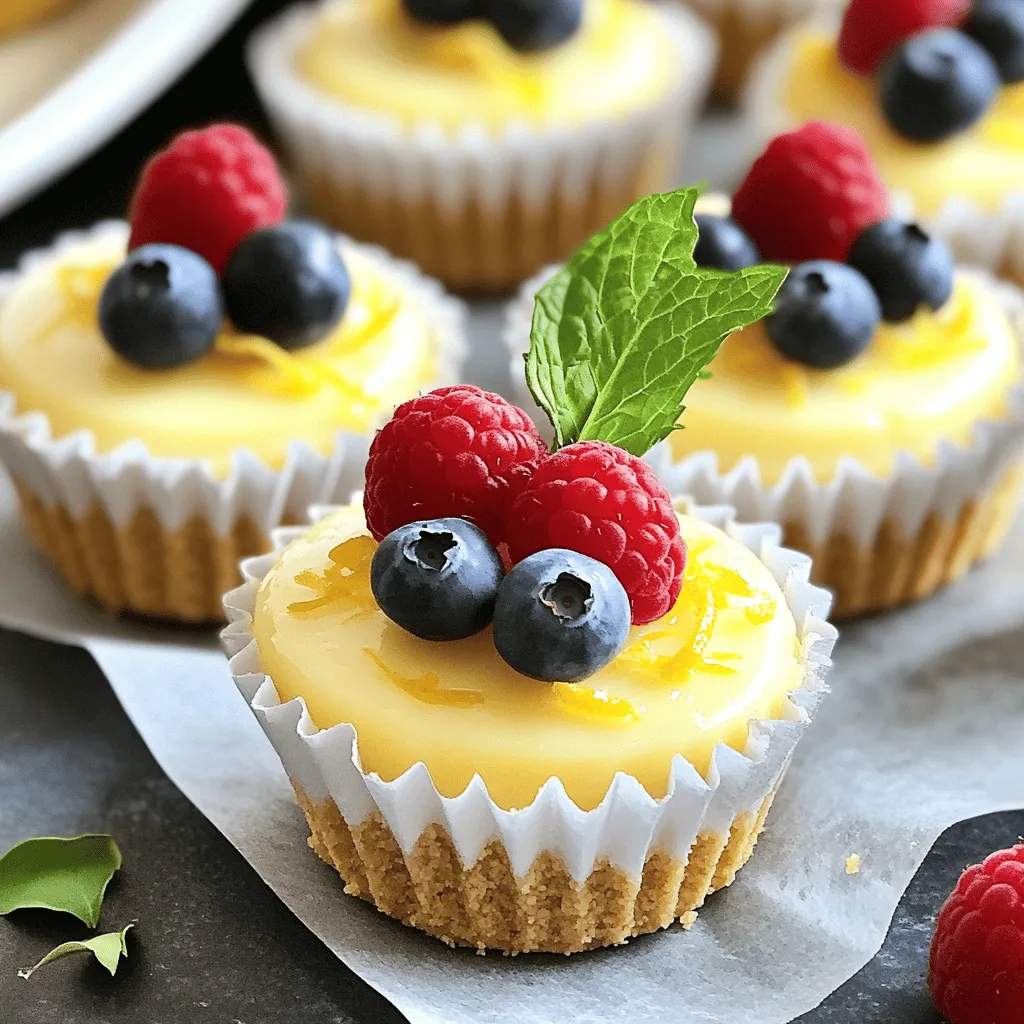
Are you ready to make a treat that’s both zesty and easy? Mini lemon cheesecakes are the perfect blend of sweet and tart, bringing sunshine to your table. In this article, I’ll guide you through simple steps to whip up these delightful treats. You don’t need fancy tools or skills—just a love for lemon and a few basic ingredients. Let’s dive into this refreshing recipe that will impress your friends and family!

- 16 oz cream cheese, softened - 1 cup graham cracker crumbs - 1/4 cup fresh lemon juice These three main ingredients create the base of our mini lemon cheesecakes. Cream cheese gives them their rich and creamy texture. Graham cracker crumbs form a delicious crust, while fresh lemon juice adds a bright, zesty flavor. - Fresh berries - Mint leaves These optional ingredients are fun to add. Fresh berries, like strawberries or blueberries, provide color and sweetness. Mint leaves add a lovely touch and fresh taste. You can use them to top your cheesecakes for an extra pop. - Muffin tin - Mixing bowls - Electric mixer You'll need a muffin tin to shape the mini cheesecakes. Mixing bowls help you combine the ingredients easily. An electric mixer makes it simple to beat the cream cheese until smooth. Make sure you have all these tools ready before you start! First, preheat your oven to 325°F (160°C). Line a muffin tin with paper liners. In a small bowl, mix together: - 1 cup graham cracker crumbs - 1/4 cup unsalted butter, melted - 2 tablespoons sugar Stir until the mixture looks like wet sand. Next, take about 1 tablespoon of this mix. Spoon it into each muffin liner. Press down firmly to form a nice crust. In a large bowl, beat 16 oz of softened cream cheese with 1/2 cup sugar. Mix until it’s smooth and creamy. Now, add in 2 large eggs, one at a time. Make sure to mix well after each egg. Then, stir in: - 1/4 cup fresh lemon juice - Zest of 1 lemon - 1 teaspoon vanilla extract Mix everything until it is fully combined. Pour the cheesecake batter into the crusts. Fill each liner about 3/4 full. Bake for 18 to 20 minutes. Check if the edges are set. The centers should jiggle a bit but not be wet. After baking, let the cheesecakes cool for about 30 minutes at room temperature. Then, chill them in the fridge for at least 2 hours. This helps them firm up. Once chilled, carefully remove the cheesecakes from the muffin tin. Enjoy your mini lemon cheesecakes! To get the best texture, use room temperature ingredients. This helps the cream cheese mix well. Cold cream cheese can make the batter lumpy. Let your eggs sit out for a bit, too. They blend in better when warm. For cooling, let the cheesecakes sit at room temperature first. After 30 minutes, move them to the fridge. Chilling them for at least two hours makes them firm and easier to remove from the liners. Garnishing your mini cheesecakes can make them look fancy. Use fresh berries like raspberries or blueberries on top. Add a sprig of mint for color and freshness. You can also drizzle some honey or a lemon glaze over them for extra flair. Serve the cheesecakes on a nice platter. This makes them more appealing. If you want, pair them with a scoop of vanilla ice cream for a special treat. One big mistake is overmixing the batter. Mix just until smooth to prevent cracks. Overmixing adds too much air, which can cause them to puff up and crack while baking. Another common error is not chilling long enough. If you skip the chill time, they won’t set properly. Make sure to let them cool completely before serving for the best results. {{image_2}} You can mix things up by adding different fruit juices. Imagine the bright taste of lime or the sweetness of strawberry. Each flavor adds a new twist to your mini lemon cheesecakes. You can also try incorporating chocolate. Add melted chocolate to the batter for a rich, creamy treat. Just remember that chocolate pairs well with a hint of lemon! If you need gluten-free options, use gluten-free graham crackers. They work just as well and taste great! For sugar-free adaptations, swap regular sugar for a sugar substitute. This way, you can enjoy a delicious cheesecake without the guilt. Always check the labels to ensure they fit your diet. For holiday-themed versions, think about adding spices like cinnamon or nutmeg. These spices can give your mini cheesecakes a warm, festive flavor. In summer, use fresh fruits like peaches or berries for a fruity twist. Top your cheesecakes with seasonal fruits for a bright, colorful look. These changes make each batch special and fun! To keep your mini lemon cheesecakes fresh, store them in an airtight container. Use a container that fits the cheesecakes snugly to prevent them from moving around. If you want to keep them cool, place the container in the fridge. This helps maintain their creamy texture and zesty flavor. You can freeze mini cheesecakes for later enjoyment. First, let them cool completely after baking. Then, wrap each cheesecake in plastic wrap. Place the wrapped cheesecakes in a freezer bag or airtight container. To thaw, leave them in the fridge overnight. This keeps them from getting soggy. In the fridge, mini lemon cheesecakes last for about 5 days. You may notice they start to lose their texture after a few days. Check for any signs of spoilage. If they smell off or have visible mold, it's best to toss them. Always prioritize freshness for the best taste! Yes, you can make mini cheesecakes a day or two ahead. Just store them in the fridge. It's a great way to save time. Look for the edges to be set. The centers should jiggle slightly but not be wet. This means they are ready to cool. Absolutely! You can use Oreo cookies or almond flour for a crust. Adjust your butter amount based on your choice for the best results. You can use Greek yogurt or silken tofu for a lighter option. They will change the taste slightly but will still be creamy. Yes, they freeze well. Place them in an airtight container. They can last for up to two months in the freezer. You learned how to make mini lemon cheesecakes, from choosing ingredients to storing them. Remember to use the right tools and techniques for great results. Customizing flavors or dietary options is easy, so have fun! Follow those tips for the perfect texture and presentation. Enjoy sharing these treats with friends and family. Now it's time to get baking!

Ingredients

Primary Ingredients

– 16 oz cream cheese, softened

– 1 cup graham cracker crumbs

– 1/4 cup fresh lemon juice

These three main ingredients create the base of our mini lemon cheesecakes. Cream cheese gives them their rich and creamy texture. Graham cracker crumbs form a delicious crust, while fresh lemon juice adds a bright, zesty flavor.

Optional Ingredients

– Fresh berries

– Mint leaves

These optional ingredients are fun to add. Fresh berries, like strawberries or blueberries, provide color and sweetness. Mint leaves add a lovely touch and fresh taste. You can use them to top your cheesecakes for an extra pop.

Equipment Needed

– Muffin tin

– Mixing bowls

– Electric mixer

You’ll need a muffin tin to shape the mini cheesecakes. Mixing bowls help you combine the ingredients easily. An electric mixer makes it simple to beat the cream cheese until smooth. Make sure you have all these tools ready before you start!

Step-by-Step Instructions

Preparing the Crust

First, preheat your oven to 325°F (160°C). Line a muffin tin with paper liners. In a small bowl, mix together:

– 1 cup graham cracker crumbs

– 1/4 cup unsalted butter, melted

– 2 tablespoons sugar

Stir until the mixture looks like wet sand. Next, take about 1 tablespoon of this mix. Spoon it into each muffin liner. Press down firmly to form a nice crust.

Making the Cheesecake Filling

In a large bowl, beat 16 oz of softened cream cheese with 1/2 cup sugar. Mix until it’s smooth and creamy. Now, add in 2 large eggs, one at a time. Make sure to mix well after each egg. Then, stir in:

– 1/4 cup fresh lemon juice

– Zest of 1 lemon

– 1 teaspoon vanilla extract

Mix everything until it is fully combined.

Baking and Cooling

Pour the cheesecake batter into the crusts. Fill each liner about 3/4 full. Bake for 18 to 20 minutes. Check if the edges are set. The centers should jiggle a bit but not be wet. After baking, let the cheesecakes cool for about 30 minutes at room temperature. Then, chill them in the fridge for at least 2 hours. This helps them firm up. Once chilled, carefully remove the cheesecakes from the muffin tin. Enjoy your mini lemon cheesecakes!

Tips & Tricks

Perfecting the Cheesecake Texture

To get the best texture, use room temperature ingredients. This helps the cream cheese mix well. Cold cream cheese can make the batter lumpy. Let your eggs sit out for a bit, too. They blend in better when warm.

For cooling, let the cheesecakes sit at room temperature first. After 30 minutes, move them to the fridge. Chilling them for at least two hours makes them firm and easier to remove from the liners.

Presentation Enhancements

Garnishing your mini cheesecakes can make them look fancy. Use fresh berries like raspberries or blueberries on top. Add a sprig of mint for color and freshness. You can also drizzle some honey or a lemon glaze over them for extra flair.

Serve the cheesecakes on a nice platter. This makes them more appealing. If you want, pair them with a scoop of vanilla ice cream for a special treat.

Common Mistakes to Avoid

One big mistake is overmixing the batter. Mix just until smooth to prevent cracks. Overmixing adds too much air, which can cause them to puff up and crack while baking.

Another common error is not chilling long enough. If you skip the chill time, they won’t set properly. Make sure to let them cool completely before serving for the best results.

Variations

Flavor Variations

You can mix things up by adding different fruit juices. Imagine the bright taste of lime or the sweetness of strawberry. Each flavor adds a new twist to your mini lemon cheesecakes. You can also try incorporating chocolate. Add melted chocolate to the batter for a rich, creamy treat. Just remember that chocolate pairs well with a hint of lemon!

Dietary Adjustments

If you need gluten-free options, use gluten-free graham crackers. They work just as well and taste great! For sugar-free adaptations, swap regular sugar for a sugar substitute. This way, you can enjoy a delicious cheesecake without the guilt. Always check the labels to ensure they fit your diet.

Seasonal Twists

For holiday-themed versions, think about adding spices like cinnamon or nutmeg. These spices can give your mini cheesecakes a warm, festive flavor. In summer, use fresh fruits like peaches or berries for a fruity twist. Top your cheesecakes with seasonal fruits for a bright, colorful look. These changes make each batch special and fun!

Storage Info

Best Practices for Storage

To keep your mini lemon cheesecakes fresh, store them in an airtight container. Use a container that fits the cheesecakes snugly to prevent them from moving around. If you want to keep them cool, place the container in the fridge. This helps maintain their creamy texture and zesty flavor.

Freezing Instructions

You can freeze mini cheesecakes for later enjoyment. First, let them cool completely after baking. Then, wrap each cheesecake in plastic wrap. Place the wrapped cheesecakes in a freezer bag or airtight container. To thaw, leave them in the fridge overnight. This keeps them from getting soggy.

Shelf Life

In the fridge, mini lemon cheesecakes last for about 5 days. You may notice they start to lose their texture after a few days. Check for any signs of spoilage. If they smell off or have visible mold, it’s best to toss them. Always prioritize freshness for the best taste!

FAQs

Can I make these mini cheesecakes ahead of time?

Yes, you can make mini cheesecakes a day or two ahead. Just store them in the fridge. It’s a great way to save time.

How do I know when the cheesecakes are done baking?

Look for the edges to be set. The centers should jiggle slightly but not be wet. This means they are ready to cool.

Can I use a different type of crust?

Absolutely! You can use Oreo cookies or almond flour for a crust. Adjust your butter amount based on your choice for the best results.

What can I substitute for cream cheese?

You can use Greek yogurt or silken tofu for a lighter option. They will change the taste slightly but will still be creamy.

Are mini lemon cheesecakes suitable for freezing?

Yes, they freeze well. Place them in an airtight container. They can last for up to two months in the freezer.

You learned how to make mini lemon cheesecakes, from choosing ingredients to storing them. Remember to use the right tools and techniques for great results. Customizing flavors or dietary options is easy, so have fun! Follow those tips for the perfect texture and presentation. Enjoy sharing these treats with friends and family. Now it’s time to get baking!

- 16 oz cream cheese, softened - 1 cup graham cracker crumbs - 1/4 cup fresh lemon juice These three main ingredients create the base of our mini lemon cheesecakes. Cream cheese gives them their rich and creamy texture. Graham cracker crumbs form a delicious crust, while fresh lemon juice adds a bright, zesty flavor. - Fresh berries - Mint leaves These optional ingredients are fun to add. Fresh berries, like strawberries or blueberries, provide color and sweetness. Mint leaves add a lovely touch and fresh taste. You can use them to top your cheesecakes for an extra pop. - Muffin tin - Mixing bowls - Electric mixer You'll need a muffin tin to shape the mini cheesecakes. Mixing bowls help you combine the ingredients easily. An electric mixer makes it simple to beat the cream cheese until smooth. Make sure you have all these tools ready before you start! First, preheat your oven to 325°F (160°C). Line a muffin tin with paper liners. In a small bowl, mix together: - 1 cup graham cracker crumbs - 1/4 cup unsalted butter, melted - 2 tablespoons sugar Stir until the mixture looks like wet sand. Next, take about 1 tablespoon of this mix. Spoon it into each muffin liner. Press down firmly to form a nice crust. In a large bowl, beat 16 oz of softened cream cheese with 1/2 cup sugar. Mix until it’s smooth and creamy. Now, add in 2 large eggs, one at a time. Make sure to mix well after each egg. Then, stir in: - 1/4 cup fresh lemon juice - Zest of 1 lemon - 1 teaspoon vanilla extract Mix everything until it is fully combined. Pour the cheesecake batter into the crusts. Fill each liner about 3/4 full. Bake for 18 to 20 minutes. Check if the edges are set. The centers should jiggle a bit but not be wet. After baking, let the cheesecakes cool for about 30 minutes at room temperature. Then, chill them in the fridge for at least 2 hours. This helps them firm up. Once chilled, carefully remove the cheesecakes from the muffin tin. Enjoy your mini lemon cheesecakes! To get the best texture, use room temperature ingredients. This helps the cream cheese mix well. Cold cream cheese can make the batter lumpy. Let your eggs sit out for a bit, too. They blend in better when warm. For cooling, let the cheesecakes sit at room temperature first. After 30 minutes, move them to the fridge. Chilling them for at least two hours makes them firm and easier to remove from the liners. Garnishing your mini cheesecakes can make them look fancy. Use fresh berries like raspberries or blueberries on top. Add a sprig of mint for color and freshness. You can also drizzle some honey or a lemon glaze over them for extra flair. Serve the cheesecakes on a nice platter. This makes them more appealing. If you want, pair them with a scoop of vanilla ice cream for a special treat. One big mistake is overmixing the batter. Mix just until smooth to prevent cracks. Overmixing adds too much air, which can cause them to puff up and crack while baking. Another common error is not chilling long enough. If you skip the chill time, they won’t set properly. Make sure to let them cool completely before serving for the best results. {{image_2}} You can mix things up by adding different fruit juices. Imagine the bright taste of lime or the sweetness of strawberry. Each flavor adds a new twist to your mini lemon cheesecakes. You can also try incorporating chocolate. Add melted chocolate to the batter for a rich, creamy treat. Just remember that chocolate pairs well with a hint of lemon! If you need gluten-free options, use gluten-free graham crackers. They work just as well and taste great! For sugar-free adaptations, swap regular sugar for a sugar substitute. This way, you can enjoy a delicious cheesecake without the guilt. Always check the labels to ensure they fit your diet. For holiday-themed versions, think about adding spices like cinnamon or nutmeg. These spices can give your mini cheesecakes a warm, festive flavor. In summer, use fresh fruits like peaches or berries for a fruity twist. Top your cheesecakes with seasonal fruits for a bright, colorful look. These changes make each batch special and fun! To keep your mini lemon cheesecakes fresh, store them in an airtight container. Use a container that fits the cheesecakes snugly to prevent them from moving around. If you want to keep them cool, place the container in the fridge. This helps maintain their creamy texture and zesty flavor. You can freeze mini cheesecakes for later enjoyment. First, let them cool completely after baking. Then, wrap each cheesecake in plastic wrap. Place the wrapped cheesecakes in a freezer bag or airtight container. To thaw, leave them in the fridge overnight. This keeps them from getting soggy. In the fridge, mini lemon cheesecakes last for about 5 days. You may notice they start to lose their texture after a few days. Check for any signs of spoilage. If they smell off or have visible mold, it's best to toss them. Always prioritize freshness for the best taste! Yes, you can make mini cheesecakes a day or two ahead. Just store them in the fridge. It's a great way to save time. Look for the edges to be set. The centers should jiggle slightly but not be wet. This means they are ready to cool. Absolutely! You can use Oreo cookies or almond flour for a crust. Adjust your butter amount based on your choice for the best results. You can use Greek yogurt or silken tofu for a lighter option. They will change the taste slightly but will still be creamy. Yes, they freeze well. Place them in an airtight container. They can last for up to two months in the freezer. You learned how to make mini lemon cheesecakes, from choosing ingredients to storing them. Remember to use the right tools and techniques for great results. Customizing flavors or dietary options is easy, so have fun! Follow those tips for the perfect texture and presentation. Enjoy sharing these treats with friends and family. Now it's time to get baking!

Mini Lemon Cheesecakes

Indulge in the refreshing taste of Zesty Mini Lemon Cheesecakes! These delightful treats combine a buttery graham cracker crust with a creamy, lemon-infused filling that's sure to impress. Perfect for parties or a sweet snack at home, they are easy to make and just require a little chill time. Ready to whip up something delicious? Click through for the full recipe and elevate your dessert game today!

Ingredients
  

1 cup graham cracker crumbs

1/4 cup unsalted butter, melted

2 tablespoons sugar

16 oz cream cheese, softened

1/2 cup sugar

2 large eggs

1/4 cup fresh lemon juice

Zest of 1 lemon

1 teaspoon vanilla extract

Fresh berries and mint leaves for garnish (optional)

Instructions
 

Preheat your oven to 325°F (160°C) and line a muffin tin with paper liners.

    In a small bowl, combine the graham cracker crumbs, melted butter, and 2 tablespoons of sugar. Mix until the crumbs resemble wet sand.

      Spoon about 1 tablespoon of the graham cracker mixture into the bottom of each liner and press down firmly to create a crust.

        In a large mixing bowl, beat the softened cream cheese with 1/2 cup of sugar until smooth and creamy.

          Add in the eggs, one at a time, mixing well after each addition.

            Stir in the fresh lemon juice, lemon zest, and vanilla extract until fully incorporated.

              Pour the cheesecake batter evenly over the prepared crusts in the muffin tin. Fill each liner about 3/4 full.

                Bake for 18-20 minutes, or until the edges are set and the centers slightly jiggle but are not wet.

                  Remove from the oven and allow the cheesecakes to cool at room temperature for about 30 minutes, then chill in the refrigerator for at least 2 hours to firm up.

                    Once chilled, carefully remove the cheesecakes from the muffin tin.

                      Prep Time: 15 min | Total Time: 2 hr 35 min | Servings: 12

                        - Presentation Tips: Serve the cheesecakes topped with fresh berries and a sprig of mint for a pop of color and elegance.