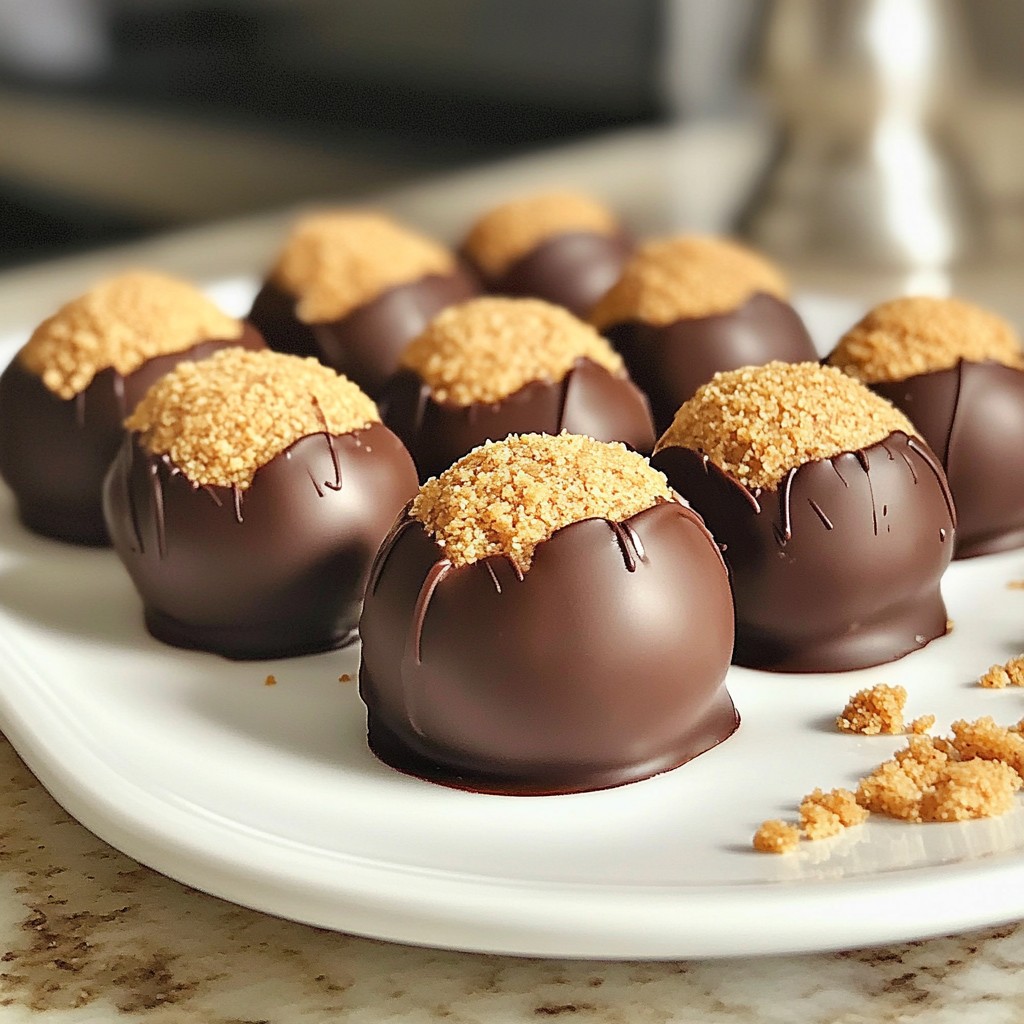
If you love sweet treats but want something easy, you're in for a delight! No Bake Peanut Butter Cheesecake Balls are creamy, tasty, and perfect for any occasion. You can whip these up in no time with simple ingredients and no oven required. Let me guide you through this fun recipe that will please everyone. Get ready to impress with these delicious little bites!
Why I Love This Recipe
- Easy to Make: This recipe requires no baking, making it perfect for quick dessert preparation.
- Decadent Flavor: The combination of peanut butter and cream cheese creates a rich and indulgent taste.
- Customizable: You can easily switch up the toppings or mix-ins to suit your taste preferences.
- Perfect for Sharing: These bite-sized treats are great for parties or gatherings, making them ideal for sharing.
Ingredients
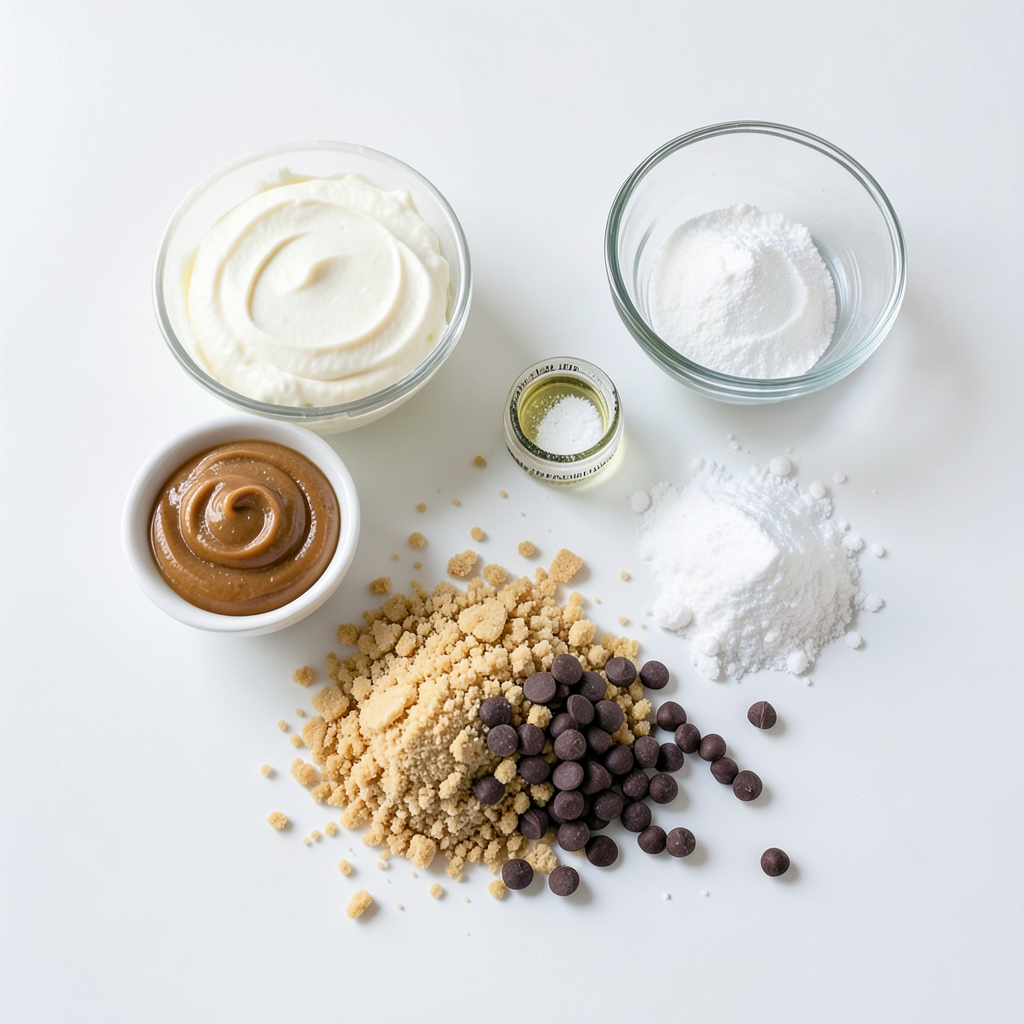
List of Ingredients
To make No Bake Peanut Butter Cheesecake Balls, you need:
- 1 cup cream cheese, softened
- 1/2 cup peanut butter (smooth or chunky)
- 1/3 cup powdered sugar
- 1 teaspoon vanilla extract
- 1 cup graham cracker crumbs
- 1/2 cup semisweet chocolate chips (for coating)
- Pinch of salt
Substitutions and Alternatives
You can swap cream cheese with a dairy-free option, like cashew cream. For peanut butter, try almond or sunflower seed butter if you have allergies. Use maple syrup instead of powdered sugar for a healthier choice. If you don't have graham crackers, crushed cookies or oats work well. Dark chocolate can replace semisweet chocolate for a richer taste.
Special Equipment Needed
You will need a large mixing bowl for combining the ingredients. A hand mixer or spatula helps mix everything smoothly. A small cookie scoop is handy for shaping the balls. Finally, a microwave-safe bowl is needed for melting the chocolate. Parchment paper will keep your tray clean and make it easy to remove the balls once set.
Step-by-Step Instructions
Mixing the Base
Start by taking a large mixing bowl. Add 1 cup of softened cream cheese. Next, include 1/2 cup of peanut butter. I like to use smooth peanut butter, but chunky works too. Then, add 1/3 cup of powdered sugar and 1 teaspoon of vanilla extract. Mix these ingredients together. You can use a hand mixer or a spatula. Keep mixing until the mixture is creamy and smooth. This step is key for a nice texture.
Forming the Balls
After mixing, add 1 cup of graham cracker crumbs. Don’t forget a pinch of salt! Gently fold the crumbs into the mixture. This adds a great flavor and texture. Once combined, chill the mixture in the fridge for about 30 minutes. This helps it firm up. After chilling, use a small cookie scoop or your hands. Form the mixture into small balls, about 1 inch in size. Place these balls on a tray lined with parchment paper.
Melting and Coating with Chocolate
Now, it’s time for the chocolate! Take 1/2 cup of semisweet chocolate chips and put them in a microwave-safe bowl. Melt the chips in 30-second bursts. Stir them between each burst until the chocolate is smooth. Once melted, dip each peanut butter cheesecake ball into the chocolate. Make sure to let the excess chocolate drip off. Place the coated balls back on the parchment-lined tray. This gives them a nice, shiny finish.
Chilling for the Perfect Texture
After coating all the balls, refrigerate them again. Leave them in the fridge for 30 minutes. This step lets the chocolate set perfectly. Once set, your peanut butter cheesecake balls are ready to serve! Enjoy them cold for a delightful treat.
Tips & Tricks
How to Achieve the Best Texture
For the best texture in your no-bake peanut butter cheesecake balls, start with room temperature cream cheese. This ensures a smooth mix. Use a hand mixer or spatula to combine the cream cheese and peanut butter well. You want them fully blended. When you add the graham cracker crumbs, fold gently. This helps keep the mix light. Chilling the mixture for 30 minutes makes it easier to form into balls.
Common Mistakes to Avoid
One common mistake is not using softened cream cheese. Cold cream cheese makes it hard to mix. Another mistake is rushing the chilling time. If the mix is too warm, the balls will not hold their shape. When dipping in chocolate, do not skip the cooling step. Let the balls chill again after coating. This sets the chocolate well.
Serving Suggestions
Serve these cheesecake balls chilled. They are great for parties or snacks. You can place them on a nice platter for a fun display. Add fresh fruit or nuts for a colorful touch. Pair them with coffee or milk for a tasty treat. Enjoy them straight from the fridge for the best taste!
Pro Tips
- Chill the Mixture: Refrigerating the mixture for 30 minutes makes it easier to handle and shape into balls.
- Chocolate Melting Technique: Melt chocolate in 30-second intervals to prevent burning; stir in between for a smooth consistency.
- Coating Tips: Allow excess chocolate to drip off before placing the balls back on the tray to avoid puddles of chocolate.
- Storage Recommendations: Keep the cheesecake balls in an airtight container in the fridge for up to a week for optimal freshness.
Variations
Different Coating Options
You can change the coating for your peanut butter cheesecake balls. Instead of semisweet chocolate, try white chocolate for a sweeter taste. Dark chocolate gives a rich flavor that balances well with the peanut butter. For a fun twist, roll the balls in crushed nuts or sprinkles. You can also use cocoa powder or shredded coconut to coat them. Each option adds a unique look and taste, making your treat special.
Flavor Add-Ins
Want to mix things up? Add different flavors to your cheesecake balls. Try mixing in a tablespoon of cocoa powder for a chocolate version. You can also add mini chocolate chips for extra texture. If you love caramel, a drizzle of caramel sauce on top adds sweetness. For a fruity touch, consider adding a bit of lemon zest or crushed berries. These flavor add-ins can make your treats exciting and fun.
Dietary Modifications (e.g., Vegan, Gluten-Free)
You can easily adjust this recipe to fit your dietary needs. For a vegan version, use vegan cream cheese and nut butter. Make sure to choose dairy-free chocolate chips for coating. To make the recipe gluten-free, swap graham cracker crumbs with gluten-free options like almond flour or gluten-free cookies. These simple changes let everyone enjoy these tasty treats without worry.
Storage Info
Best Practices for Storing Cheesecake Balls
To keep your no bake peanut butter cheesecake balls fresh, store them in an airtight container. Place parchment paper between layers to prevent sticking. Keep them in the fridge for the best taste and texture. Avoid leaving them out at room temperature for too long.
How Long Do They Last?
These cheesecake balls last about a week in the fridge. After that, their taste and texture may change. If you want to enjoy them longer, consider freezing them. Just remember, they taste best when fresh!
Freezing Instructions
To freeze your cheesecake balls, first, place them in a single layer on a tray. Freeze for about an hour until firm. Then, transfer them to a freezer-safe bag or container. They can last up to three months in the freezer. To serve, thaw them in the fridge overnight for a tasty treat!
FAQs
Can I use different nut butters?
Yes, you can use other nut butters. Almond butter or cashew butter work great. Each nut butter gives a unique flavor. Just make sure it is smooth for easy mixing. If you choose a chunky nut butter, expect some texture in your balls.
What can I use instead of graham crackers?
If you don't have graham crackers, try using crushed cookies. Digestive biscuits or vanilla wafers are good options. You can also use crushed nuts for a gluten-free version. Just remember, the flavor will change slightly with different choices.
How can I make these healthier?
To make these balls healthier, reduce the sugar. Use less powdered sugar or a sugar substitute. You can also swap cream cheese for Greek yogurt. This adds protein and reduces fat. For a nut-free option, use sun butter instead of peanut butter.
Are there any tips for making these allergen-friendly?
To make these allergen-friendly, choose nut-free butters. Sunflower seed butter is a great choice. Use gluten-free cookies for the crust. Always check labels for allergens in chocolate chips. This way, you can share these treats with everyone.
You’ve learned how to make tasty cheesecake balls from scratch. We covered key ingredients, easy steps, and special tips to get it right. You can use different nut butters and find alternatives for graham crackers. Remember to store your cheesecake balls properly to keep them fresh. Experiment with flavors and coatings to make them your own. Enjoy making these treats that fit your diet and taste. Now, get in the kitchen and start creating!