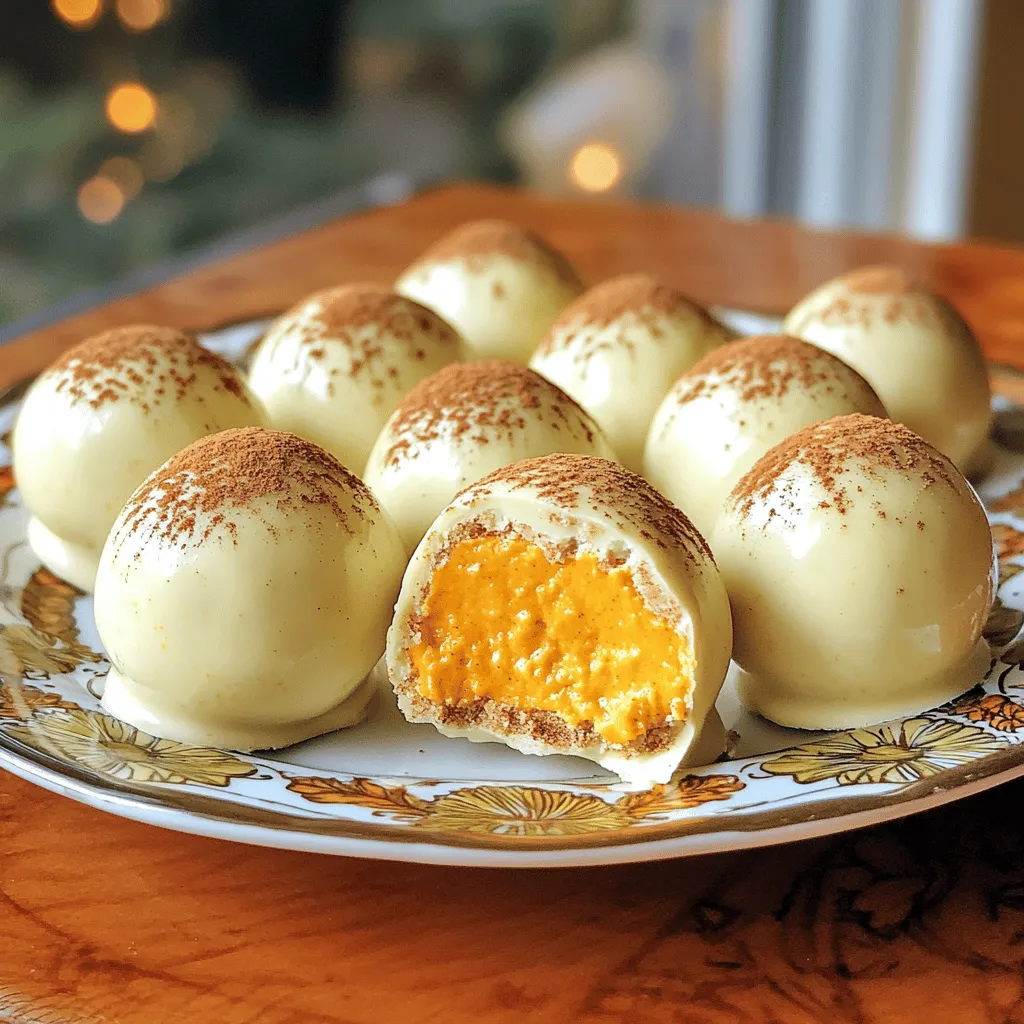
Ready to dive into a delicious treat that captures fall’s essence? These No-Bake Pumpkin Cheesecake Balls are simple, flavorful, and perfect for any gathering. With just a few ingredients, you can whip up these delightful bites that blend creamy pumpkin and sweet spices. Whether you’re a seasoned baker or just starting, this recipe will make you look like a pro. Let’s get started on this tasty journey!
Ingredients
List of Ingredients
– 1 cup cream cheese, softened
– 1 cup canned pumpkin puree
– 1/2 cup powdered sugar
– 1 teaspoon vanilla extract
– 1 teaspoon ground cinnamon
– 1/2 teaspoon ground nutmeg
– 1/4 teaspoon ground ginger
– 1/2 cup graham cracker crumbs
– 1/2 cup walnuts or pecans, finely chopped (optional)
– 1/2 cup white chocolate chips (for coating)
To make these no-bake pumpkin cheesecake balls, gather all your ingredients. Start with softened cream cheese. This helps create a smooth mix. The canned pumpkin puree brings that fall flavor. You can use fresh pumpkin too, but canned saves time.
Add powdered sugar for sweetness. Vanilla extract enhances the taste. Ground cinnamon, nutmeg, and ginger add warmth. These spices make your cheesecake balls taste like autumn.
Next, the graham cracker crumbs give a nice crunch. If you love nuts, chop walnuts or pecans and mix them in. They add texture and flavor.
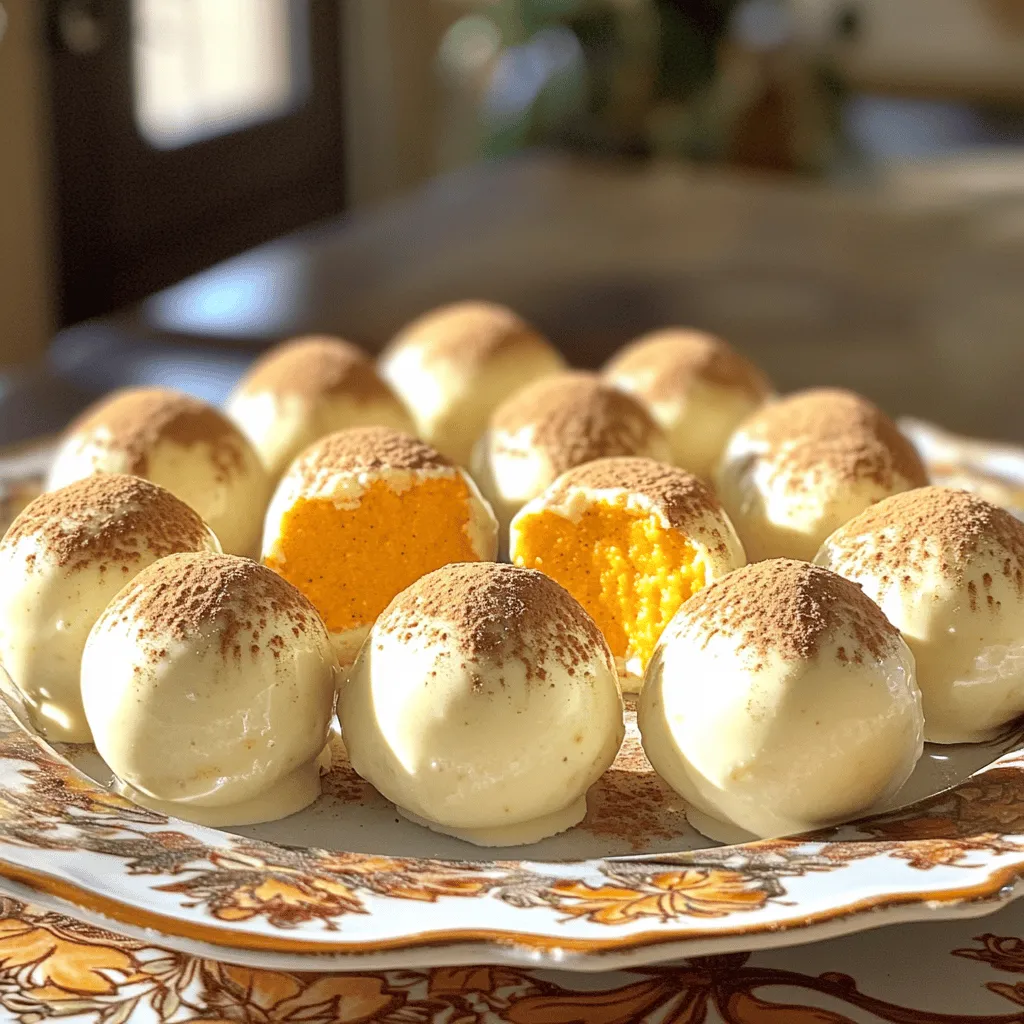
Finally, we need white chocolate chips for coating. Melt them to create a sweet outer layer. This will make the balls look fancy and taste delicious.
Nutritional Information
– Calories per serving: Approximately 120
– Macros breakdown:
– Fat: 7g
– Carbs: 13g
– Protein: 2g
– Allergen information: Contains dairy and nuts (if using walnuts or pecans).
Knowing the nutritional information helps you plan. Each serving has about 120 calories. You have a nice balance of fat, carbs, and protein. Remember, these treats are rich, so enjoy them in moderation!
Step-by-Step Instructions
Preparation Steps
1. In a large bowl, I mix the softened cream cheese and canned pumpkin puree. I stir until the mixture is smooth and creamy. This step is key for a great base.
2. Next, I add powdered sugar, vanilla extract, ground cinnamon, nutmeg, and ginger. I mix everything well until it becomes a uniform blend. Each spice brings warmth and flavor.
3. I gently fold in the graham cracker crumbs. This gives the balls a nice texture. If I want some crunch, I add finely chopped walnuts or pecans at this point.
Forming the Cheesecake Balls
1. Using my hands, I shape the mixture into small balls, about 1 inch wide. I place them on a baking sheet lined with parchment paper. This step is fun and allows for creativity.
2. Once all the balls are formed, I chill them in the fridge for at least 1 hour. This helps them firm up and makes them easier to coat.
Coating the Balls
1. While the cheesecake balls chill, I melt the white chocolate chips. I use a microwave-safe bowl and heat in 20-second intervals. I stir in between until it is completely melted.
2. After chilling, I dip each pumpkin cheesecake ball into the melted white chocolate. I let any extra chocolate drip off before placing them back on the baking sheet.
3. For a finishing touch, I sprinkle extra graham cracker crumbs or a dash of cinnamon on top. Then, I return them to the fridge for another 30 minutes to set.
Tips & Tricks
Perfecting Texture and Flavor
To make the best no-bake pumpkin cheesecake balls, start with cream cheese. Make sure it is soft. If it is too cold, your mixture will not blend well. Let it sit out for a bit. This helps create a smooth texture.
Next, adjust the sweetness. Taste your mixture as you go. You can add more powdered sugar if you like it sweeter. Remember, pumpkin puree has a natural sweetness too.
Efficiency Tips
Want to speed up chilling? Try placing the cheesecake balls in the freezer for about 20 minutes. This way, they firm up faster. Just don’t forget to keep an eye on them!
Use a cookie scoop for easy portioning. It helps form uniform balls. For mixing, a hand mixer can save time. It makes the cream cheese and pumpkin blend quickly.
Presentation Suggestions
For serving, place the cheesecake balls on a pretty plate. A tiered stand looks great too. Drizzle some melted chocolate on top for flair.
Garnish with whole nuts or a sprinkle of cinnamon. These little touches make your dish pop. You can also use extra graham cracker crumbs for an added crunch. Enjoy your beautiful creation!
Variations
Flavor Variations
You can easily change the taste of your pumpkin cheesecake balls. Adding spices like cloves or allspice gives them a warm, cozy flavor. Just a pinch can make a big difference. You might also try flavored extracts. Maple or almond can add a nice twist to the classic taste. Experimenting with these can make each batch unique and fun!
Dietary Modifications
If you need gluten-free options, use gluten-free graham cracker crumbs. They work just as well and keep the taste great. For vegan alternatives, swap cream cheese for a nut-based cream cheese. You can also use maple syrup instead of powdered sugar. These changes keep the deliciousness while fitting your diet needs.
Seasonal Twists
You can dress up these cheesecake balls for any holiday. Try festive decorations like colorful sprinkles or edible glitter. For pairing suggestions, serve them at parties with warm drinks like cider or coffee. They bring a delightful fall flavor that everyone will enjoy. No matter the season, these cheesecake balls can shine!
Storage Info
Short-term Storage
To keep your no-bake pumpkin cheesecake balls fresh, store them in the fridge. Place them in an airtight container. Make sure they are not touching each other. This prevents sticking and keeps them neat. They stay fresh for about a week. If you want them to last longer, try covering them with plastic wrap before sealing the container.
Long-term Storage
You can freeze these cheesecake balls for longer storage. First, place them on a baking sheet lined with parchment paper. Freeze them for about 1-2 hours until firm. Once frozen, transfer them to a freezer-safe bag. Make sure to remove as much air as you can. This helps avoid freezer burn. When you want to eat them, thaw the balls in the fridge overnight. Serve them cold for a refreshing treat.
Shelf Life
These cheesecake balls stay tasty for up to a week in the fridge. In the freezer, they can last for about three months. Keep an eye out for any signs of spoilage. If they develop an off smell, change in color, or texture, it’s best to discard them. Fresh is always best when it comes to flavor. Enjoy your treats at their peak!
FAQs
Can I use fresh pumpkin instead of canned?
Yes, you can use fresh pumpkin. Start by selecting a sugar pumpkin. Cut it in half and remove the seeds. Bake the halves at 350°F for about 45 minutes or until soft. Once cool, scoop out the flesh and blend until smooth. Use this puree in place of canned pumpkin. It may have a fresher taste, but make sure to drain excess moisture for the best results.
How do I make these cheesecake balls without cream cheese?
You can use Greek yogurt or silken tofu as substitutes. Both provide creaminess while keeping the flavor nice. For a sweeter touch, you could also try mascarpone or a plant-based cream cheese. Adjust the sugar to balance the taste. Each option offers a unique twist, so feel free to experiment!
Can I make these ahead of time?
Yes, you can prepare these cheesecake balls in advance. Make them up to two days ahead of time. Store them in an airtight container in the fridge. This also helps the flavors meld together beautifully. Just remember to coat them with chocolate shortly before serving for a fresh look.
What can I use instead of white chocolate for coating?
You can use dark chocolate or milk chocolate instead. Both options add a rich flavor. If you want a fun twist, try candy melts in different colors for a festive look. Just melt and dip as you would with white chocolate.
How to enhance the flavor profile?
To boost flavor, consider adding a pinch of cloves or allspice. You can also use flavored extracts like maple or almond. Topping with crushed nuts or a sprinkle of sea salt adds texture and depth. Even a drizzle of caramel can elevate your cheesecake balls to the next level!
In this post, we covered how to make delicious cheesecake balls using cream cheese and pumpkin. I shared key ingredients, detailed steps, and helpful tips. Remember to adjust flavors to your taste and try different variations. These treats are perfect for any event, so get creative with your presentation. With proper storage, you can enjoy them longer. Experiment and have fun with this recipe!