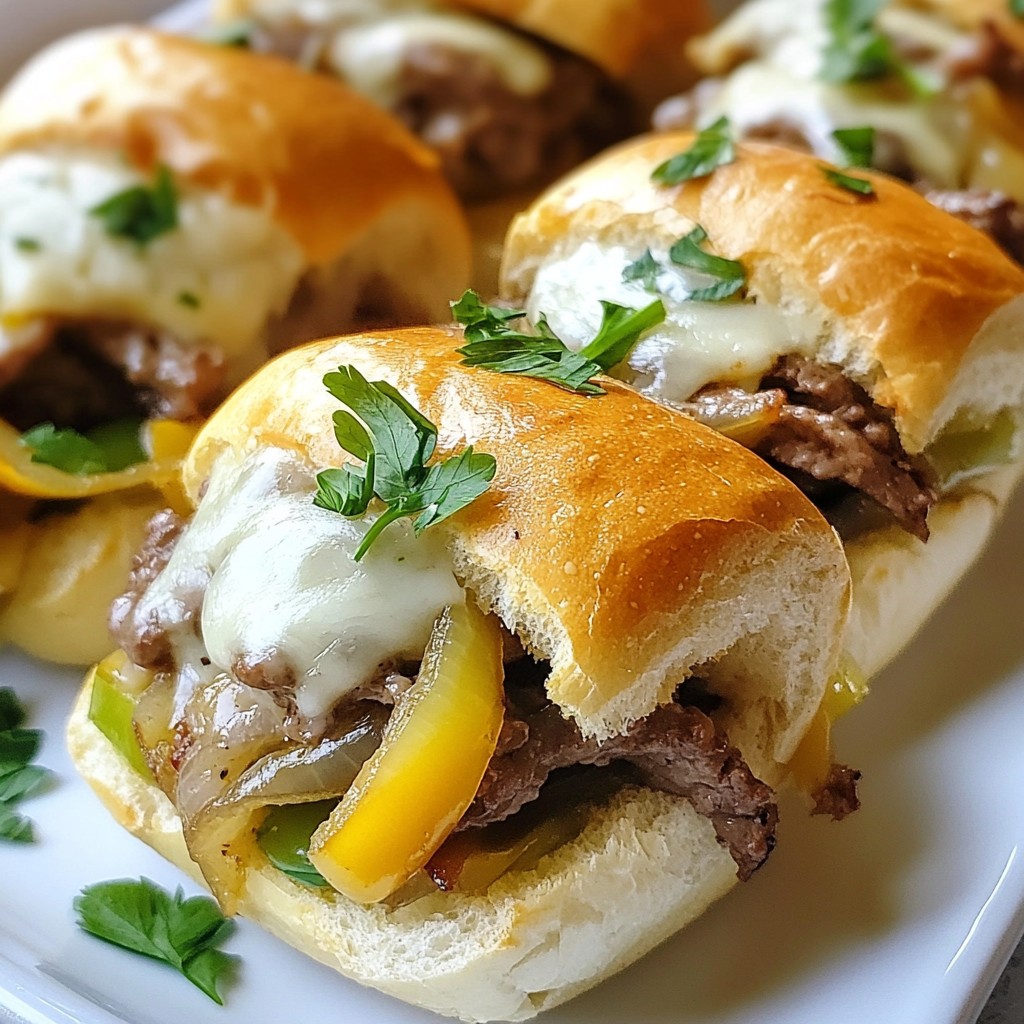
Do you love the rich taste of a classic Philly cheesesteak? Imagine all that flavor packed into bite-sized sliders! This easy recipe invites you to create delicious Philly cheesesteak sliders with thinly sliced beef, gooey provolone cheese, and sautéed veggies. Whether you're hosting a party or want a quick dinner, these sliders are perfect. Let’s dive into the tasty details and make your next meal unforgettable!
Why I Love This Recipe
- Delicious Flavor Combination: The combination of tender beef, sautéed onions, and bell peppers creates a savory and satisfying flavor profile that is hard to resist.
- Quick and Easy: This recipe is simple to follow and can be prepared in just 30 minutes, making it a perfect choice for busy weeknights or casual gatherings.
- Perfect for Sharing: With 12 sliders, it's an ideal dish for parties or game days, allowing everyone to enjoy a tasty bite-sized treat.
- Customizable: You can easily modify the ingredients to suit your tastes, whether by adding different cheeses or vegetables to make it your own.
Ingredients
Main Ingredients
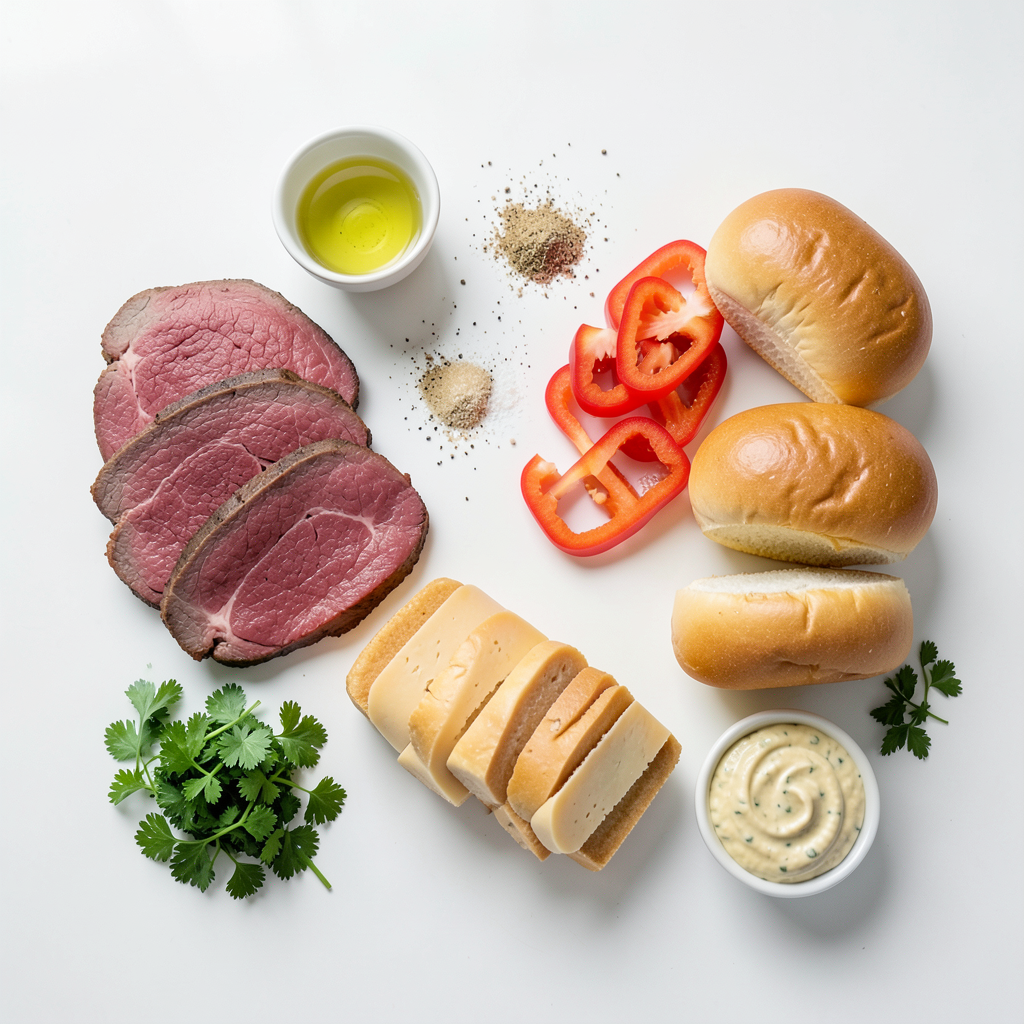
- 1 pound thinly sliced beef steak (ribeye or sirloin)
- 8 slices provolone cheese
Vegetables
- 1 medium onion, sliced
- 1 medium bell pepper, sliced
Condiments and Rolls
- 1/4 cup mayonnaise
- 1 tablespoon Dijon mustard
- 12 slider rolls (small sandwich rolls)
Gathering the right ingredients makes a huge difference in flavor. For the beef, ribeye or sirloin works best. These cuts are tender and full of flavor. Provolone cheese melts beautifully, creating that gooey, cheesy goodness everyone loves.
Next, we need vegetables. Sliced onion and bell pepper add sweetness and crunch. They balance the rich meat and cheese. Use fresh veggies for the best taste.
Don't forget the condiments and rolls! Mayonnaise and Dijon mustard give a creamy, tangy kick. Slider rolls are perfect for holding all the tasty fillings. They should be soft yet sturdy. Enjoy the ease of making these sliders with high-quality ingredients.
Step-by-Step Instructions
Preparation Steps
To start, gather your ingredients. Slice the beef into thin strips. Use ribeye or sirloin for the best taste. Next, slice the onion and bell pepper. Make sure they are all uniform in size. This helps them cook evenly. Set these aside for later use.
Cooking Process
In a large skillet, heat one tablespoon of olive oil over medium heat. Add the sliced onion and bell pepper. Sauté these for about 5 to 7 minutes. You want them to soften and caramelize slightly. Season with salt and pepper to taste. Once done, remove the veggies from the skillet and set them aside.
Now, raise the heat to medium-high. Add the thinly sliced beef to the same skillet. Season with a bit more salt and pepper. Cook the beef for about 3 to 4 minutes until it is browned. Stir it occasionally for even cooking. After that, add the sautéed onions and bell peppers back into the skillet. Mix everything well and cook for an extra minute. This allows all the flavors to blend together.
Assembling and Baking
Preheat your oven to 350°F (175°C). Cut the slider rolls in half horizontally. Place the bottom halves on a baking sheet. Spread a thin layer of mayonnaise and Dijon mustard on each bottom half.
Next, evenly distribute the beef and veggie mix over the bottom halves. Top each slider with a slice of provolone cheese. Place the top halves of the rolls over the cheese. Cover the baking sheet with aluminum foil. Bake for 10 minutes. After that, remove the foil and bake for an additional 5 minutes. You want the cheese to melt and the rolls to toast lightly.
Once baked, take them out of the oven. Garnish with chopped fresh parsley and cut into individual sliders. Serve these warm for the best taste!
Tips & Tricks
Perfect Your Cooking
To caramelize onions and peppers, start with a hot pan. Heat olive oil over medium heat. Add the sliced onions and peppers. Stir them often. Cook for about 5-7 minutes. They should be soft and golden brown. Season with salt and pepper to bring out the flavor. This technique gives depth to your sliders.
Cheese Melting Tips
To ensure the cheese melts well, use provolone cheese. Layer it on top of the beef and veggies while they’re hot. Cover the sliders with foil when baking. This traps heat and steam, helping the cheese melt evenly. Bake for 10 minutes covered. Then, remove the foil and bake for 5 more minutes. This step makes the cheese gooey and delicious.
Serving Suggestions
For great pairings, serve your sliders with crispy fries or a fresh salad. Add a side of pickles for crunch. You can also try a spicy ketchup or ranch for dipping. Garnish with chopped fresh parsley for color. This adds a nice touch to your presentation. Enjoy your sliders warm for the best taste!
Pro Tips
- Choose the Right Beef: Opt for ribeye or sirloin for the best flavor and tenderness in your sliders.
- Don't Overcook the Vegetables: Sauté the onions and bell peppers just until they're tender to retain some crunch and flavor.
- Use Fresh Rolls: For the best texture, select fresh slider rolls that are soft yet sturdy enough to hold the fillings.
- Garnish for Freshness: Add chopped fresh parsley just before serving to enhance the presentation and add a pop of color.
Variations
Different Proteins
You can switch the beef for other proteins. Try chicken or turkey for a lighter option. Both will still taste great with the same toppings. If you want a vegetarian treat, use mushrooms or a plant-based meat. This gives a fun twist while still keeping the flavor.
Cheese Options
While provolone cheese is classic, feel free to explore! Swiss cheese adds a nutty taste. Cheddar brings a sharp kick. Pepper jack gives a spicy twist. Each cheese has its own flair. Choose what you love most!
Flavor Add-Ins
Want to spice up your sliders? Consider adding sauces like barbecue or hot sauce. A drizzle of ranch can also add a creamy touch. If you like bold flavors, sprinkle in garlic powder or smoked paprika. These add depth and excitement to your sliders.
Storage Info
Storing Leftovers
To keep your sliders fresh, place them in an airtight container. Make sure to let them cool first. Store them in the fridge for up to three days. If you want to keep them longer, freezing is a great option.
Reheating Sliders
When reheating, avoid the microwave. It can make the bread soggy. Instead, use an oven or toaster oven. Preheat the oven to 350°F (175°C). Wrap the sliders in foil to keep them moist. Heat for about 10 minutes. This way, the bread stays soft, and the cheese melts nicely.
Freezing Options
Yes, you can freeze the sliders! First, cool them completely. Wrap each slider tightly in plastic wrap. Then, place them in a freezer bag. They can last up to three months in the freezer. When ready to eat, thaw them in the fridge overnight. Then, reheat as described above.
FAQs
What kind of beef is best for Philly cheesesteak sliders?
For Philly cheesesteak sliders, I recommend using either ribeye or sirloin.
- Ribeye has a good amount of fat, making it juicy and flavorful.
- Sirloin is leaner but still tasty.
Both cuts are easy to slice thinly. Thin slices cook fast and stay tender. Using these cuts ensures a great flavor in each bite.
Can I make Philly cheesesteak sliders ahead of time?
Yes, you can make these sliders ahead of time!
- Cook the beef and veggies, then store them in the fridge.
- Assemble the sliders before baking.
This way, you save time when you're ready to serve. Just remember to bake them fresh for the best taste.
What can I substitute for provolone cheese?
If you don’t have provolone cheese, there are tasty alternatives.
- Mozzarella offers a mild flavor and melts well.
- Cheddar gives a sharper taste if you prefer more flavor.
- American cheese is another good option that melts nicely.
Choose the cheese you like best for your sliders.
You now know how to make delicious Philly cheesesteak sliders from start to finish. We covered the key ingredients like thinly sliced beef and provolone cheese, and how to prepare and cook them. I shared tips for perfecting the flavors and storage methods. You can also experiment with different proteins and cheese types. Enjoy making these sliders for your next gathering or meal. Happy cooking!