WANT TO SAVE THIS RECIPE?
Looking for a fun snack that everyone will love? Cheesy Taco Sticks are easy to make and packed with flavor! These tasty bites combine cheesy goodness with savory taco filling, making them perfect for game night or a quick treat. In this guide, I’ll share the best ingredients, simple steps, and helpful tips to get you cooking. Let’s dive into the delicious world of Cheesy Taco Sticks!

Why I Love This Recipe
- Quick and Easy: This recipe is perfect for busy weeknights as it takes only 35 minutes from start to finish.
- Customizable: You can easily swap out the proteins or add different vegetables to suit your taste.
- Cheese Lovers Delight: With both cheddar and mozzarella, these taco sticks are irresistibly cheesy!
- Fun to Eat: The handheld nature of these taco sticks makes them a hit at parties or as a fun family dinner.
Ingredients
Main Ingredients for Cheesy Taco Sticks
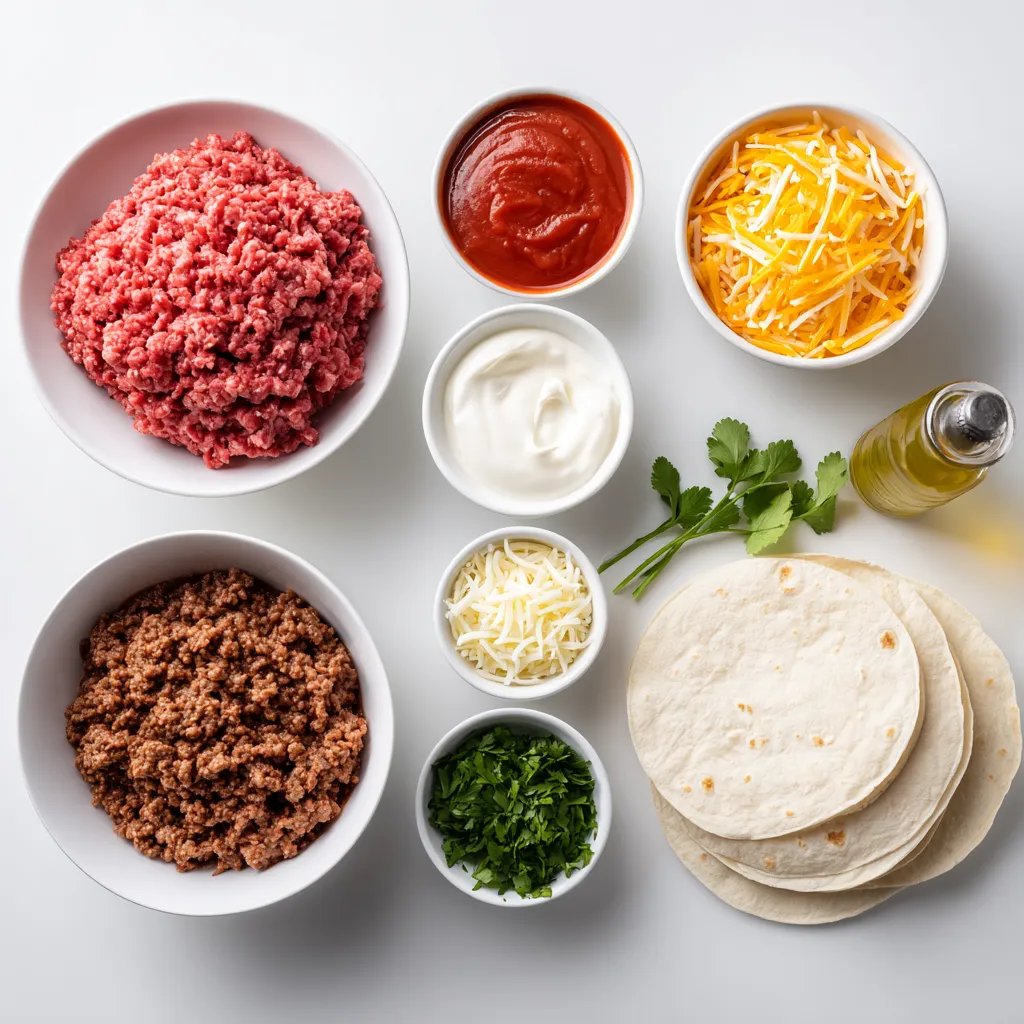
To make Cheesy Taco Sticks, you need some key ingredients. Here’s what you’ll need:
– 1 pound ground beef
– 1 packet taco seasoning
– 1 cup shredded cheddar cheese
– 1 cup shredded mozzarella cheese
– 1 cup salsa
– 10 large flour tortillas
– 1 cup sour cream (for dipping)
– Cooking spray or olive oil (for brushing)
– Chopped fresh cilantro (for garnish)
These ingredients come together to create a tasty treat that everyone loves. The combination of beef, cheese, and salsa is hard to beat.
Suggested Cooking Essentials
You will also need some basic tools to prepare this dish. Here’s what I recommend:
– A skillet for cooking the beef
– A mixing bowl for combining ingredients
– A baking sheet lined with parchment paper
– A sharp knife for cutting the sticks
– A pastry brush for oiling
Having the right tools makes cooking easier and more fun.
Optional Ingredients for Enhanced Flavor
Feel free to get creative! You can add extra flavors to your Cheesy Taco Sticks. Here are some options:
– Black beans for added protein
– Jalapeños for a spicy kick
– Corn for sweetness and texture
– Avocado for creaminess
– Extra spices like cumin or paprika
These optional ingredients can take your snack to the next level. Mixing in different flavors keeps things exciting and new.
Step-by-Step Instructions
Preheat and Prepare Your Oven
First, preheat your oven to 375°F (190°C). This step is key to getting crispy taco sticks. Next, line a baking sheet with parchment paper. This helps the taco sticks not stick to the pan.
Cooking and Seasoning the Ground Beef
In a skillet, heat the ground beef over medium heat. Break it apart as it cooks until it is browned. If there is extra fat, drain it off. Now, stir in the taco seasoning and add about 1/4 cup of water. Mix well and let it simmer for about 5 minutes. This lets the flavors blend together nicely.
Combining the Filling Ingredients
In a large bowl, combine the cooked beef with both cheeses and salsa. Use a spatula to mix until everything is well blended. This mixture will fill your taco sticks with cheesy goodness.
Assembling and Securing the Taco Sticks
Take a flour tortilla and lay it flat on a clean surface. Spoon 2-3 tablespoons of the beef and cheese mixture onto the center. Roll the tortilla tightly around the filling. Place each roll seam side down on the lined baking sheet. Repeat this with the rest of the tortillas.
Baking Instructions for Perfect Crispiness
Lightly brush the tops of the rolled tortillas with cooking spray or olive oil. This adds flavor and helps them crisp up. Bake in the preheated oven for 15-20 minutes. Keep an eye on them until they turn golden brown and crispy.
Serving and Presentation Tips
Once baked, take them out and let them cool slightly. Cut each taco stick into 2-3 pieces. Serve them warm with sour cream for dipping. For a fun touch, sprinkle chopped fresh cilantro on top. This adds a burst of color and flavor!
Tips & Tricks
How to Make the Crispiest Taco Sticks
To get crispy taco sticks, preheat your oven to 375°F (190°C). Use parchment paper on your baking sheet. Brush the tops of the rolls lightly with cooking spray or olive oil. This helps them brown well. Bake for 15 to 20 minutes until they are golden and crunchy.
Common Mistakes to Avoid
One common mistake is overfilling the tortillas. If you add too much filling, they can burst while baking. Make sure to use only 2-3 tablespoons of the beef and cheese mixture. Another mistake is not letting the cooked beef drain properly. Too much fat can make your taco sticks soggy.
Substitutions for Dietary Preferences
If you want a vegetarian option, swap the ground beef for black beans or lentils. For a spicy kick, try adding jalapeños to the filling. You can also use gluten-free tortillas for those with gluten sensitivity. Finally, switch the cheeses for dairy-free varieties to make it vegan-friendly.
Pro Tips
- Use Fresh Ingredients: Always opt for fresh tortillas and high-quality cheese for the best flavor and texture in your taco sticks.
- Customize the Filling: Feel free to add your favorite ingredients like black beans, corn, or jalapeños to enhance the flavor profile.
- Watch the Baking Time: Keep a close eye on the taco sticks as they bake; remove them from the oven when they are golden brown for a perfect crunch.
- Serve with Variety: Offer different dipping sauces like guacamole or pico de gallo alongside sour cream to elevate the dining experience.
Variations
Vegetarian Cheesy Taco Sticks
You can easily make cheesy taco sticks vegetarian. Just swap the ground beef with black beans or lentils. Add taco seasoning to give it flavor. For cheese, use your favorite blend. I like using a mix of cheddar and Monterey Jack. Add some chopped bell peppers, onions, and corn for extra texture and taste. These veggie sticks are just as fun!
Spicy Taco Sticks for Heat Lovers
If you like heat, try adding jalapeños or serrano peppers to your filling. You can also use spicy salsa instead of regular salsa. For an extra kick, mix in some hot sauce with your meat or beans. If you want more heat, sprinkle some crushed red pepper flakes on top before baking. These spicy taco sticks will make your taste buds dance!
Additional Fillings to Try
You can get creative with fillings! Try adding cooked chicken or turkey for a different protein. If you love cheese, add cream cheese for a creamy texture. You can also include diced tomatoes or olives for added flavor. If you want something sweet, try adding a spoonful of pineapple. The choices are endless, so have fun mixing and matching!
Storage Info
How to Store Leftover Taco Sticks
To keep your leftover taco sticks fresh, place them in an airtight container. Make sure they cool down to room temperature first. Store them in the fridge for up to three days. If you want them to last longer, consider freezing them.
Reheating Instructions
When you’re ready to enjoy your taco sticks again, preheat the oven to 350°F (175°C). Place the taco sticks on a baking sheet. Heat them for about 10-15 minutes. This will help them regain their crispiness. You can also use a microwave, but they might not be as crispy.
Freezing Tips for Long-Term Storage
To freeze taco sticks, wrap each one tightly in plastic wrap. Then, place them in a freezer-safe bag or container. They can stay in the freezer for up to three months. When you’re ready to eat, let them thaw in the fridge overnight before reheating.
FAQs
What are Cheesy Taco Sticks?
Cheesy Taco Sticks are a fun snack made with tortillas, beef, and cheese. You fill tortillas with a tasty mix of cooked ground beef, salsa, and cheddar and mozzarella cheeses. Then, you roll and bake them until crispy. They are great for parties or game nights.
Can I make Cheesy Taco Sticks ahead of time?
Yes, you can make Cheesy Taco Sticks ahead of time. Prepare the filling and roll the tortillas. Place them in the fridge for a few hours or overnight. When you are ready, just bake them until golden. This makes them perfect for meal prep or busy days.
How can I modify the recipe for gluten-free diets?
To make Cheesy Taco Sticks gluten-free, use gluten-free tortillas. Many stores offer these options. Ensure your taco seasoning is also gluten-free. This way, everyone can enjoy this tasty snack without worry.
What are some dip options besides sour cream?
Besides sour cream, you can try many dips. Salsa pairs well, adding more flavor. Guacamole adds creaminess and richness. You could also use ranch dressing for a different taste. Experiment with your favorite dips for fun!
Where can I buy Cheesy Taco Sticks pre-made?
You can find pre-made Cheesy Taco Sticks at some grocery stores or online. Check the frozen food section, as many brands offer them. Local restaurants may also have them on the menu. It’s a great way to enjoy the snack without cooking!
Cheesy taco sticks are easy to make and fun to eat. We covered key ingredients, from main staples to optional flavor boosters. I detailed the steps, from preheating the oven to serving tips. You now know how to create crispy, tasty treats and avoid common mistakes. Feel free to try variations that suit your taste.
Remember, whether you choose to store leftovers or enjoy them fresh, these taco sticks bring joy to any meal. Enjoy your cooking adventur
Cheesy Taco Sticks
Delicious taco-inspired sticks filled with beef and cheese, perfect for dipping.
Prep Time 15 minutes mins
Cook Time 20 minutes mins
Total Time 35 minutes mins
Course Appetizer
Cuisine Mexican
- 1 pound ground beef
- 1 packet taco seasoning
- 1 cup shredded cheddar cheese
- 1 cup shredded mozzarella cheese
- 1 cup salsa
- 10 large flour tortillas
- 1 cup sour cream (for dipping)
- 1 amount cooking spray or olive oil (for brushing)
- to taste amount chopped fresh cilantro (for garnish)
Preheat your oven to 375°F (190°C) and prepare a baking sheet by lining it with parchment paper.
In a skillet over medium heat, cook the ground beef until browned, breaking it apart as it cooks. Drain excess fat if necessary.
Stir in the taco seasoning and a splash of water (about 1/4 cup) to the beef. Mix well and let it simmer for about 5 minutes until the flavors meld.
In a bowl, combine the cooked beef, both cheeses, and salsa. Mix until well combined.
Lay a flour tortilla flat on a clean surface. Spoon about 2-3 tablespoons of the beef and cheese mixture onto the center of the tortilla.
Roll the tortilla tightly around the filling, then place seam side down on the prepared baking sheet. Repeat with the remaining tortillas.
Lightly brush the tops of the rolls with cooking spray or olive oil. Bake in the preheated oven for 15-20 minutes, or until golden and crispy.
Once baked, remove from the oven and let cool slightly. Cut each roll into 2-3 pieces. Serve warm with sour cream and sprinkle with chopped cilantro for garnish.
Serve warm with sour cream and cilantro for garnish.
Keyword appetizer, cheese, snack, taco
WANT TO SAVE THIS RECIPE?